Exploring Magical Realism Through a 3D Fantasy Character
Katia Zanetti, a recent graduate of BigRock, offers insights from her debut in crafting a photorealistic fantasy character, unveiling the process and tools employed.
Katia Zanetti, a recent graduate of BigRock, offers insights from her debut in crafting a photorealistic fantasy character, unveiling the process and tools employed.
In this article, Katia Zanetti, a recent graduate of BigRock, shares insights garnered from her first attempt at creating a photorealistic character in detail. Katia sheds light on the process, tools, and techniques utilised to breathe life into a fantasy character.
The beauty of computer graphics lies in the fact that you can create anything your mind can imagine. Bringing to light characters and creatures that in real life are considered fantasies or legends.
The difference with other artistic media, such as drawing or painting, is the three-dimensional element. It plays a very important key in the representation of realism in fantasy characters. The assumption that we can visualise an element at 360 degrees with realistic details and textures brings us closer to what we see, causing the viewer a feeling of familiarity.
This is the reason that pushed me to create this character. I wanted to practice creating a photorealistic representation of a humanoid character. In addition, I desired to unleash my creativity by experimenting with fantasy elements.
After attending a master's degree in computer graphics at Bigrock School in Italy, I had not yet learned how to create a photorealistic character in detail. I was not fully aware of the various steps needed to make the job work as best as possible and still had many doubts that I wanted to address.
Feeling lost in moments of artistic creation is a common experience, especially when surrounded by other talented artists producing extraordinary projects.
Inspired by what I saw around me, I decided to try my hand at creating something similar. I combined my knowledge from school with information from the internet to accomplish this. Through this article, my goal is to share my knowledge and aid those who may need it.
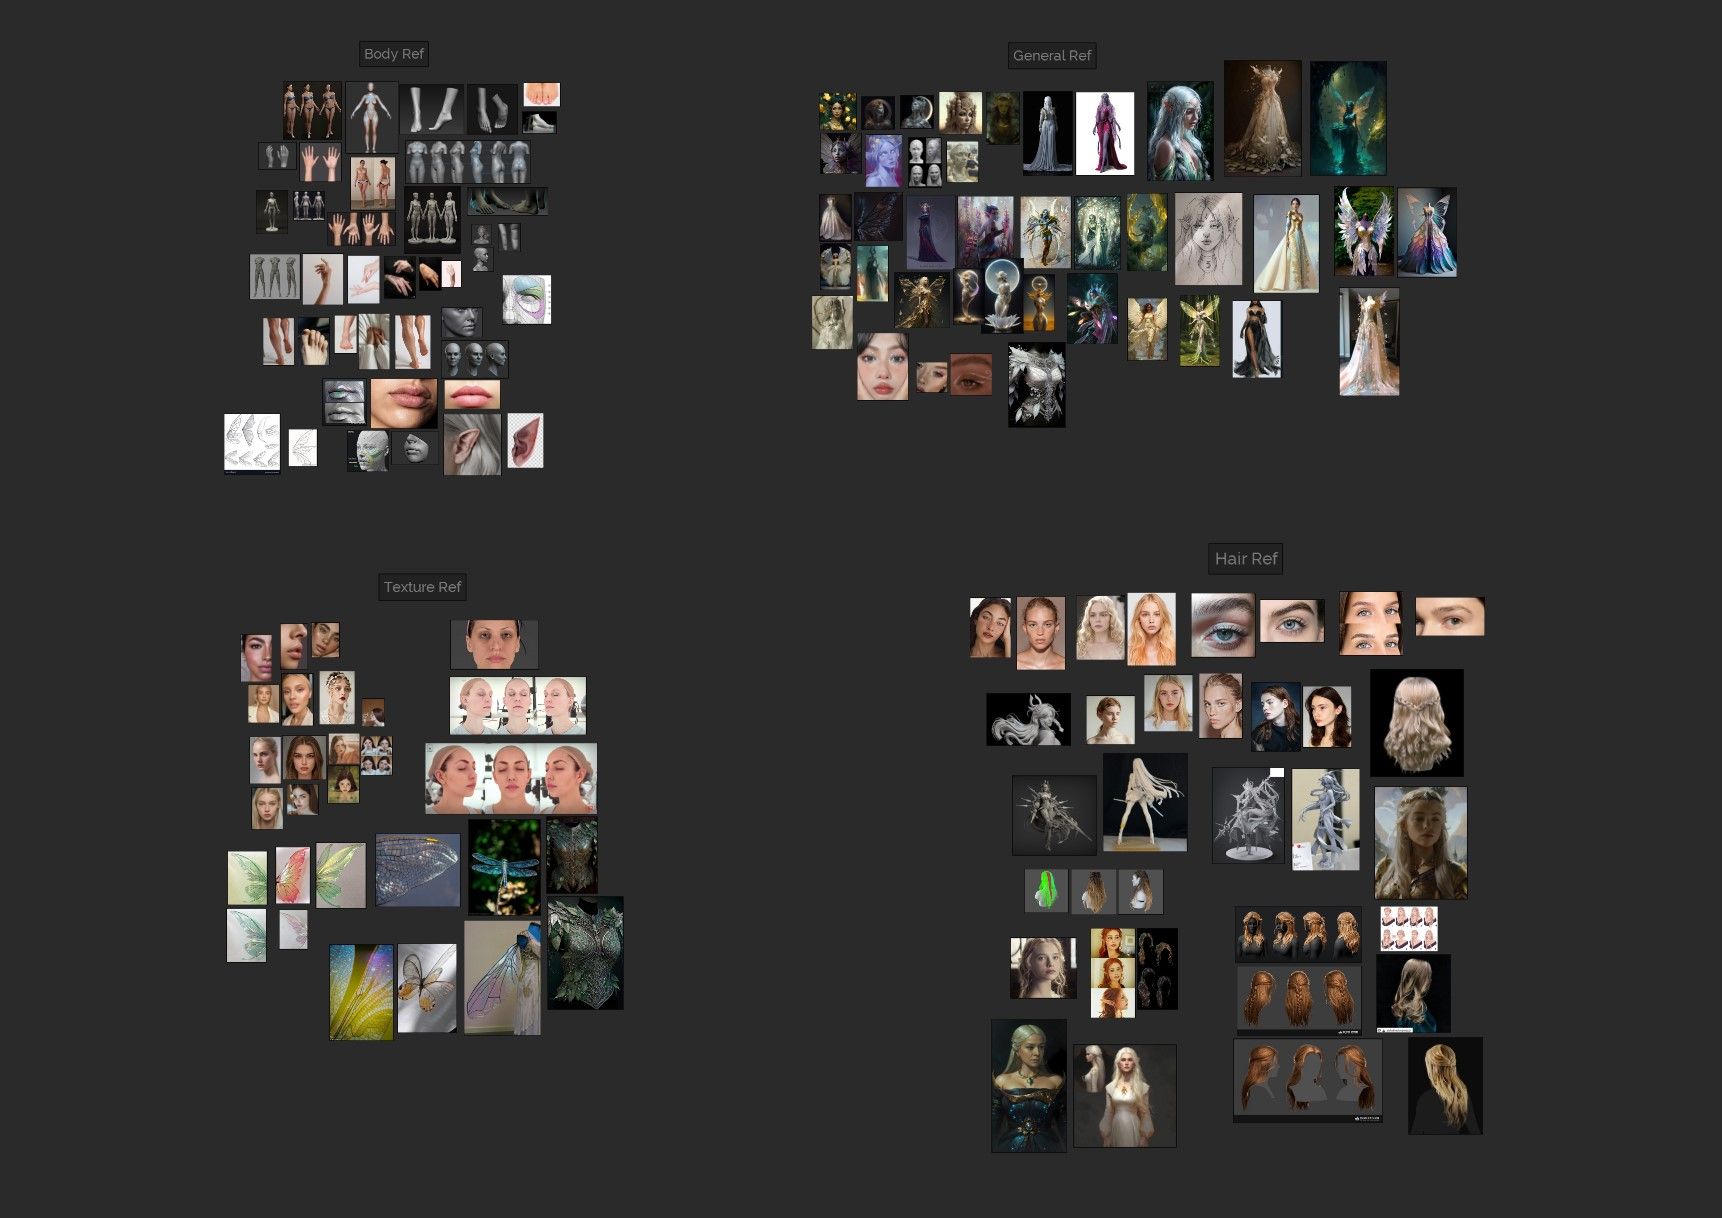
Finding the right references is crucial for any project, especially when creating photorealistic characters.
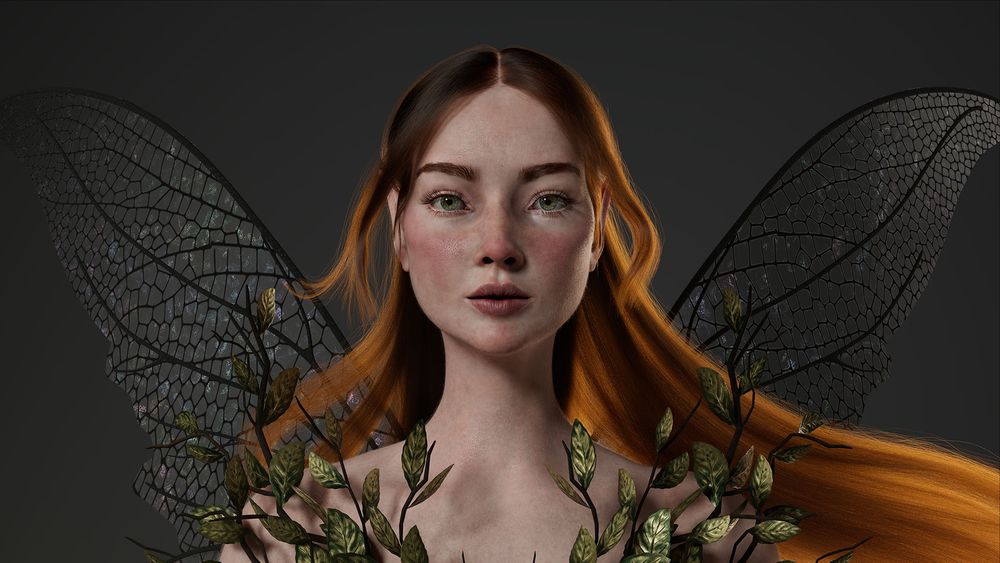
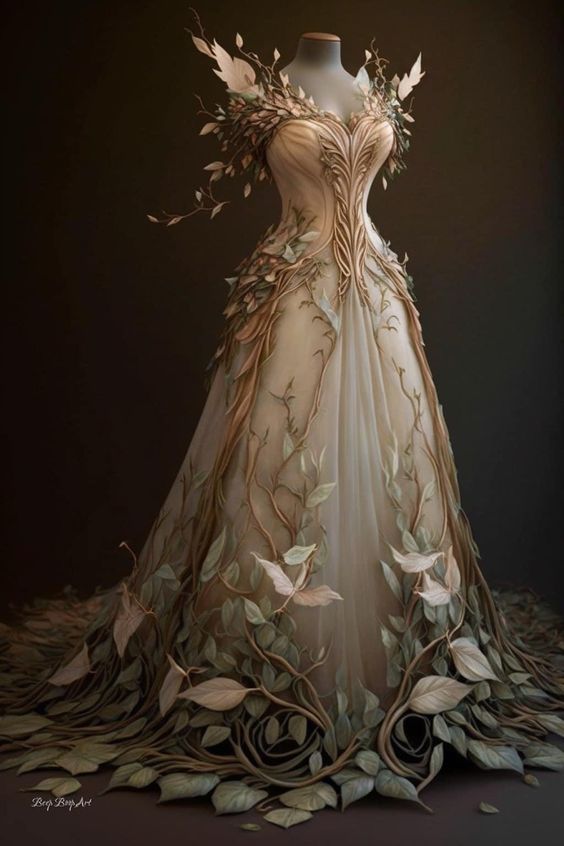
Initially, I wasn't sure what subject I wanted to represent, but then I came across an image of a dress that struck me straight away. That dress gave me fairytale feelings and immediately reminded me of fairies. This image will serve as my primary reference, shaping my entire concept and guiding me throughout the creation process.
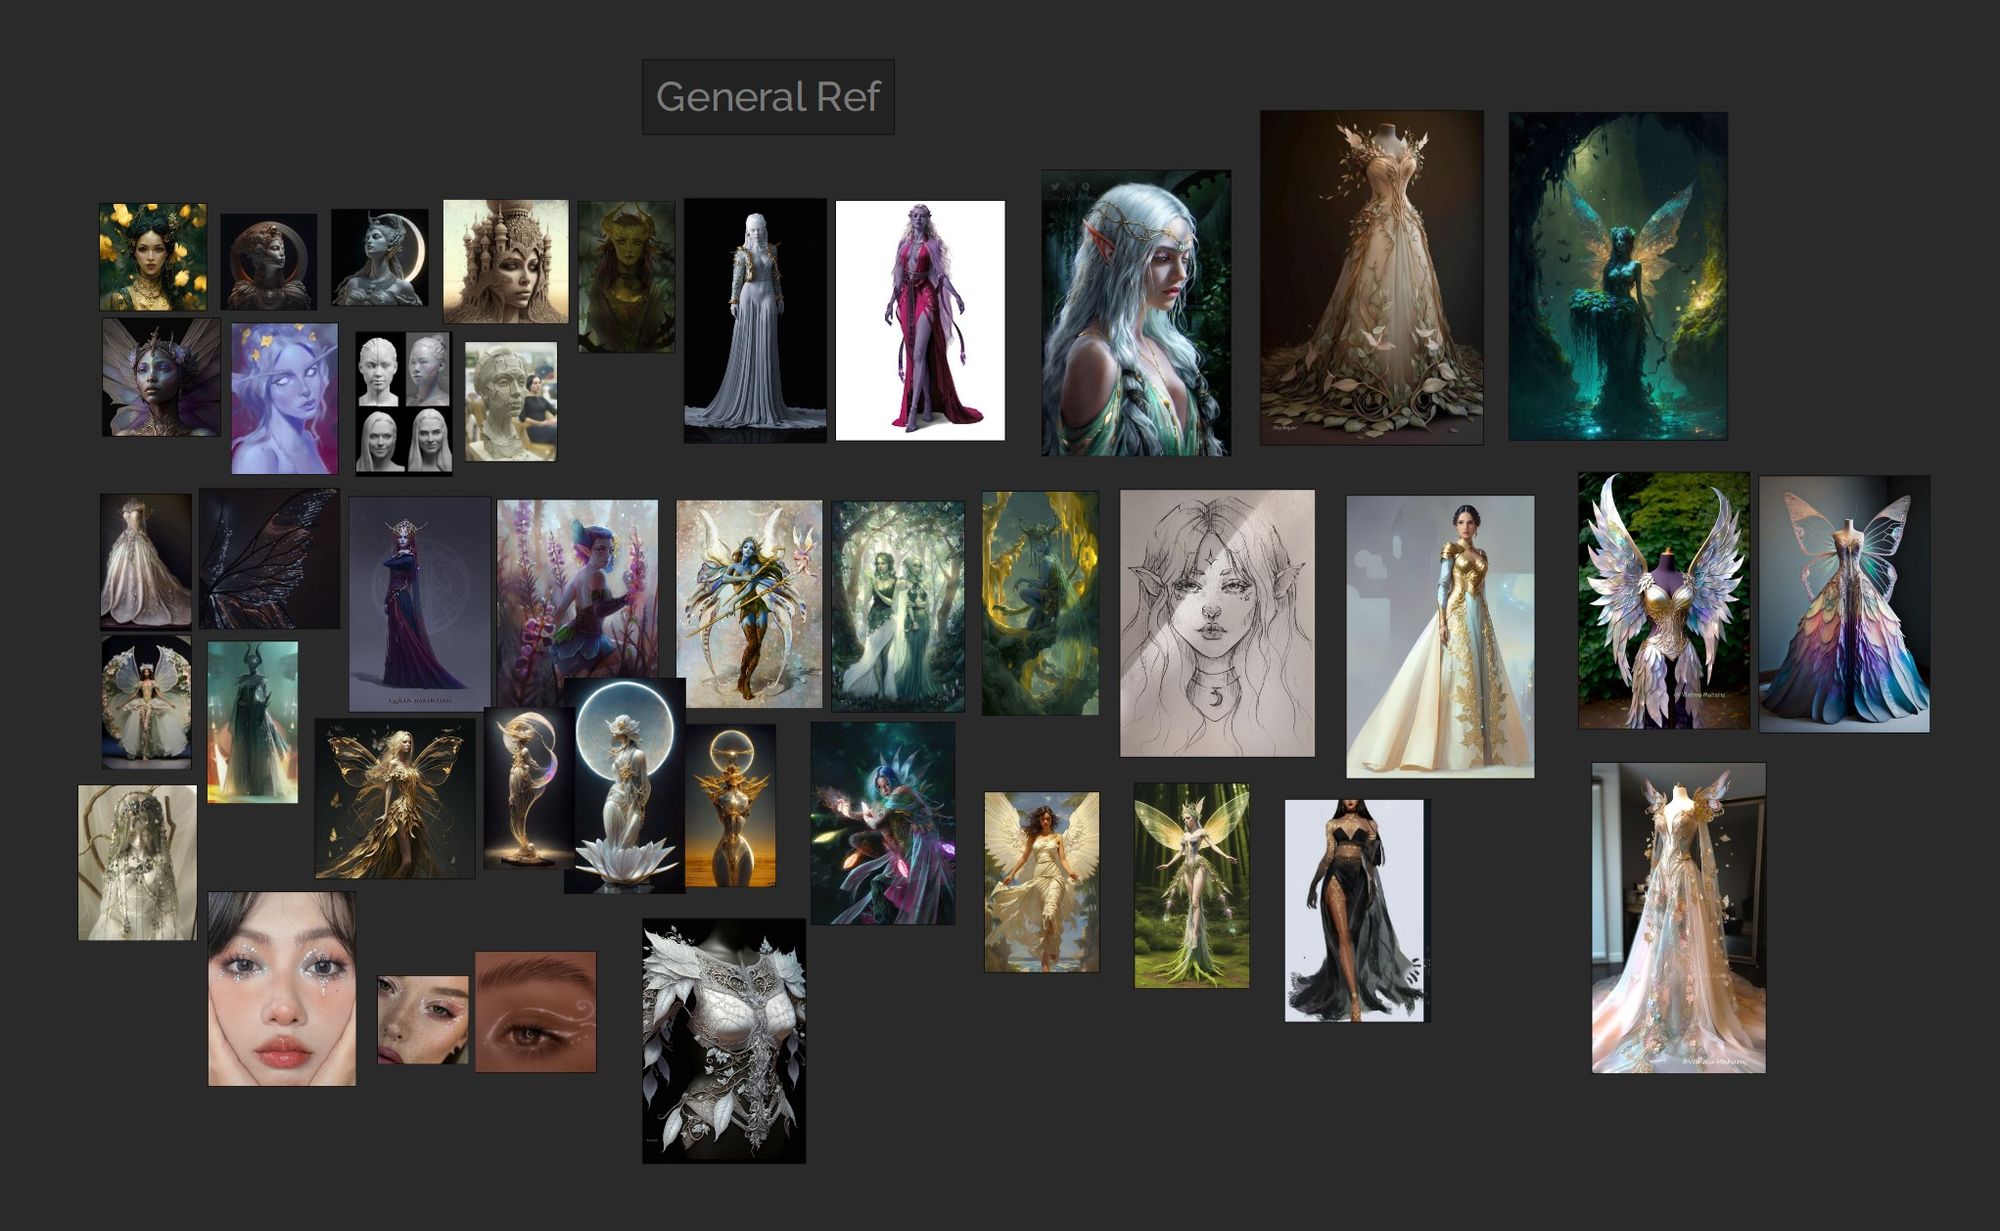
Once I had identified the subject, I collected images to capture the general mood I wanted to convey. It is useful to divide images into sectors. In my case, I chose the categories based on what I needed to represent. I also collected additional images to help me with the next steps. For example, references for modeling the human body. Texturing which involves the creation of the skin and wings. Finally, the hair and grooming in general. It is not essential to collect all the references at once. The process can always be enriched at any time.
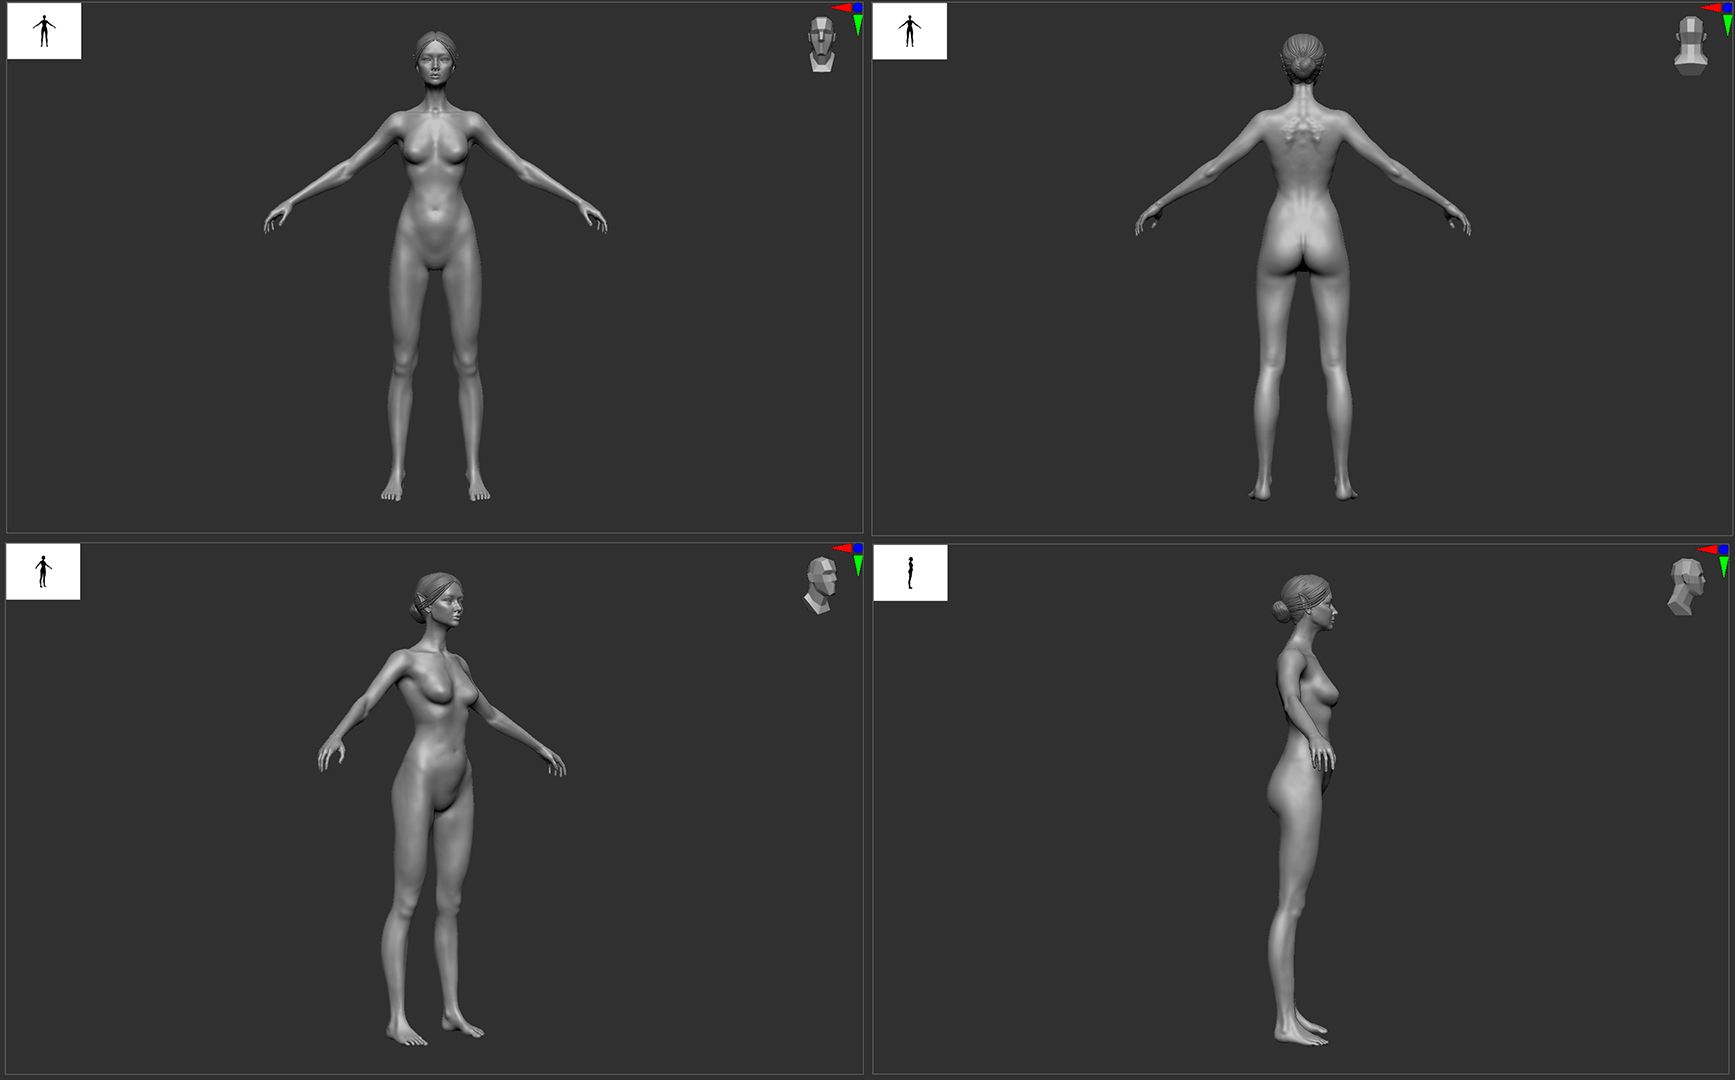
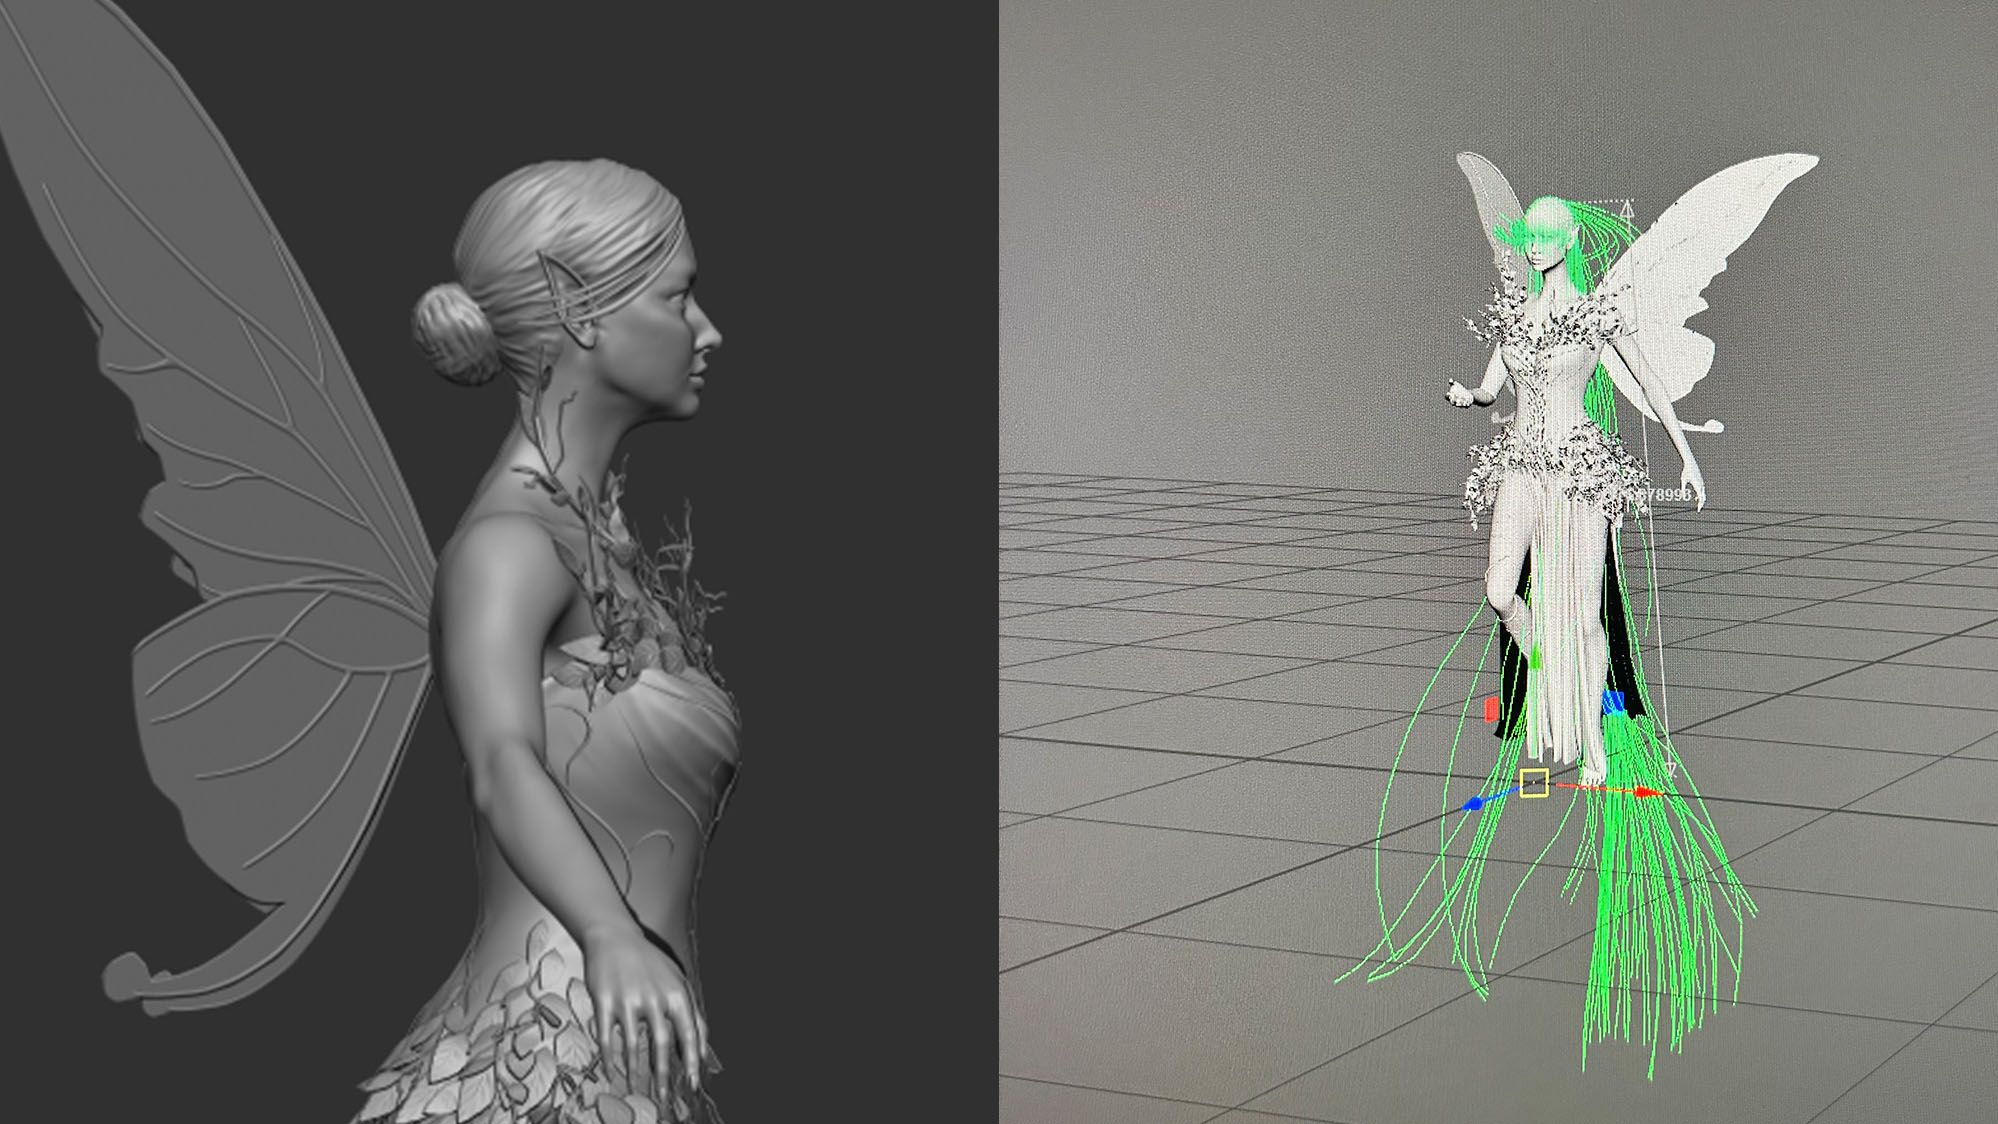
For the body, I started modeling using ZBrush. I imported a base mesh by Tsvetomir Georgiev, which can be found directly within the “Lightbox” menu. This method speeds up work and provides you with a correct representation of anatomical proportions to use.
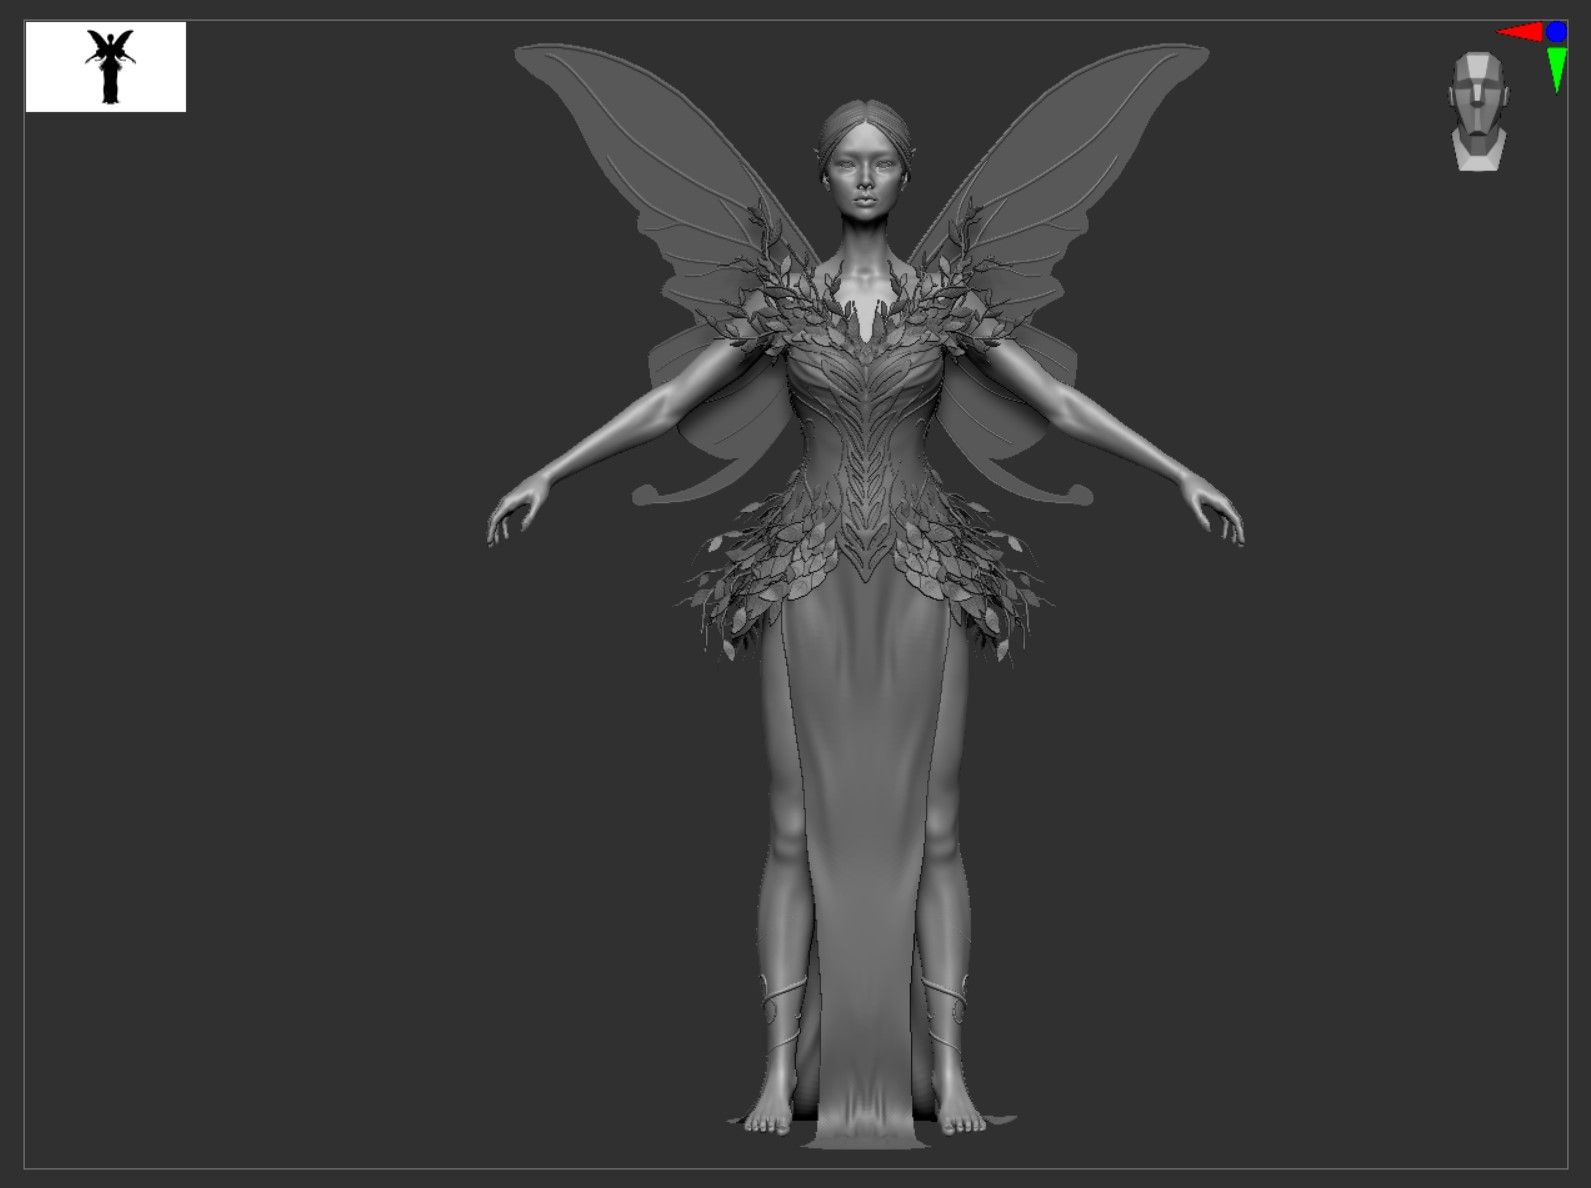
I began sculpting using a low Dynamesh resolution at first and gradually increased it when I wanted to add more details. This allows you to work more effectively because you will be able to easily modify any changes due to the fact that the resolution of the polygons is still low.
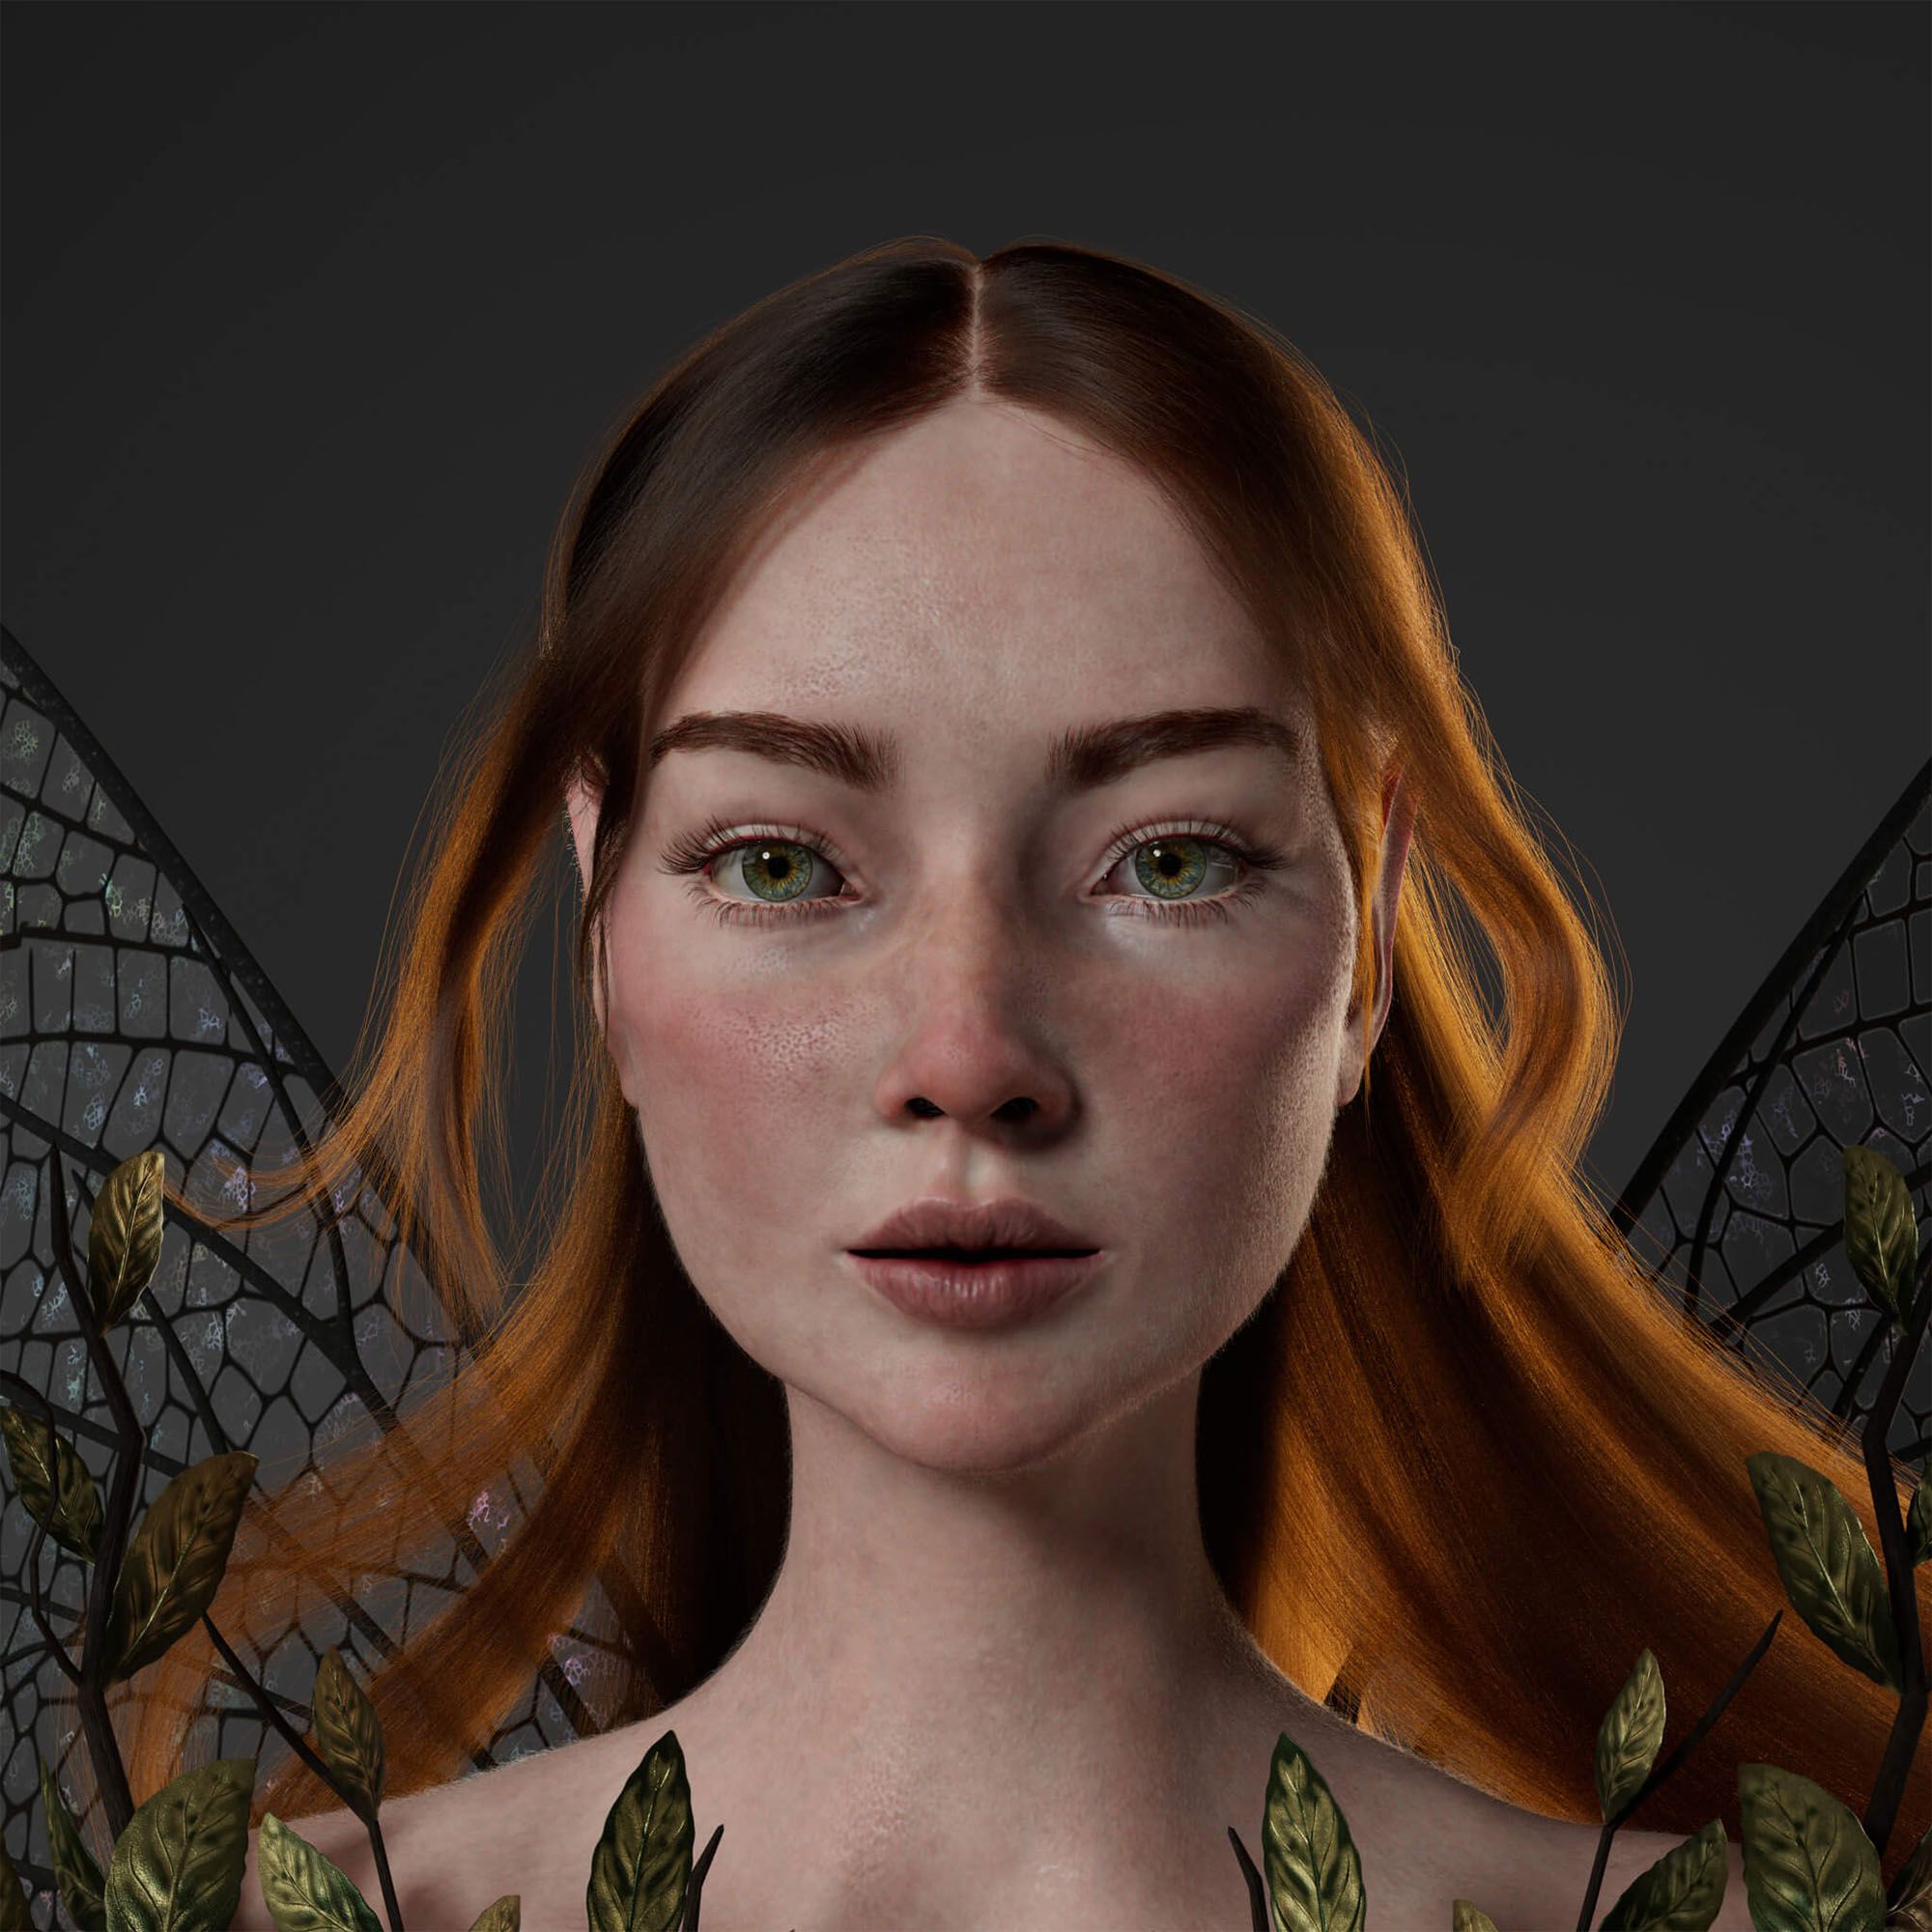
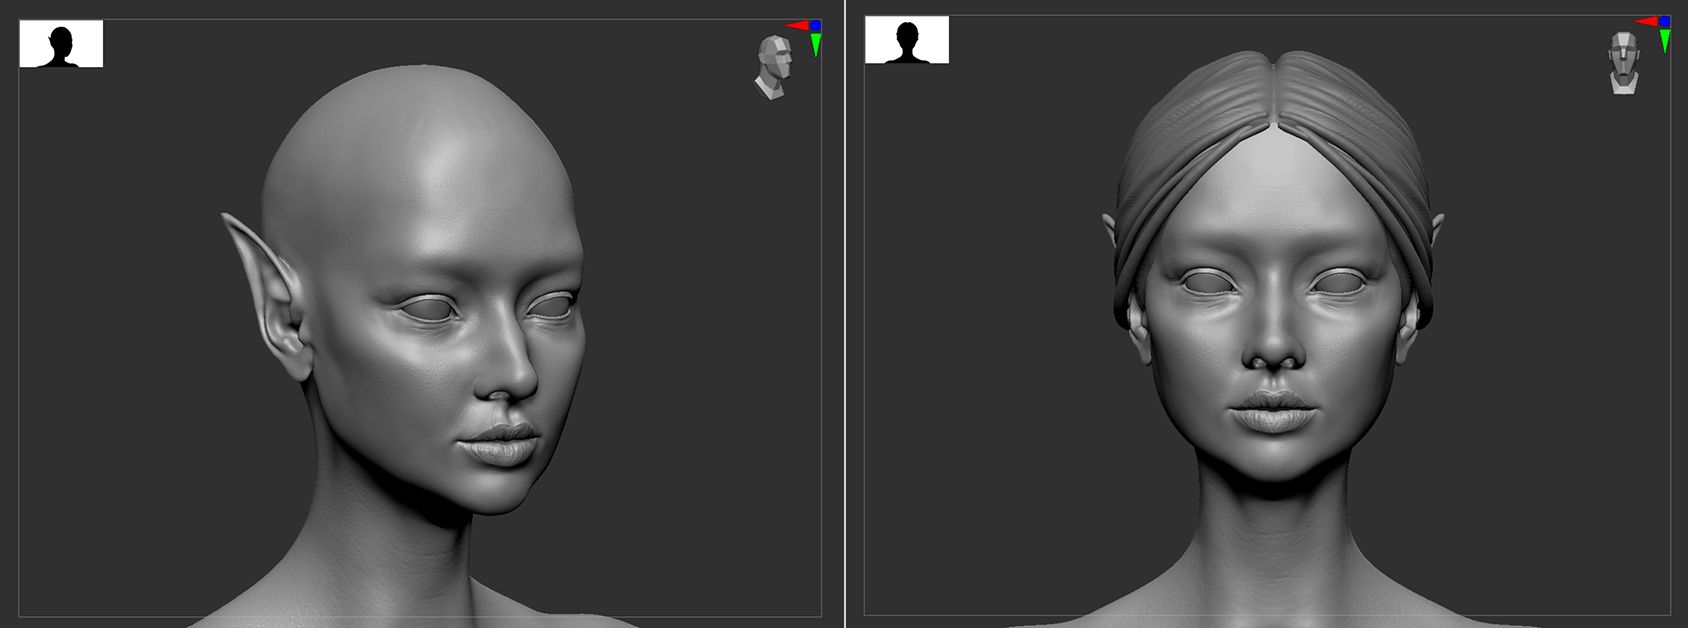
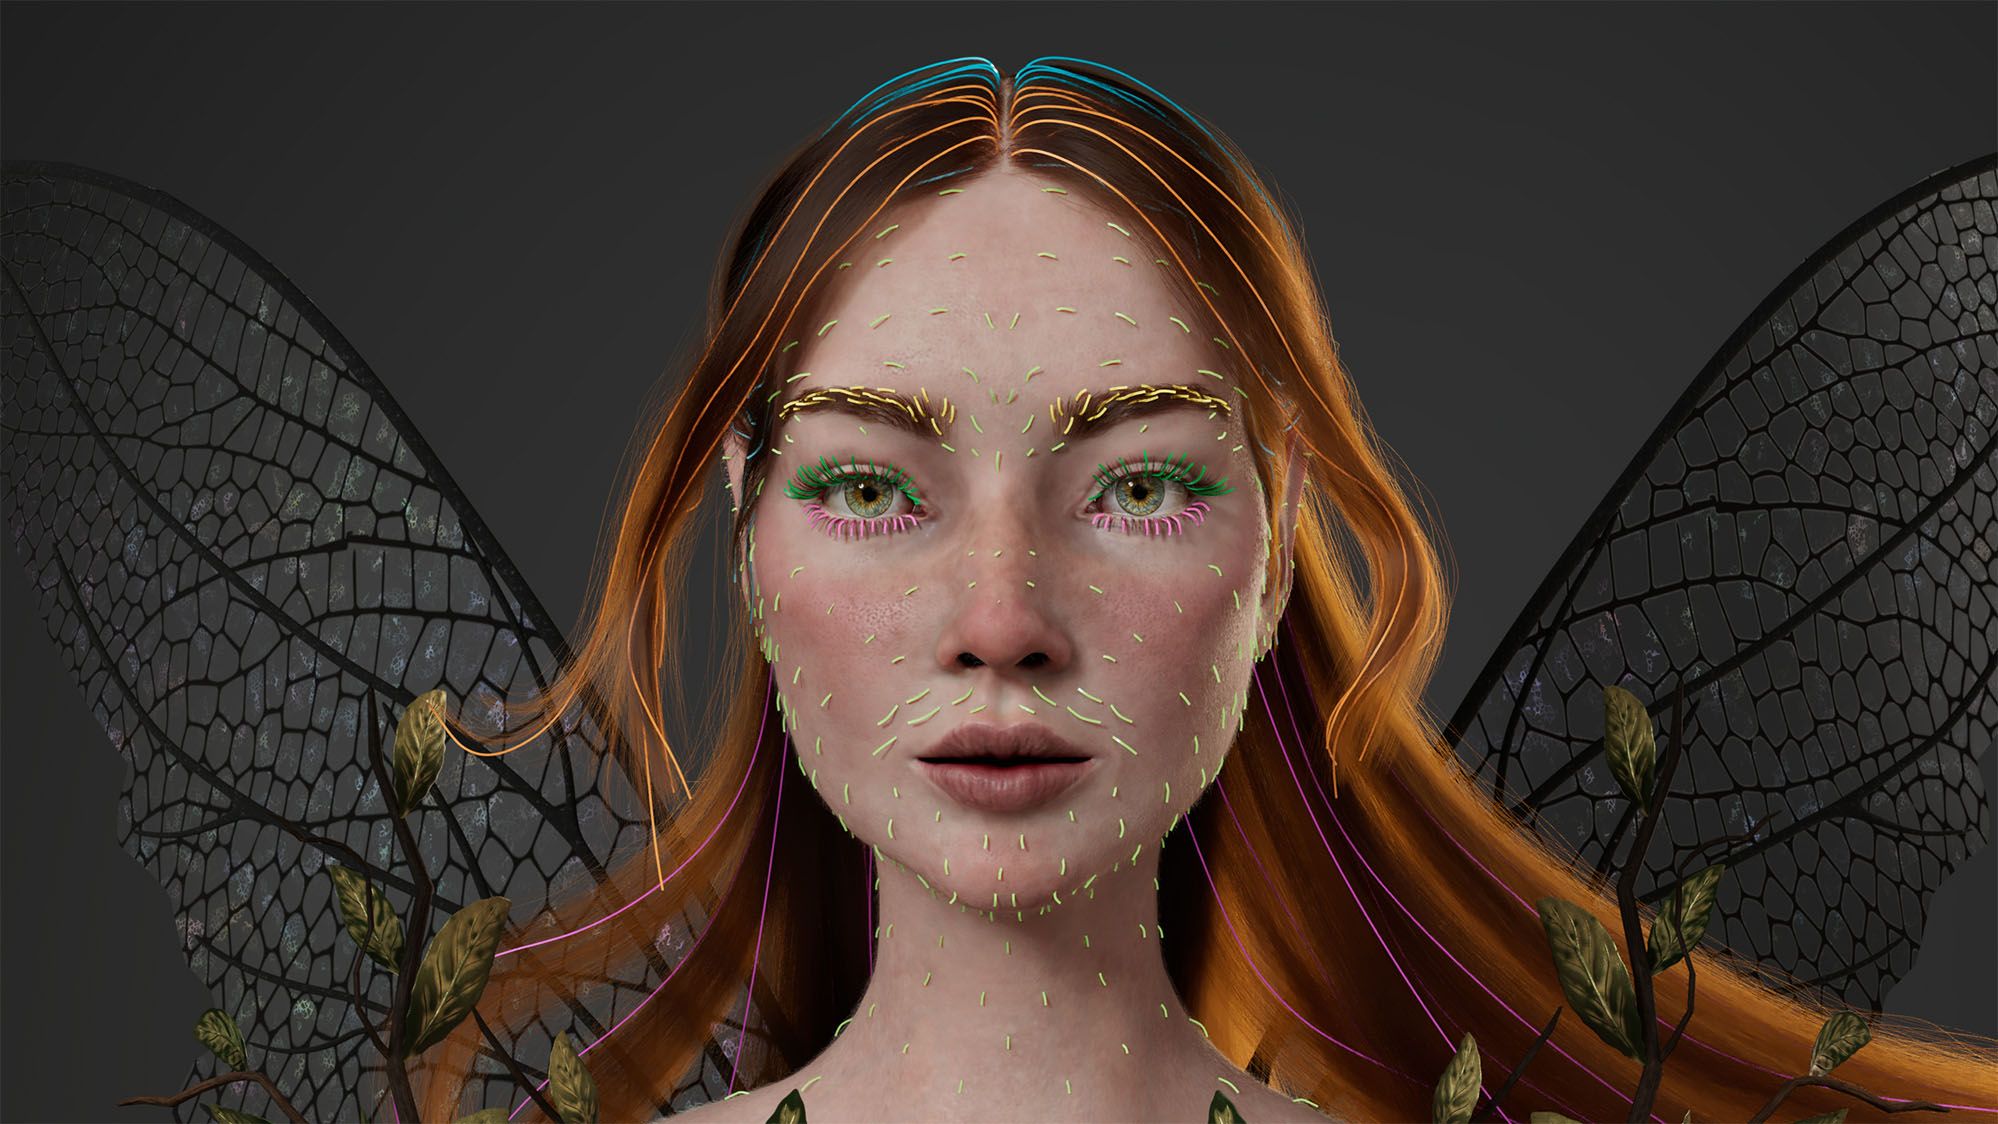
Using basic brushes such as ClayBuildUp, DamStandard, and Move, I adjusted the body to achieve the desired build. Lastly, I focused on the head, trying to copy the facial features I had among my reference images.
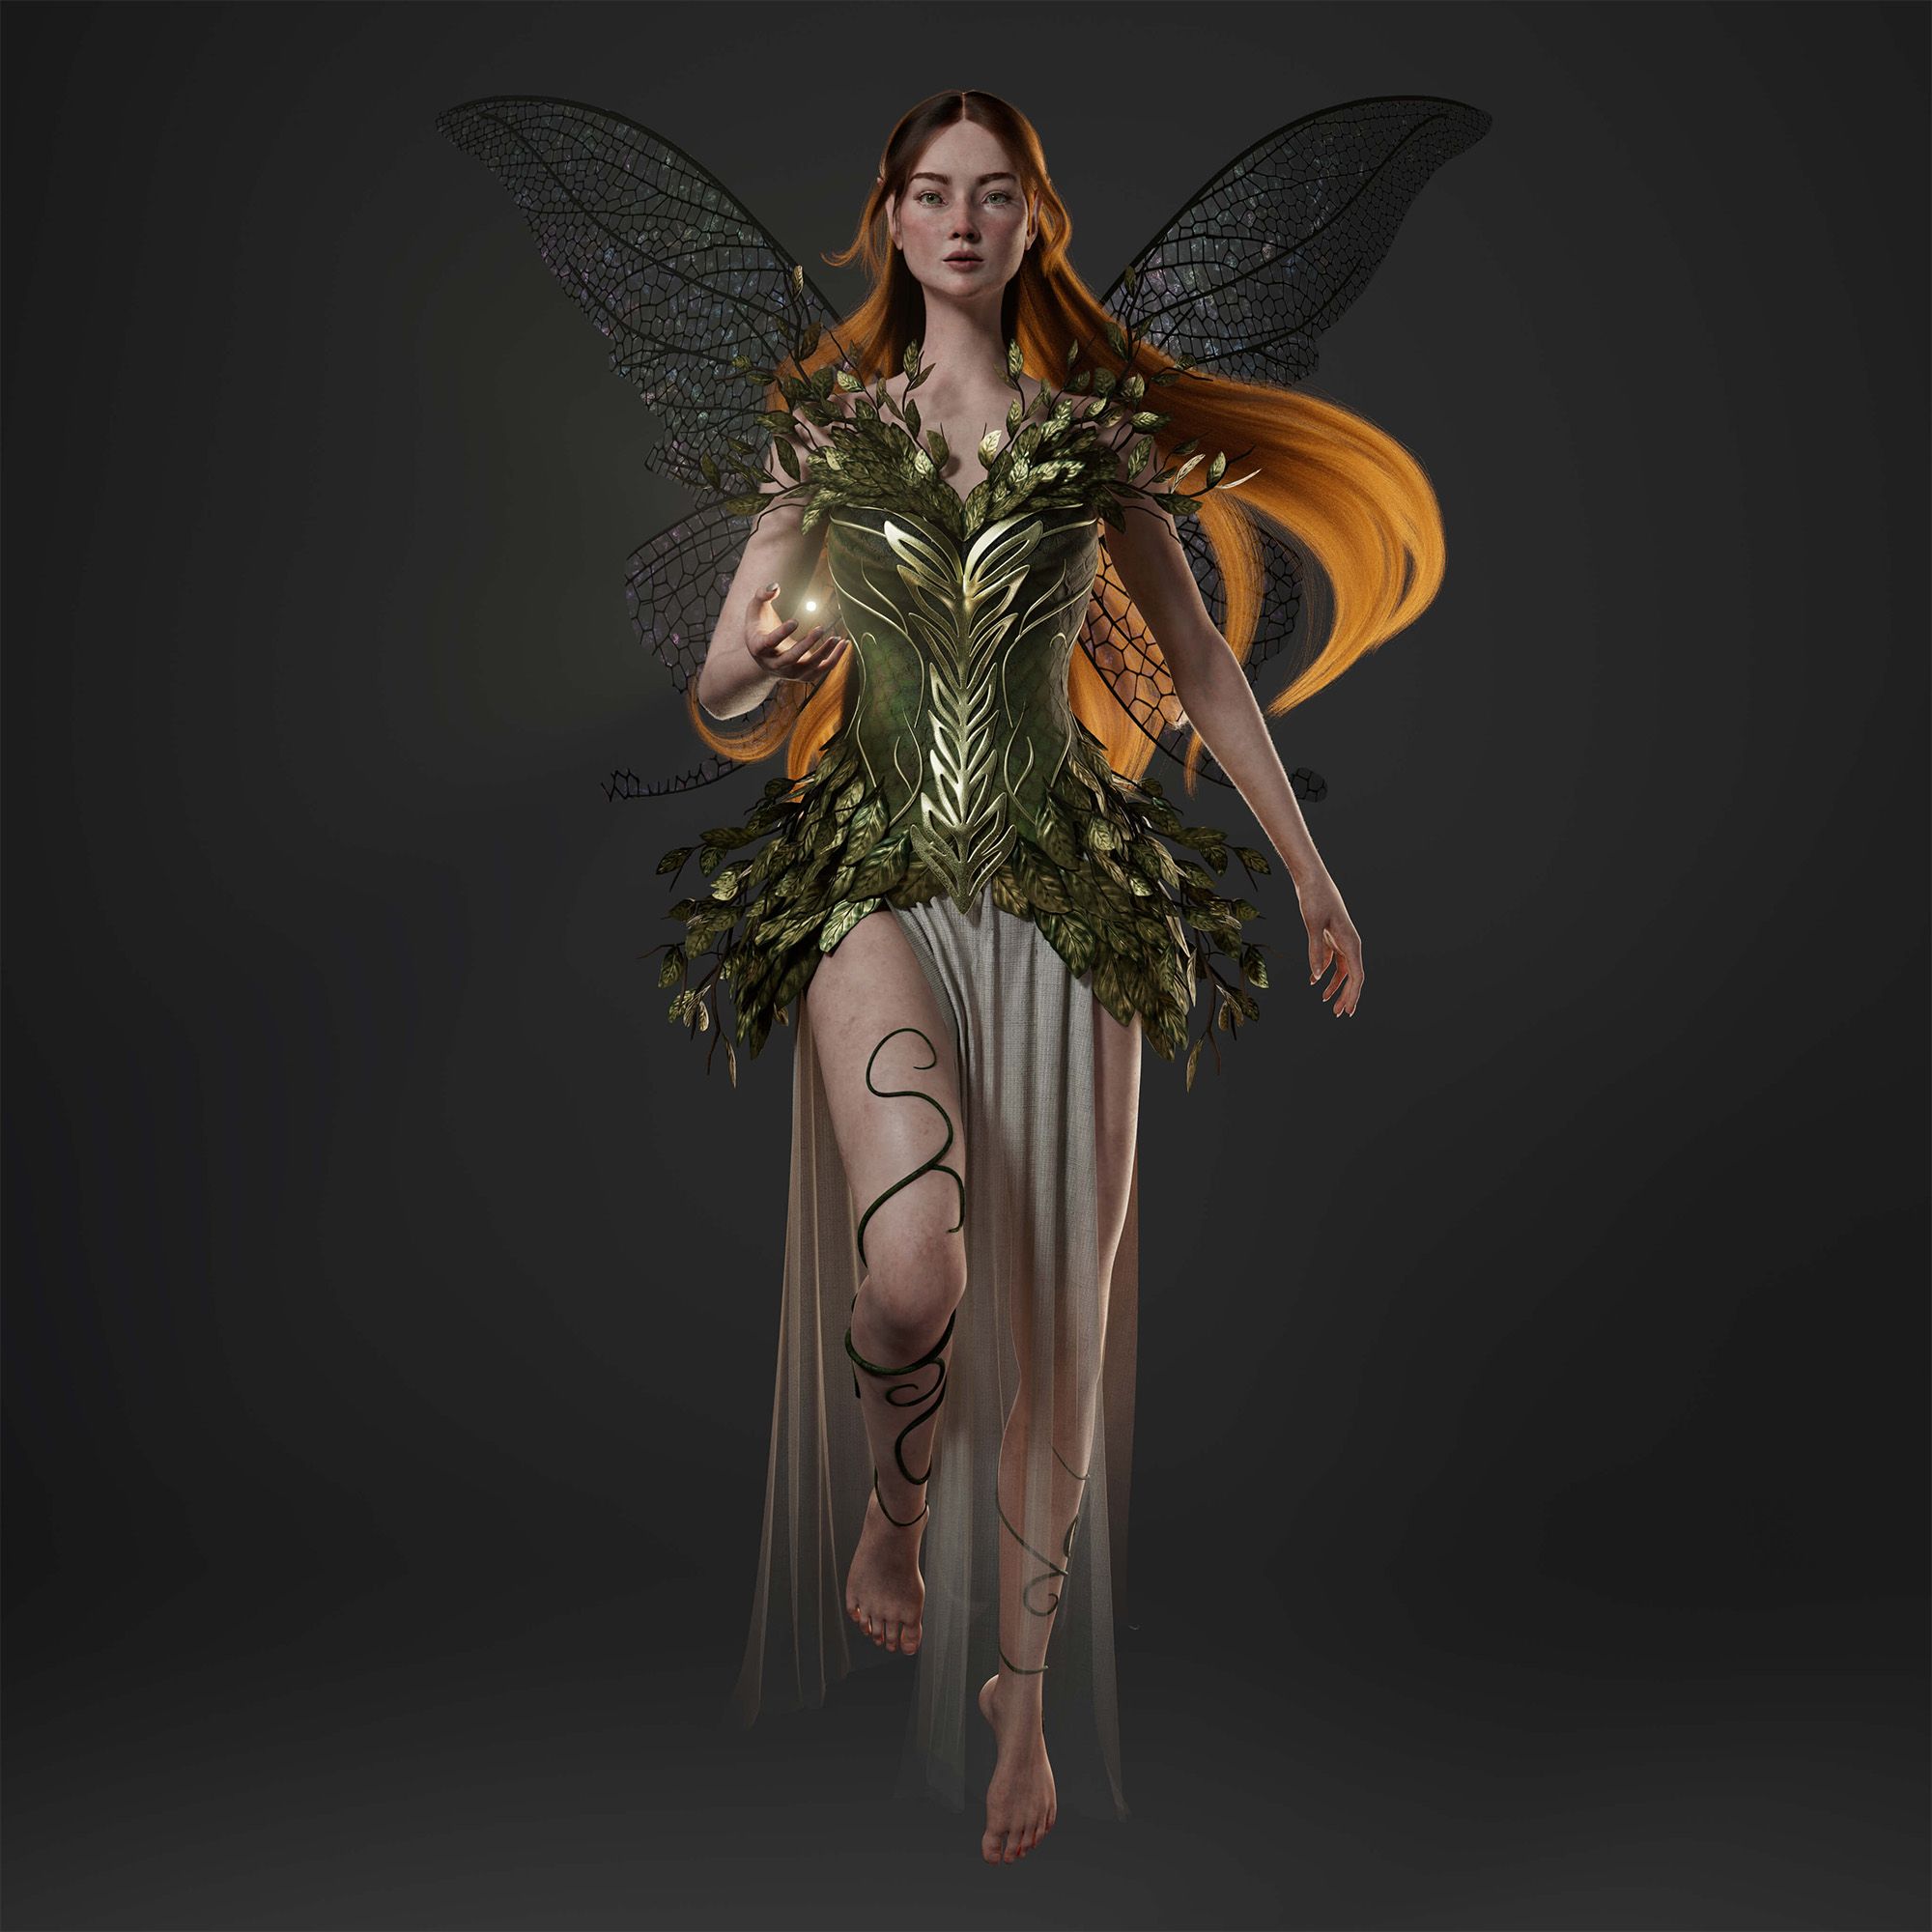
After modeling the body, I shifted my focus to the dress and the leaf branches.
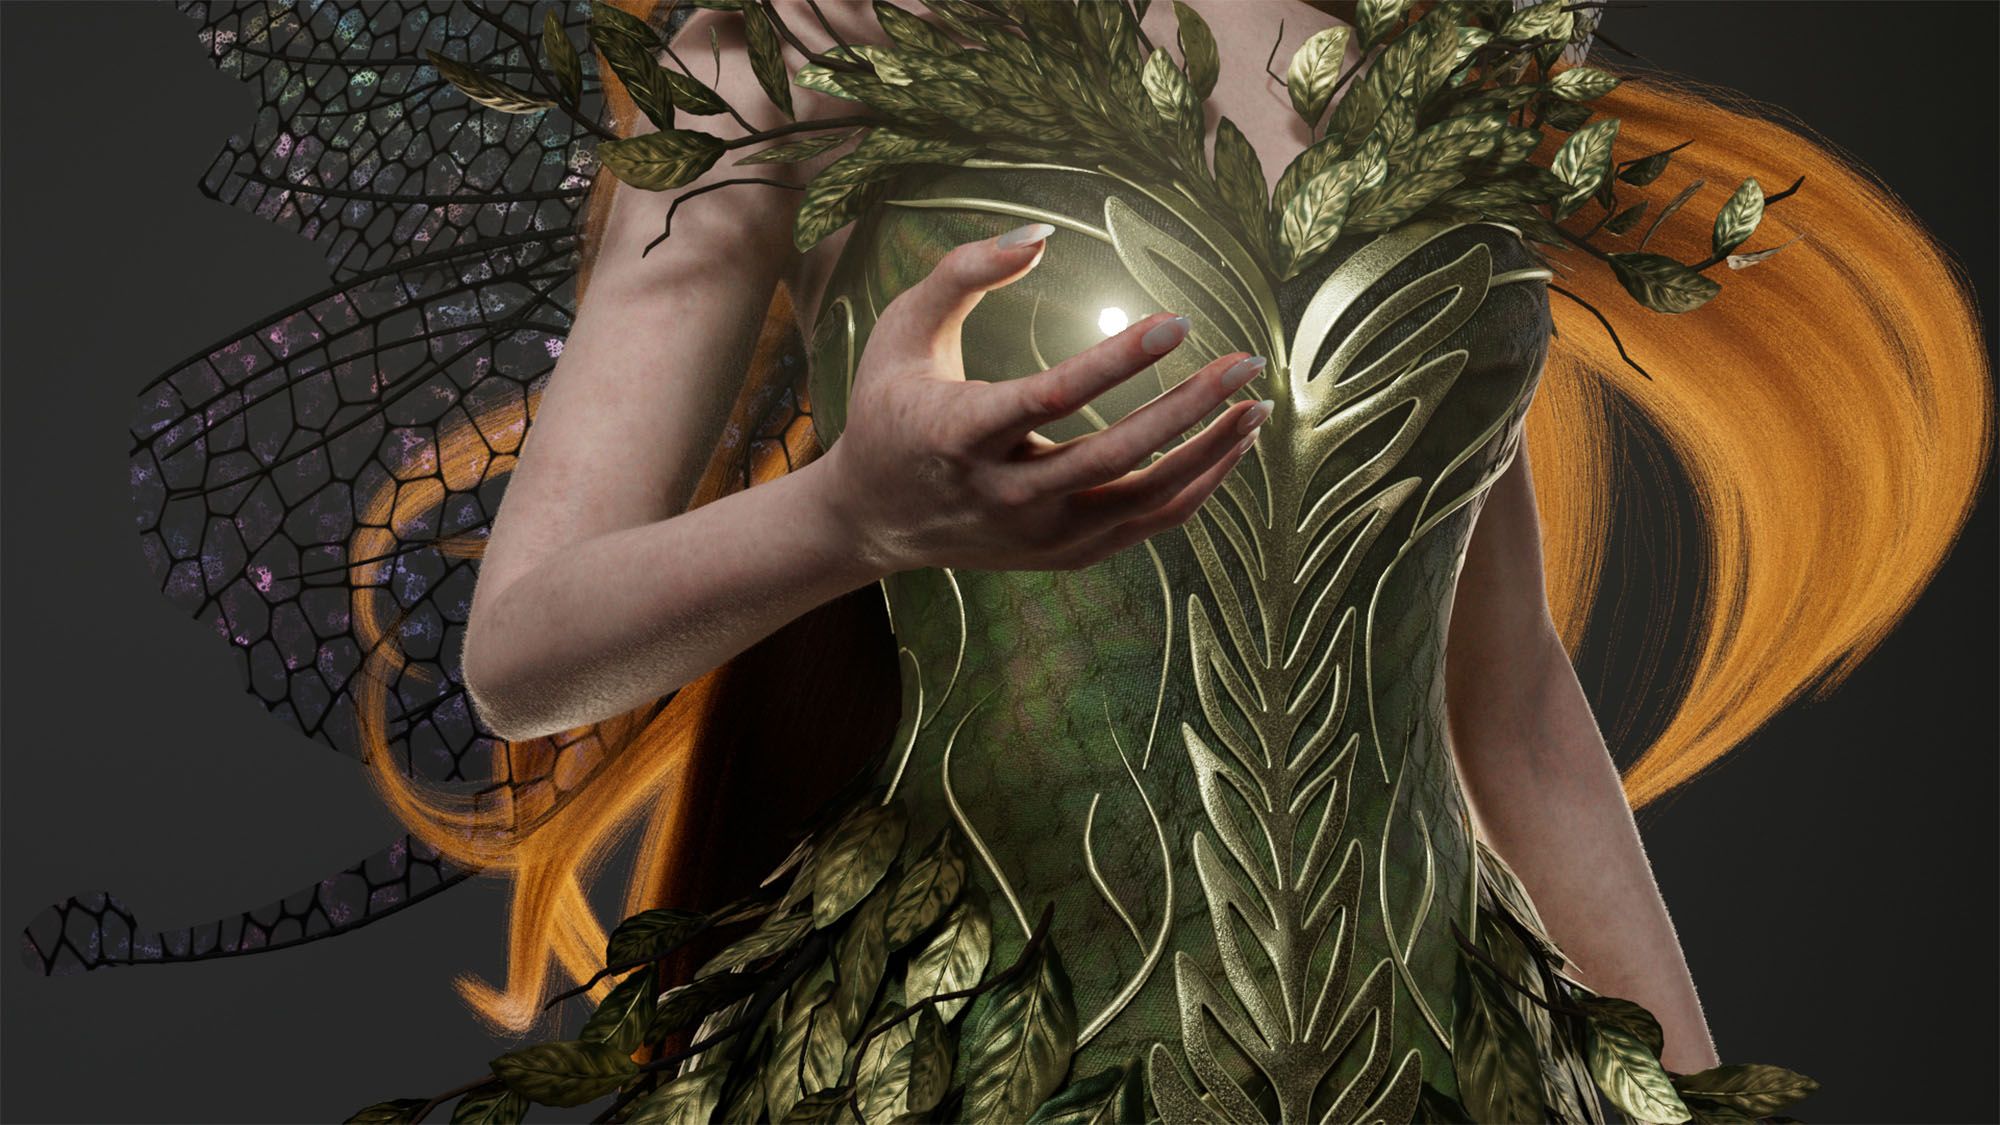
I began by masking off the portion of the mesh that the dress would cover and then extracted it, giving it the necessary thickness to sculpt the folds. To create the decorations, I utilised the “CurveTubes” brush and adjusted the size of the “Curve Falloff” in the “Curve Modifier” parameter.
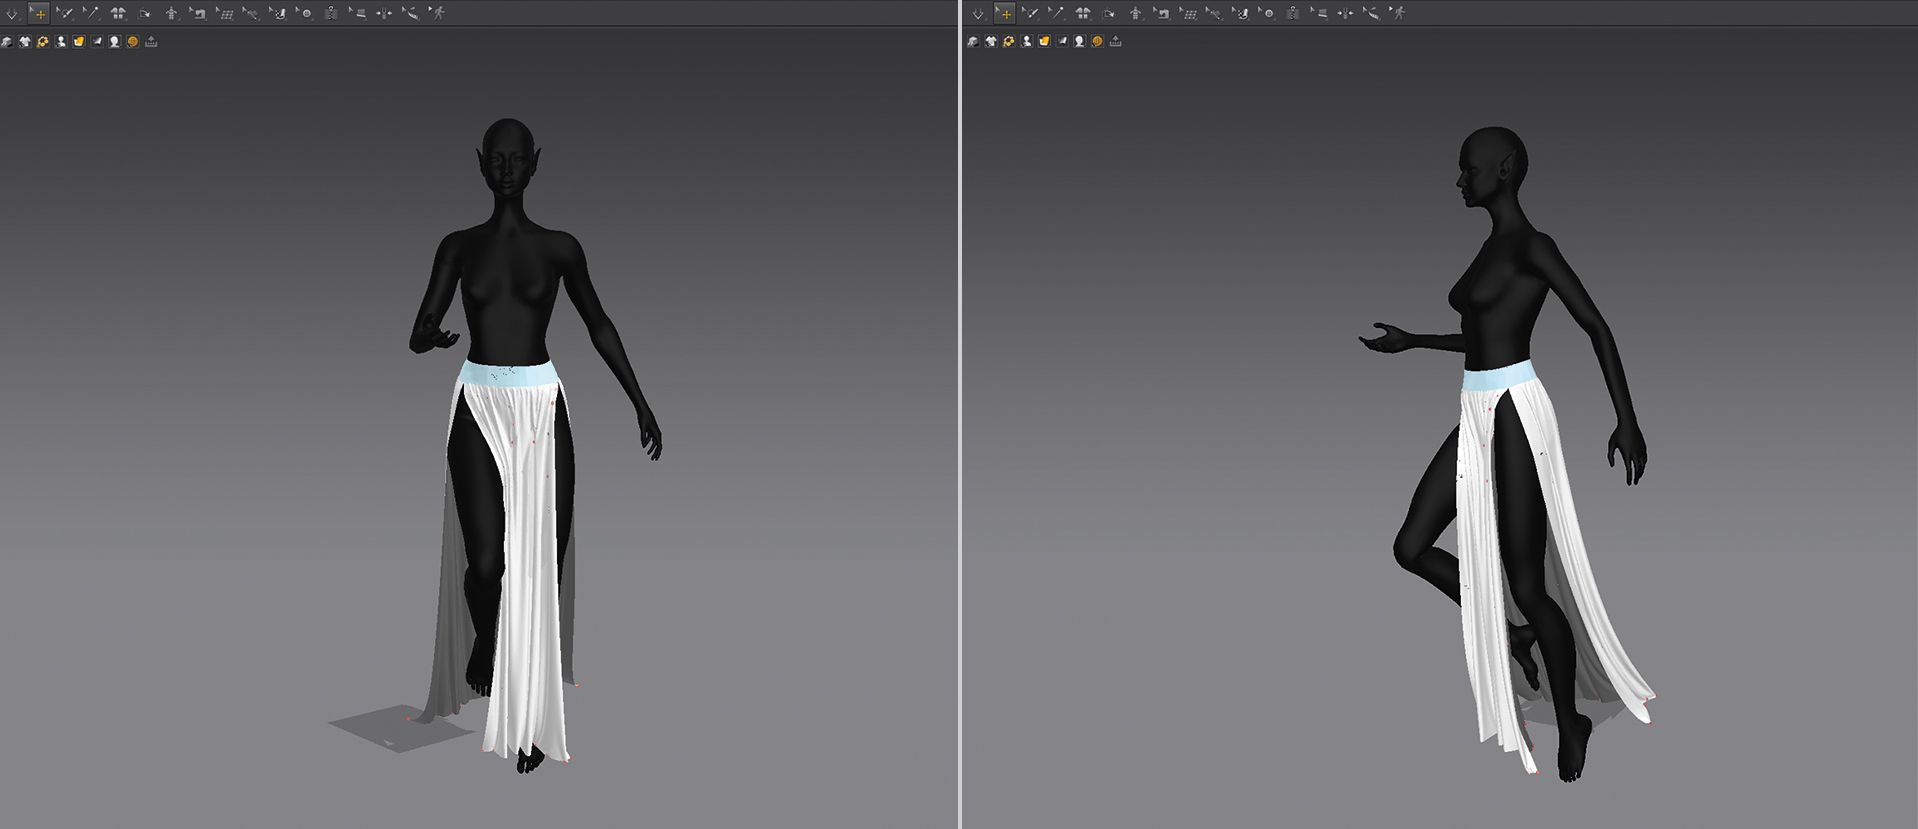
For the skirt, I aimed to create a basic mesh as a reference for blocking. I modified a plane and used “Dynamic Simulation” to automatically calculate the gravity in ZBrush. The final skirt will be created later using Marvelous Designer.
Following this, I proceeded to create the branches and leaves individually. To ensure good topology from the start, I divided them using “Zremesher”. After duplicating and positioning them correctly, I mirrored everything to achieve symmetry in the design.

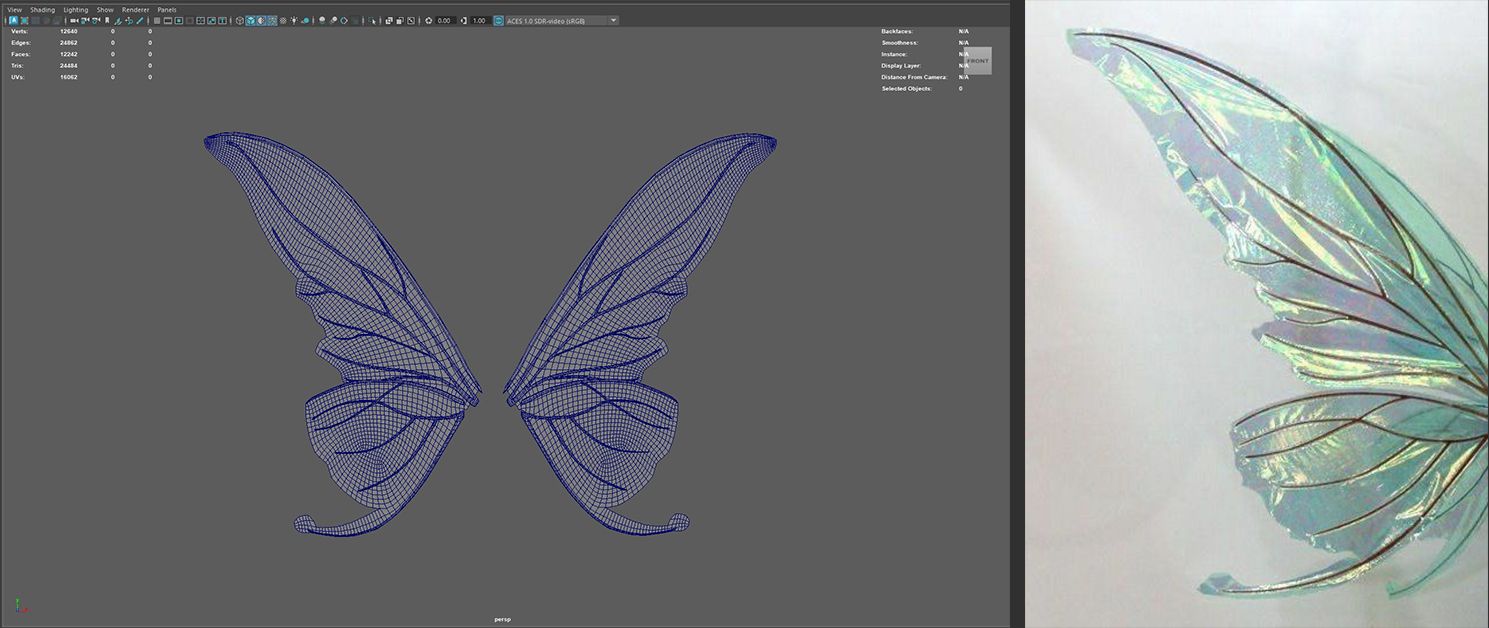
I used Autodesk Maya to model the wings, as I found it to be the easiest and fastest option for me. To create the wings, I loaded the reference file I needed into an "Image Plane" and used "Live Surface" and "Quad Draw" to model them exactly as I wanted.
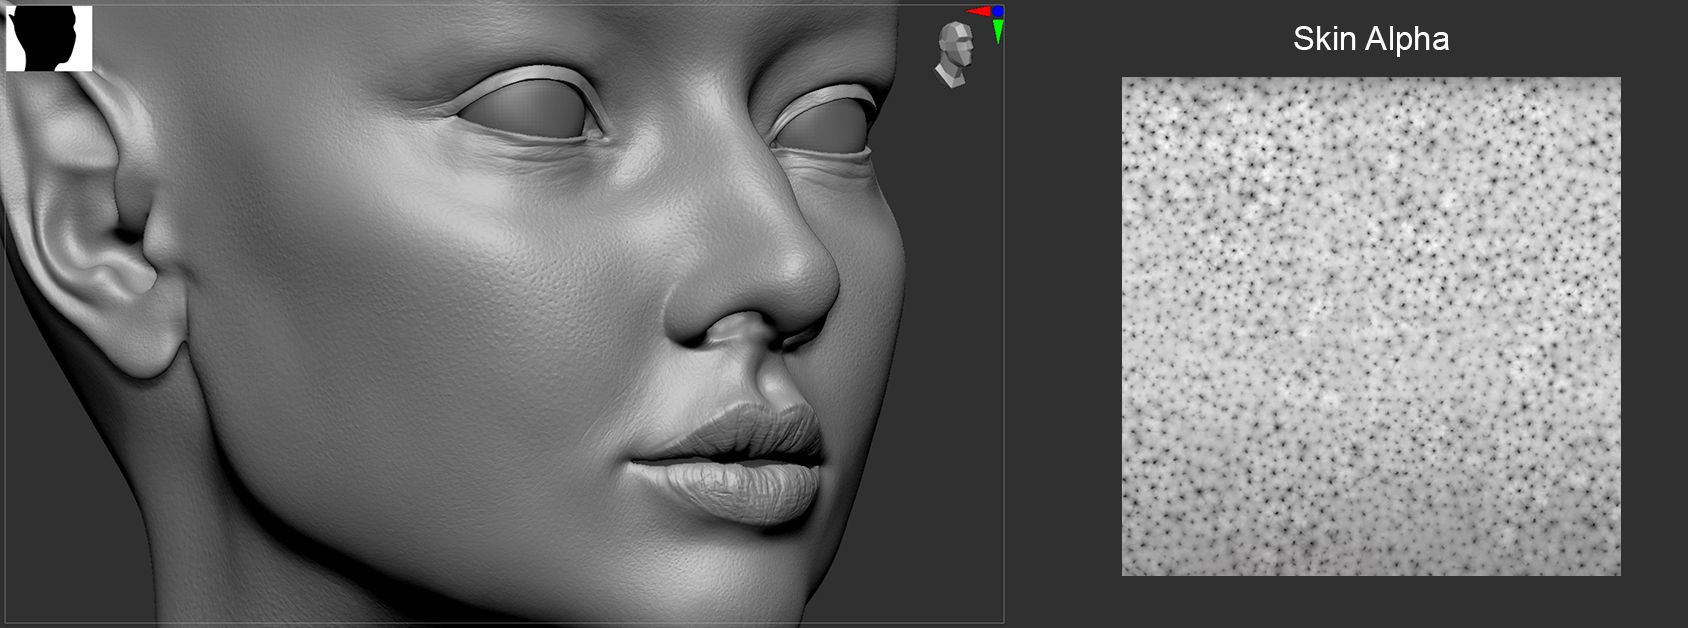
For the final step, I used "Zremesher" to give the body more detail and divided it into five layersTo add realism to the skin, I used the "DamStandard" brush and applied different alphas, some from the ZBrush menu and others downloaded, such as those offered by JHill. This step is crucial for adding realism to the character and is also the most enjoyable, as it elevates the model and brings it to life.
The body retopology was done manually in Maya for practice and to follow a workflow as close to the production process as possible. After that, I prepared the character for texturing by creating the UVs of the entire model.

Texturing was an incredibly enjoyable process, but also the one that gave me the most challenges. I did everything with Substance 3D Painter. I will explain in particular how I created the skin and wings. I believe they are the most interesting parts and deserve further investigation.
When creating skin it is crucial to incorporate as much variation as possible, both in terms of colour and roughness. It is important to seek references that give you the right indications. They should be without filters or makeup. In this instance, RBX Images and Cross Polarized Photos helped me a lot. These references allowed me to observe human skin in the most realistic way, with all its associated defects and imperfections. To learn more about this topic, I recommend watching this video by JHill.
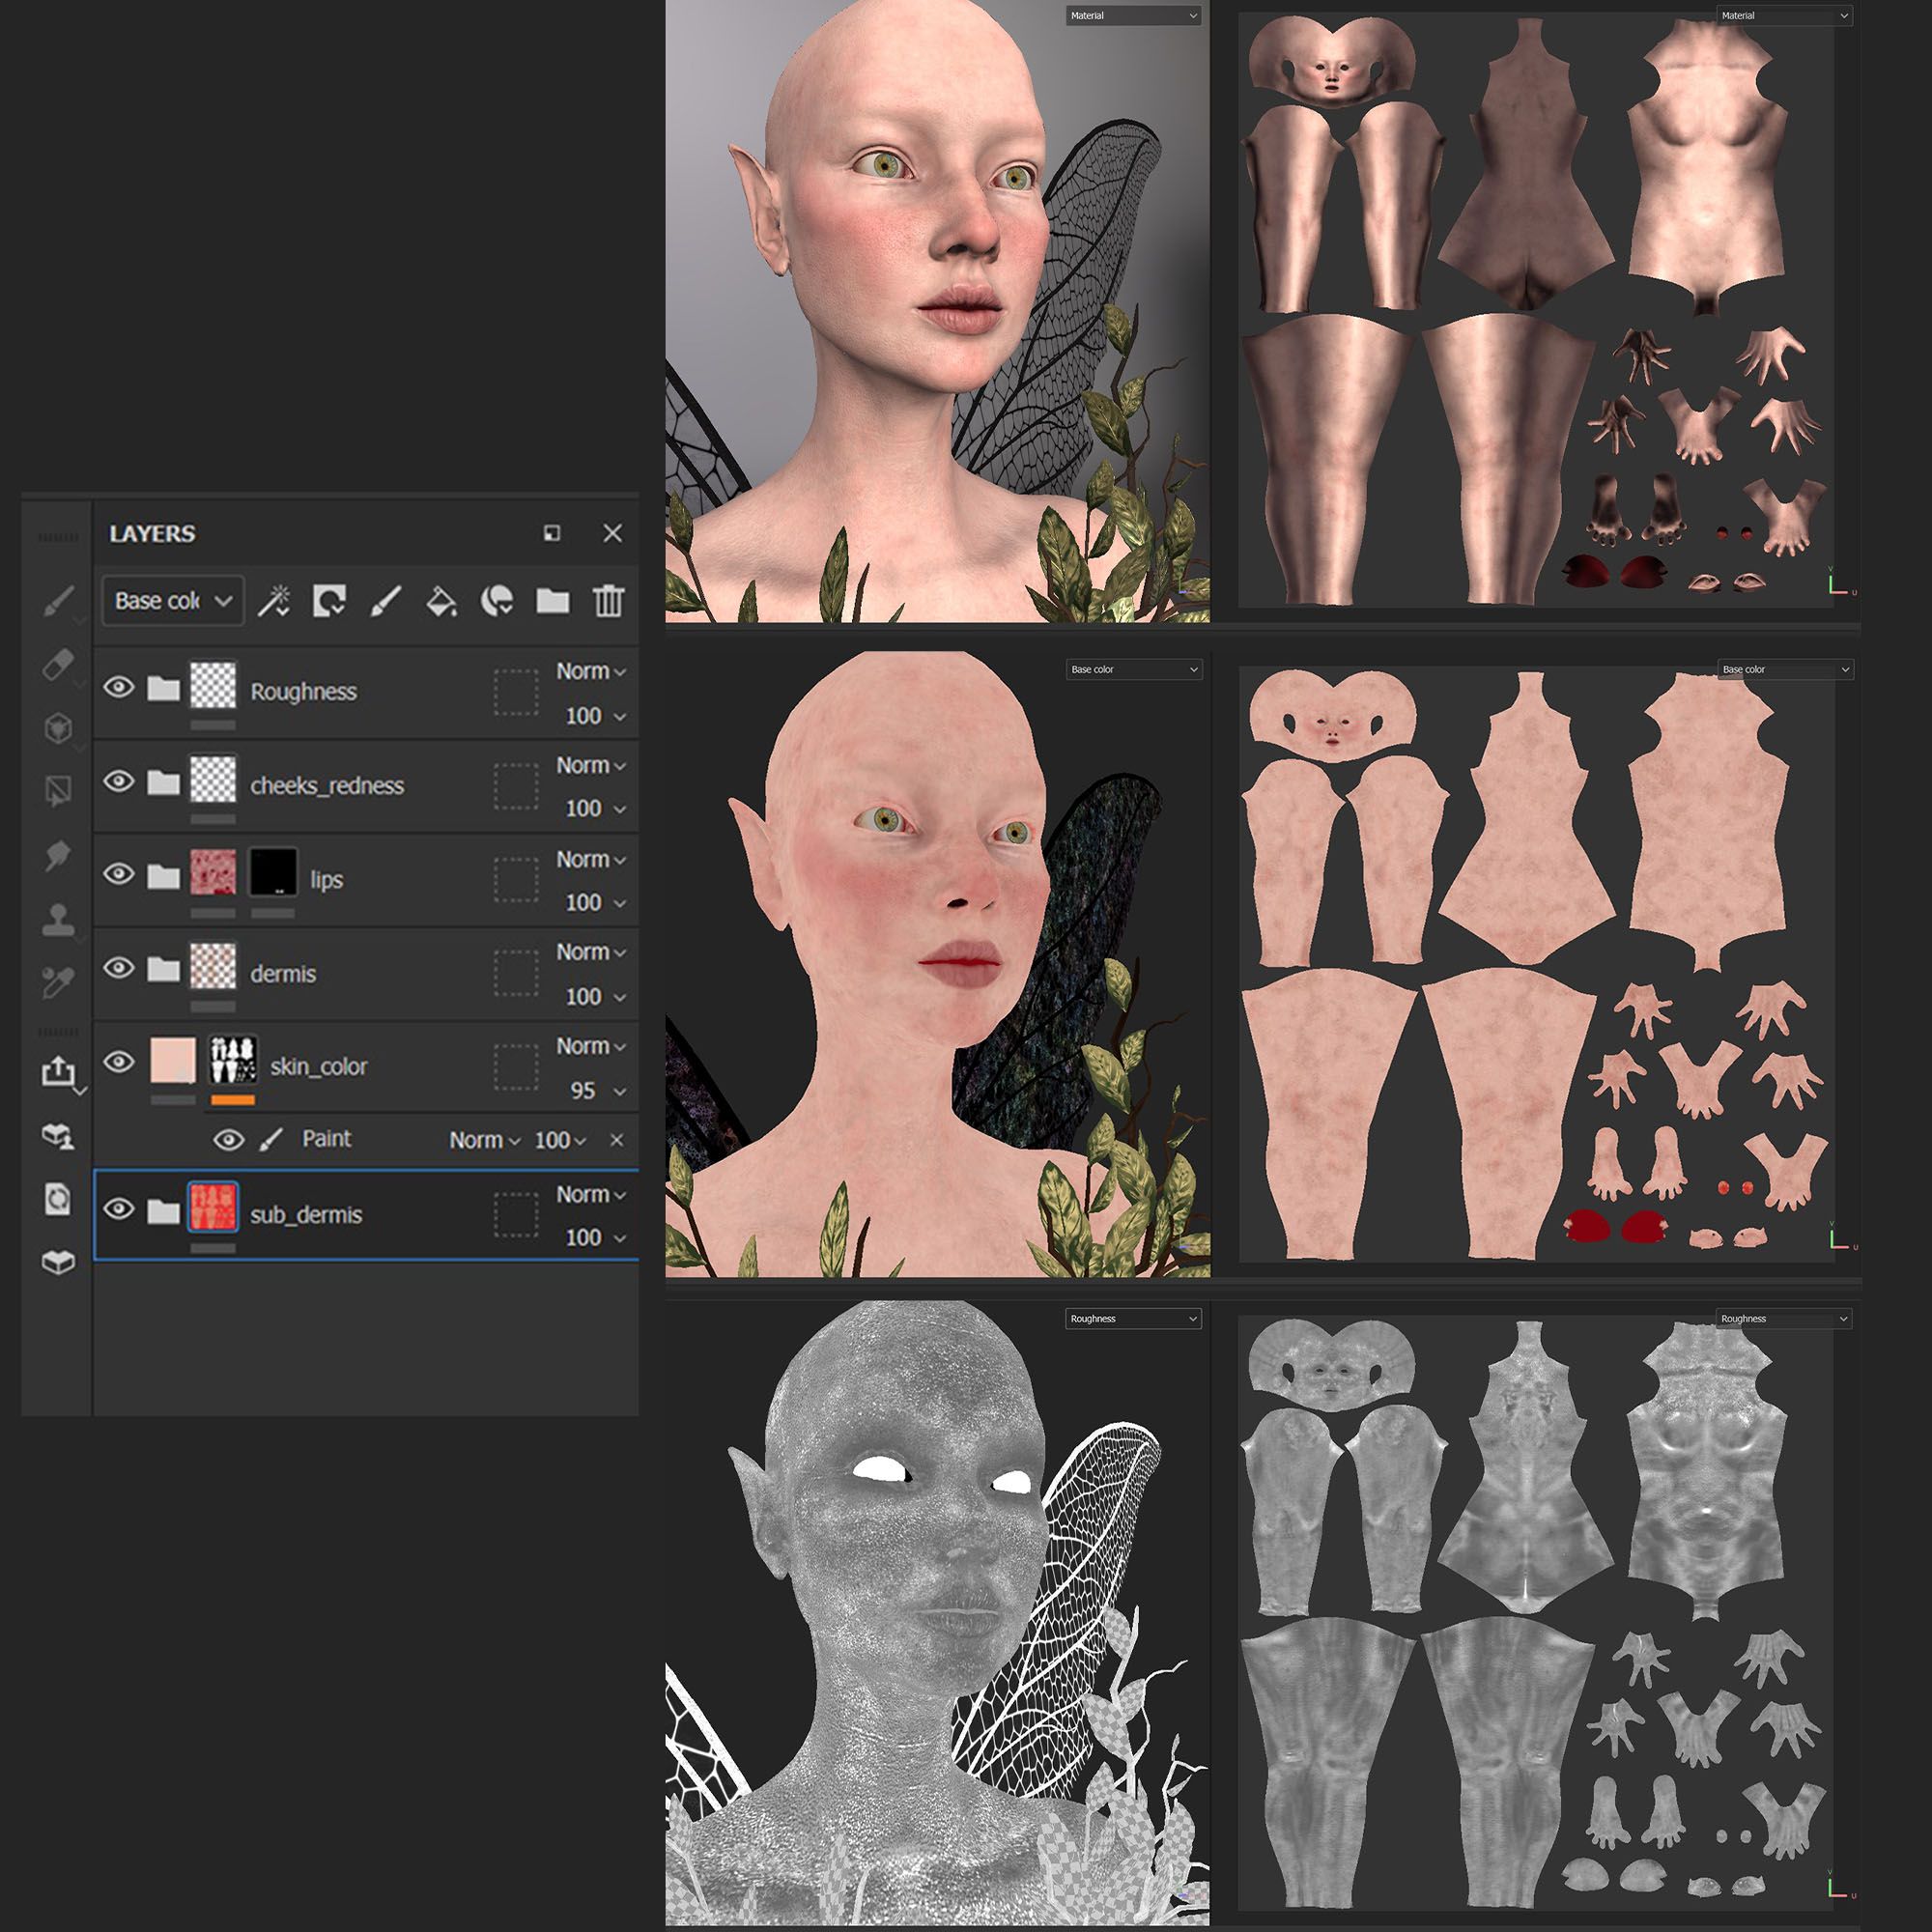
I recreated the skin in 6 steps:

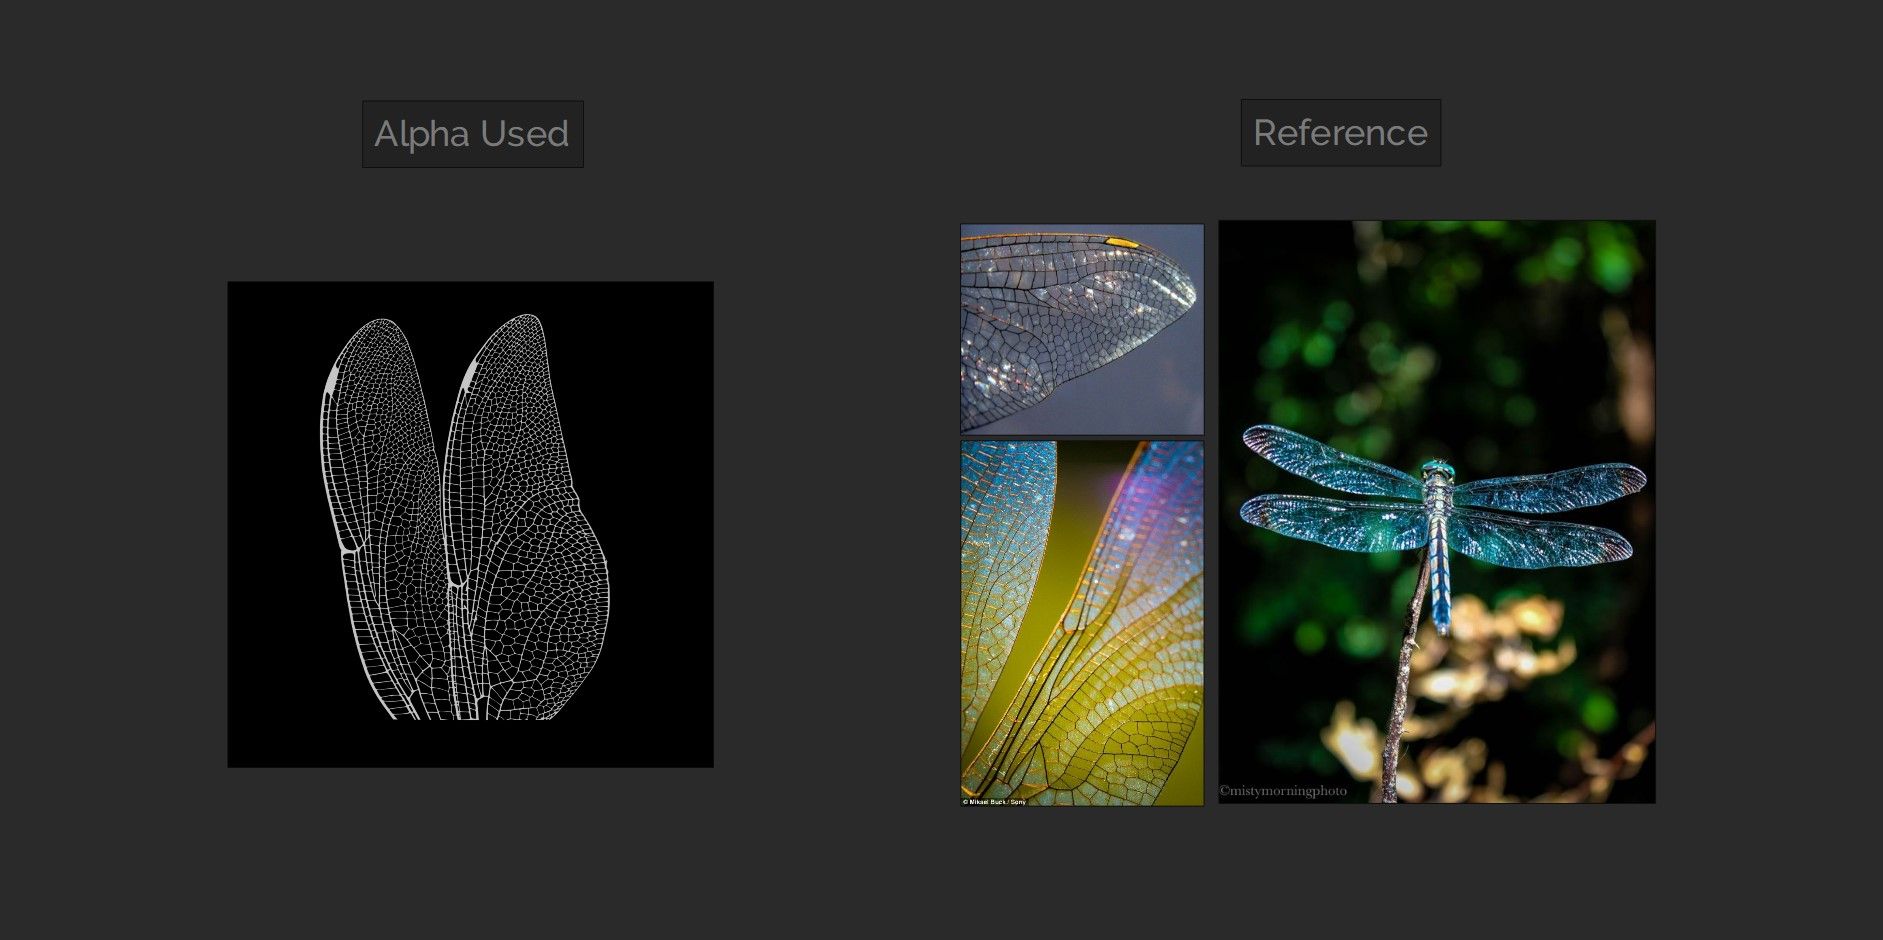
The wings were the most difficult part to texture, requiring several attempts to achieve the desired result. My goal was to replicate the intricate texture of dragonfly wings to add an interesting visual element.
To begin, I added a layer with the Opacity channel, I set the surface slightly transparent but not completely. Afterward, I created a highly reflective material. I achieved this by reducing the Roughness and adding some Metalness. I added a whole series of basic colours and blended them using different masks. This way I was able to have a wide variation of different colours. A crucial step involved creating a mask with several different grayscale layers, which were then layered using blending modes such as Overlay and Screen. Finally, I created an alpha in Photoshop using a photograph of a dragonfly's wings and applied it to the texture, adjusting the Colour, Opacity, and Roughness.
To achieve a more dynamic and natural result, I decided to pose my character using the Mixamo website. After uploading my model to the platform, it automatically generated the rig for me. I then imported it into Maya and began posing my character. Following that, I utilised Marvelous Designer to create the skirt, re-imported the mesh into Maya, and proceeded to create textures using Substance Painter.
For shading, I simply connected the maps I exported from Substance 3D Painter into the Arnold nodes. In particular, for the skin I also used the Displacement Maps that I exported directly from my ZBrush project. I didn't use Normal Map because I preferred to give detail directly with Displacement.
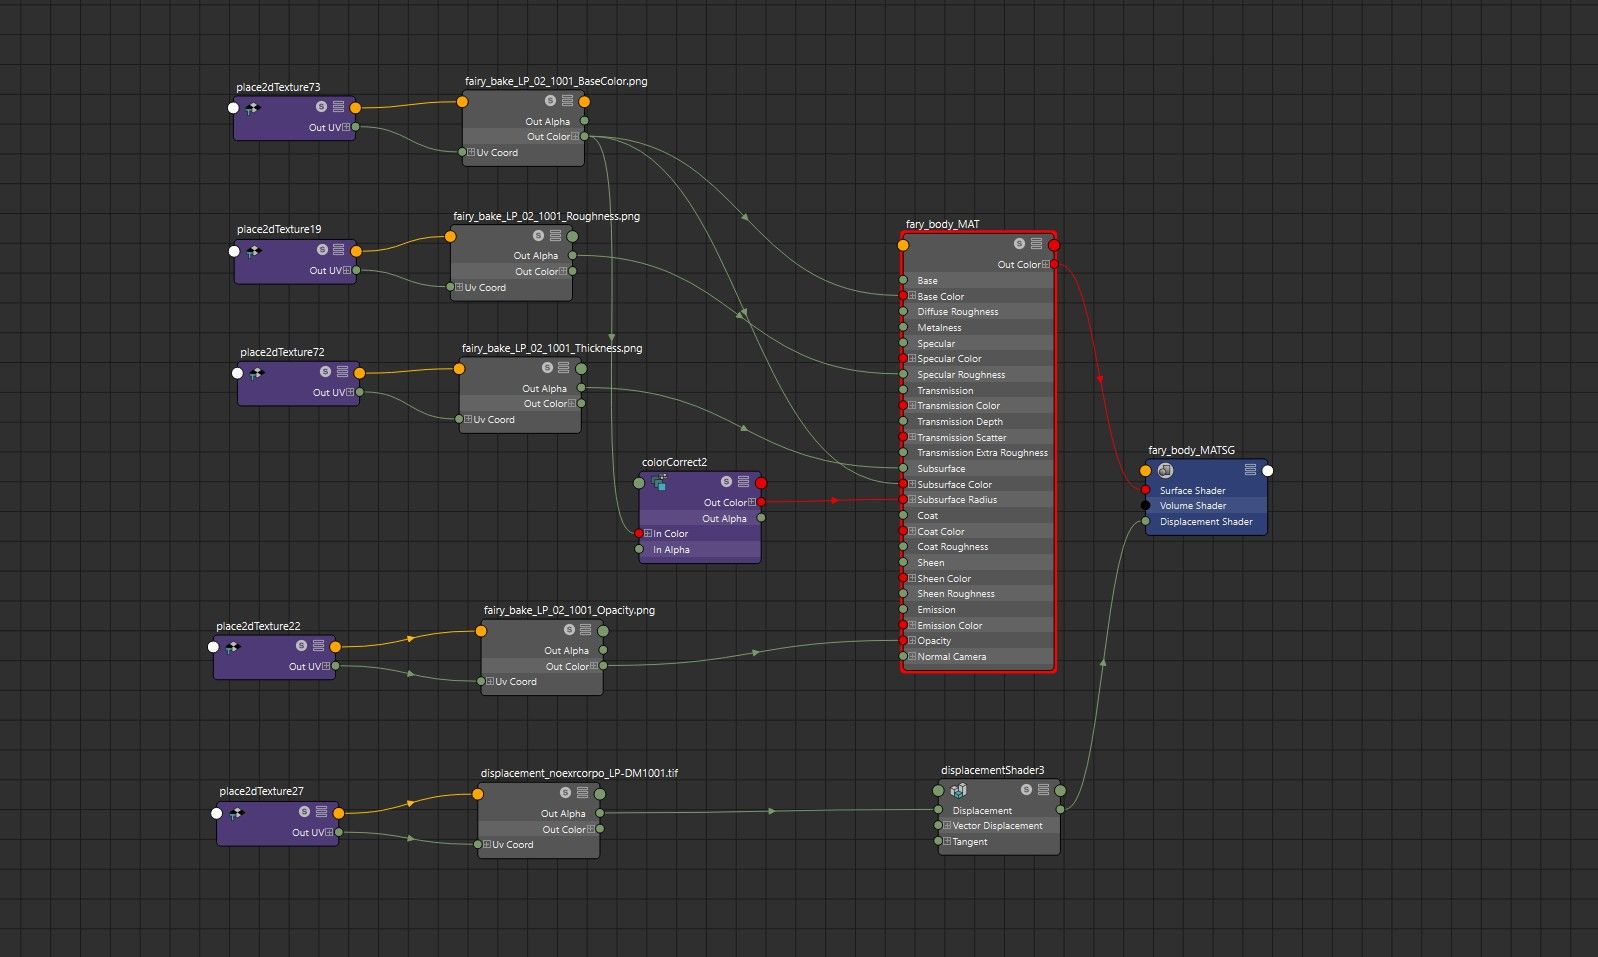
For the Subsurface, I used the Thickness Map generated from the Substance Painter bake to emphasize the areas where Subsurface Scattering occurs. Additionally, I adjusted the Colour Base Map to have more control over the Subsurface Radius.
To create the groom I used XGen.
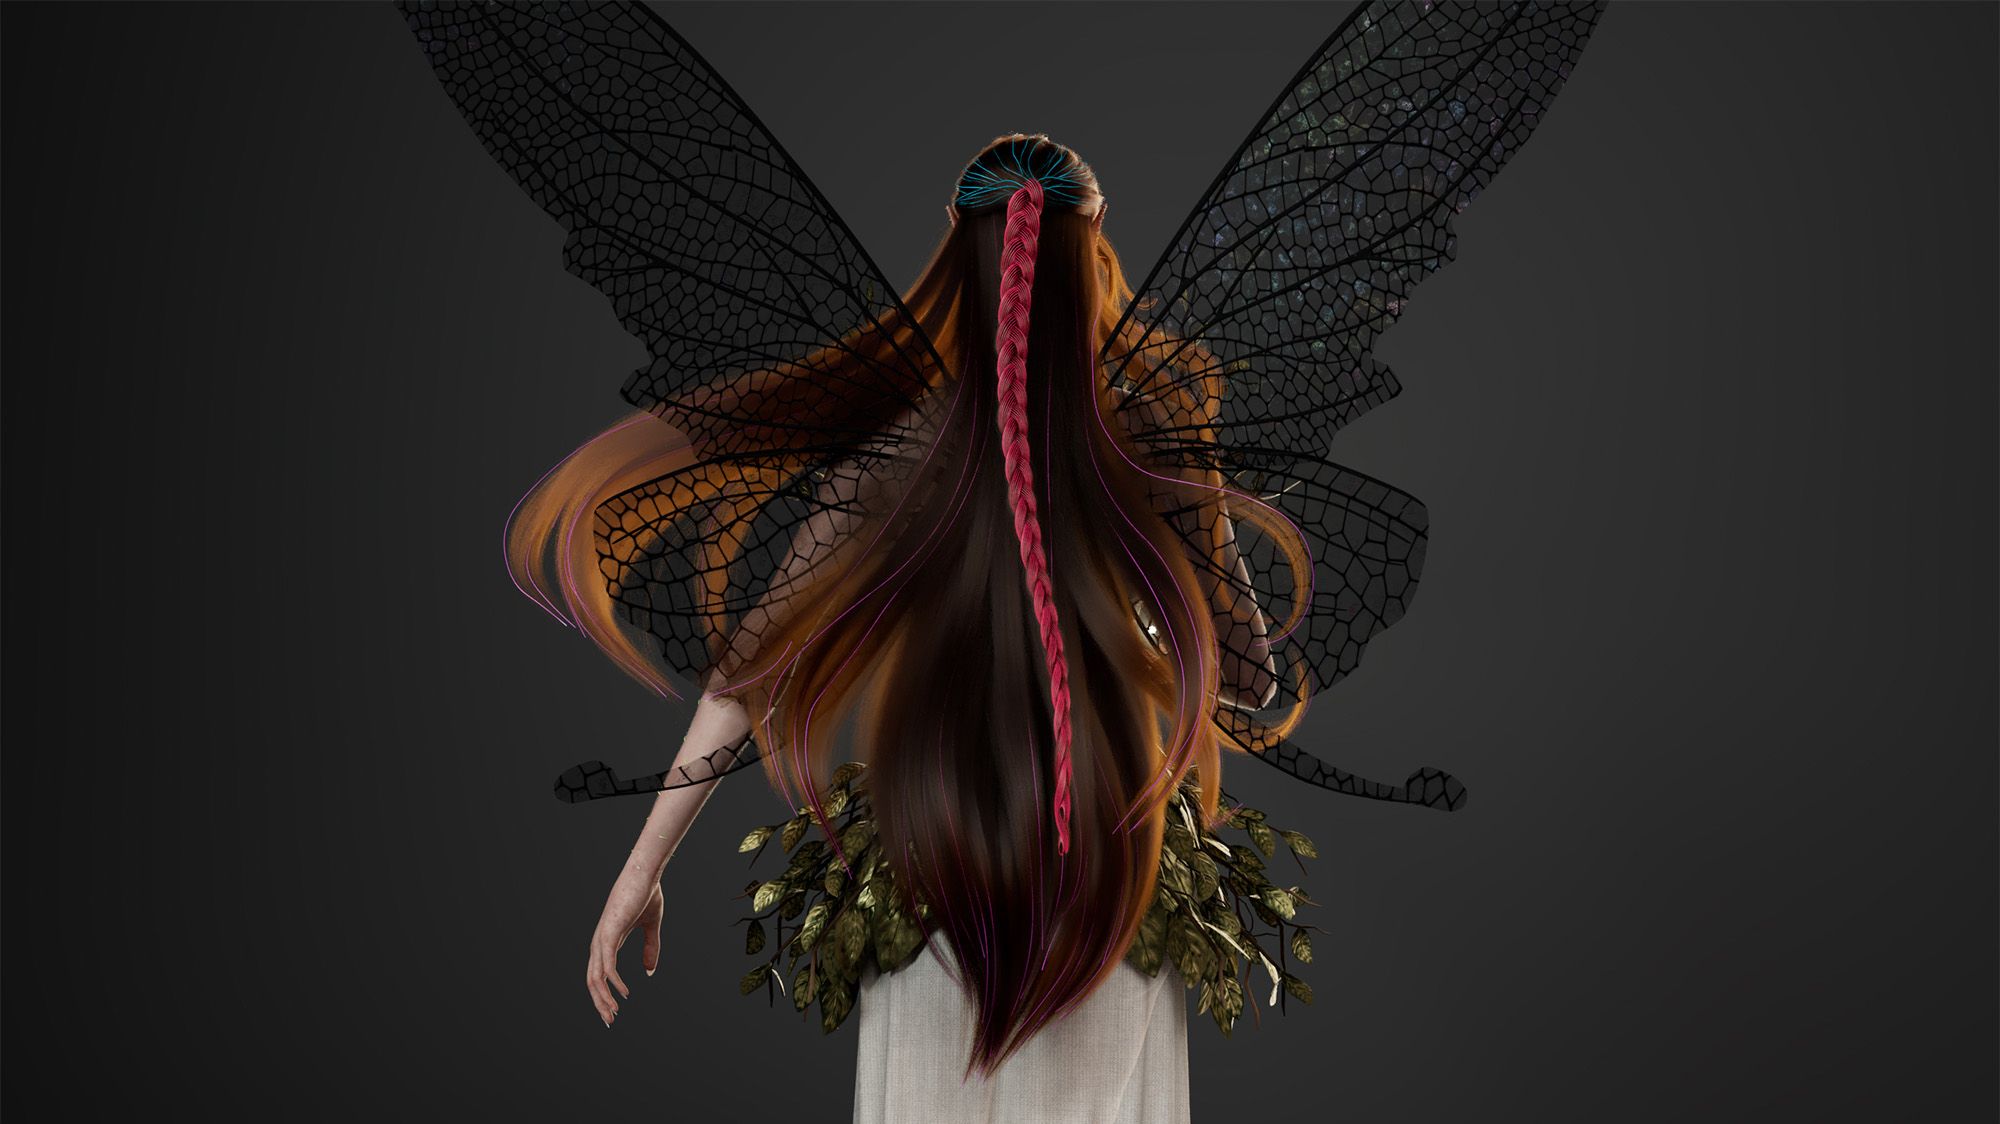
At first the hair design was totally different from the final result I got. In my ZBrush model, I chose a cleaner aesthetic, with hair tied in a bun. I believed this would provide more visibility to the model, especially the wings. However, I later discovered that I had made a mistake in setting the character size incorrectly, and I had already started applying the first guides.
When working with the groom it is very important to scale the model to the right size. This allows you to work better with the guides and It also ensures that the clumping modification parameters work correctly. Despite the initial error, it allowed me to see the model from a different perspective. After scaling it correctly, the result I obtained was having extremely long guides. It was at that moment I realised that the character would appear more captivating with long hair, adding much more dynamism to the composition. I therefore decided to completely redo the hair and apply the guides correctly.
Making mistakes is a natural part of the learning process, and it can also help us correct poor stylistic choices.
After choosing to completely change the character's hairstyle, I began searching for additional references. I also chose to incorporate a braid that evoked a fantasy hairstyle.
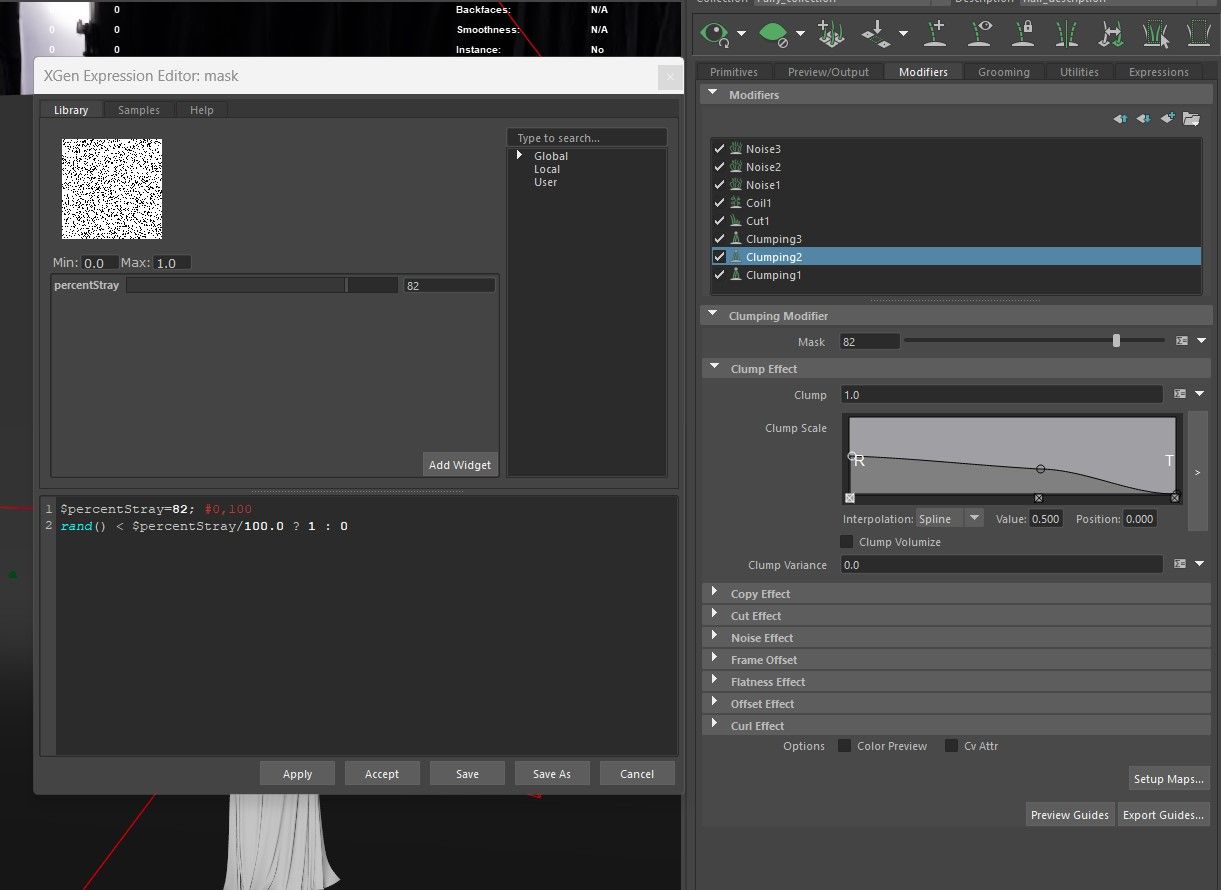
I prepared the mesh for the groom by creating a duplicate of the scalp and the eye contour area. I assigned them the Lambert material and did the UVs. I used the “Spline” mode by applying the guides individually. I created several descriptions to have more control over the individual parts:
In order to achieve maximum variation, I used masks created by expressions to modify various parameters. I also added several modifiers including at least three “Clumping” layers, a “Cut”, a “Coil” and two or three “Noises”. Throughout the process, I noticed that what creates greater realism is first and foremost having the right thickness of hair. I recommend entering a randomisation ranging from 0.002 to 0.005. Furthermore, achieving as much variety as possible by adding masks inserted with expressions and adding multiple layers of modifiers.
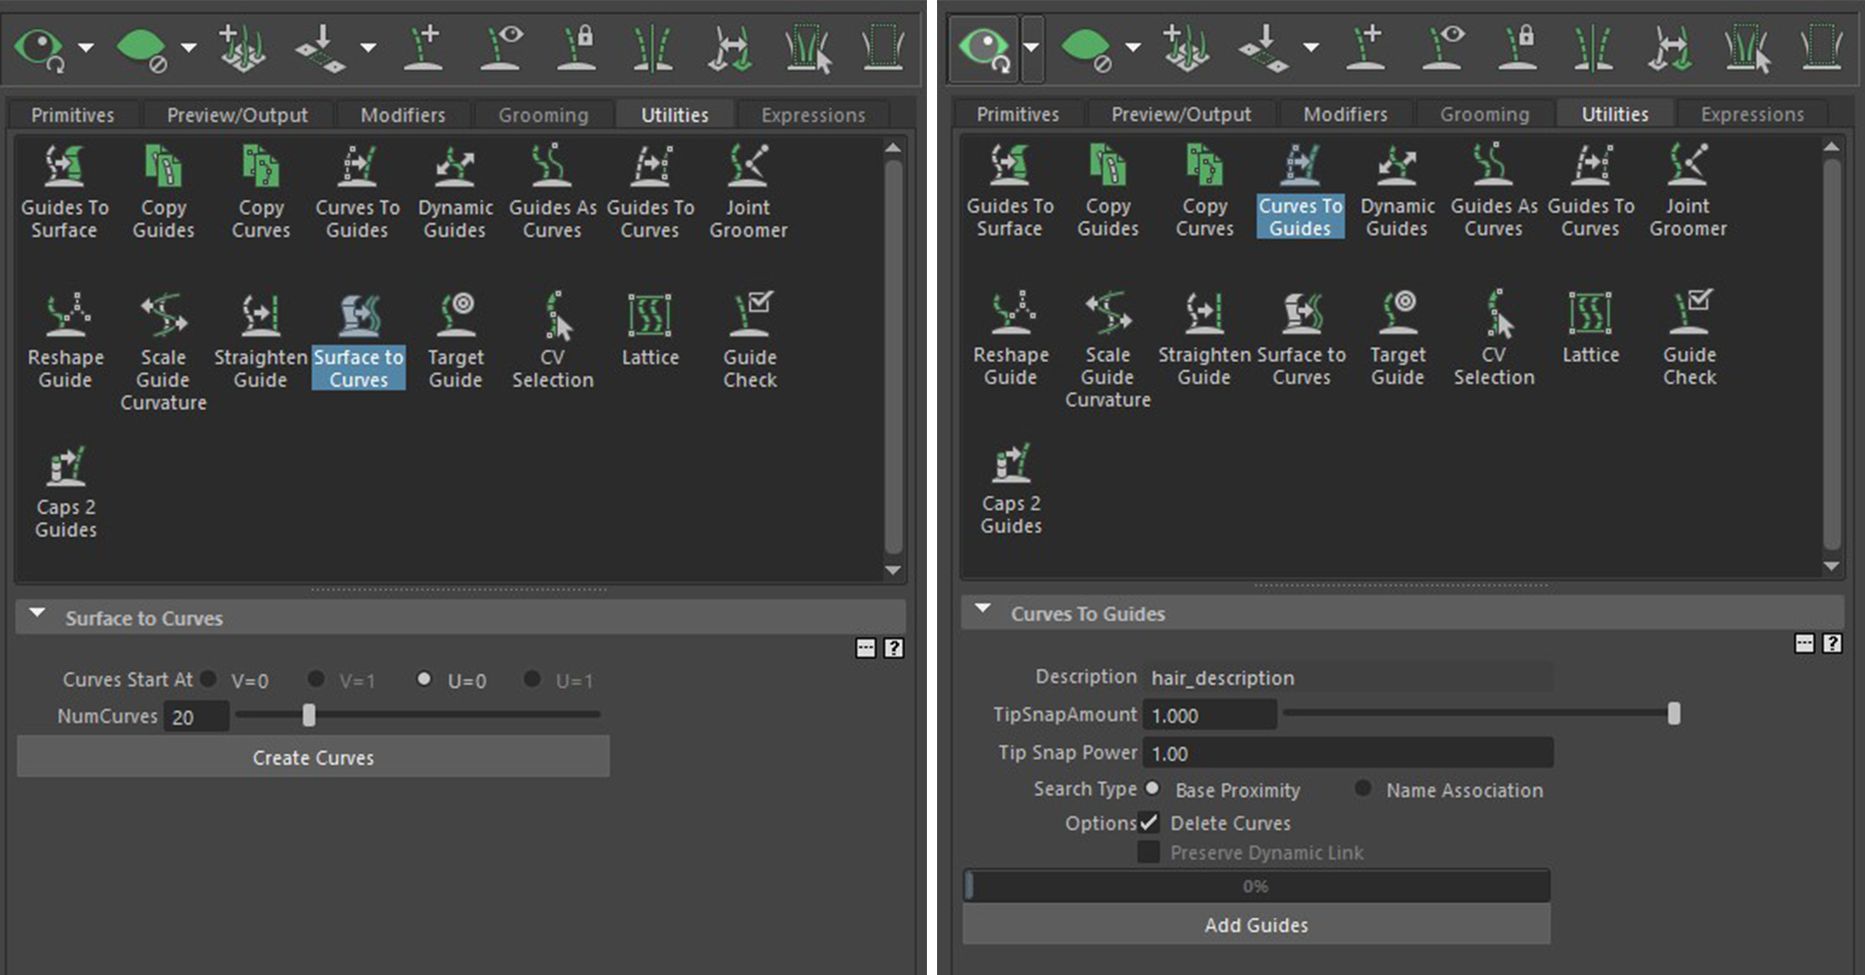
To create the braid I followed this tutorial by Olabode Ajayi. Furthermore, achieving as much variety as possible by adding masks inserted with expressions and adding multiple layers of modifiers. This would later help me with the transformation of the braid into guides. Next, I converted the mesh into NURBS and created a new description for the braid. In the Xgen utilities, I converted the "surface to curves" and then the "curves to guide". Finally, I continued generating the hair using the basic Xgen settings.
Lighting and rendering are the final stages of the process and the most crucial since they determine how your work will be seen. It is essential to dedicate significant attention and energy to this process. I spent a lot of time at this stage because I wanted to create a highly realistic aesthetic, and the lights play a fundamental role in this.
I decided to place a neutral backdrop to let the attention focus on my character. I used a SkyDome into which I inserted the HDRI Studio Tomoco, setting it to light intensity. I then positioned three lights, respectively a Key Light, a Rim Light, and a Fill Light opposite to the Rim Light. After that, I continued adding three more lights so I could fill the dark spots and make the reflections of the wings more visible. To further enhance the render, I created a Light Mesh positioned above the character's hand, adding an appealing atmosphere. Additionally, I inserted an aiAtmosphereVolume via the “render setting” panel under the “environment” item, activating the light volume parameter exclusively for the Light Mesh. This allowed me to create volumetrics for just one light without affecting the others.
What I learned from making this character is that, despite the difficulties you may encounter, you should never give up.
It's fine to feel insecure during the creation process. Surround yourself with people who encourage you and help you push your limits. I think it's important to create a project that is outside your comfort zone. This will help you learn many more things.
When it comes to creating a character that, despite not existing, is very realistic, it is important to incorporate as much variation in details as possible, from start to finish. It is crucial to ask yourself, "What are the elements that can make my character as truthful as possible?" and try to respect those responses. Take your time and keep trying until you are satisfied. In my opinion the secret is to broaden your knowledge and believe in your abilities.
I hope this article was helpful, thank you so much for reading it.
Reach out to Katia via her Rookies profile here and check out the rest of her student work.