CG Generalist Apolline Koehrer and graduate from ESMA, shares her expertise in texturing and grooming realistic CG animals, with a special focus on the humble cow, showcasing her talent showcased on The Rookies platform.
Apolline Koehrer is currently a CG Generalist and graduate of ESMA. We admire the characters she has shared on her Rookies profile and invited her to elaborate on her techniques for texturing and grooming realistic CG animals, particularly focusing on the humble cow!
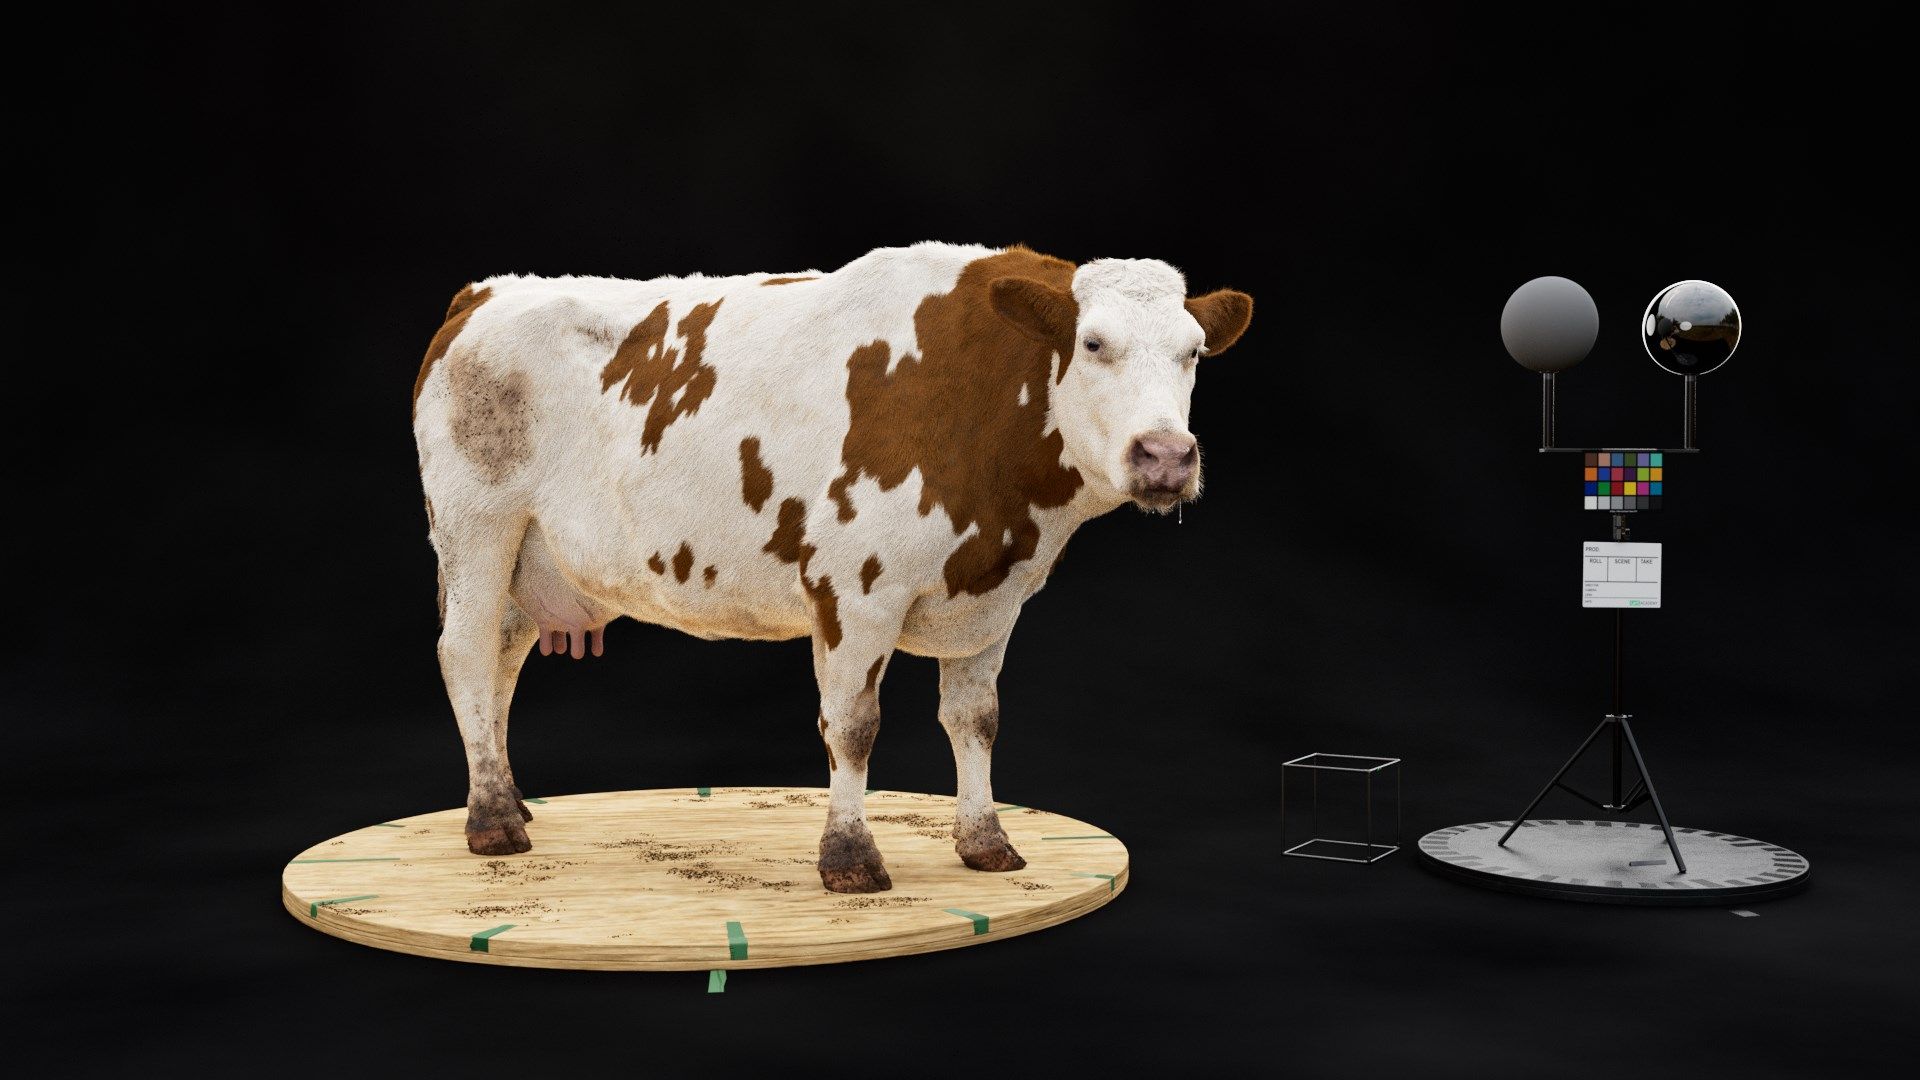
Today I want to share with you my workflow to make a realistic CG cow, through a personal project. I’ll talk to you about every step I followed to create this animal that everyone should be familiar with.
But the real question is : do you really know cows ?
Well, observing these brave creatures from all angles, I've noticed a lot of things and I’ll explain it all here. I’ll show you how I did it and what I learned from it.
The idea was born when someone I know named Felix, posted a project in which he had sculpted cows.
I asked him if I could borrow a cow from his work, and he kindly agreed. I believe everyone can recognize a cow; it's one of the first animals a child learns. Representing a cow in 3D must have been quite challenging, as even the slightest mistake would be noticeable.
So I gave it a try !
Pre-production
The first thing I always do is look for references. It's essential.
You always "think" you know, but you never really know, you only have a few vague impressions and prejudices. Good refs always bring the truth up to date very quickly!
This cow's breed was a Holstein. So, for the sake of precision, I went for this type of cow, and that already gave me a good direction for the groom and texture.
So, I searched for references - global references of the entire animal, including side views, front views, top views, rear views, and bottom views. Additionally, I looked for close-ups of the head, hooves, eyes, ears, tail, and more, along with references for posing.
Groom references on PureRef
I like things well organised, so I arranged my refs according to their purpose: sculpting, grooming, texturing. And all this thanks to the amazing tool PureRef.
Shader references on PureRef
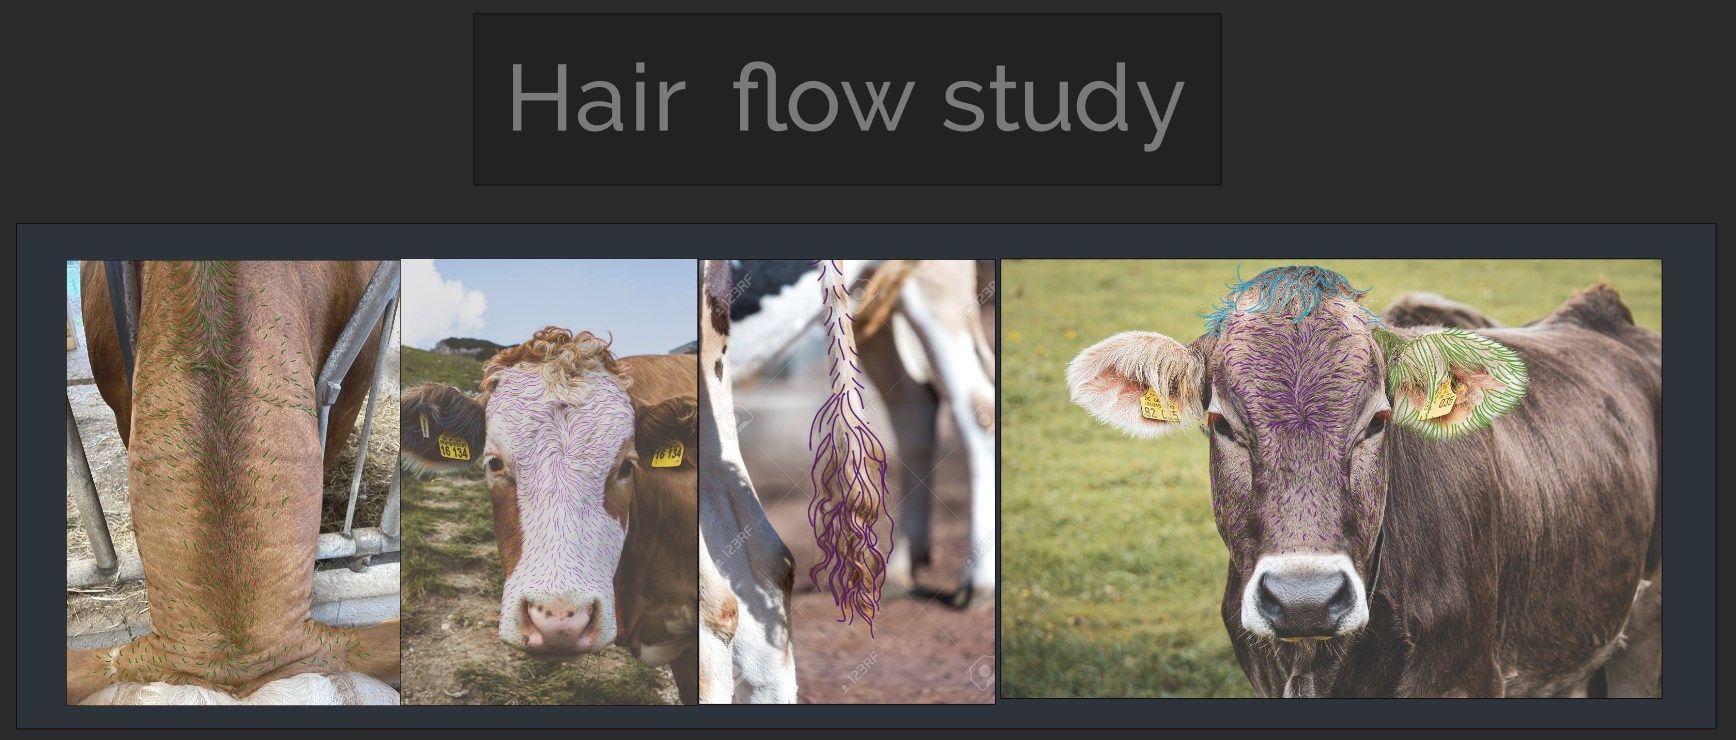
On some grooming references, I studied the hair flow by drawing directly on the reference images. This preparatory work revealed many crucial details. Each furry animal has its own unique fur flow, with changing directions, swirls, spirals, and hairs that converge and diverge, creating the distinctive fur pattern of each animal.
As I mentioned, I had an existing base model for this project, so I didn't need to search extensively for sculpting references. Typically, when starting from scratch, obtaining photos of the animal without its hair is invaluable. This often involves finding images of shorn, naked, wet, or even sick animals, as they reveal crucial details about anatomy and distinctive features. However, in this case, I only needed to make a few characteristic adjustments and refinements in the sculpt, so references of cows with their hair on sufficed. Additionally, since cows generally have short hair, important details aren't obscured.
Sculpt references on PureRef
About software, I've opted for ZBrushfor sculpting & modeling modifications. Mayafor posing and UV. Houdinifor grooming and set-dressing. Substance 3D Painterfor texturing. Rendermanfor lighting & rendering and Procreatefor some post-production effects. I chose to do this project in ACESto access the widest possible range of colours.
Art Direction
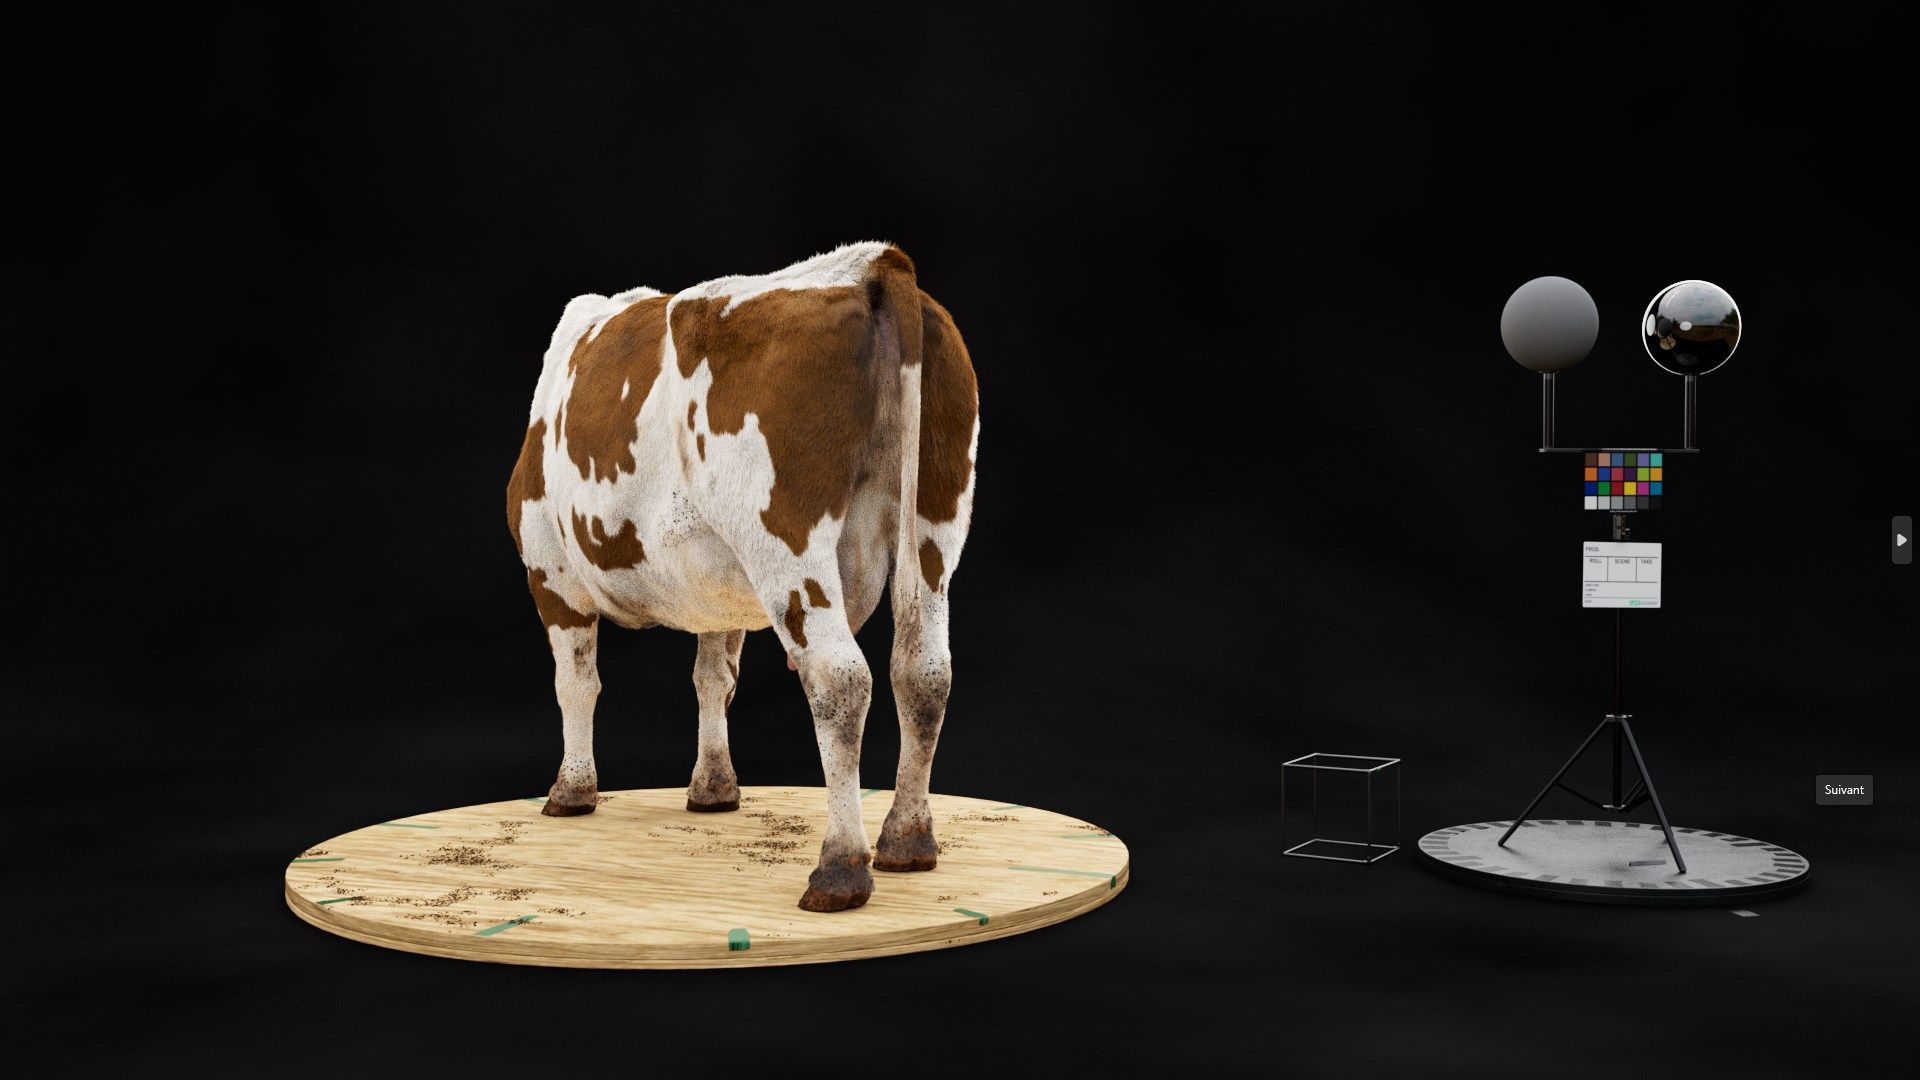
I selected a white cow with brown spots, typical of Holstein cows, which come in either black and white or brown and white variations. Personally, I prefer portraying animals with a touch of natural imperfection rather than pristine perfection often seen in competition animals. Nature's beauty lies in its authenticity, and I aimed to capture that essence. Thus, I chose a cow that appeared to live outdoors, reflecting the effects of various weather conditions. Opting for an autumn setting allowed for a slightly longer winter coat with natural variations and subtle traces of dirt.
References of cows living outside: fur length and appearance, dirtiness, posing
Let’s create a cow !
Sculpting
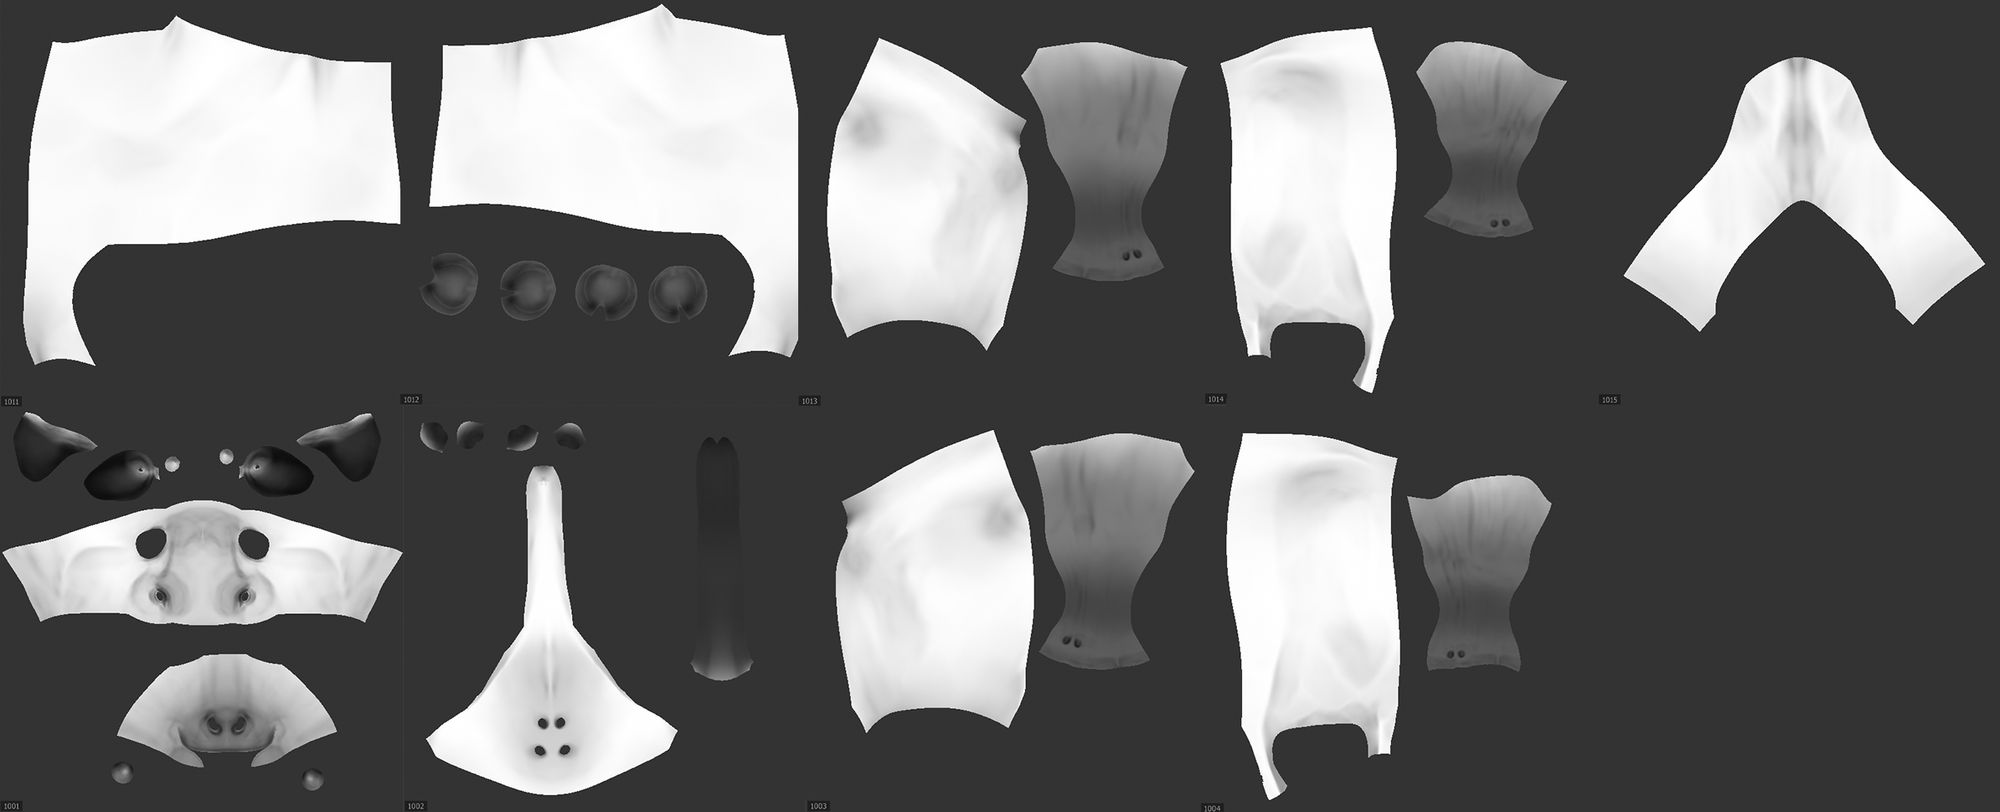
The retopology step had already been done by Felix so all I had to do was unfold UVs and go straight to the next stage.
UV maps (Substance view)
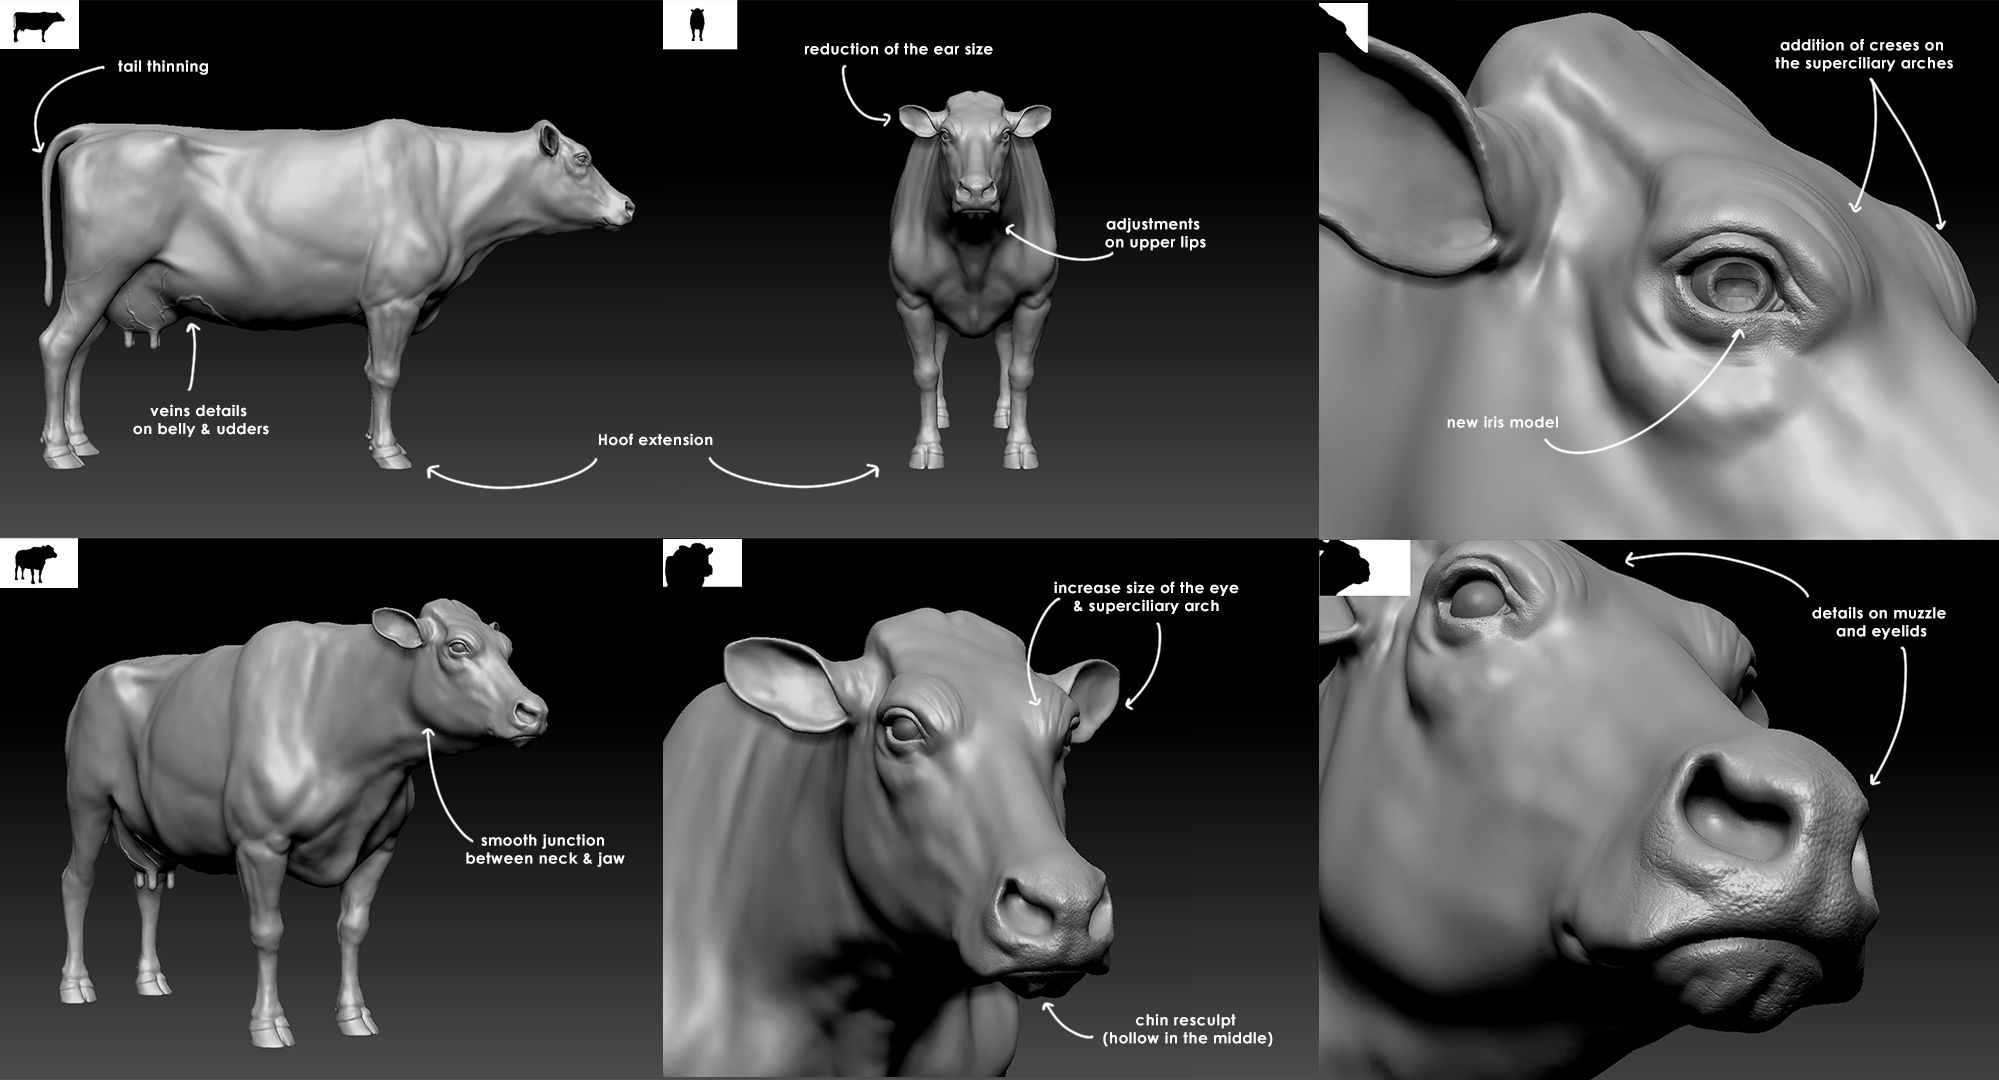
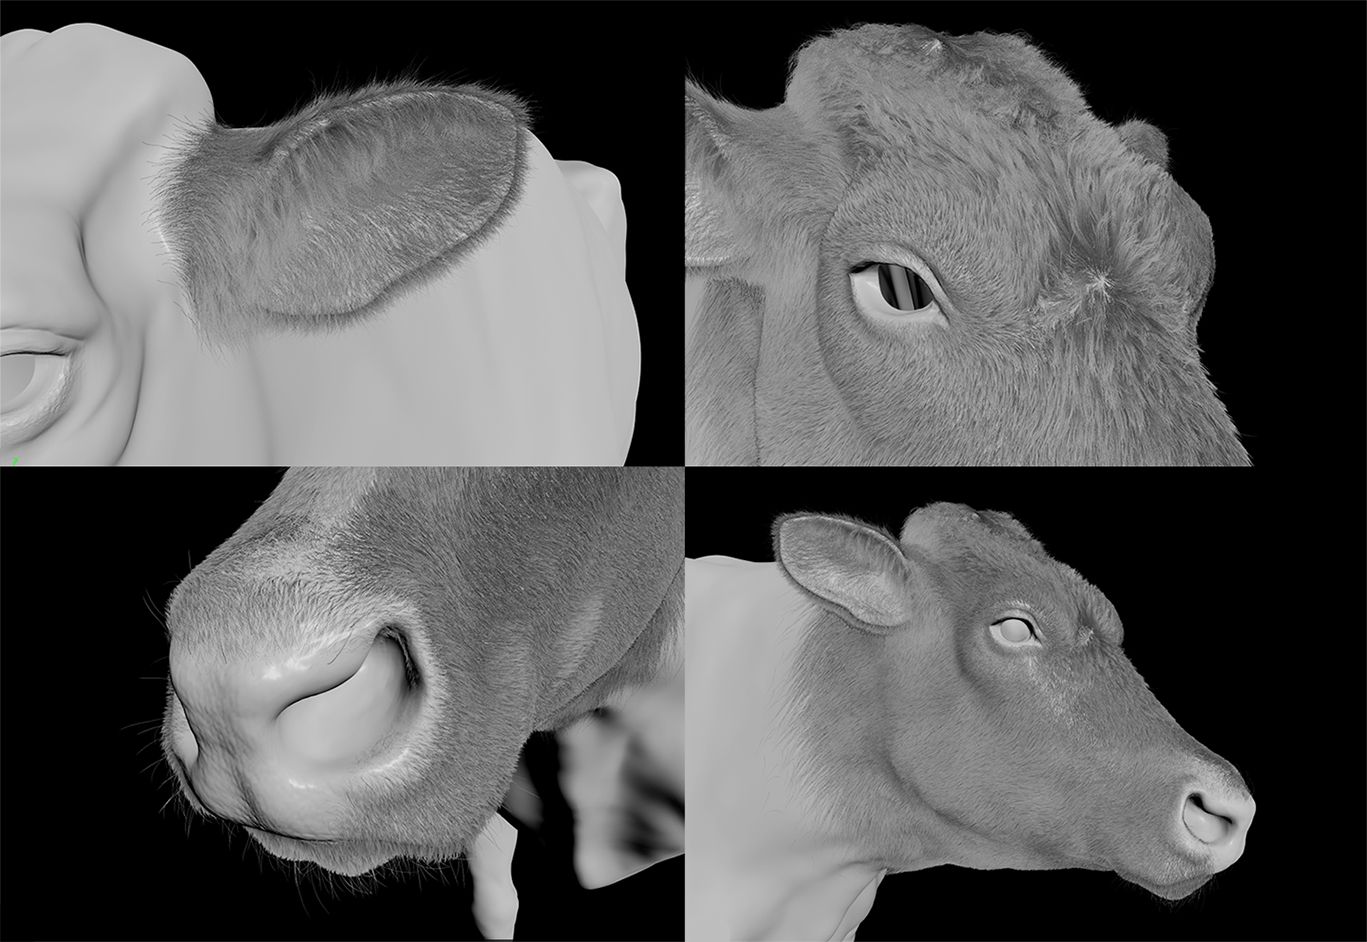
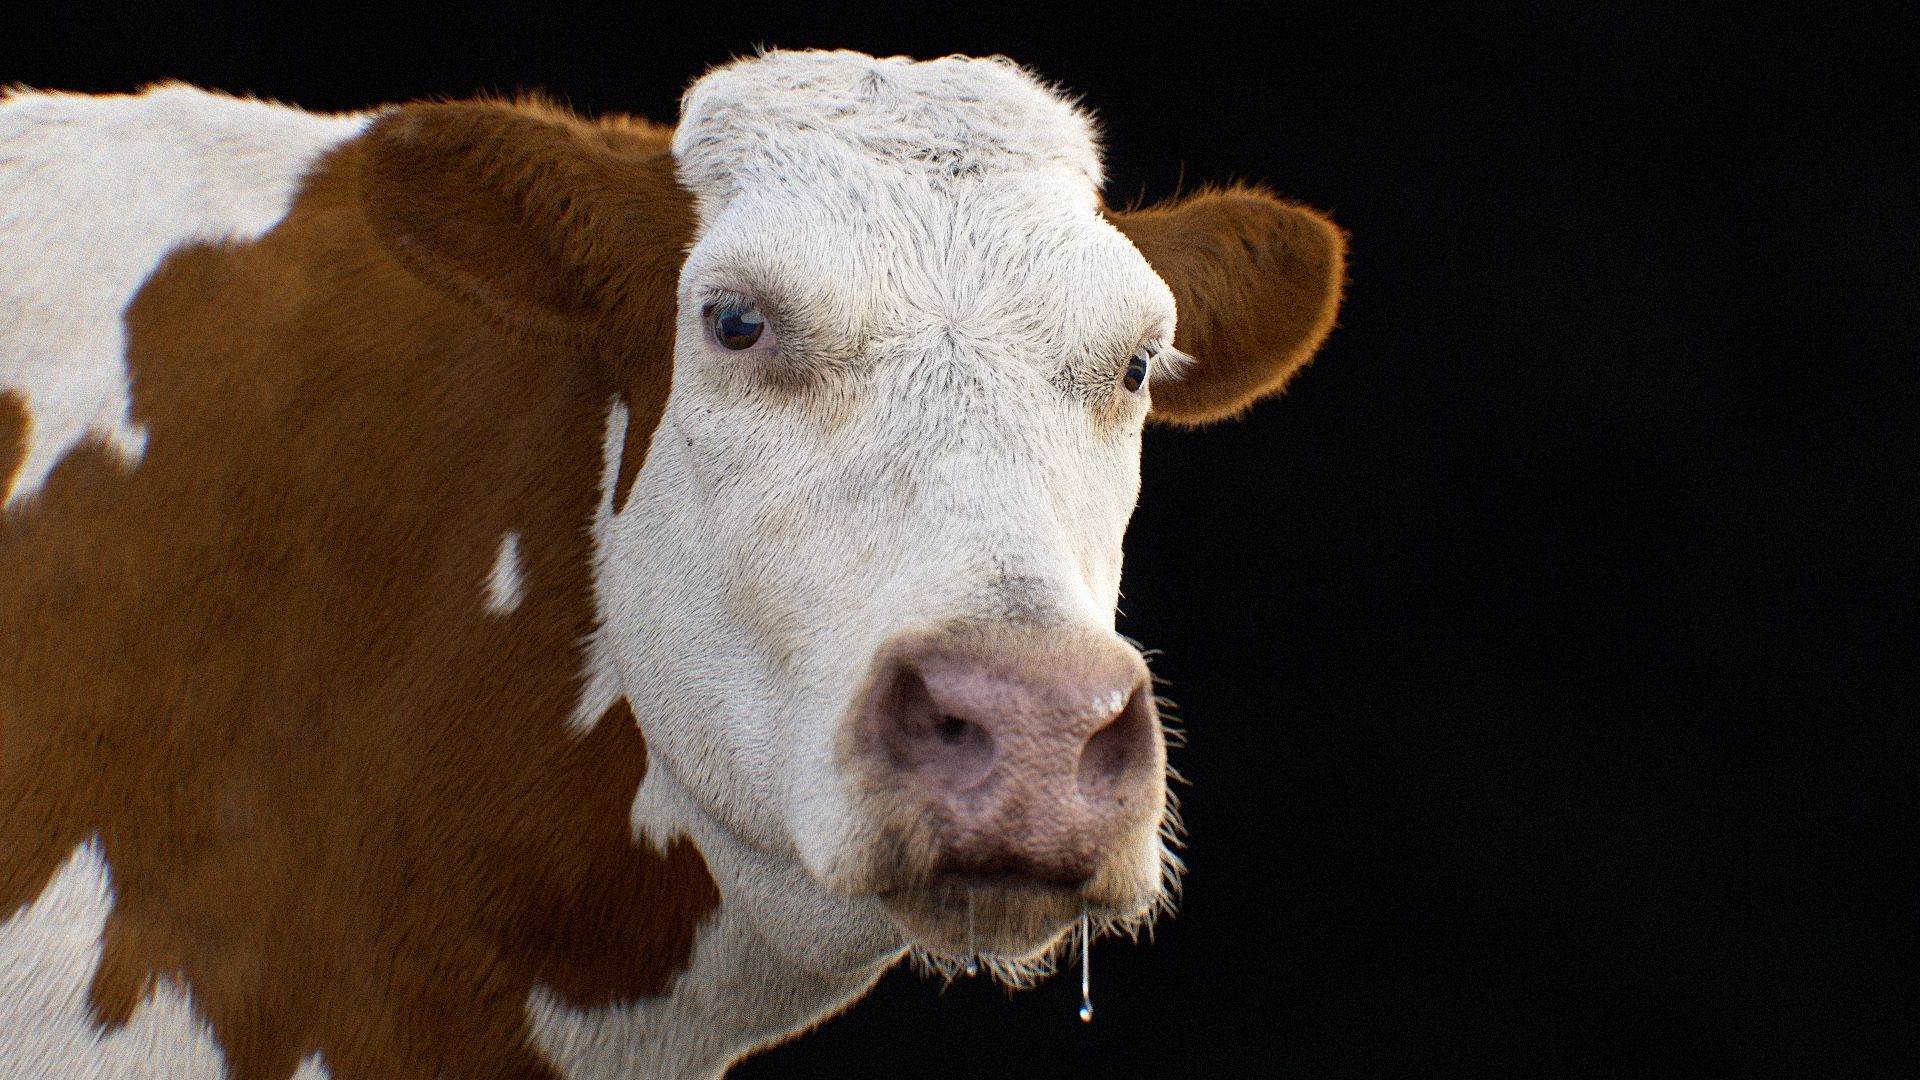
The base model was already quite detailed. I only needed to make some adjustments and add specific details I wanted to highlight through the fur. Referring to my PureRef references, I focused on enhancing details such as the nose, eyelids, udder, veins, eyes, chin, jaw, ears, hooves, and tail.
ZBrush screenshots
Once all the desired details were achieved, I exported a new model to serve as the base for the rest of the process. Additionally, I exported the high-poly model for later use in Substance, along with the displacement maps.
Grooming
Grooming this cow was only the second time I had attempted it in Houdini, presenting considerable challenges and opportunities for learning. This process greatly enhanced my workflow.
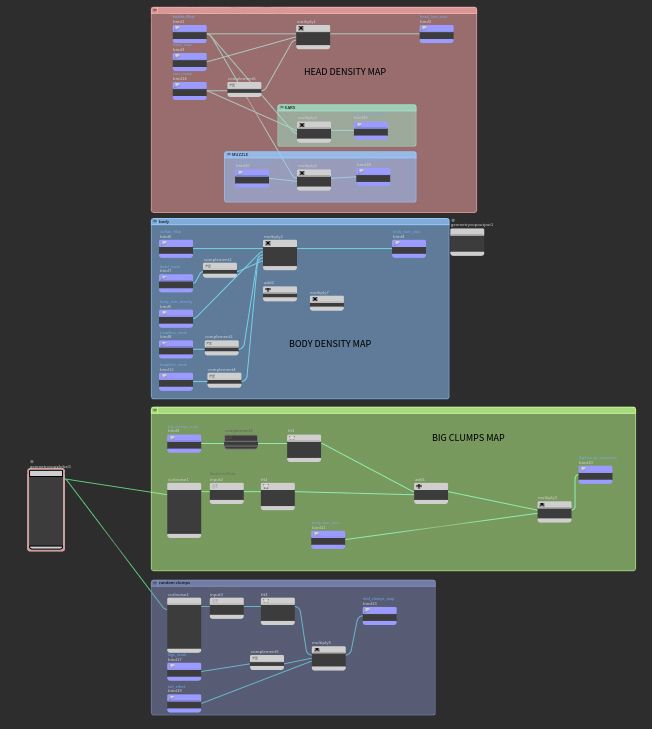
Firstly, painting the maps: This was a significant preparatory task crucial for the subsequent steps. While I could have consolidated all my maps into a single paint attribute node, I preferred to keep everything separate for better clarity.
I painted a lot of maps like the hairless areas, masks according to specific zones, density maps, thickness maps, clumps maps, etc.
Painted maps in Houdini
Then, I mixed them with pointvop, using mainly, "bind", "multiply", "complement", "fitrange" nodes, in order to get the most accurate maps possible.
Point Vop workflow to mix the painted maps
💡
Quick Tip: When you’re finished with all the maps, cache an alembic compiling all the painted maps (but don’t forget to update the alembic cache when you touch up the maps).
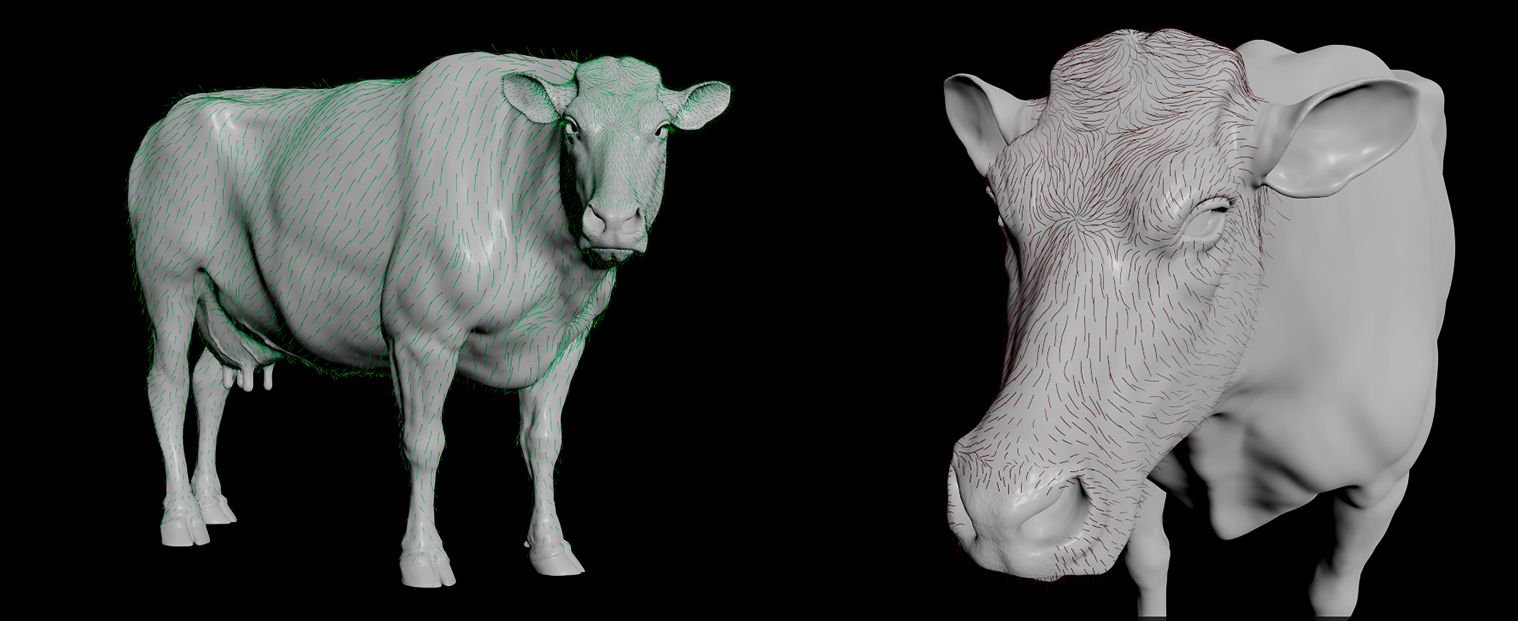
I placed all the guides manually, taking care to respect the flow of the hairs and constantly comparing them with references. All the guides were placed thanks to the amazing Groombearplugin.
Body & head guides
I separated areas to have more control, because areas like the head needed more precision than the body. I also created guides for the eyelashes, which I managed separately.
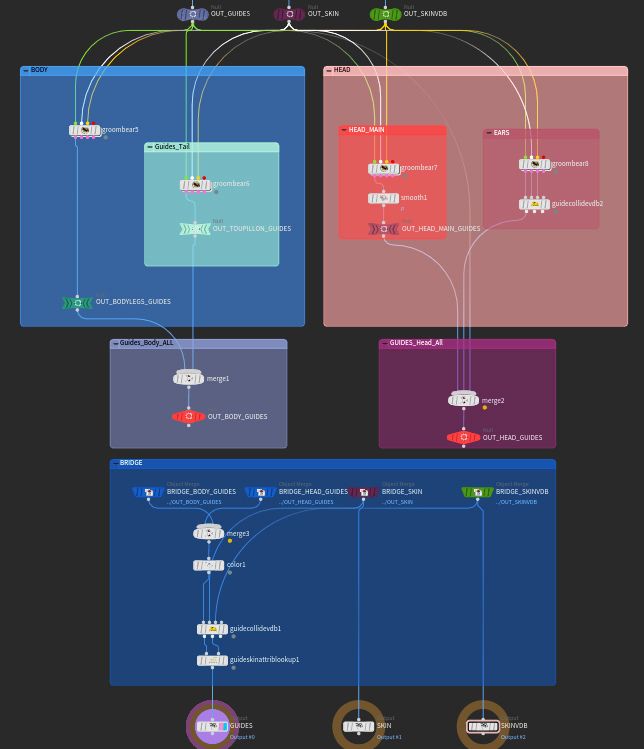
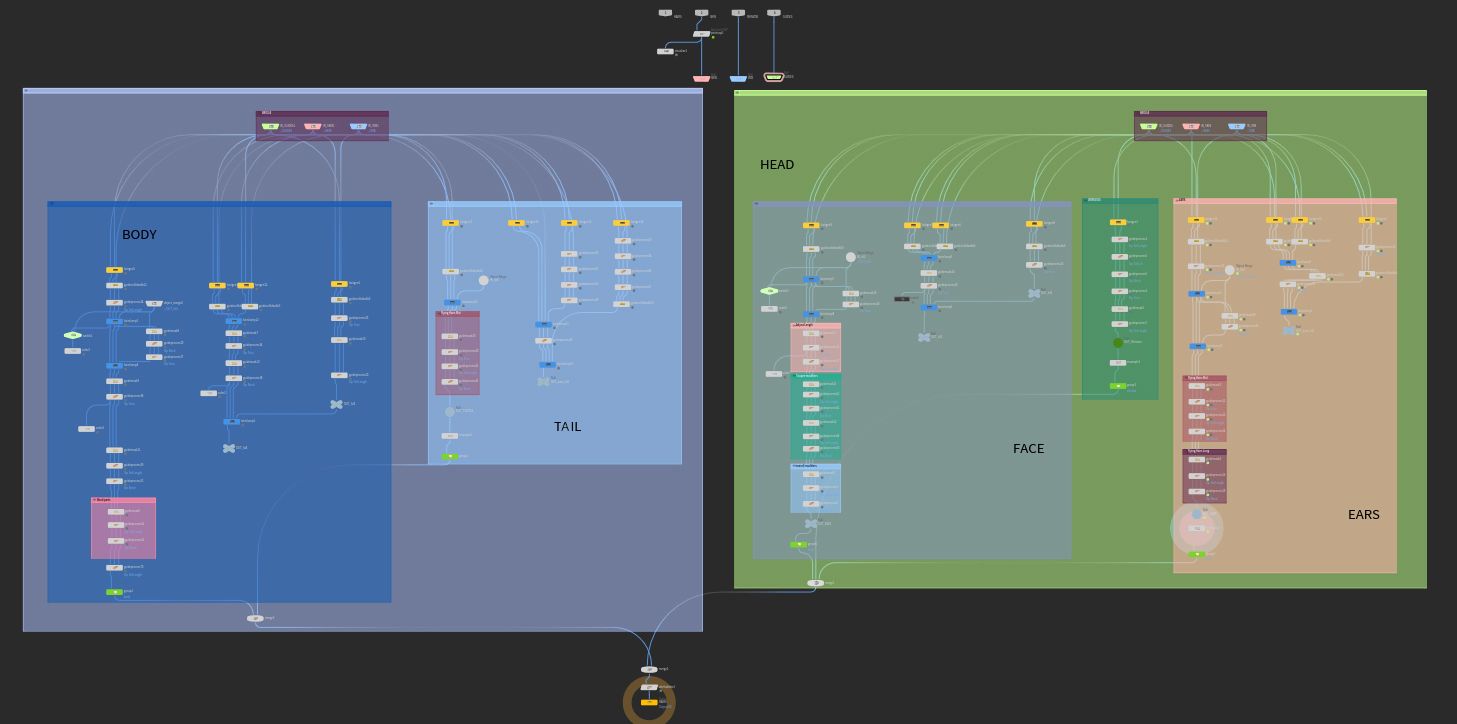
Thanks to the maps I painted earlier, I separated my hairgen by areas such as the head, ears, vibrissae, body and tail in order to have more flexibility and be able to manage them more precisely individually. Here is my workflow:
Hairgen workflow
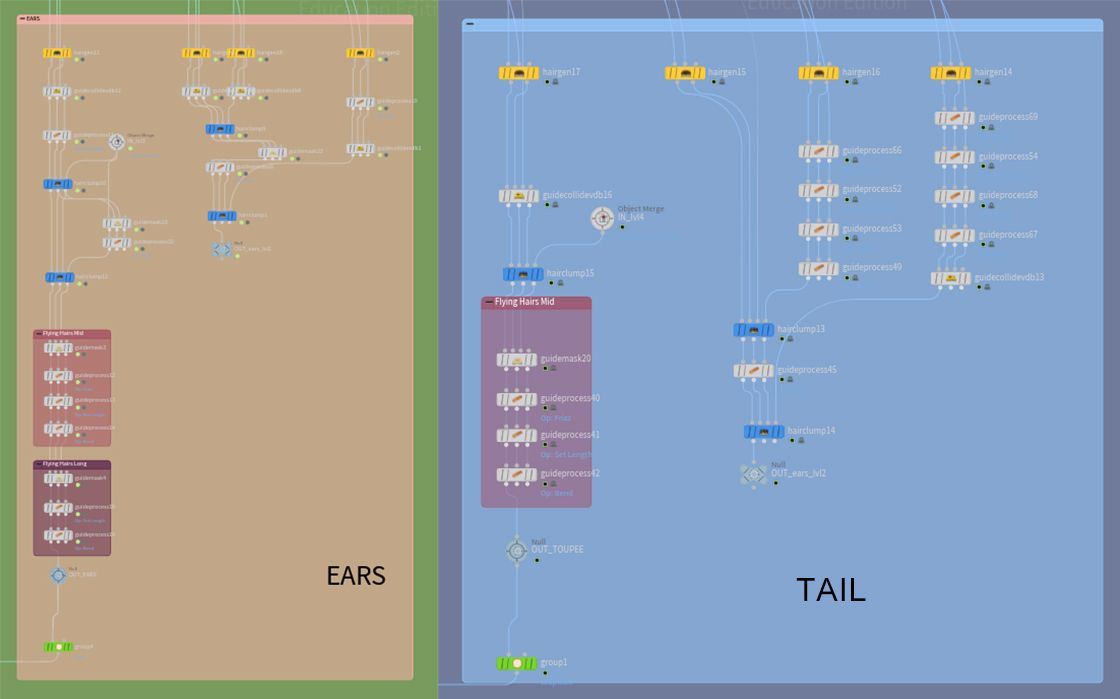
Then, I began working on the fur, gradually building it up. I managed the levels of clumps one by one, treating each zone separately with my maps to add length variations, bend, frizz, and curling according to the areas and hair length. I followed a fairly similar workflow for each part. This is also where I controlled the thickness of the hair, thanks to a maximum value multiplied by a painted map once again.
Example of my hairgen workflow on the ears & the tail tip areas.
💡
Quick tip: To visualise the fur more clearly in the viewport when working on it, assign a hairshader material, setting a darker colour to the roots and a lighter colour to the tips. This is very useful for visualising the look of fur, clumps etc.
Some close-ups of the head fur in the Houdini viewport
I then plugged my displacement maps on the hairgen to catch the details under the fur (like veins), and I exported the fur for lookdev.
Texturing
For the texturing, I utilised Substance 3D Painter.
Skin texture
Initially, I imported the high poly model to bake the details onto the low poly one and extract interesting maps from this baking. Then, I began painting maps for the base color, roughness, and bump/normal. I prefer to manage roughness and speculars directly at lookdev, so I essentially created masks or global settings for this data.
I also organised my work according to zones and variations in materials : I separated the muzzle / hooves / udder from the rest of the body.
Fur texture
I made another Substance project for the fur texture.
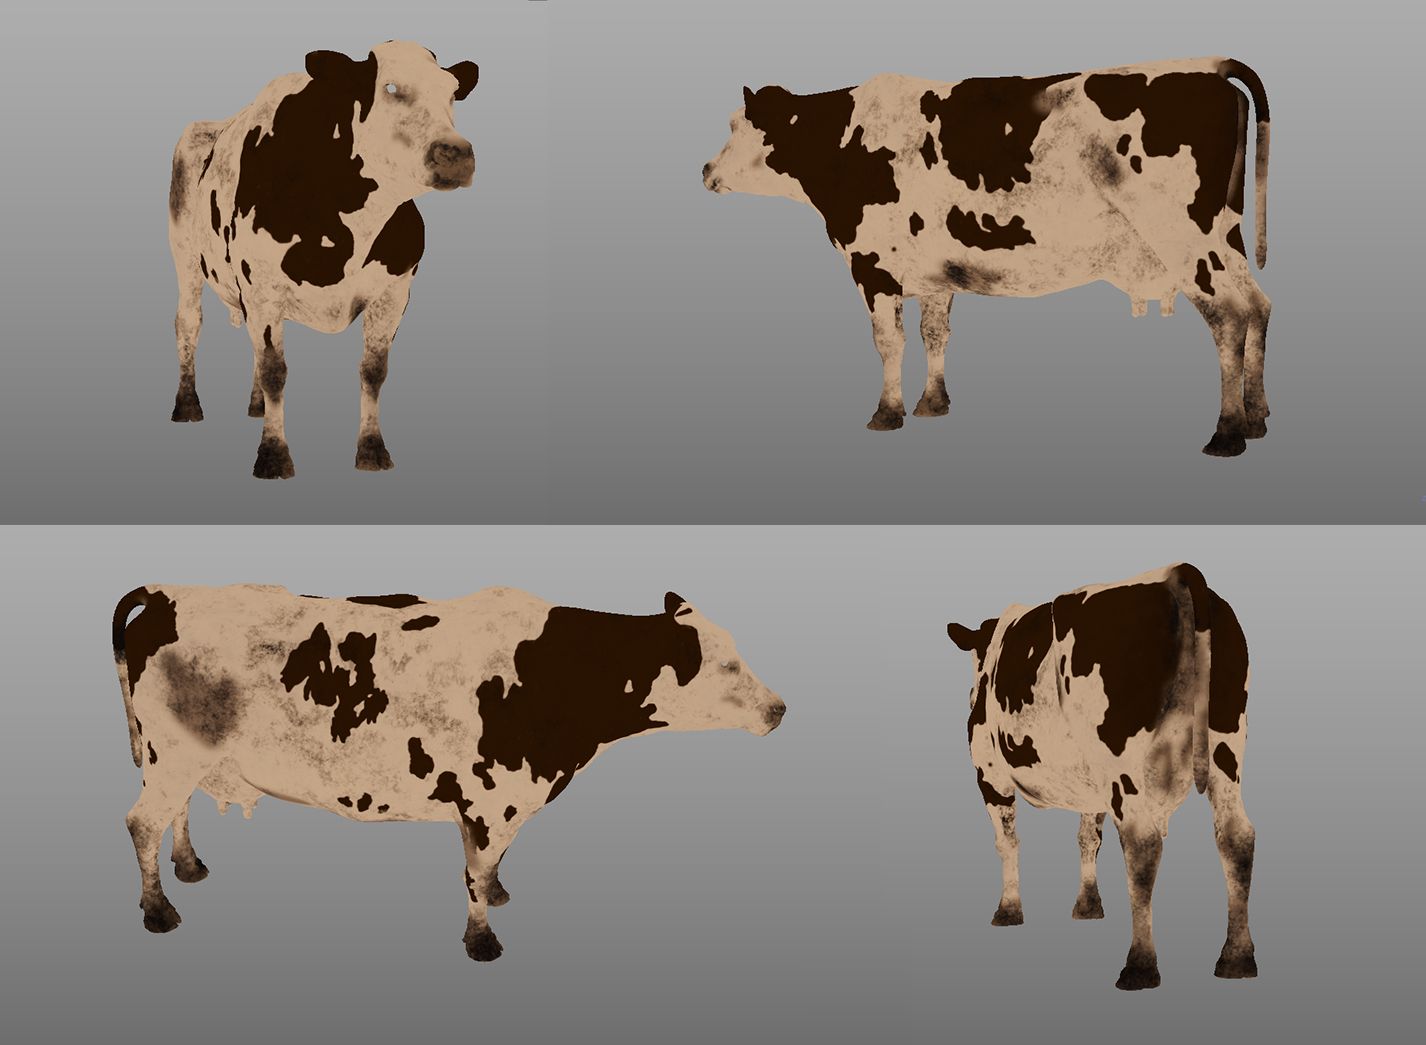
The texture is transferred to the hair via the model's UV. Therefore, I imported a low poly model of the cow and assigned an off-white base. I introduced a lot of color variation using masks and various brushes. To maintain consistency, I utilized the same mask I painted in the skin project for the tasks.
Fur base color painted in Substance
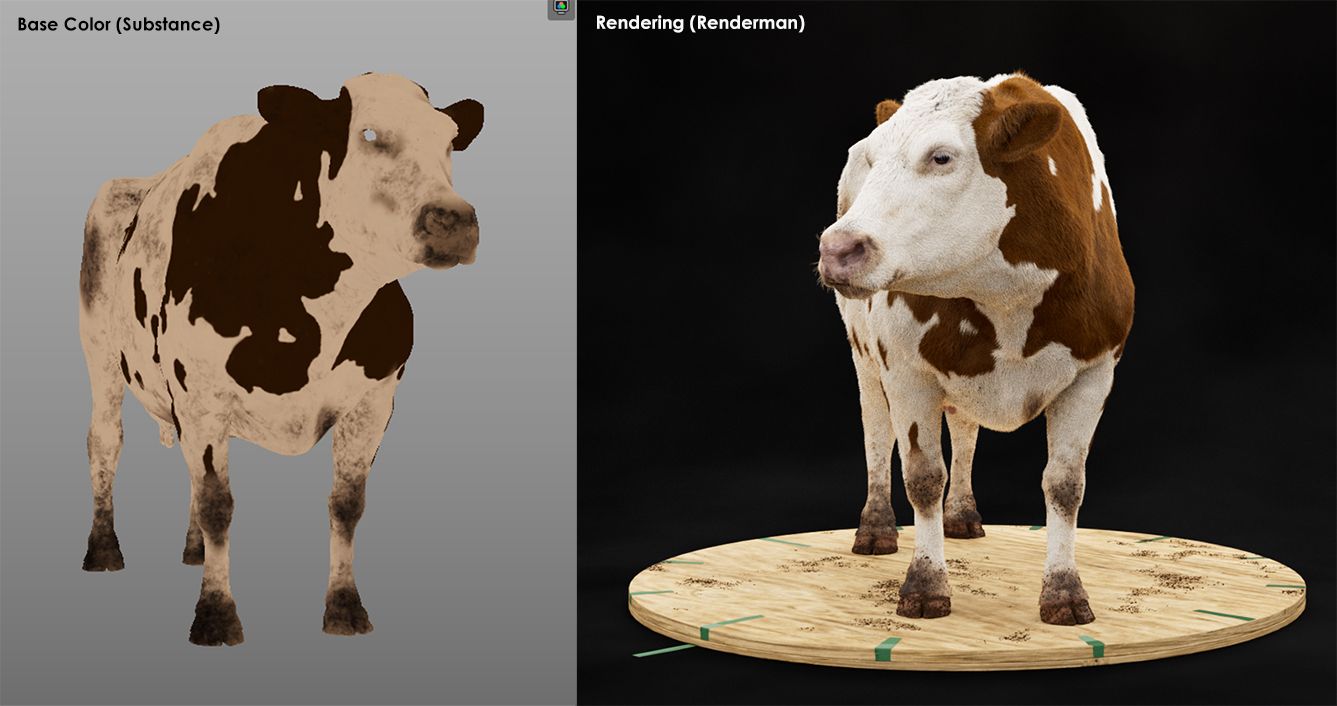
Hair colour is determined by melanin, a physical attribute. Simply applying a colour in Substance isn't sufficient because the rendered result may not match. To address this, I conducted tests in Renderman, adjusting the PxrHairColor and PxrMarschnerHair parameters to find suitable melanin values for brown and white hues. Once determined, I transferred these values to Substance and created variations around them.
Comparison between the base color in Susbtance and a WIP Rendering
Then, I incorporated dirt by applying earth-toned zones of varying density to specific areas such as knees, thighs, and around the hooves. Additionally, I created a separate project to paint the shaders for the irises and wattles.
Posing
Regarding posing, I utilised Maya. While ZBrush could also achieve this, Maya's rigging tools and soft selection feature yield excellent results. Given that cows are heavy animals, typically standing on all four feet, I aimed for a natural pose while ensuring stability and immobility.
I admired the distinctive silhouette created by their heads resting beneath the withers. Thus, I chose a pose reminiscent of the way cows stand when we pass near their meadow.
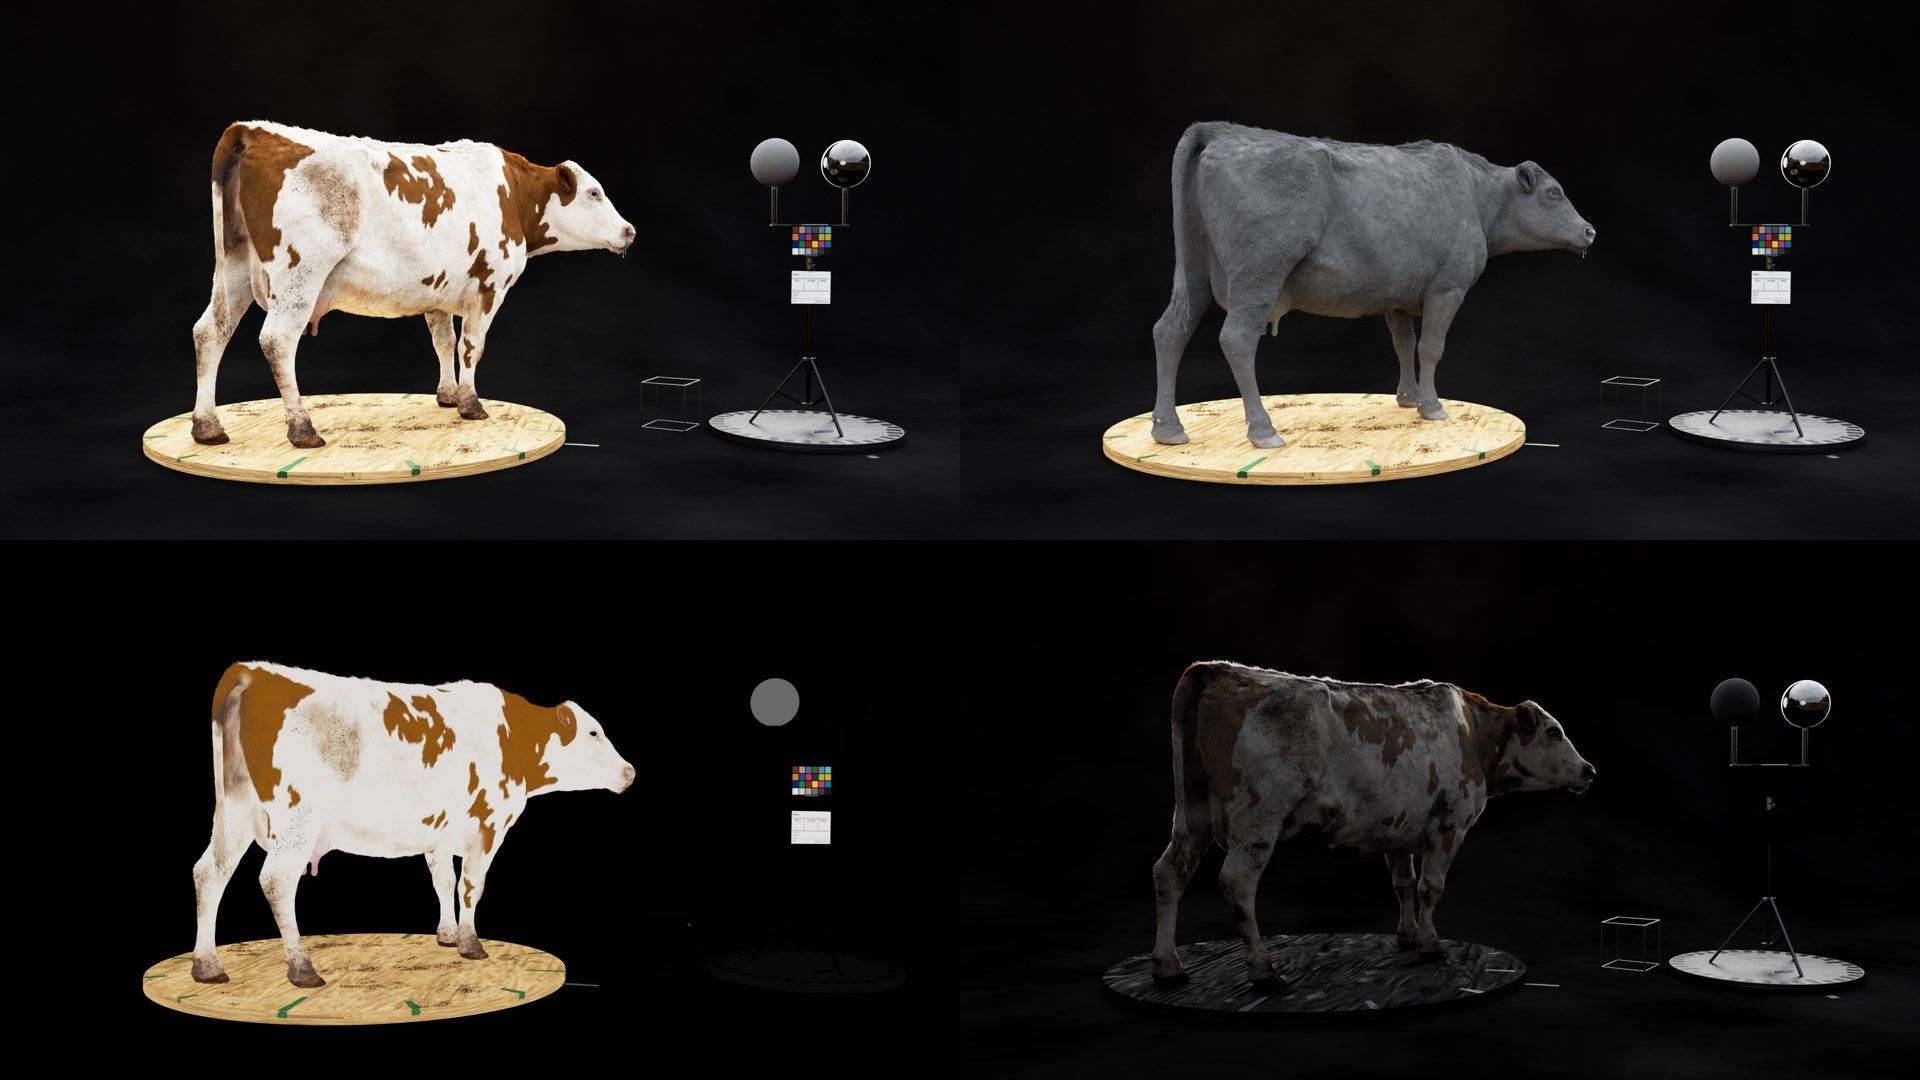
Lookdev
In terms of lookdev, I employed a PxrSurface for the skin, integrating all textures into the appropriate inputs and adjusting them during rendering in my lookdev setup. Notably, I refined each map for the project's specific requirements. Additionally, I utilised a PxrDisplace to incorporate displacement maps from ZBrush.
Btw I acquired some lookdev assets on Cave Academy. Check out their website, there's some interesting stuff there!
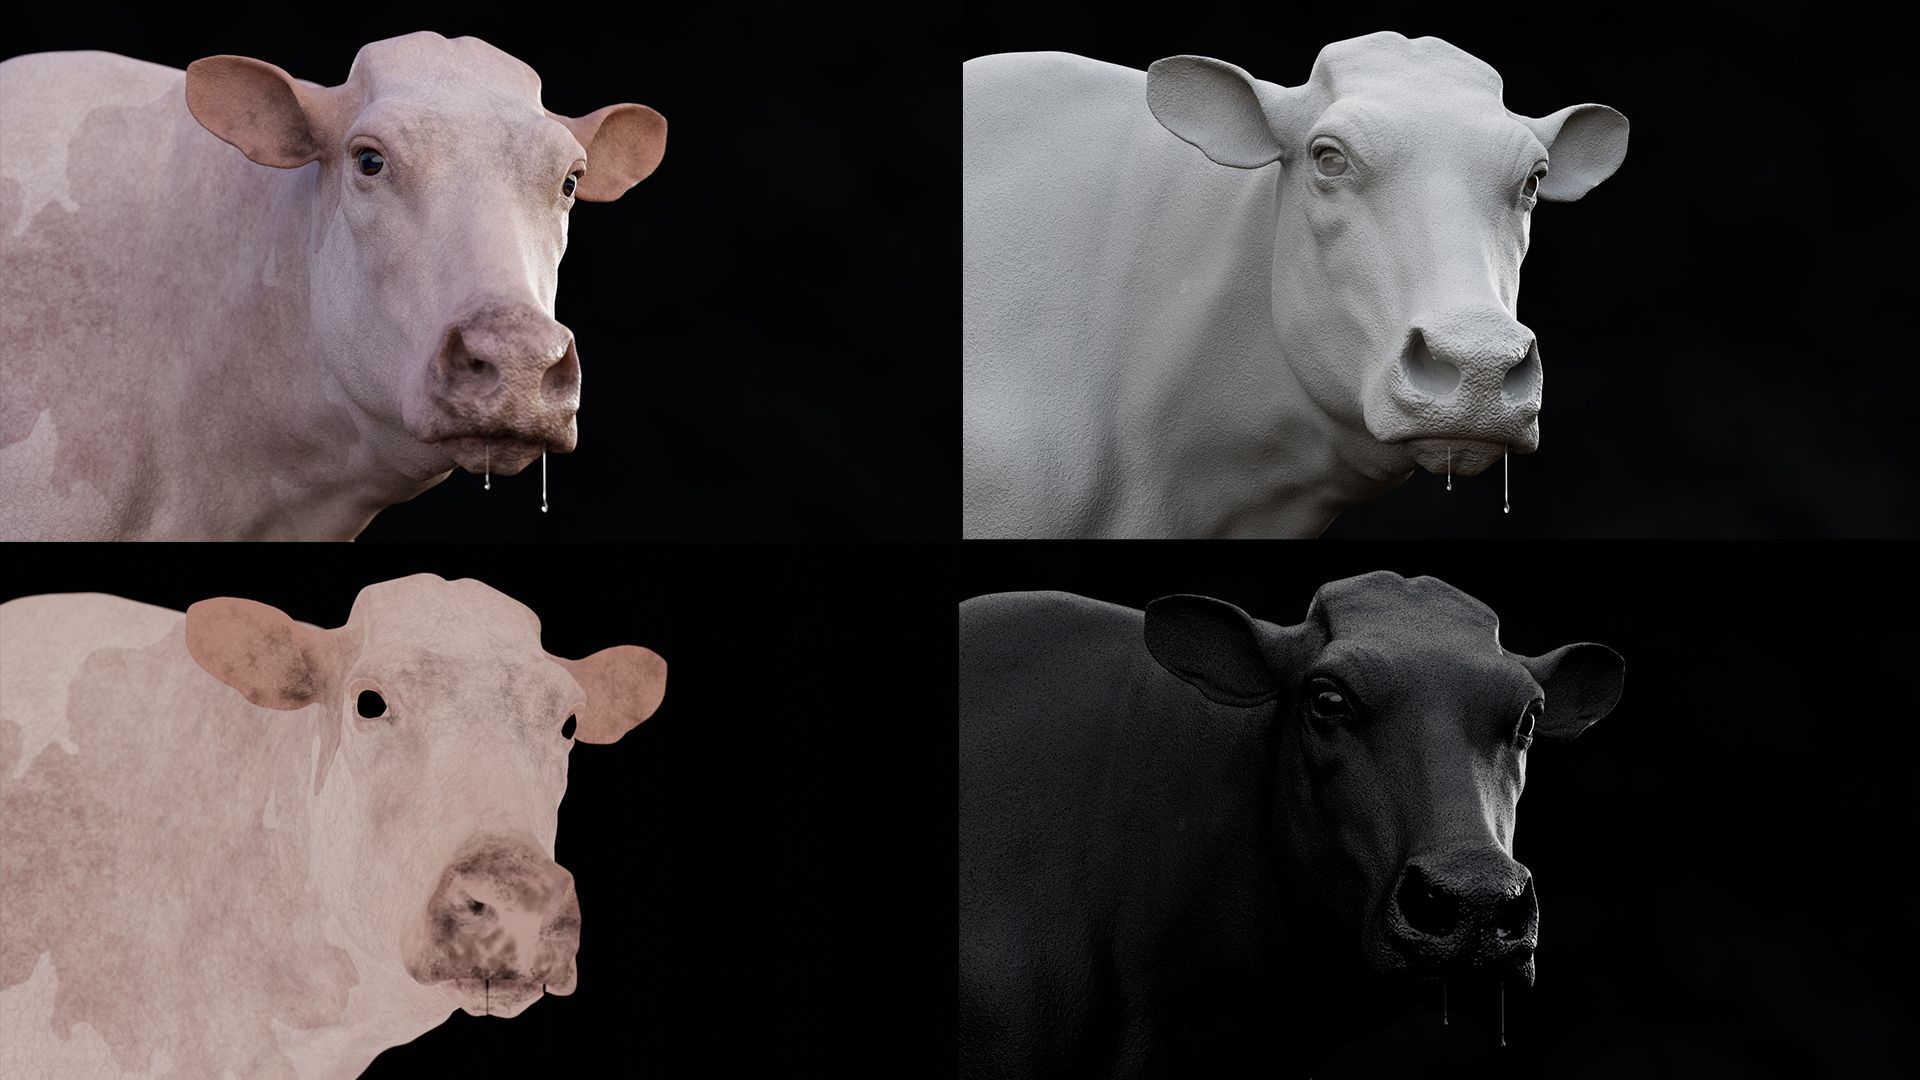
I used my diffuse map to generate subsurface & I tweaked it with the subsurface parameters. I added some clearcoat to come over the specs and give an impression of nasal liquid or drool on the muzzle and bring moisture to the eye area.
I applied bump mapping using the baked maps from Substance, enhancing the sculpt details provided by the displacement. Regarding the fur, as mentioned earlier, I utilized the PxrMarschnerHair node, a familiar tool that consistently yields convincing results. I paired it with a PxrHairColor node set to artistic mode, offering greater flexibility in manipulating hair textures compared to the physical mode. This allowed for easier customisation of fur colour without being constrained by the physical properties of melanin.
I plugged the textures exported from Substance andI played with the parameters and with Primary, Secondary and Tertiary specular of the fur.
Head close-up : fur breakdowns (beauty - fur in greyscale - fur albedo - fur speculars)
Adding details
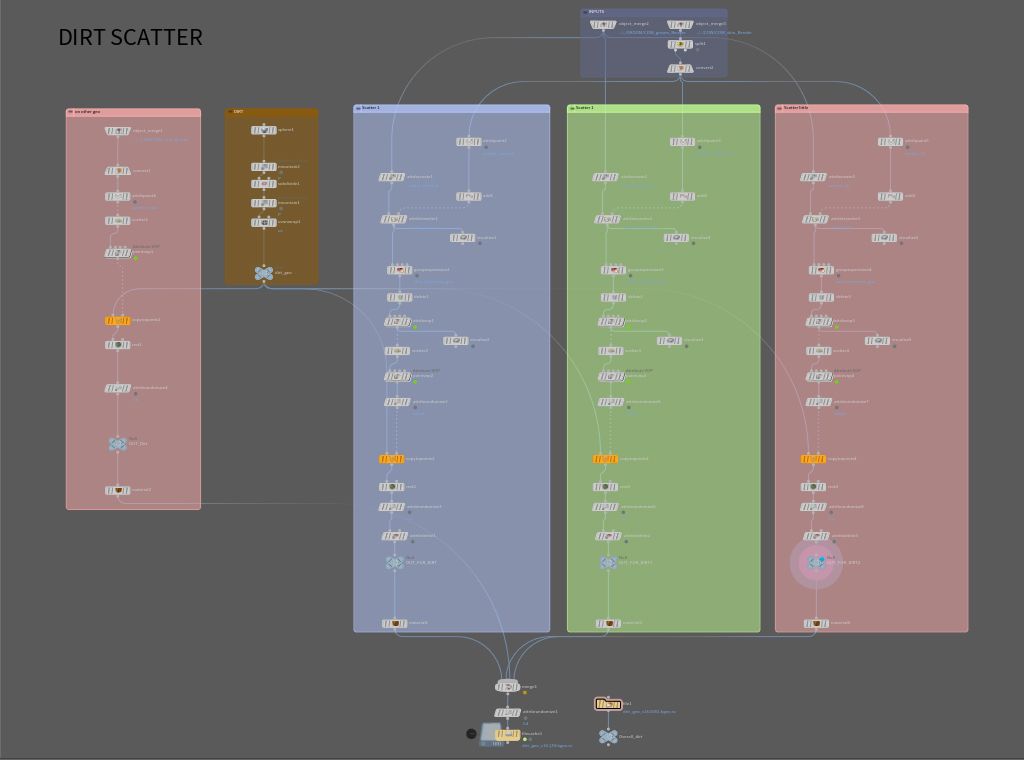
Dirt
I developed a tool in Houdini to scatter geometries directly onto the fur based on painted maps (I have a penchant for map painting!). Utilising this tool, I scattered dirt with randomized size and orientation precisely where desired. I repeated this process three times: once for larger dirt on the body, again for smaller dirt on the head, and once more for some dirt on the hooves. The process differed for the hooves as there was no fur on them, allowing me to paint directly onto the model without the need for the hair process.
Scatter on fur workflow
I merged all the scatters and then cached everything to make it lighter. Caching is an essential step. It lightens the load considerably and saves a lot of time. Then, I created a material especially for the dirt.
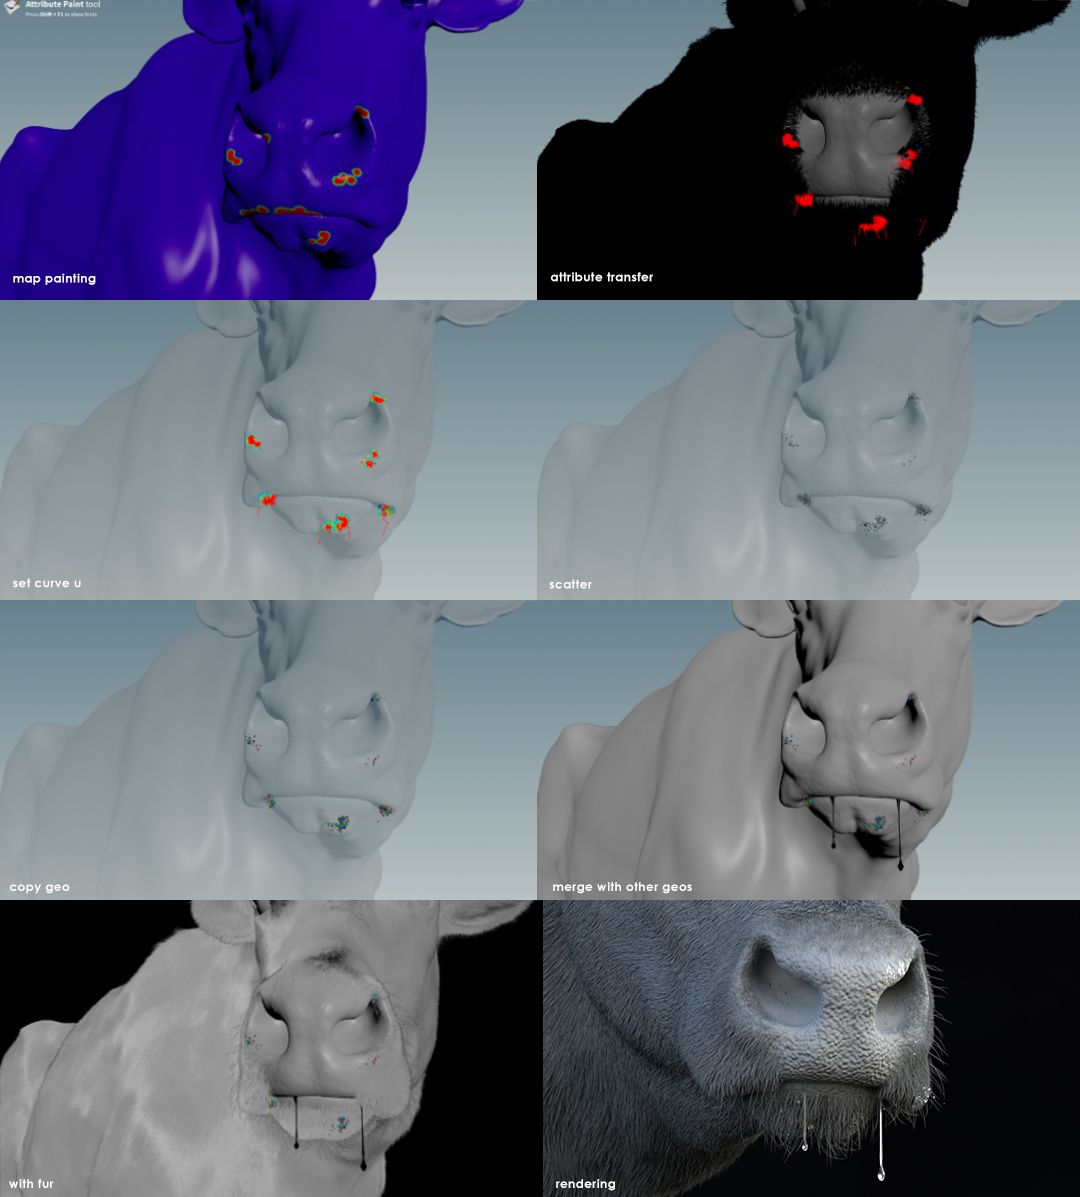
Drool
I noticed in several references that cows often drool, so I decided to incorporate this detail for added realism. Initially, I modeled two strands of drool. Using my scatter tool, I dispersed droplets of drool on the fur around the mouth. Subsequently, I developed a specialised glass material.
Rendering
For the look development, I arranged a basic three-point lighting system along with a dome light for environmental illumination and reflections. I adjusted these elements according to the desired aesthetic, whether for the look development setup or the outdoor natural setting. After settling on preferred camera angles, I rendered the scene using Renderman.
I added a few physical effects such as glow, chromatic abberation and vignetting.
Indoor / studio lightingOutdoor / natural lighting
Conclusion
Of course, this entire workflow wasn't linear, as I've described. There was a lot of back and forth, sculpt modifications, groom recaches, adjustments, texture tweaks, and so on. It's through this constant iteration that we gradually enhance each stage and move towards something more accurate. I hope you enjoy my cow and this workflow! Thanks again to Felix for providing me with the base model.
Whether we're talking about innovation, artistic creation or craftsmanship, it's all about combining imagination and hard work to create a work of art.
Check out more of Apolline's student work via her Rookies profile here.