3D Character Design Process: From Sculpting and Digital Cloth to Final Render
Valeria Niculita from Side Academy, shares her latest project: A 3D character created from an initial sculpt to final render.
Valeria Niculita from Side Academy, shares her latest project: A 3D character created from an initial sculpt to final render.

Valeria Niculita, a student at Side Academy, dreams of working for major industries such as Activision, DreamWorks, or ideally Weta Digital. Armed with the extensive knowledge from her studies, she is well on her way. In this article she shares her latest project: creative a character from first sculpt to costume creation, to a final comp and render.
Hello everyone, my name is Valeria Niculita and I'm 23 years old. My dream since childhood was to become an artist. In fact, I had multiple passions, such as music, photography, drawing, and sculpture.
In 2020 I discovered Side Academy and was immediately fascinated. Originally, I had no idea what CGI was, but the attraction I felt towards this world was so strong that I decided to enrol. Side Academy was the only school in Italy that offered a Master's degree for 3 years, and I thought it was the best choice for me. In fact, it was.
At Side Academy I learned a bit about all the tasks that exist within a short or a video game: concept, modeling, texturing, rigging, animation and compositing. This helped me to understand what a pipeline was and its functions. During the three years I had the opportunity to have Riccardo Meneghello, who worked at Wētā FX, as my mentor, who helped me a lot to have a clean and neat modeling workflow.
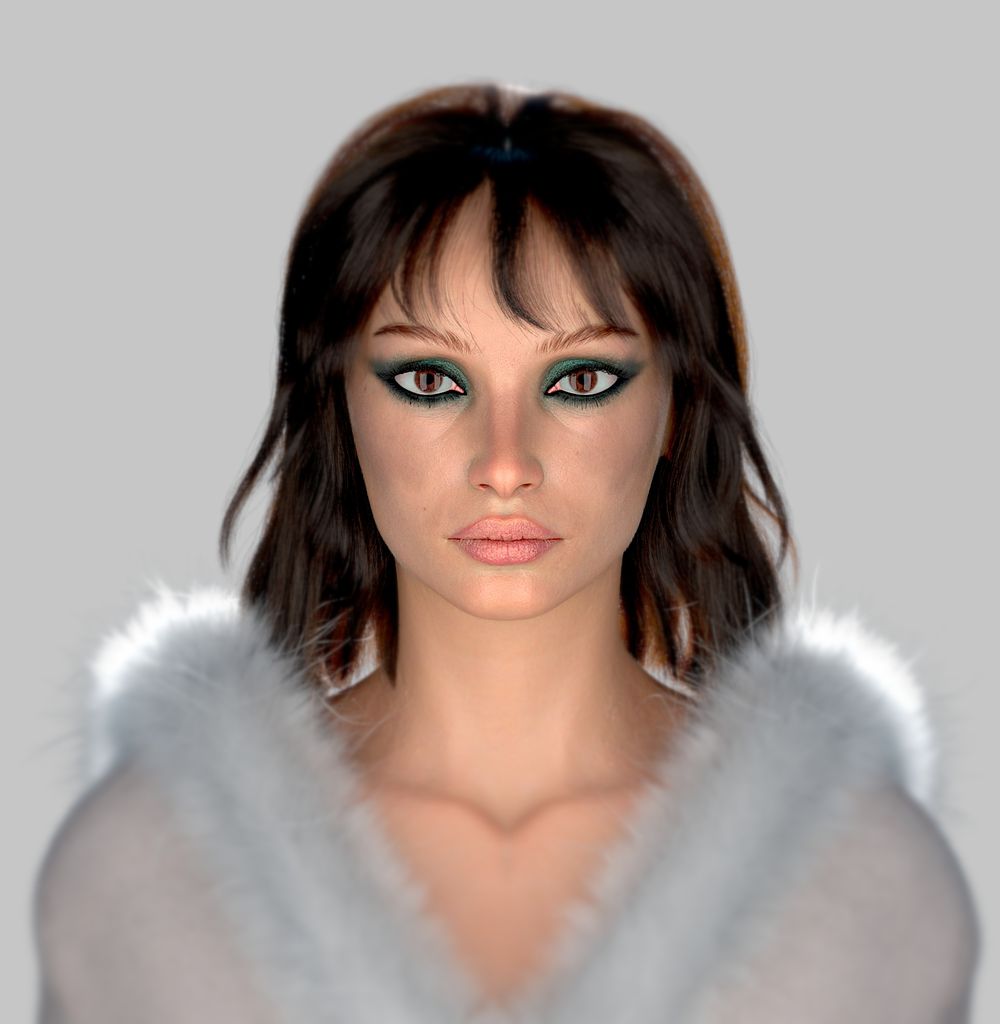
Perla was a project that was improvised during my Christmas Holidays - I am always working and have limited time to devote myself to personal projects from start to finish, so during this time I took the opportunity to work on it. I had already shaped the mesh and displacement in the past, so they were ready to be used. It took me two weeks to complete the texturing and dress creation in Marvelous, Xgen, and LookDev.


The first step was searching for a reference for the face. I aimed for a unique appearance, blending features from various female faces. My goal was to convey innocence and a sense of vulnerability. Drawing upon my training at Side Academy, I approached facial anatomy with a focus on shape and my anatomical knowledge. Subsequently, I utilised the displacement map from 3dScanstore and the diffuse map from TextureXYZ.


I promptly tested the displacement in Maya using Arnold Render. Following the Texturing XYZ tutorial, I divided the displacement into ID Maps. This technique is valuable as it allows for individual zone management. Additionally, I enhanced the lips and eye area.

For the dress I used Marvelous Designer, a program that means a lot to me and I find it really fun to use. I wanted to design a winter dress that gave me a sense of a wintery environment. The time I had was limited so I wanted to create a simple shape for the dress.
Marvelous is a very simple and above all, very intuitive program. In fact, by following the below steps, anyone could recreate this simple dress.
To import the character you want to dress up, just go to New -> Import-> obj. Enter your character. After that, the interface looks like this here; on the left having the viewport 3d and on the right you have the visualisation of the paper models in 2d. The use of paper models is very important, for this I recommend to beginners to look for good references. Marvelous has by default a selection of ready made garments, such as t-shirt, trench coat or pants, so, if you want to go faster you can take them as a starting point.


To create a pattern you can use the Polygon tool. There are more options to start with: the polygon, rectangle or circle, depending on what you create. I used the Polygon tool to give more or less the shape I wanted to give to my dress.
The advice I can give is to always work in symmetry (copy -> mirror paste) with the patterns and to be as precise as possible. Of course we do not need the precision of a tailor, but accuracy helps you a lot to have a good shape of the clothes.

Once the patterns are finished you have to sew the parts together and for this you use the Segment Sewing tool. To have a good visualisation I apply the patterns around my character and finally I activate the simulation.


To get more detail in the simulation you can lower the Particle Distance.


With active simulation I can also move the fabric and test the movement and the folds I’m looking for.

To achieve greater realism in the folds, you can apply different fabric types depending on your desired effect. The program then calculates the folds differently based on the assigned fabric.

And voilà, your dress is complete! Now comes the meticulous yet crucial step of retopology and mesh cleaning.

I prefer to work directly in Maya, I export the 2D patterns and my simulated dress with a good resolution, without seams and thickness, as OBJ format.


In Maya, I duplicate the patterns and then proceed to work on them using either Maya's retopology tools or Quad Draw. To ensure perfect symmetry, I duplicate the retopologized piece I've created and mirror it onto the other side. This ensures that the turns match seamlessly and avoids the risk of having spiral loops.

Once you have finished the retopology, it is time to transfer the attributes. The steps are as follows:

2. DeleteHistory.
3. Separate retopology and closed dress.
4. Click closed dress piece + piece retopology -> transfer attribute.

5. Delete History.
Finally, the last step involves combining and merging the vertices of all patterns. With this method, the UV mapping is already prepared, as it is transferred from the paper patterns, mimicking the pieces of cloth that make up the dress. And there you have it – your dress is now complete, with a clean topology ready for texturing.

The texturing phase in a character is my favourite, because I can play as much as I want with colours and this amuses me a lot. I used Substance 3D Painter to clean the diffuse map and to add Makeup.


For the skin shader I used the AiLayerShader node, this helped me to blend the skin material with the Makeup, which in turn was divided into: Lips shader, Blush shader and Eye makeup shader. Creating the skin shader was very interesting because Arnold has many features that allow you to create a realistic skin. I worked a lot with the Subsurface Scatter, Roughness and Coat (love it).


To create the glitter on the eye shadow I used the AiFlakes node that works on a normal map and creates a fantastic play of lights.


To render the dress, I exclusively utilised Substance 3D Painter. I developed a robust bump map, capable of serving as a texture spreader to diversify the fabric's colors. Additionally, I employed Arnold's Sheen to enhance the fabric's realism in the rendering.


Let's dive into Xgen, my favorite part of a character. I thoroughly enjoyed creating each detail. Personally, I prefer breaking down every Xgen project into three phases: shaping the hairstyle, refining with clumps, and adding texture with noise. This approach mirrors the workflow in modeling, starting with broad strokes and gradually refining to intricate details.

Now, let's delve into the technical aspect. After shaping the hairstyle, I employed three different types of Clump modifiers. The first Clump modifier was applied directly through the guides, the second utilized random generation to create secondary clumps that follow the primary ones, and finally, I crafted micro clumps to refine the details.

It's important to note that get your best groom with Xgen requires the use of expressions, which can truly be lifesavers! One crucial expression to familiarise yourself with is the Stray, essentially a versatile noise map that greatly aids with modifiers. I utilized it for both the Clump and Noise aspects.


Another expression that I love using is the expression for the Cut; this allows you to create a simple slider that you can move.

As for eyelashes, I used a trick for the rendering of mascara. I played with the width of the primitives, going sharply to raise and lower the curve, thus creating micro sketches of mascara.


The dress's fur was easy to work with. I used two descriptions: one with long and wide hair that looked like the fur's feathers and the other with very fine hair.


To set the final mood, I drew inspiration from fashion magazines. I was particularly drawn to the concept of replicating a photography studio ambiance. To achieve this, I meticulously crafted the setting with a vertical faux plane, complete with a small slit. This allowed the warm light, as seen in the final render, to gently permeate the scene.


For the second render, I used a well-defined scene setting, very similar to the one they use in photography studios. I created a kind of cabin and added three kinds of lights around the character. I finished in Nuke with a small comp.


The skills I acquired during this period are very important because I learned how to make a character more realistic. With the technique of subdivision displacement, I avoid having to return to Zbrush numerous times to modify the details. Additionally, constructing layer shaders is beneficial because it allows me to create only the makeup masks I want and manage the texture directly in Arnold, without having to return to Substance to change color. Not to mention Xgen expressions, which are fantastic because they provide incredible hair control.
If I had more time, I would have managed the lighting better and made it much more interesting to watch. In fact, I hope to have time to revisit this project and create an even more impactful GlowUp. I had a lot of fun creating this project, and I’m satisfied with the end result, considering the limited time I had at my disposal.
I hope this guide can assist you in some of your personal projects. Enjoy it!
Check out more of Valeria's student work at her Rookies profile here.