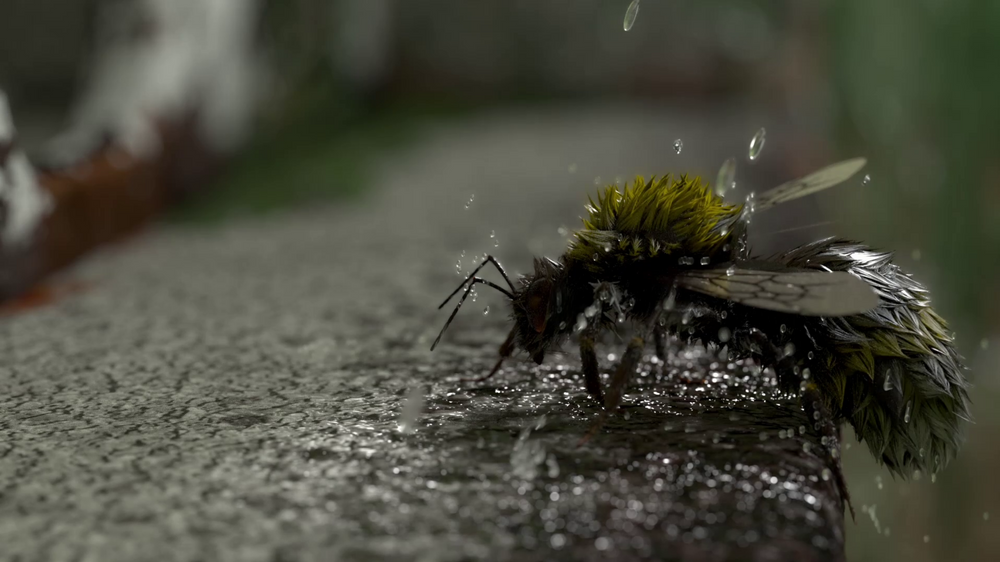
In her second year at ESMA, Estelle Rupprecht took on the challenge of crafting a photorealistic static shot of an insect and its environment. Learn how she brings to life a scene starring a wet bumblebee on a rainy day.
Tasked with a project for her second year at ESMA, Estelle Rupprecht undertook the challenge of creating a photorealistic static shot of an insect and its environment for her rendering class. The project evolved into a comprehensive exploration spanning modeling, texturing, grooming, and compositing. Follow along as she shares her journey of bringing to life a scene featuring a wet bumblebee amidst a rainy day.
The Brief
This project was created for my second year at ESMA. The goal was to produce a photorealistic static shot of an insect and its environment for my rendering class. Besides creating a high quality asset, our goal was to add to this shot a narrative dimension.
Once the static shot was done, we took this project a step further in my compositing class. Based on our static shot, the goal was to add simple camera work to create an immersive shot of our insect to use it for a future demo reel.
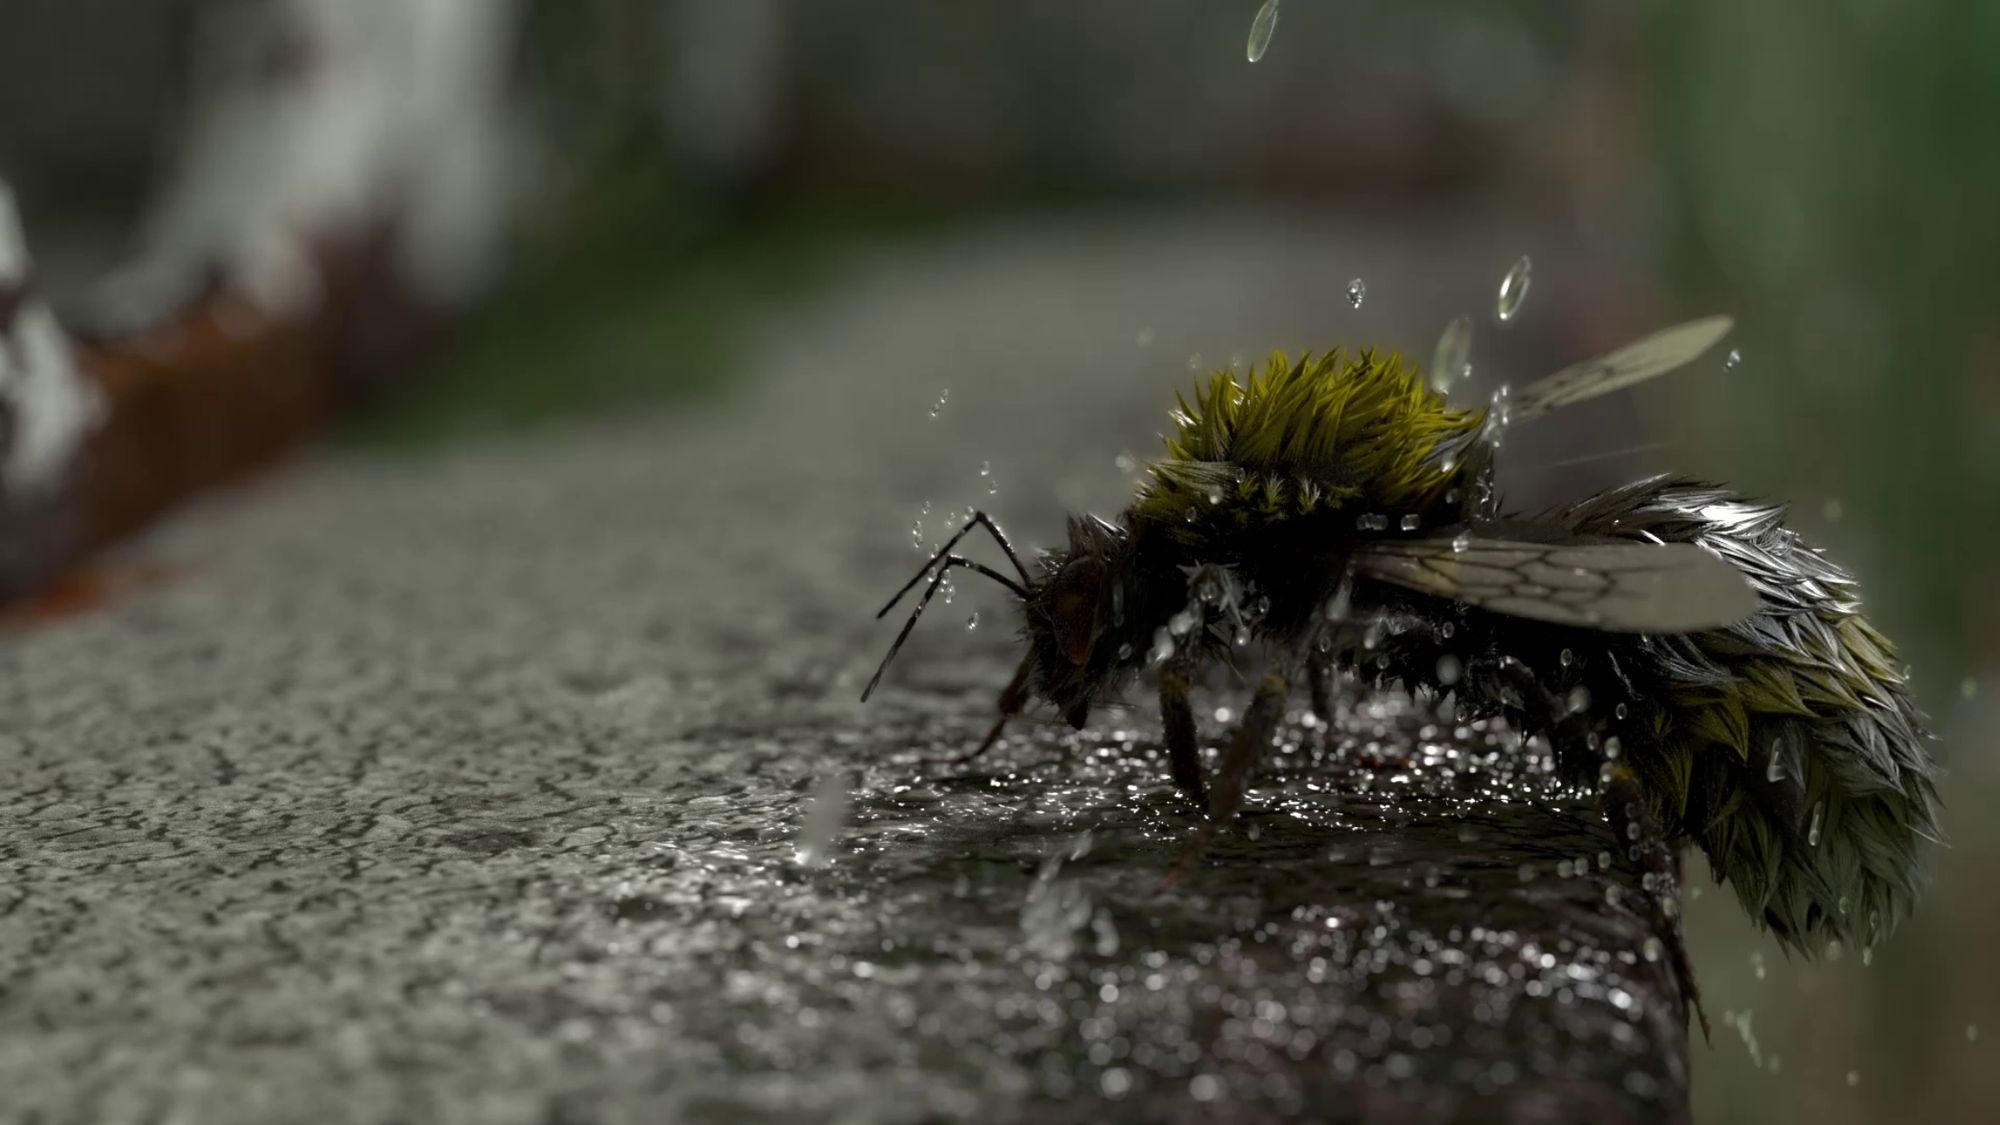
The choice of the insect was free. I chose a bumblebee because I am unfortunately scared of insects, and even if I try to learn how to love them, watching a lot of references of very close shots of insects was very hard for me. I decided to work on a bumblebee since I find them very cute. I knew it was a challenging choice since the purpose of this exercise wasn’t to learn a lot about grooming, but I gladly took on the challenge!
The Bumblebee
Modeling
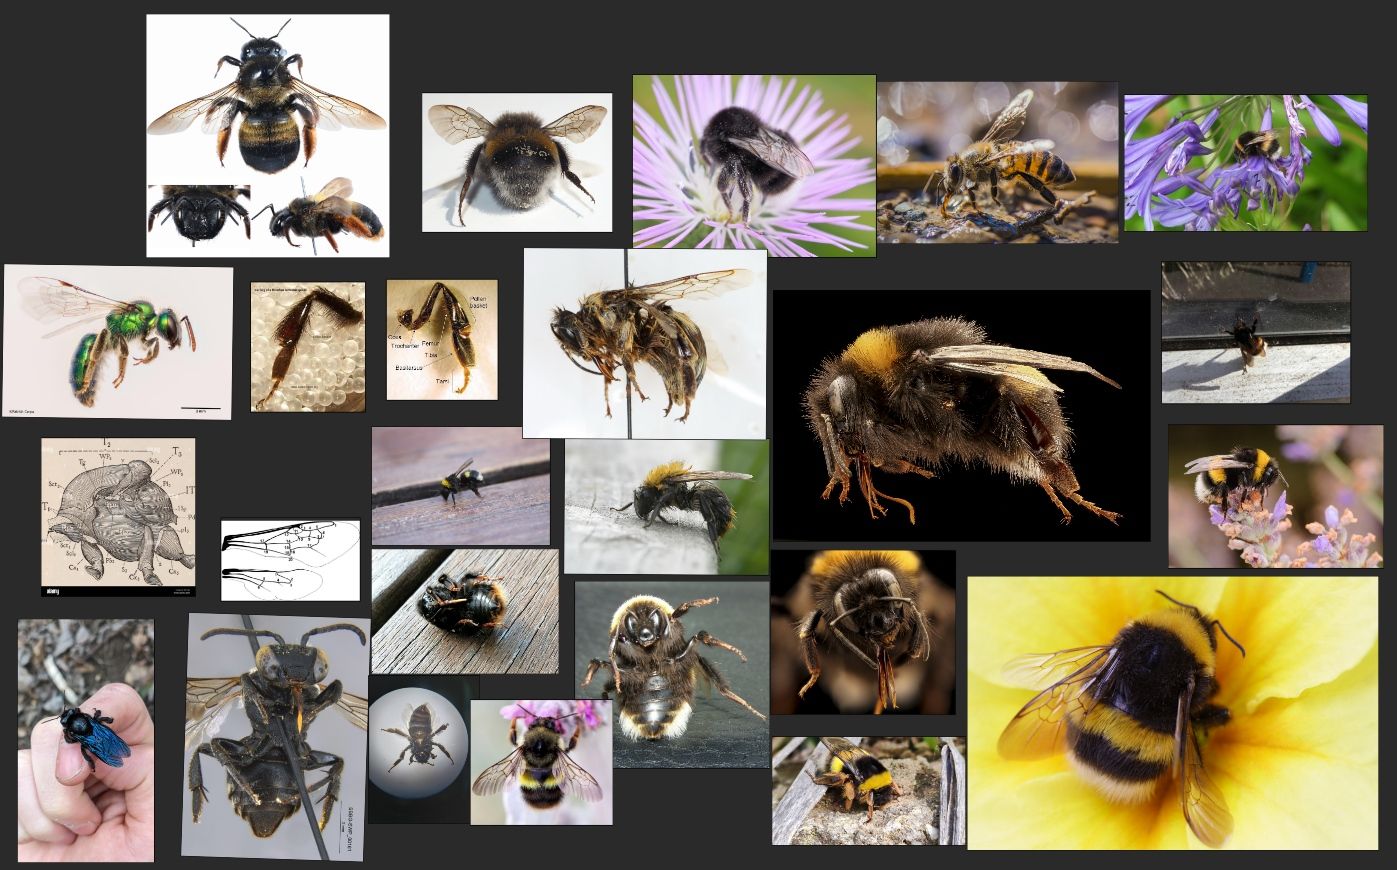
The first step of this project was to model the insect in Maya. This part was definitely challenging because it is the foundation of the project but it was extremely difficult to understand the bumblebee anatomy under the fur.
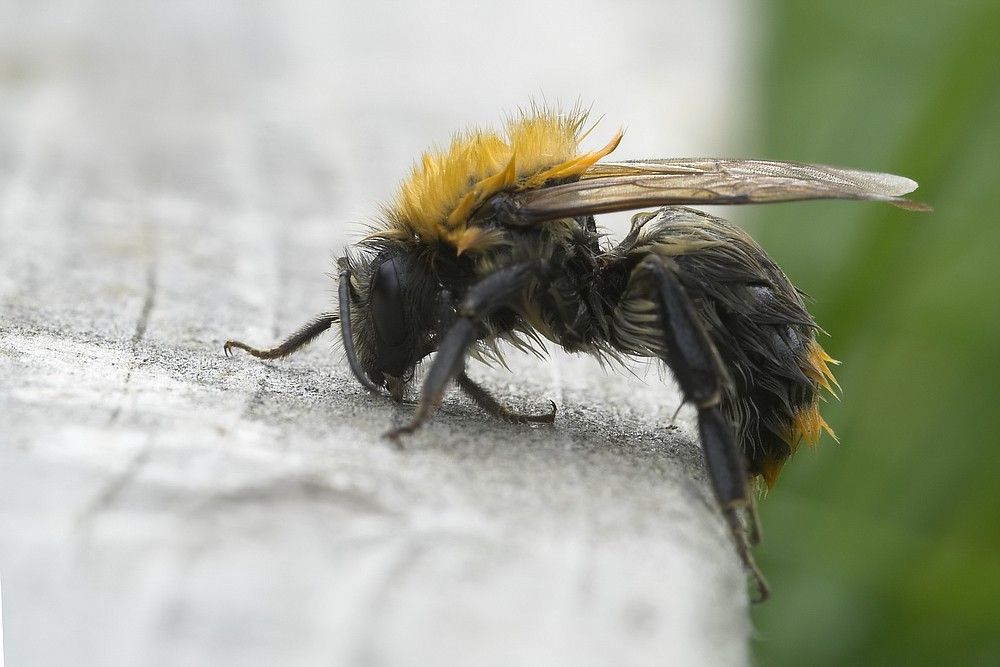
To solve this problem I used references of wasps and wet bumblebees since the fluffiness of the fur is canceled by the water.
Seeing those pictures of wet bumblebees also gave me the idea to use these references for my final shot!
Screenshot of my Pureref references
Texturing
The texturing was pretty fast compared to the other steps. Since the bumblebee was meant to be covered by fur, I didn’t spend too much time on details that would be lost anyway.
I used Mudbox to create a displacement map and a base colour. The texturing of the wings was more challenging since it was my first time using Renderman’s pixarLayerTexture.
In my case, Renderman’s PxrLayerTexture allowed me to have two different shader on the same object: I had a slightly tinted glass material for most of the wing, and another layer with a brown material with a lot of subsurface scattering to create the brown veins.
I struggled a bit but I was quite satisfied with the results for a first time shading such a complex material. I definitely have a lot of room to improve my skills and can’t wait to practice more!
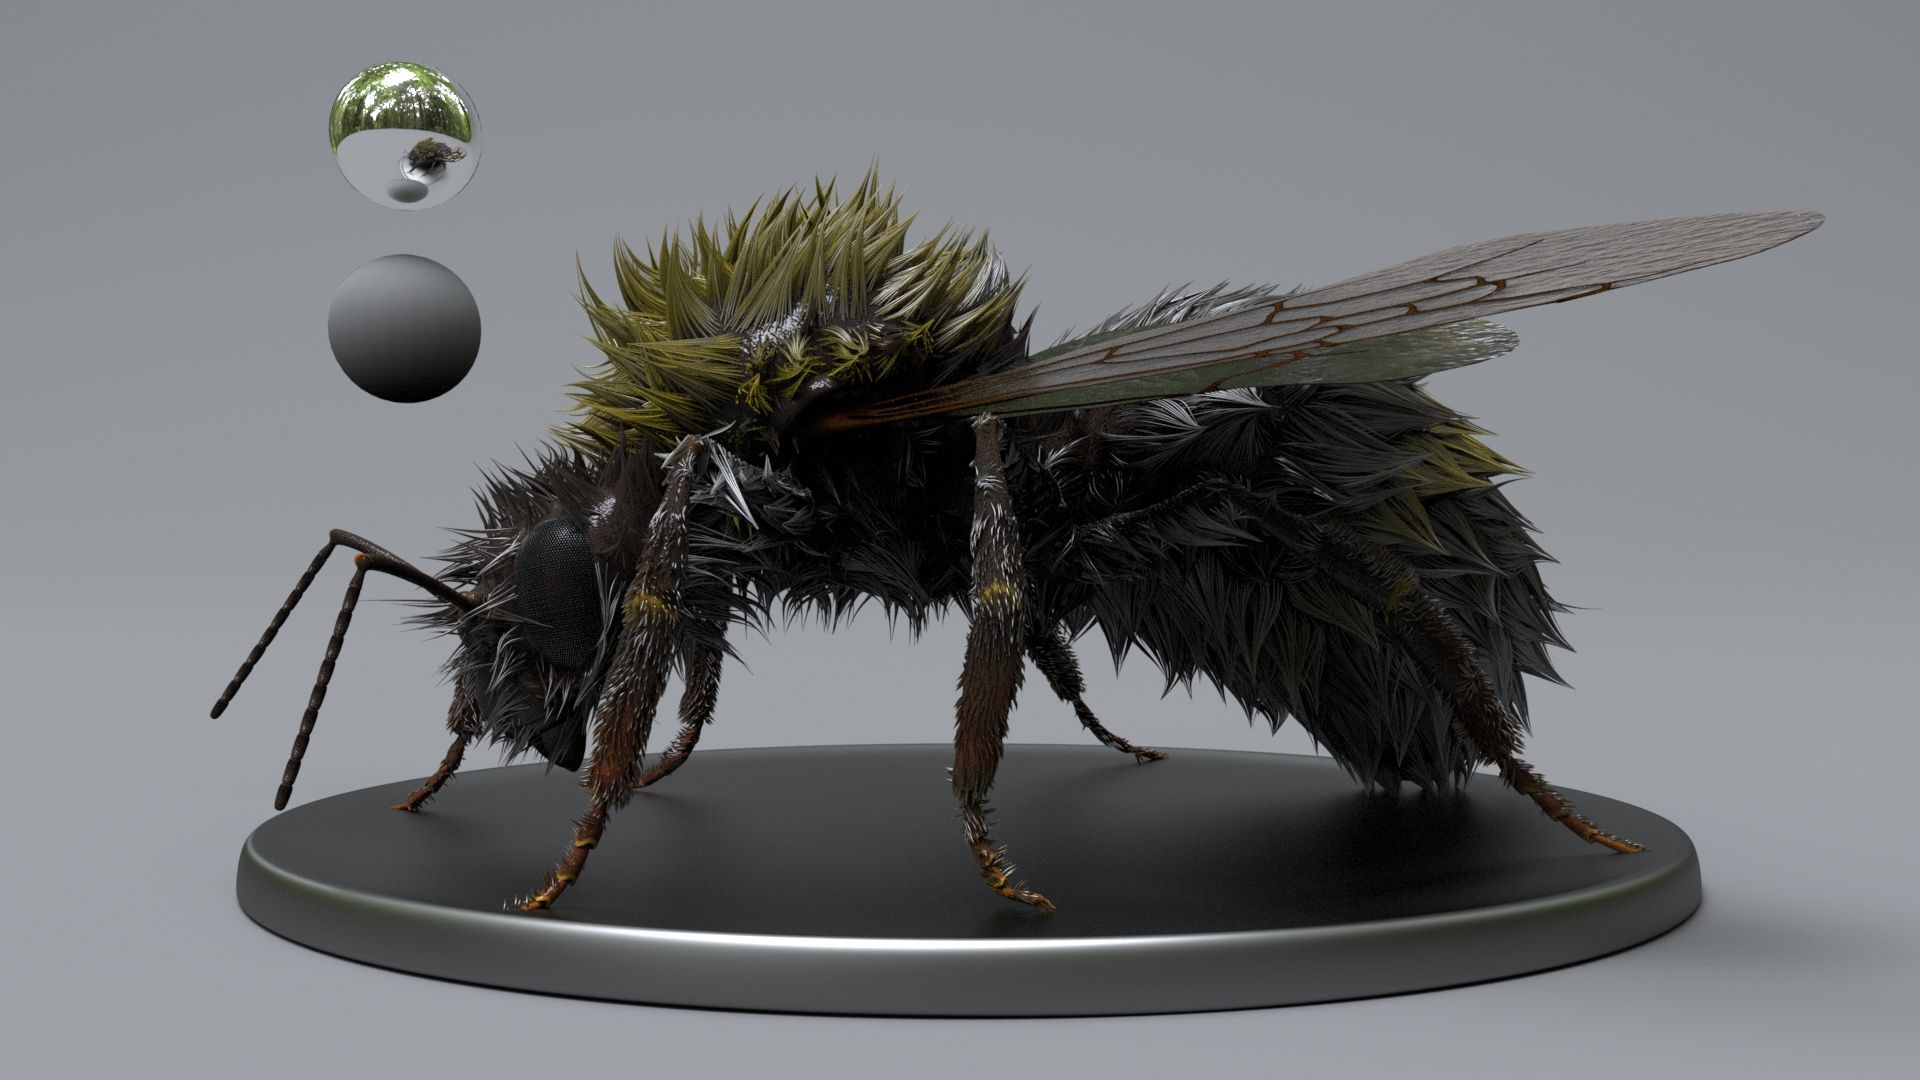
Grooming
This project was my first groom. It was entirely done in X-gen interactive. Although a short initiation to grooming was planned by my teacher, I knew I needed to do extra research since grooming is definitely more visible on a bumblebee than a beetle. I looked at the “groom fundamentals” course by creature garage. The course gives a great idea of how grooming softwares look and explain how to analyze fur references to better reproduce them. The course is made of bite-sized videos, which is great to watch all week long even on a busy school week.
I faced many challenges for this bumblebee, the most challenging being to separate the coloured stripes of the abdomen into different clumps. The clump mask option by Xgen seemed made for it, but unfortunately it didn’t work at all in this case.
I think that the problem might be the shape of my scalp: since the abdomen of the insect is made of rigid, distinct parts, it is much more different than a one part smooth shaped scalp. My only option to get the precision and control I wanted was to abandon the clump modifier and instead use the clump brush on a sculpt layer. It was very long and tedious to clump each hair by hand, but I actually enjoyed doing this a lot.
After finishing this project I realised that you shouldn’t use too many sculpt layers or your groom would be very heavy to export. Mine just looked like it exploded when I tried to import the bumblebee in reference in my shot scene.
The tip my teacher gave me is to bake the fur, this way it becomes much lighter but you can’t modify it afterwards.
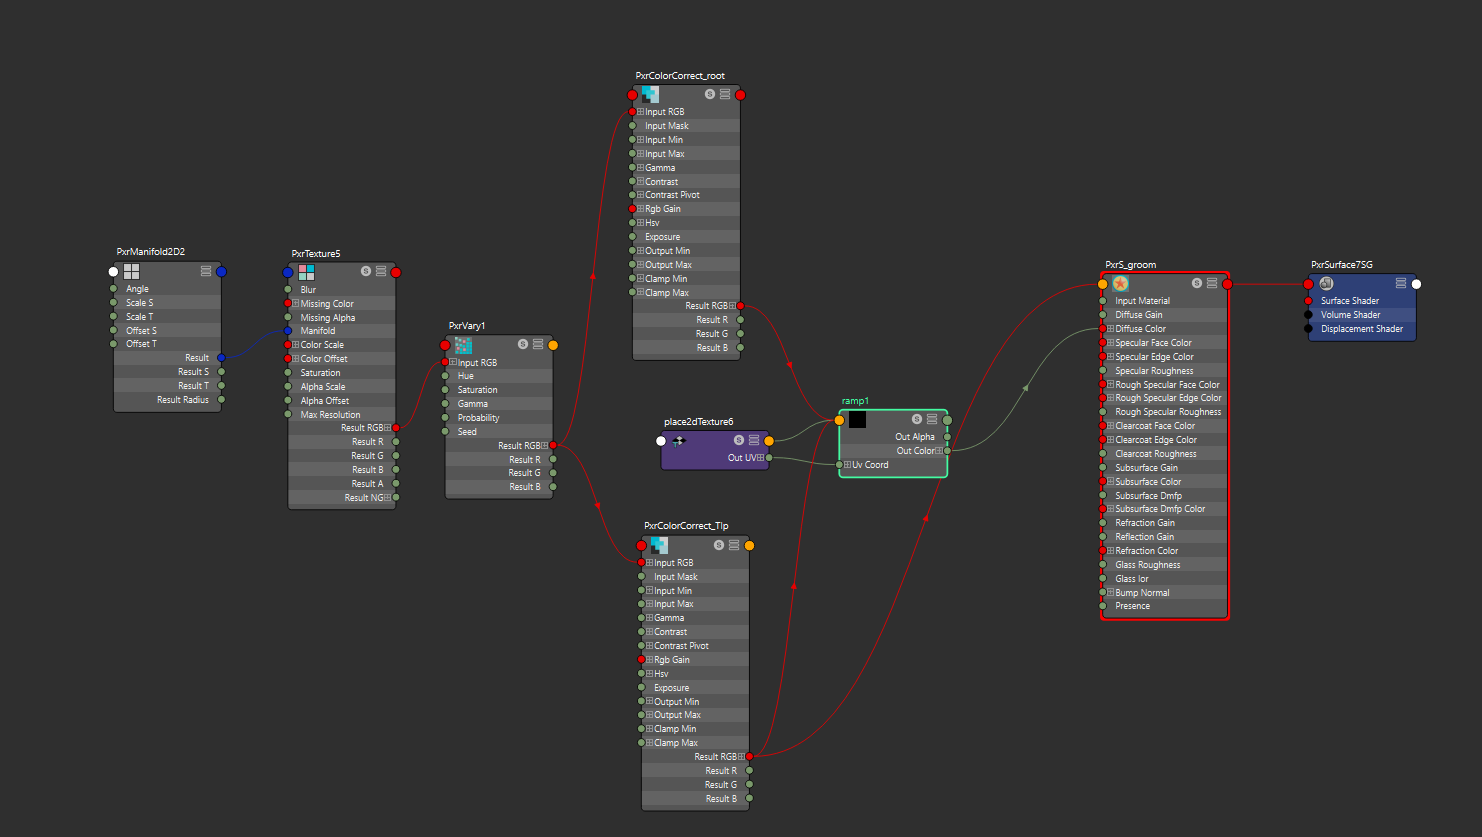
Shading the fur
This project got me started in procedural texturing. Based off a very simple colour base (I just painted the coloUr stripes on the scalp’s UV) this setup allowed me to have subtle colour variation between each individual hair (pxrVary node) and to have a colour change between the tip and the root of the hair (the colorCorrect nodes driven by the ramp to adjust the gradient to my will).
Screenshot of my hypershade for the groom shader
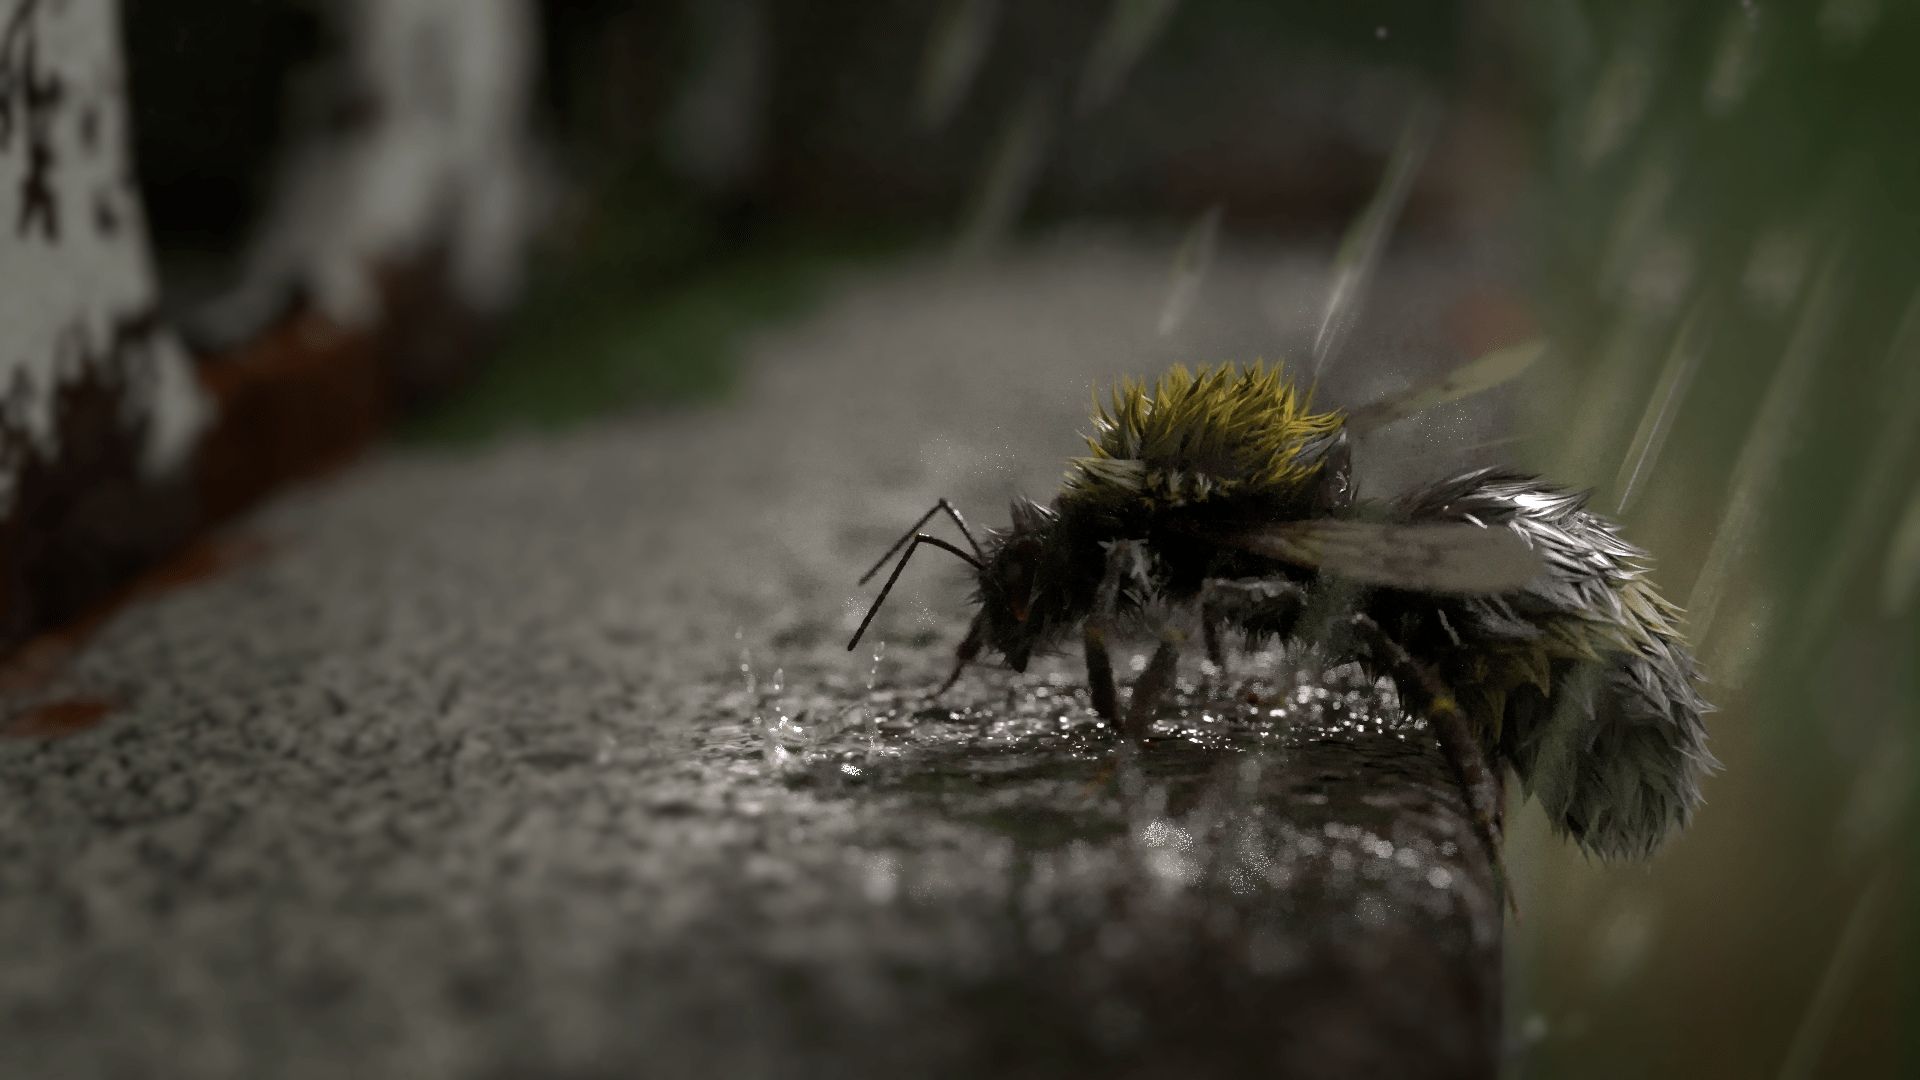
For the hair shader itself I used a simple PxrSurface with a lot of transmit to get some transparency in the hair and a lot of specular to give it this wet/Shiny feeling.
Final Lookdev
Rigging/Posing
In order to get an interesting posing for my final shot I did an extremely simple rig just to move the legs around and make the bumblebee feel more alive.
The environment
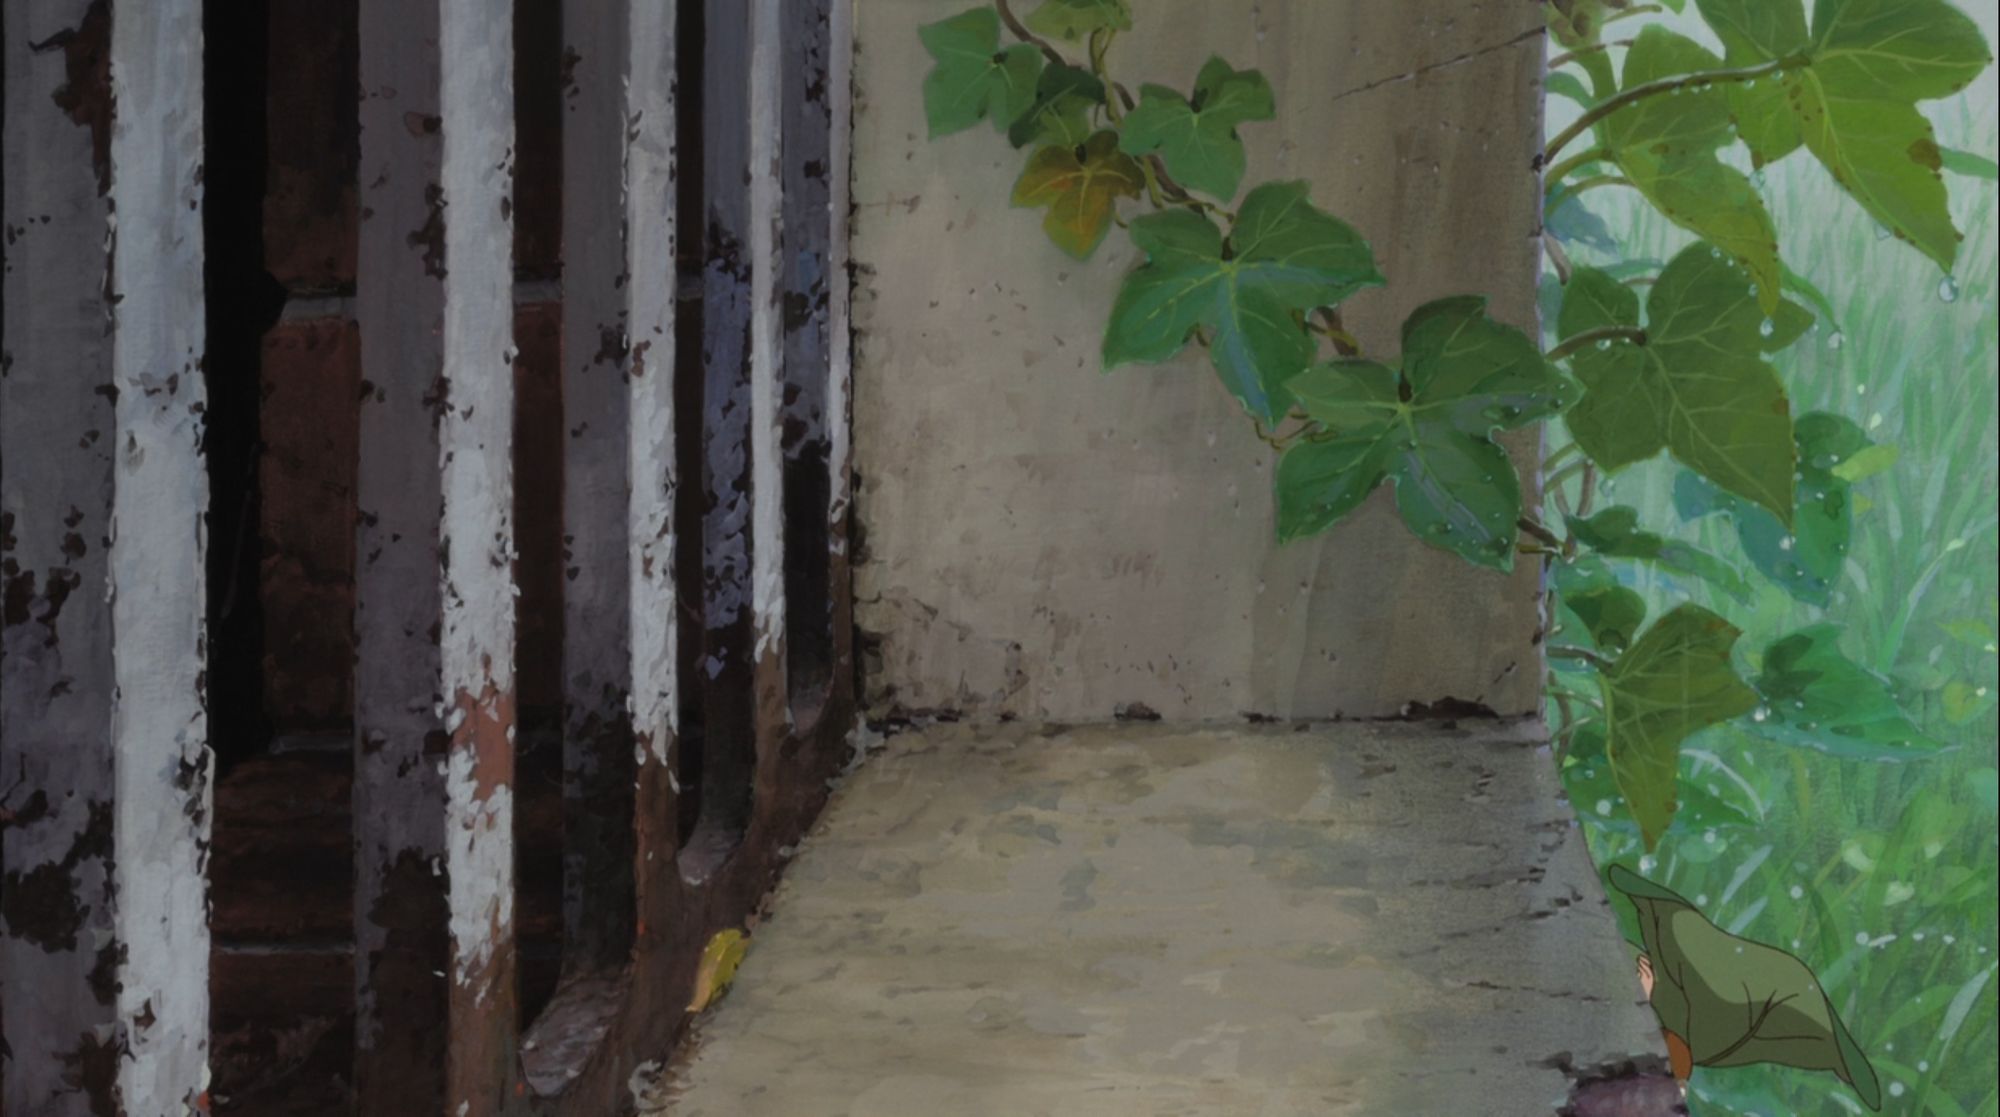
I based the environment out of The secret world of Arrietty, since it’s my favourite movie. I love how this movie turns the tiniest details of our daily lives into something absolutely gorgeous, which is a concept I tried to incorporate in this project as well.
When I got the idea of making a wet bumblebee, I immediately thought of this background in Arrietty: it is the right scale, has gorgeous details and supports the narration of a bumblebee trying to find shelter from the rain.
Modeling
The modeling of the environment was pretty simple since it only consists of a concrete wall and a rusty grid.
I used free 3D assets from Quixel Megascan to add tiny plants as details to the concrete wall. These kinds of assets aren’t made to be seen this close because they are pretty lowpoly and the textures aren’t very detailed. But since I knew they would be barely visible in the depth of field, this wasn’t an issue.
I also made some grass using MASH to fill the background a bit. I kept the grass very simple since it would be lost in the depth of field as well.
reference picture for the amount of blur
In my case I didn’t spend a lot of time on plant modeling since my background is all blurry. However this gave me a preview of plant modeling and I can’t wait to work on a project that will give me the opportunity to create a wider scale outdoor scene. I really want to work on precise and diverse plant models.
Texturing
I first tried to fully texture the bricks and grid in procedural, but the result wasn’t precise enough to me since I’ve never used procedural before. Although I managed to get a rusty effect with paint peeling off, I couldn’t get the gradient from fully rusty at the bottom to chipped paint at the top.
I decided to switch to Substance 3D Painter where I could precisely paint masks to get the effect I wanted.
To get the old concrete look, I used Substance 3D Painter’s smart materials: I layered a concrete material on top of an old red clay material to mimic the aspect of the wall in Arrietty. Unfortunately, the red clay parts aren’t that visible with the framing I chose, but Substance 3D Painter allowed me a lot of control over the transition between dry and wet concrete. For the wet part I painted a darker base colour and a lower specular roughness value with a dotted brush. The dotted brush perfectly did the job at portraying raindrop impacts on the concrete.
The rain
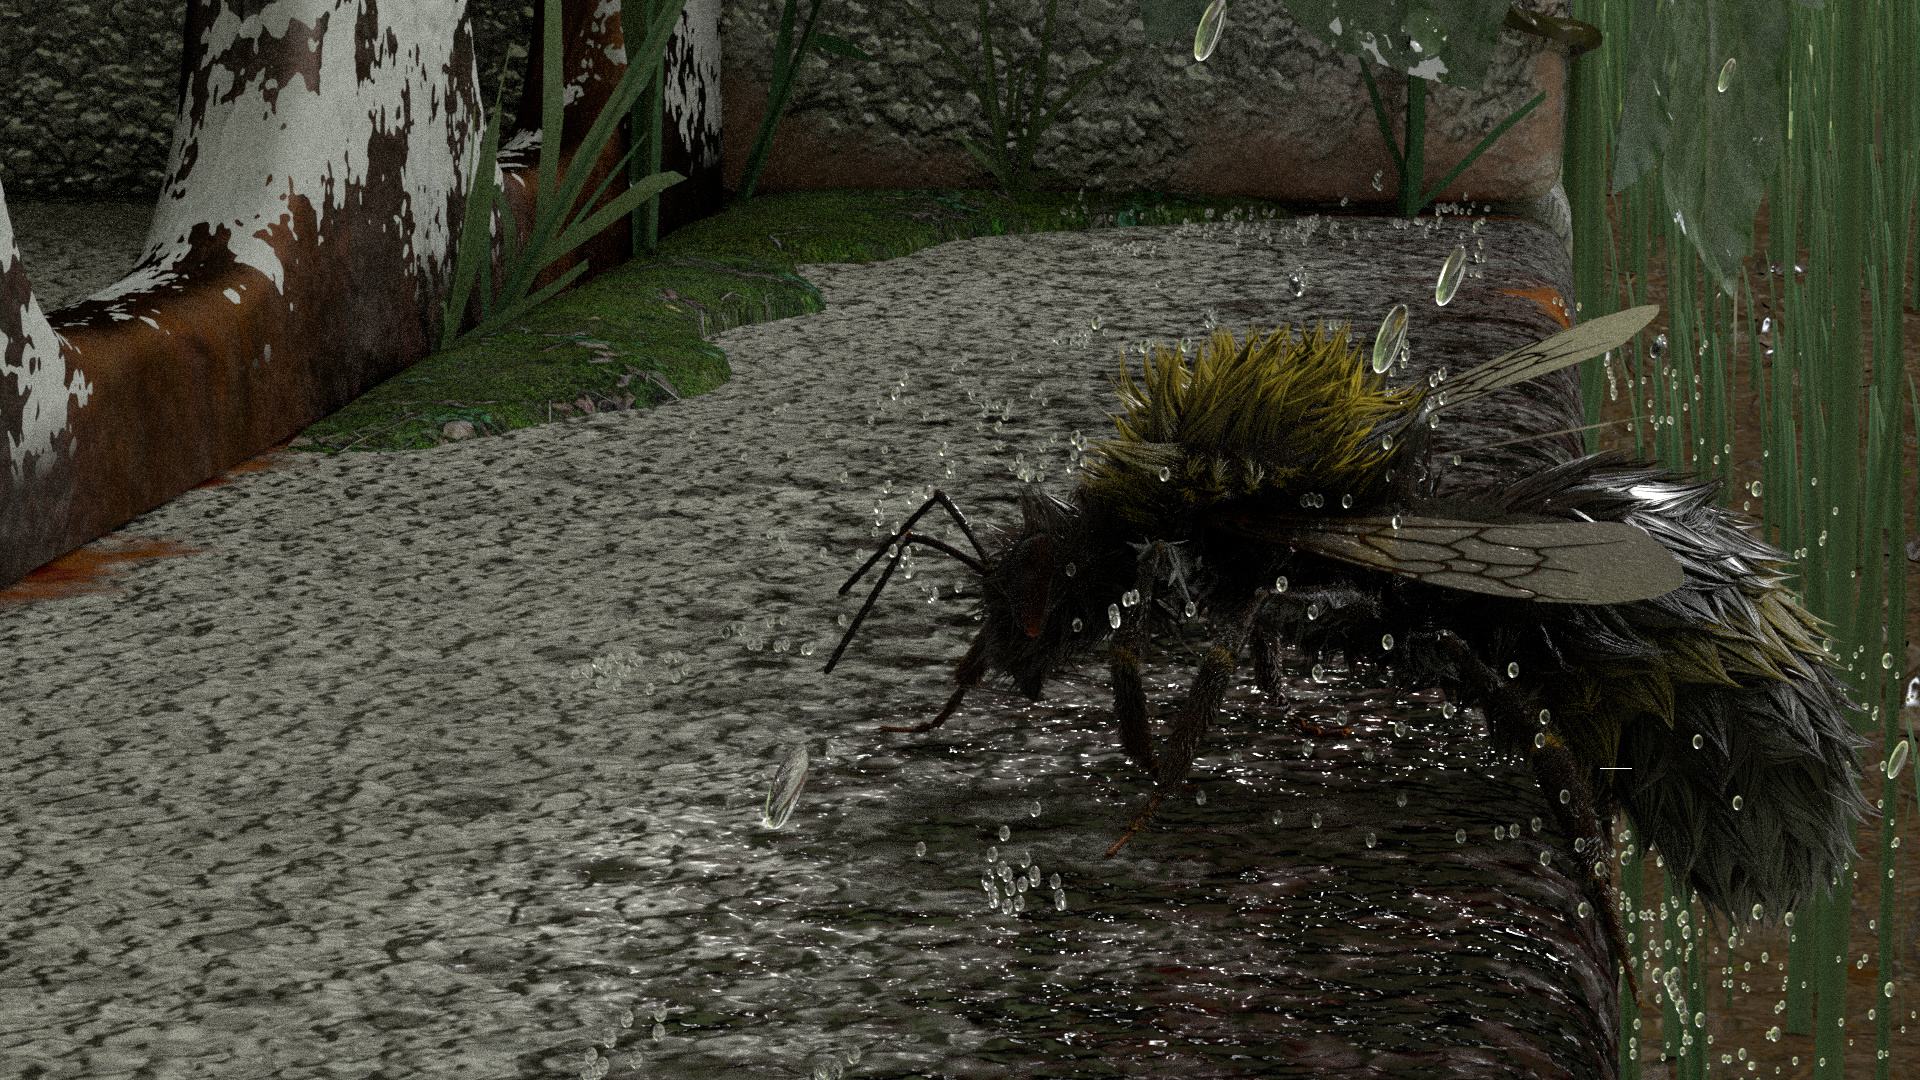
I actually have two different versions of the rain: one for the still shot where I animated raindrops and 3D modeled the impacts on the concrete, and another one for the animated shot
modeled raindrops for the still shot vs particle simulation for the animation
My main issue was to make believable rain impacts during the animation which was impossible with the modeled impacts.
I used this as an opportunity to learn about FX and simulations. I found many helpful tutorials online, but it was sometimes a bit complicated to connect different tutorials together to get a full workflow. I used a YouTtube tutorial to learn about particle emission to create believable collisions. But I couldn’t find a tutorial explaining how to turn these particles into modeled objects. Luckily, my teacher could help me and showed me the “use selected particles as instancer” mash tool. This way I could model simple raindrops that would follow the particle’s trajectory.
Using the mash instancer also allows a lighter scene compared to the simulation I tried before, this project taught me the importance of scene optimisation.
The animated shot: compositing in Nuke
This animation is my first rendered animation.
I learned how to use batch render, what render settings to use to optimise the rendering time and how to export utilities to use them in the compositing process.
The compositing in Nuke was mostly about adding blur (depth of field and motion blur), a simple colour grading to enhance contrast and a bit of glow to complete the mood.
In my static shot, the depth of field and motion blur were done in Maya. But since rendering a blurred image takes a lot of rendering time, I disabled all kinds of blur to reproduce them in Nuke. By doing so, my rendering time went from 2h30 a frame to 30 min.
When rendering my image I used the zDepth utility to create a correct depth of field.
For the motion blur, I wanted to use motion vector maps but for unknown reasons, my maps would all come out black. Luckily Nuke has a motion blur node that calculates the movement of a pixel between the previous and next frame.
Raw vs composited render
Conclusion
This animated shot is for sure my most challenging project so far, it opened the way to many aspects of 3D I had never tried so far like grooming, procedural texturing, simulation and organic modeling.
Procedural texturing may look very scary at first and is definitely not easy to understand at first, but in just a few months between finishing this project and writing the article, I improved a lot! My best advice would be to try reproducing textures from a reference when you have the time. If you are interested in procedural texturing, Substance 3D Designer is worth trying! You can find many tutorials online and the UI is great for visualising the texture you are creating.
This was my first time combining modeling, texturing, rigging, animation and compositing in the same project, so I also learned a lot about pipeline management.
My best advice would be to start with a neatly organised Maya project:
In your scene file, a folder for lookdev scene, one for your environment, one to work on the animated part and one for rigging.
In your texture file, it is also great to add many folders to sort your textures between the insect, the environment and each asset.
Unfortunately I didn’t apply this method from the beginning, so I had to rename many files and reload them one by one, which was time consuming and annoying.
I am currently using all this new knowledge in my new project : a Fennec fox! The project requirement is very similar but this time our main asset is a quadruped and not an insect.
This bumblebee project set up the bases and the Fennec fox’s goal will be to dive deeper into grooming. I can’t wait to finish this fennec fox as well and post it on my The Rookies profile.
Thank you so much for reading this article, I hope it will inspire you to create beautiful artwork!
Check out more of Estelle's work on her Rookies profile here.