Creating a Realistic Character From a Cartoon Concept in Real-Time
In this article, Snezhana Golubeva, a L'Idem Creative Arts School graduate, guides readers through her creative process, from references and planning to final render, sharing insights and techniques beneficial to fellow artists.
Throughout this article, Snezhana Golubeva, a graduate of L'Idem Creative Arts School in Barcelona, will guide readers through her creative process step by step, covering various stages including references and planning to final render. Each stage has been a learning experience for Snezhana, and she aims to share insights and techniques that may prove helpful to fellow artists.
Introduction
My name is Snezhana and this is the final personal project of my career in L’idem Barcelona, Fighter. I’ve chosen a concept by Nick Bray, Scrapper.
I’ve enjoyed the process a lot and I’m happy with the result. Big thanks to my L'idem Barcelona teachers for giving me feedback and directions.
I’ll go through the process step by step, covering the following stages:
References and Planning
Blocking
Sculpting the Outfit and the Prop
Retopology and UVs
Face Sculpting
Texturing
Eyes
Hair
Final Render
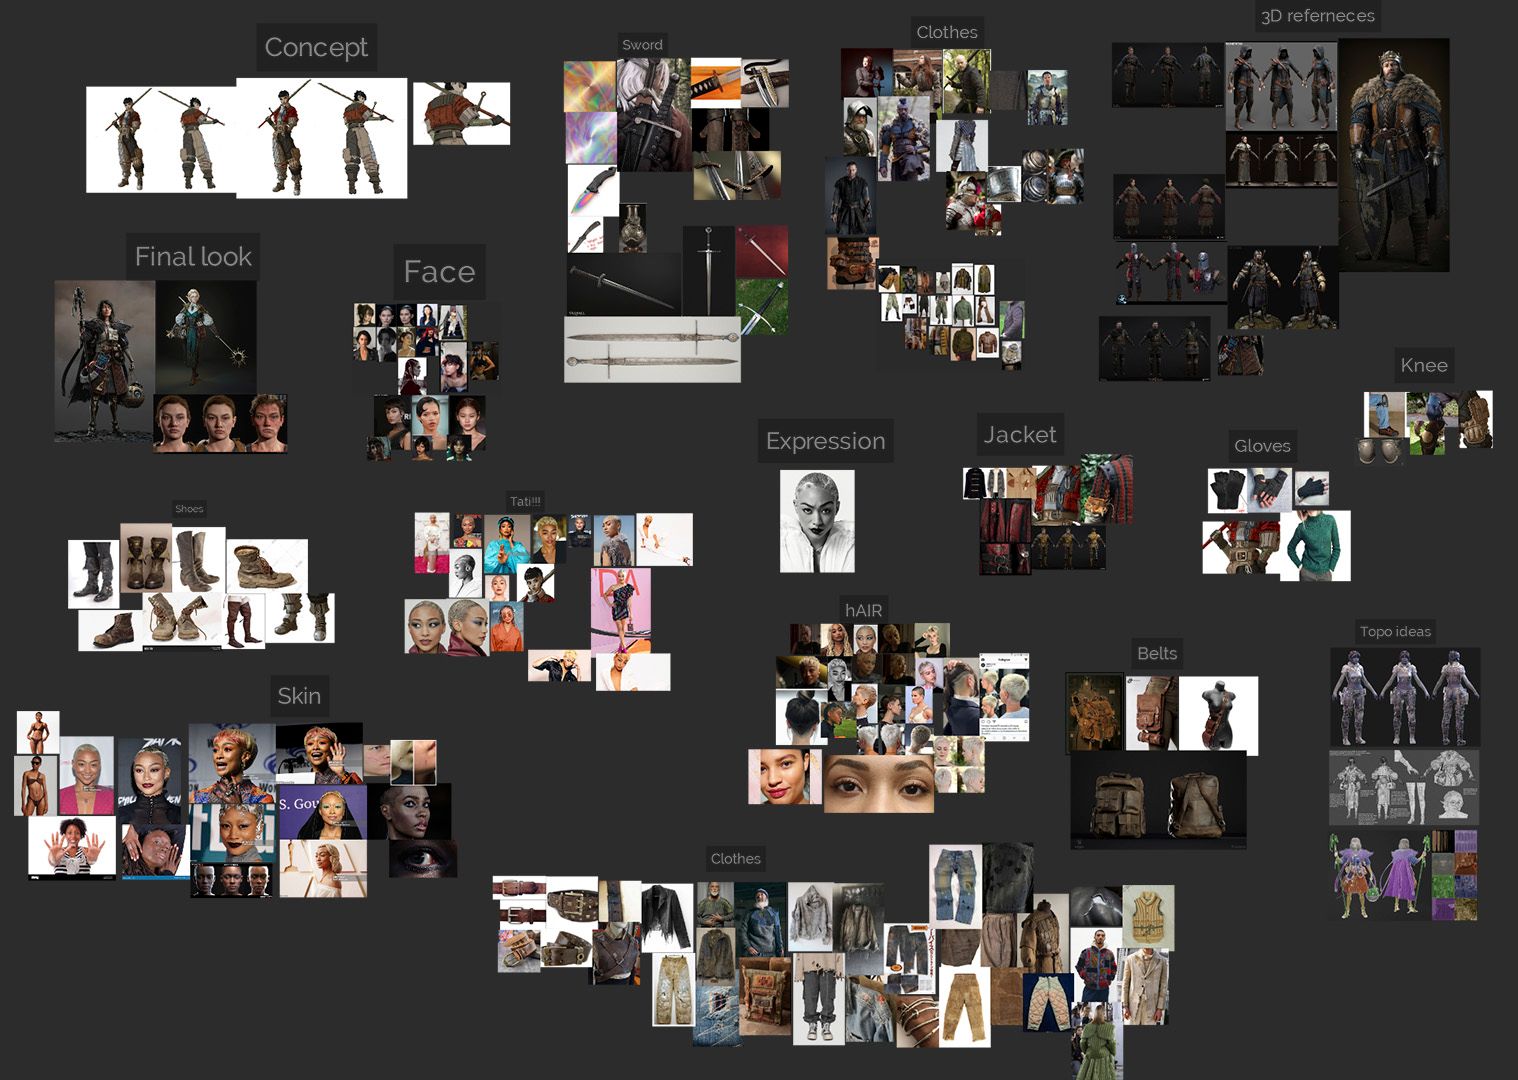
References and Planning
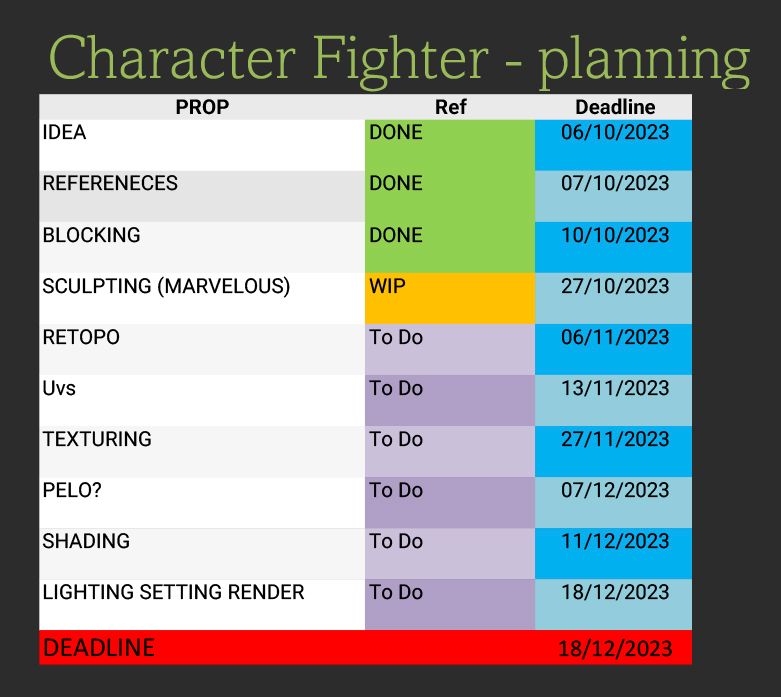
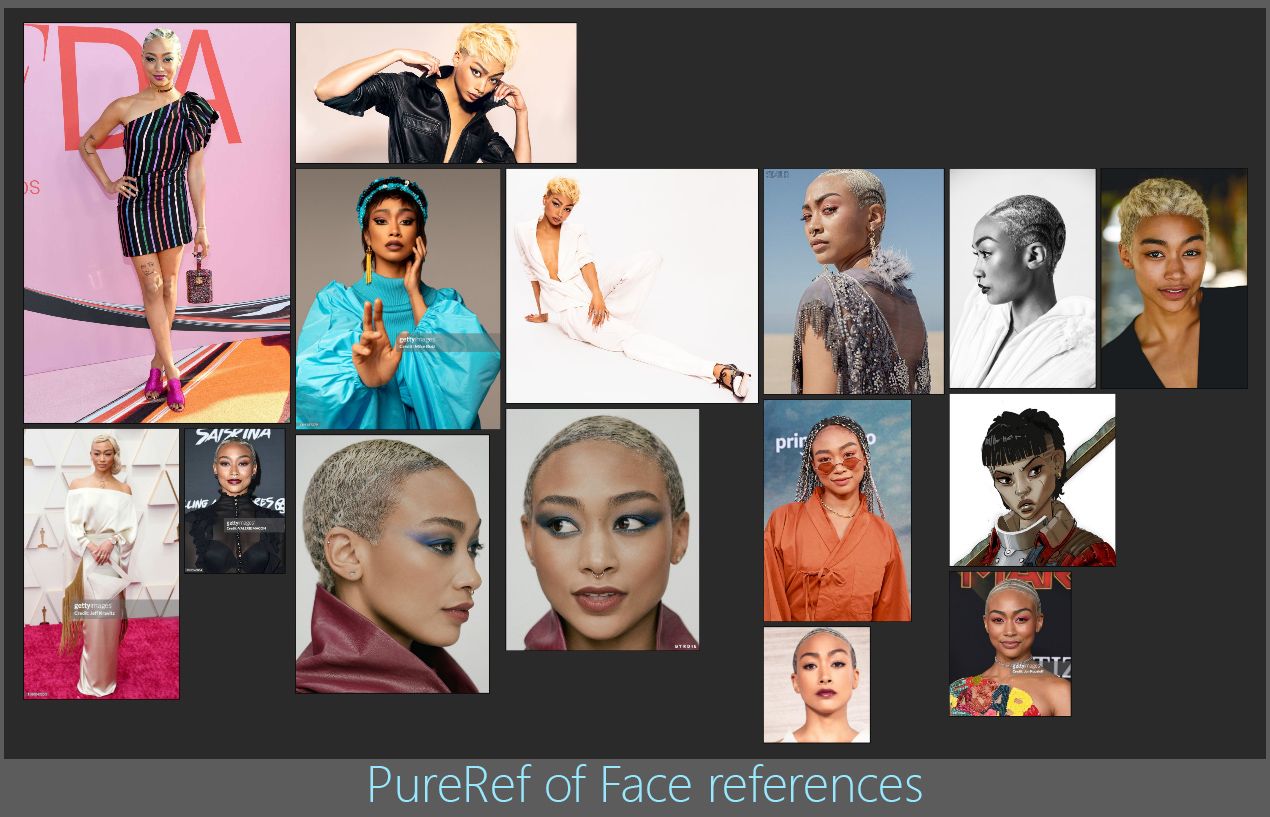
After selecting my concept, I begin the research. I gather references from various sources such as Pinterest, Google, and ArtStation. To organize these references, I use PureRef. Additionally, I create a detailed plan using Excel to outline the steps and goals for my project.
Planning is boring but it’s important, some stages need to be “closed” on time. With a project so big I can feel lost at times or not knowing what to do. Marking and dividing the big deadline into small ones helps a lot. Some things didn’t go as planned, but it’s okay because no plan is perfect!
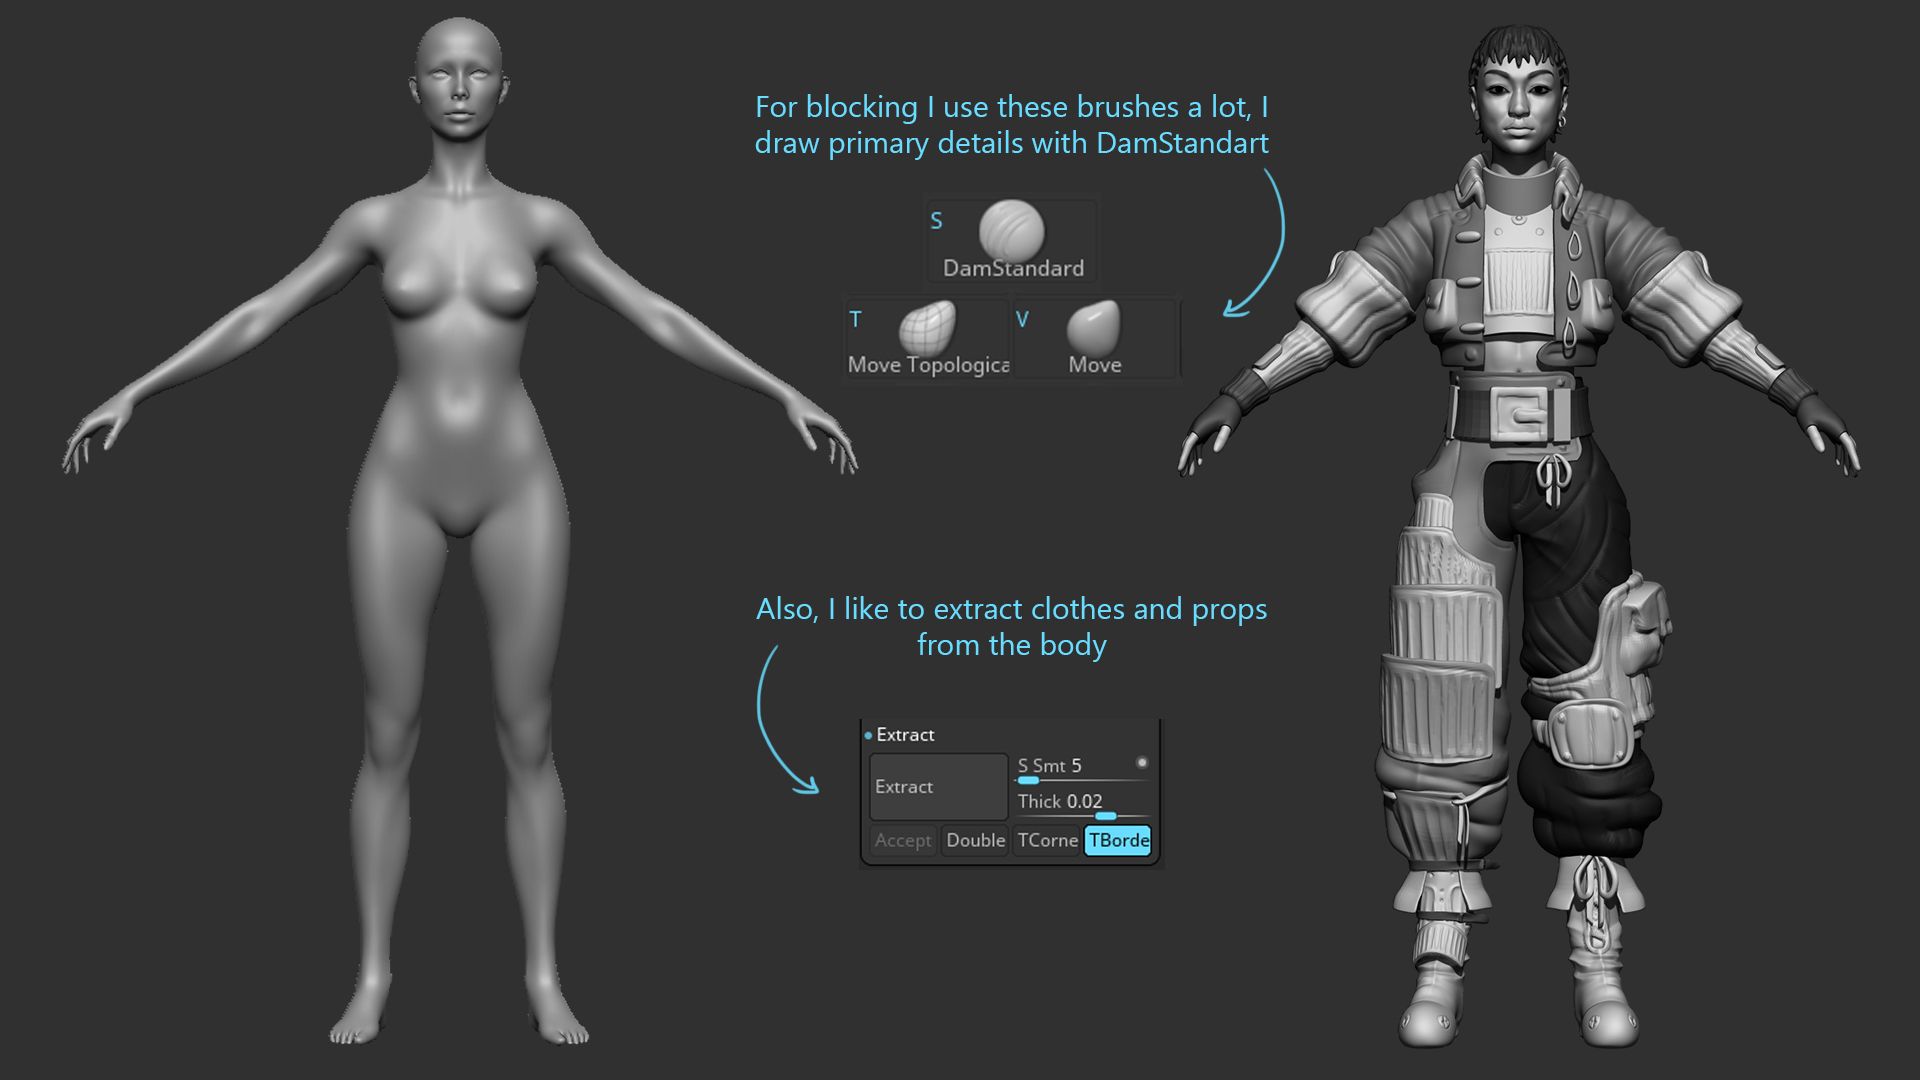
Blocking
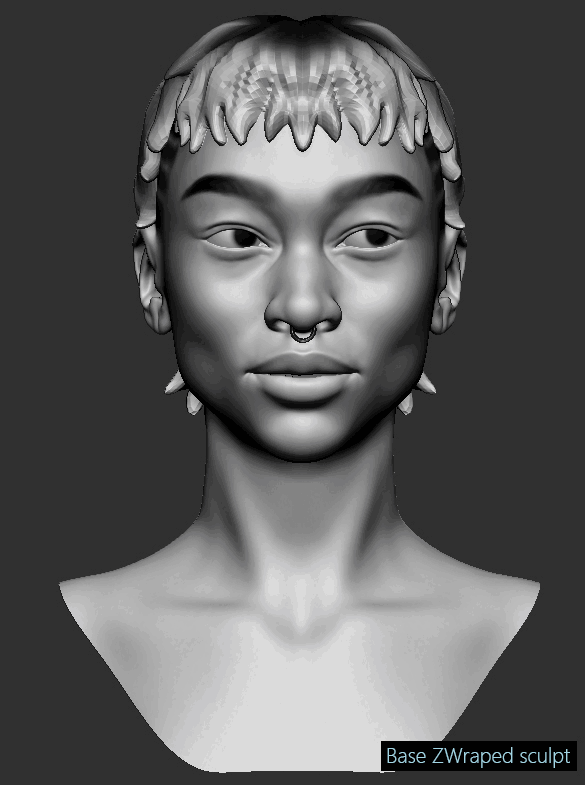
At this stage, I like to model basic forms of every detail of the character in ZBrush. It’s important for me to break down the concept as some aspects may be unclear or lack functionality. Additionally, I determine which parts I will mirror and which ones I won’t.
I begin by using a ZBrush female basemesh, considering that the clothes cover the majority of the body. Since the character needed to be game-ready, I used the body solely as a base for the clothes, deleting the parts that were covered.
During this stage, I also utilise polypaint to mark details such as hair, makeup, and other intricate features.
Don’t fall into the temptation of sculpting the face too much. And don't try to achieve likeness at this stage (like me). The face needs and deserves its own SubTool and its own stage of work.
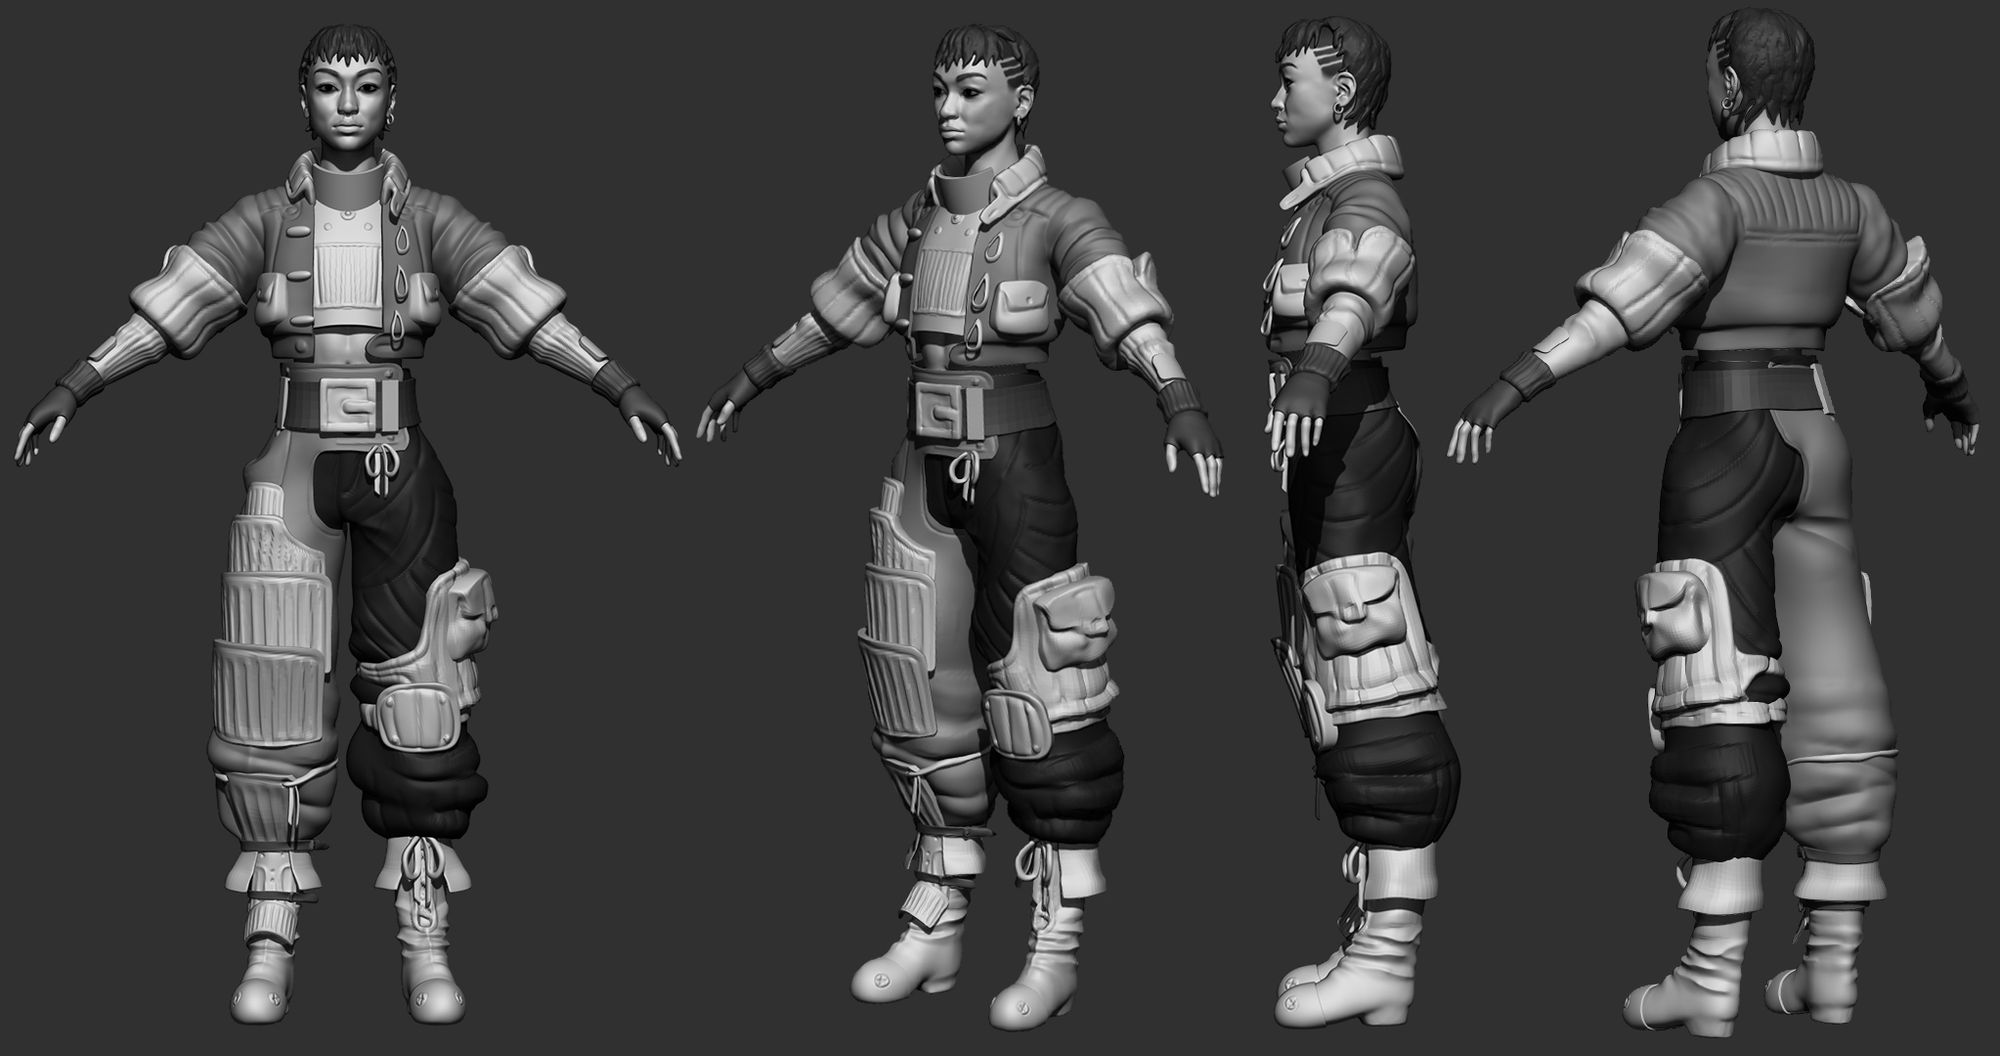
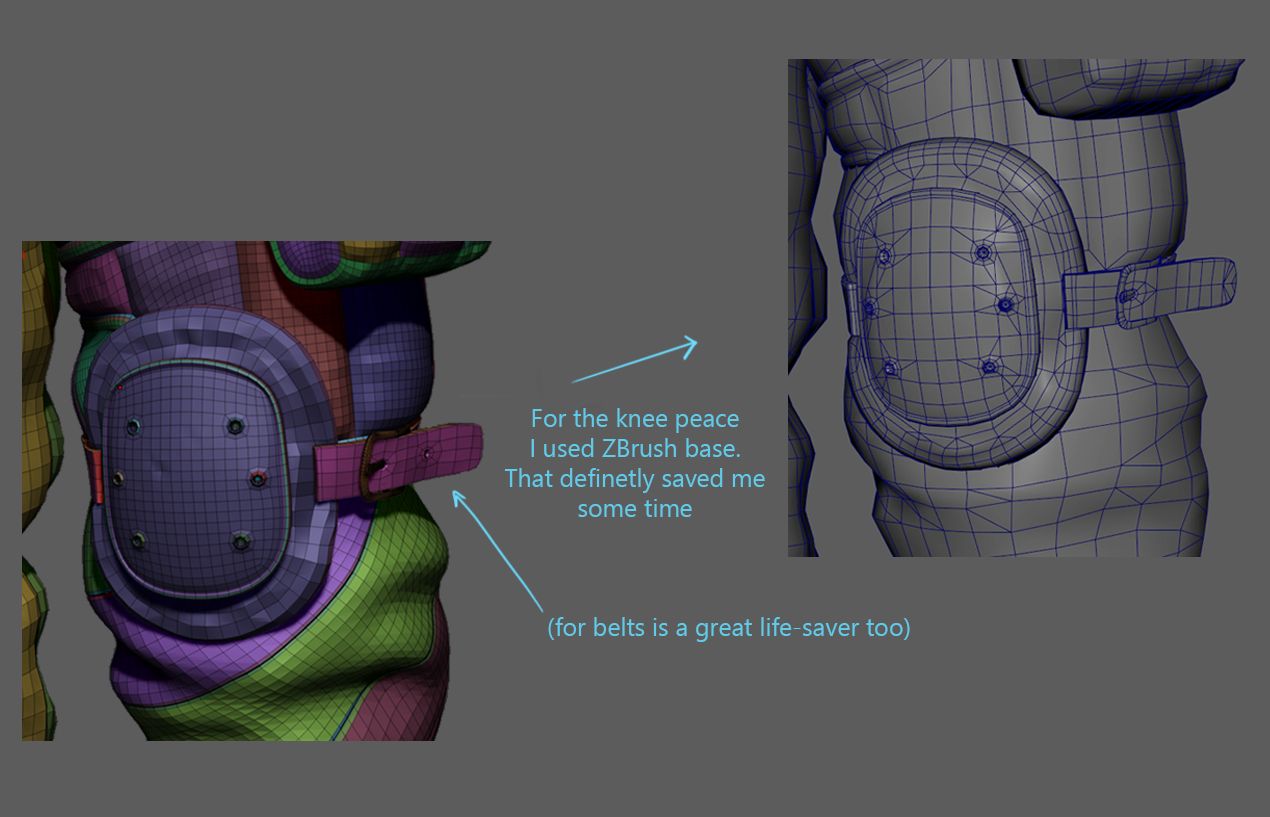
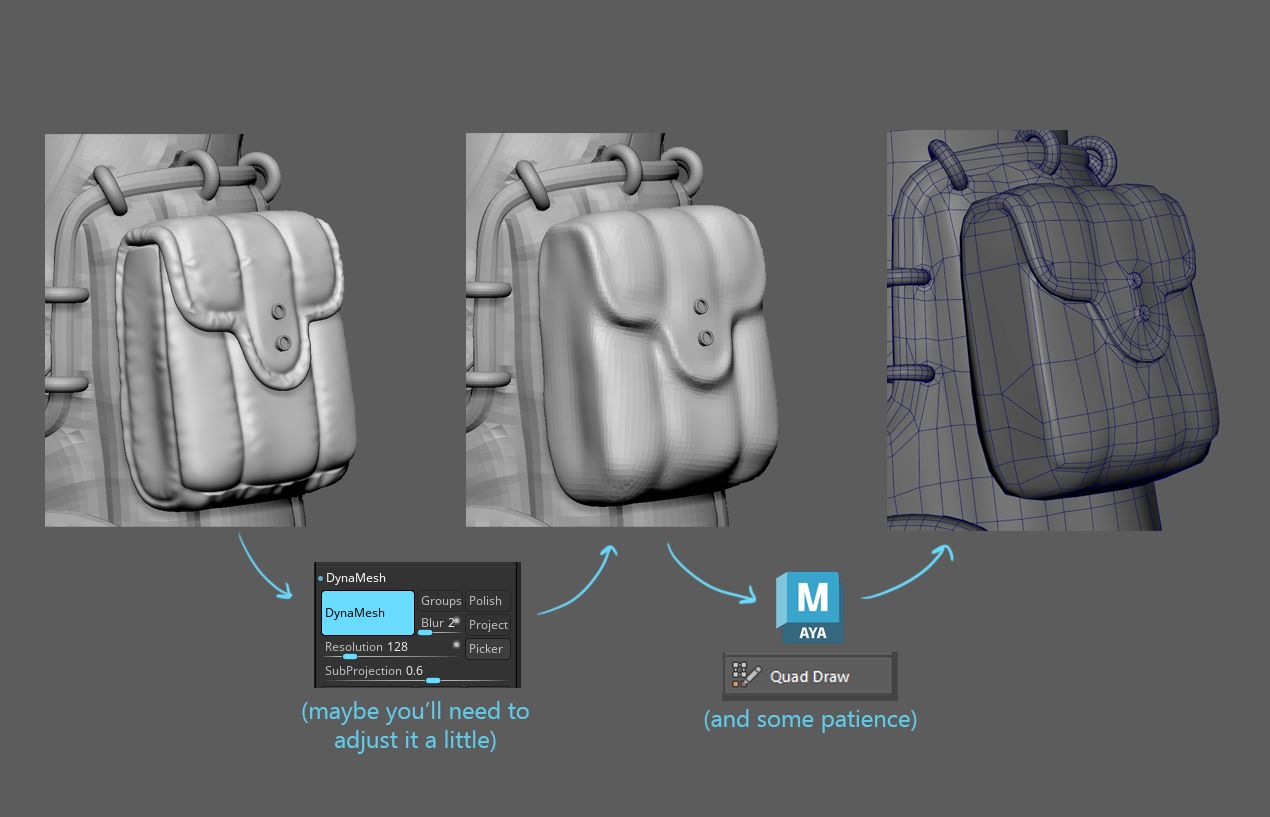
Sculpting the Outfit and the Prop
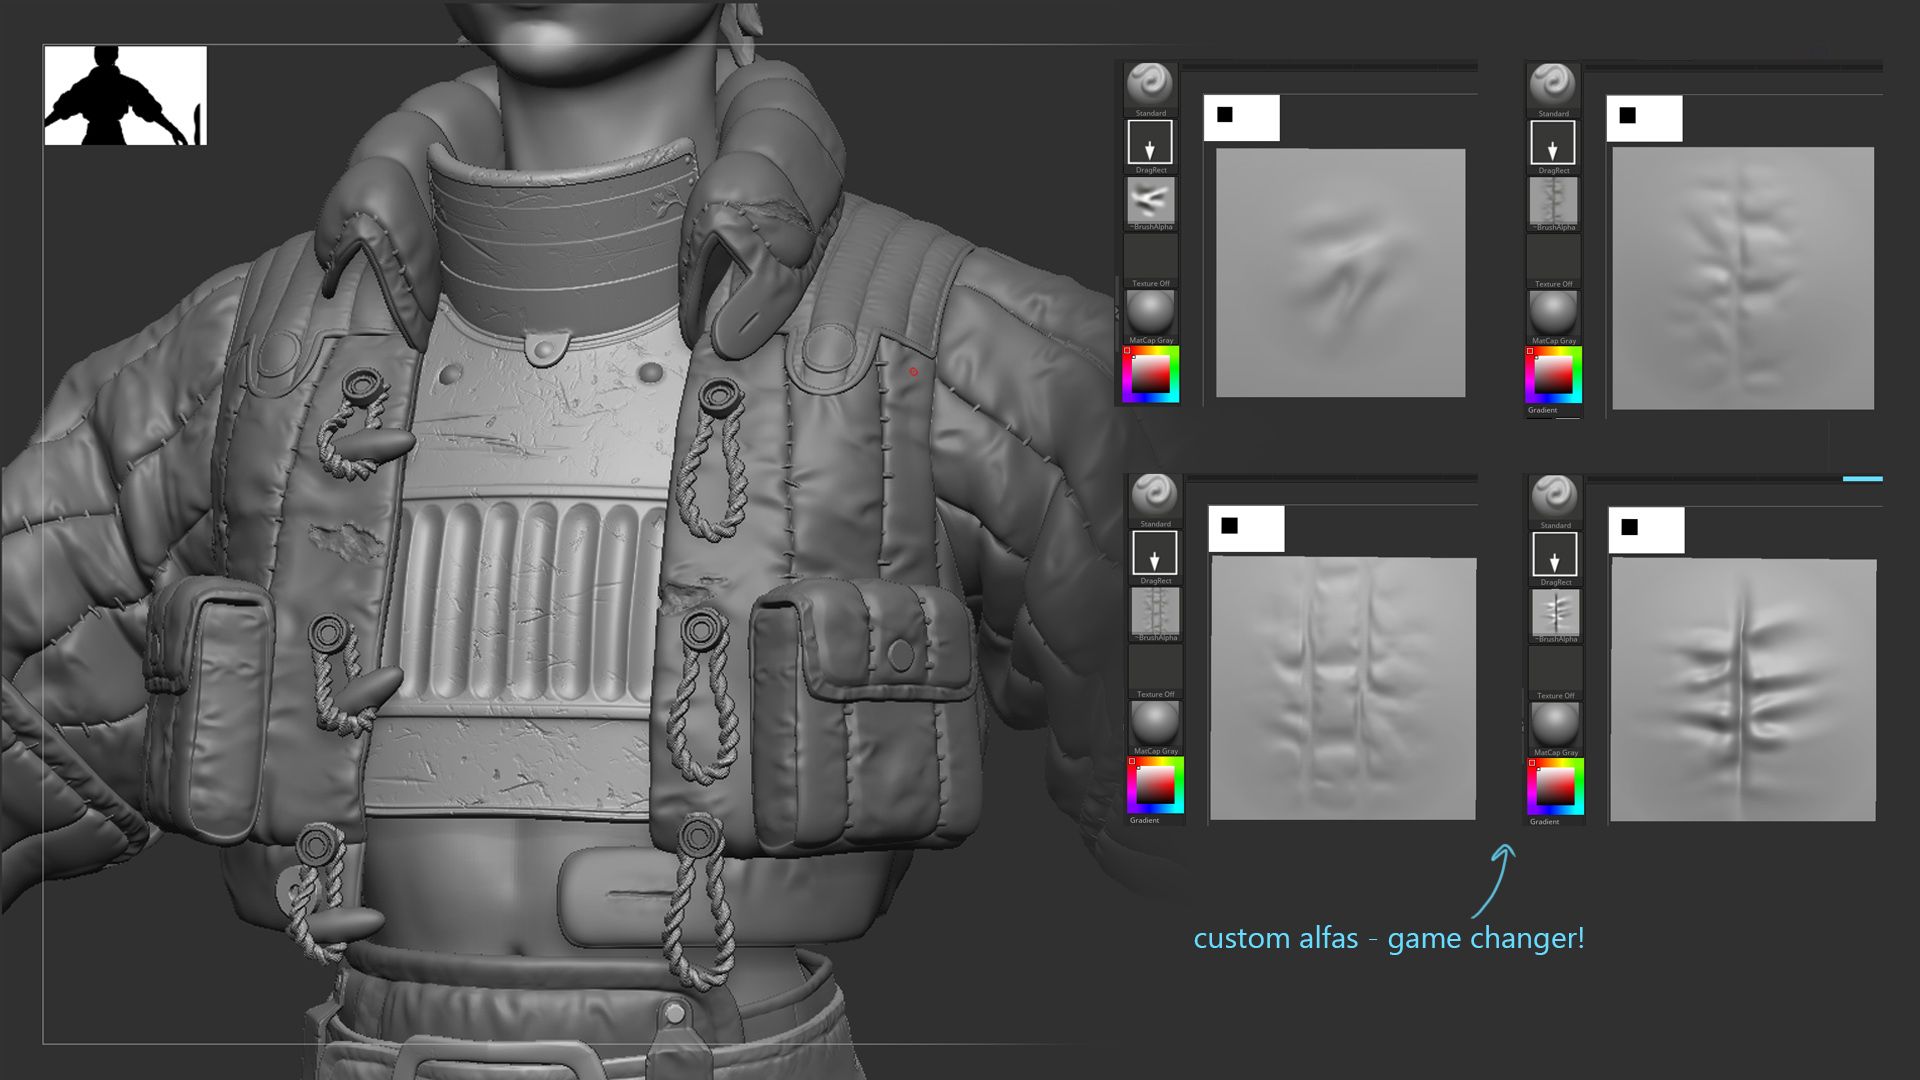
I used Marvelous Designer to create a base for the jacket and the pants. This tutorial helped me a lot. I remeshed Marvelous geo and sculpted it over in ZBrush. I created some custom alfa wrinkles for this project.
Save your custom alfas and brushes from every project. I was never so agile when sculpting!
Using layers helps a lot to have more control over the details. You can always go back! It’s non-destructive.
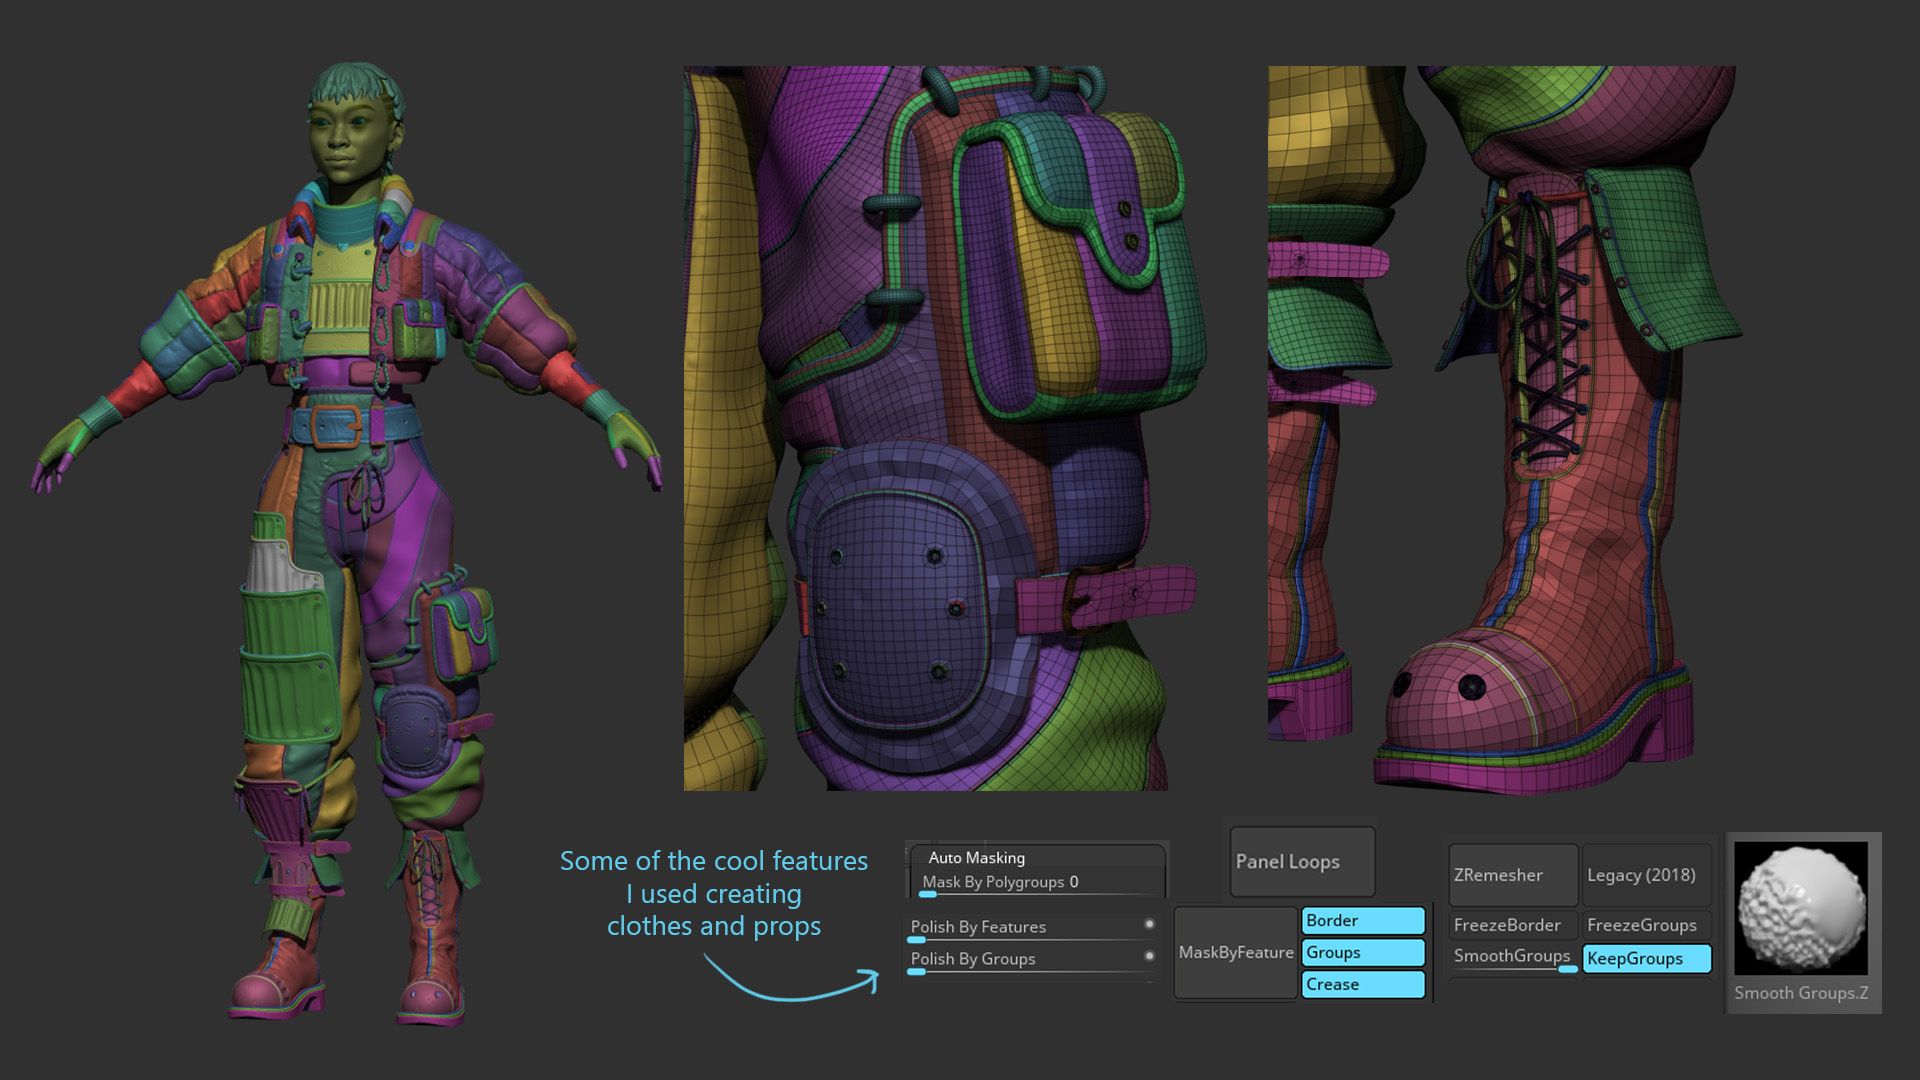
I use a lot of ZModeler. I try to maintain the lowest resolution and clean topology (as possible in ZBrush). It gives a lot of advantage when subdividing later. Especially when you do hard surfaces like boots or something “softer” like bags.
A tip: try to maintain polygroups until the final sculpt. You can make use of a lot of ZBrush features!
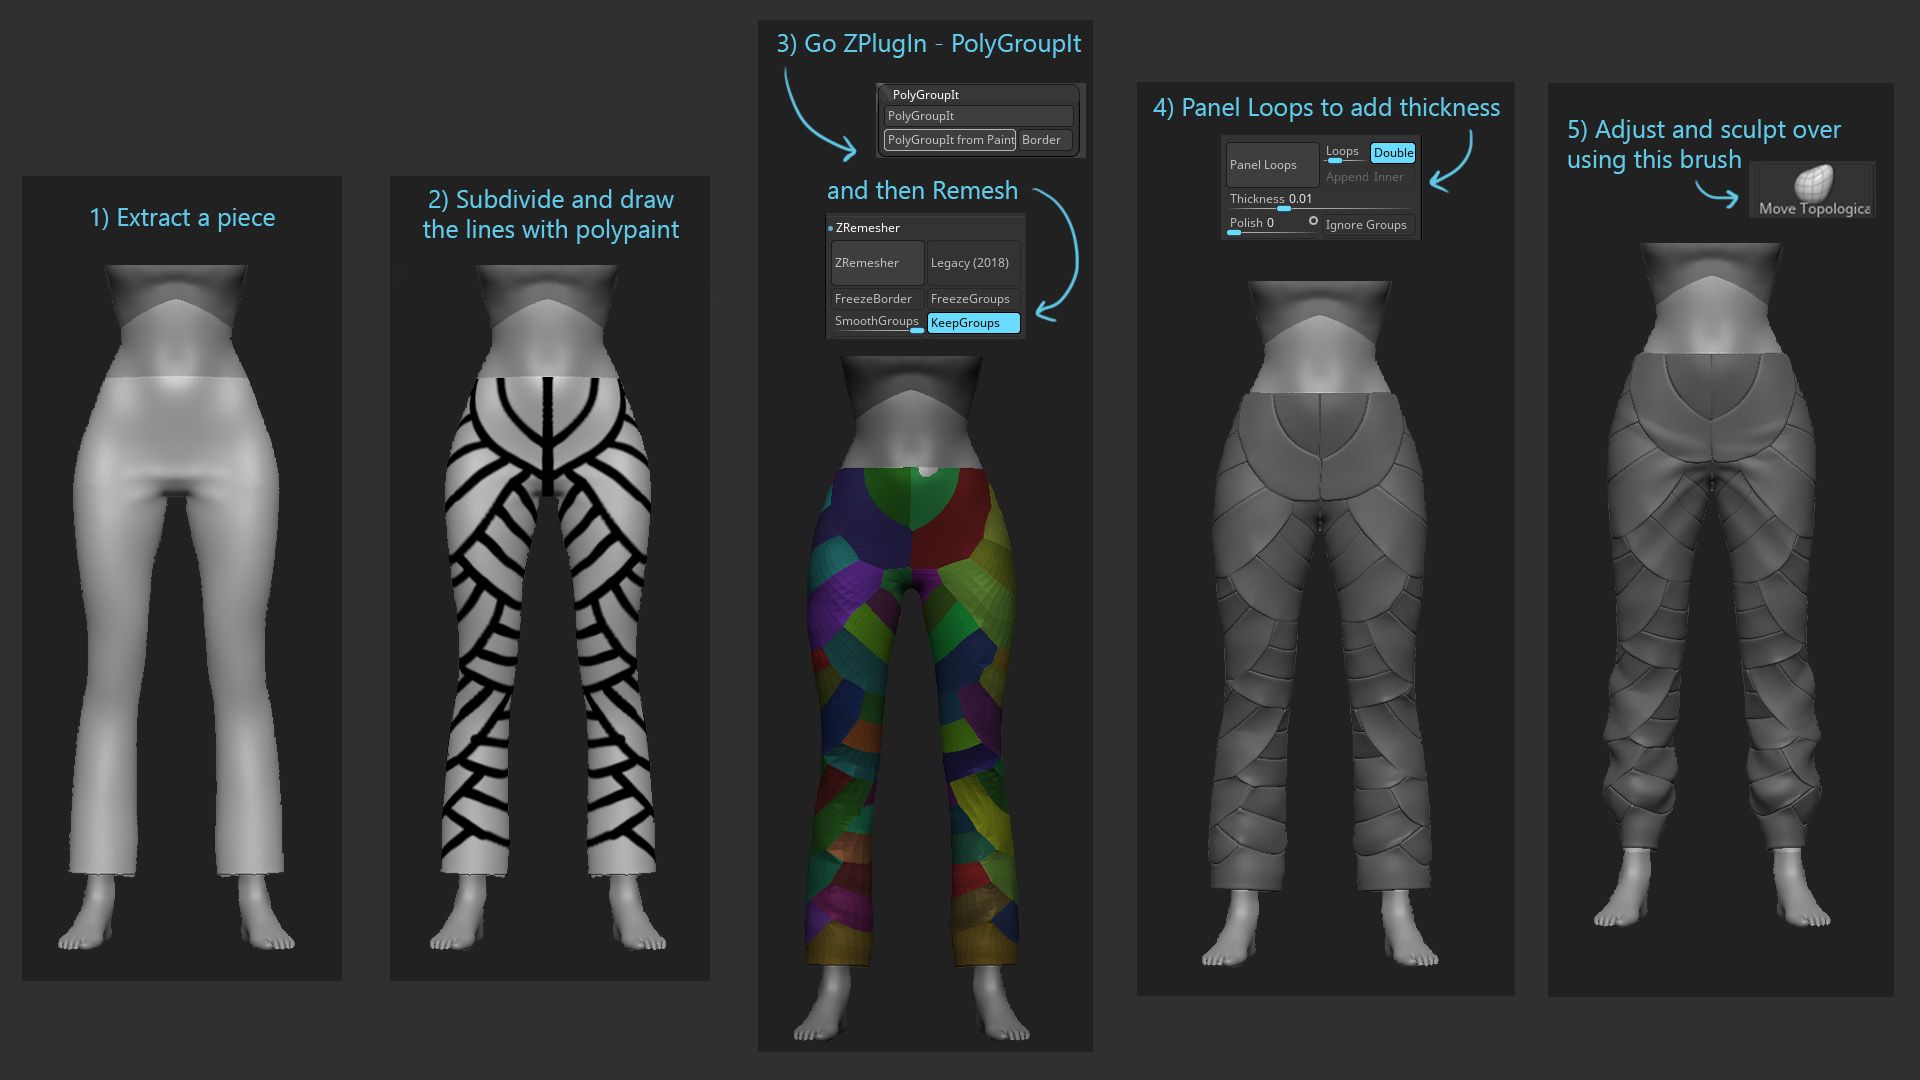
To create the patches on the pants, I used the PolyGroupIt plugin. I took inspiration from the idea from the tutorial by Alsu Rakhimova.
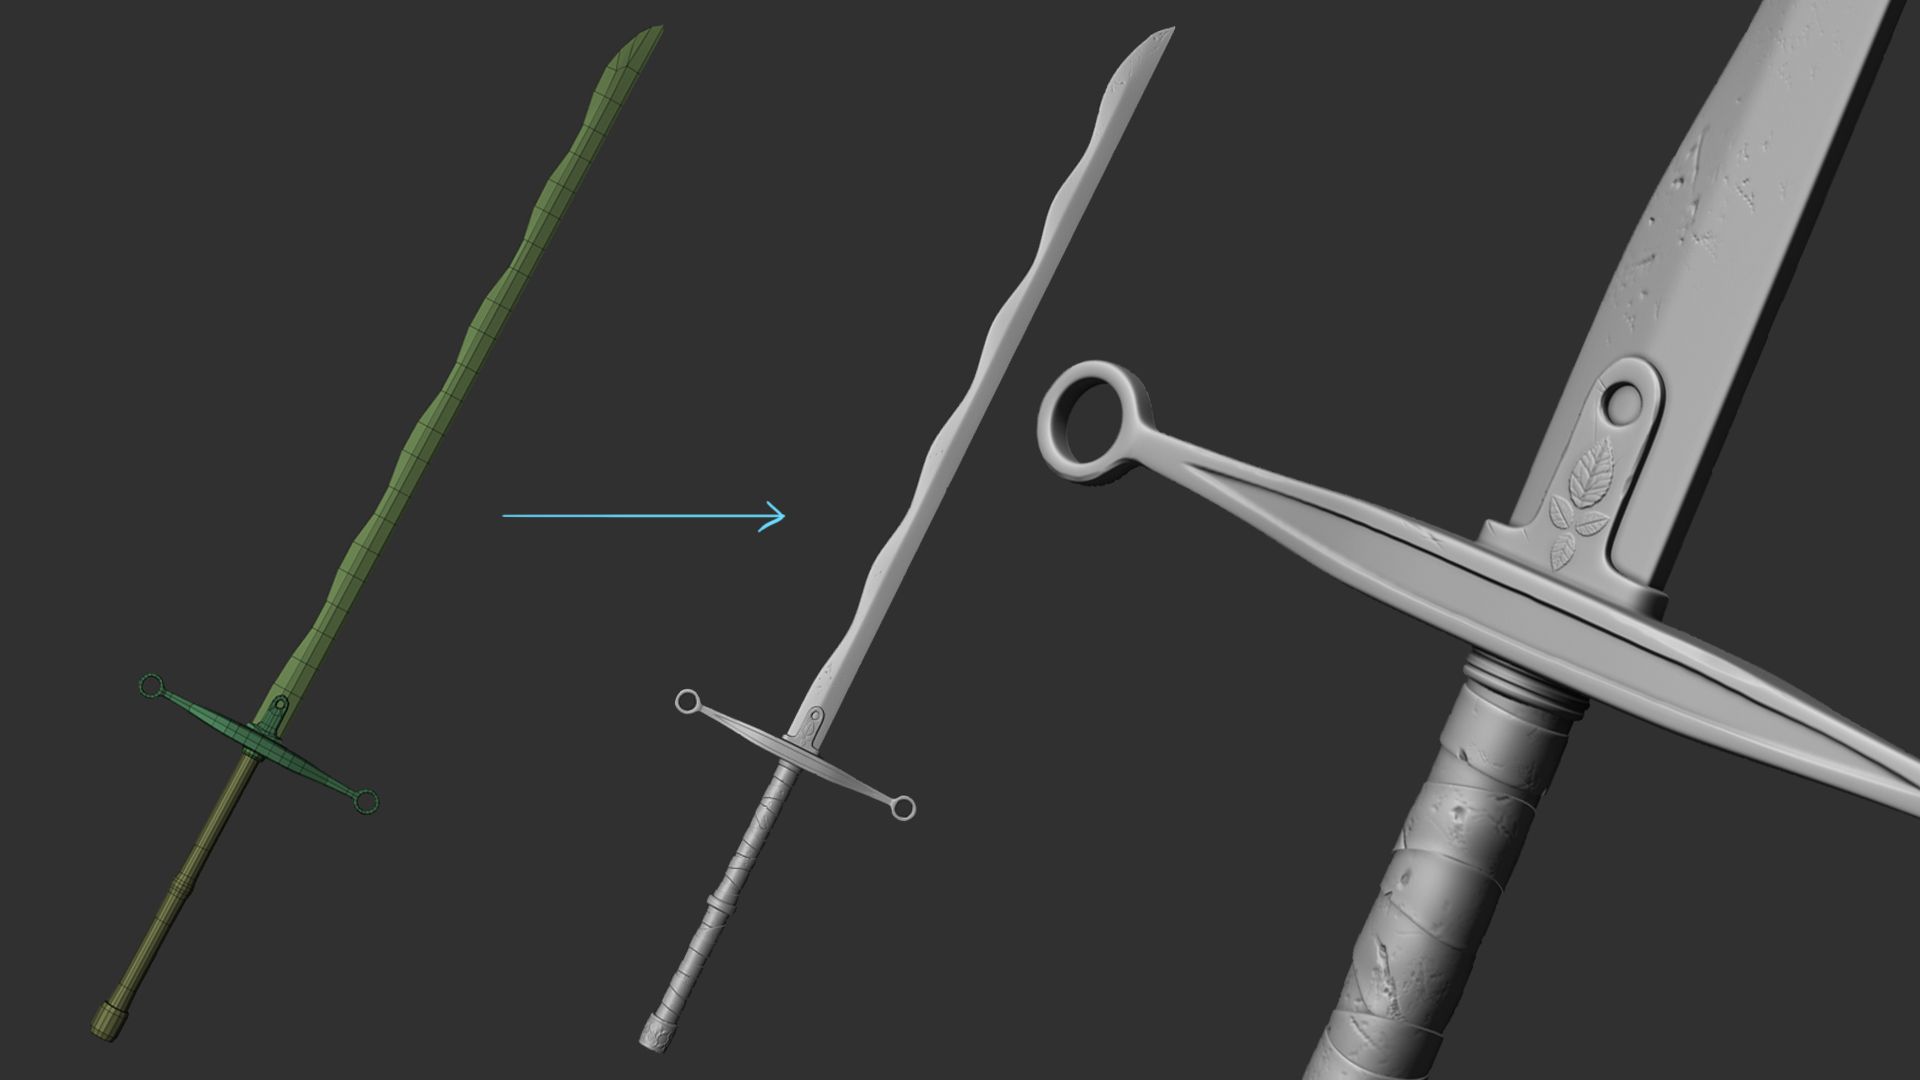
For the sword I used Maya to sculpt the base of it. Then I sculpted over. I made this with belt buckles as well. Sometimes it’s much easier than using ZModeler.
Final Sculpt
Retopolgy and UVs
Retopogy stage can be less fun than sculpting. Yet, it’s an important step to create a real-time character. I exported the decimated sculpt part by part (I had to separate it by texture sets too, because it was too heavy). Then I used Maya and its tool Quad-draw. Here are some tips that saved me time:
Try to maintain ZBrush lowest subdivision levels to have a base.
Some parts are gonna be difficult to quad-draw like an entire piece. Dynamesh it - it's gonna be a lot easier.
For a face I used XYZ topology wrapped by ZWrap, and then adjusted it and added some loops in Maya.
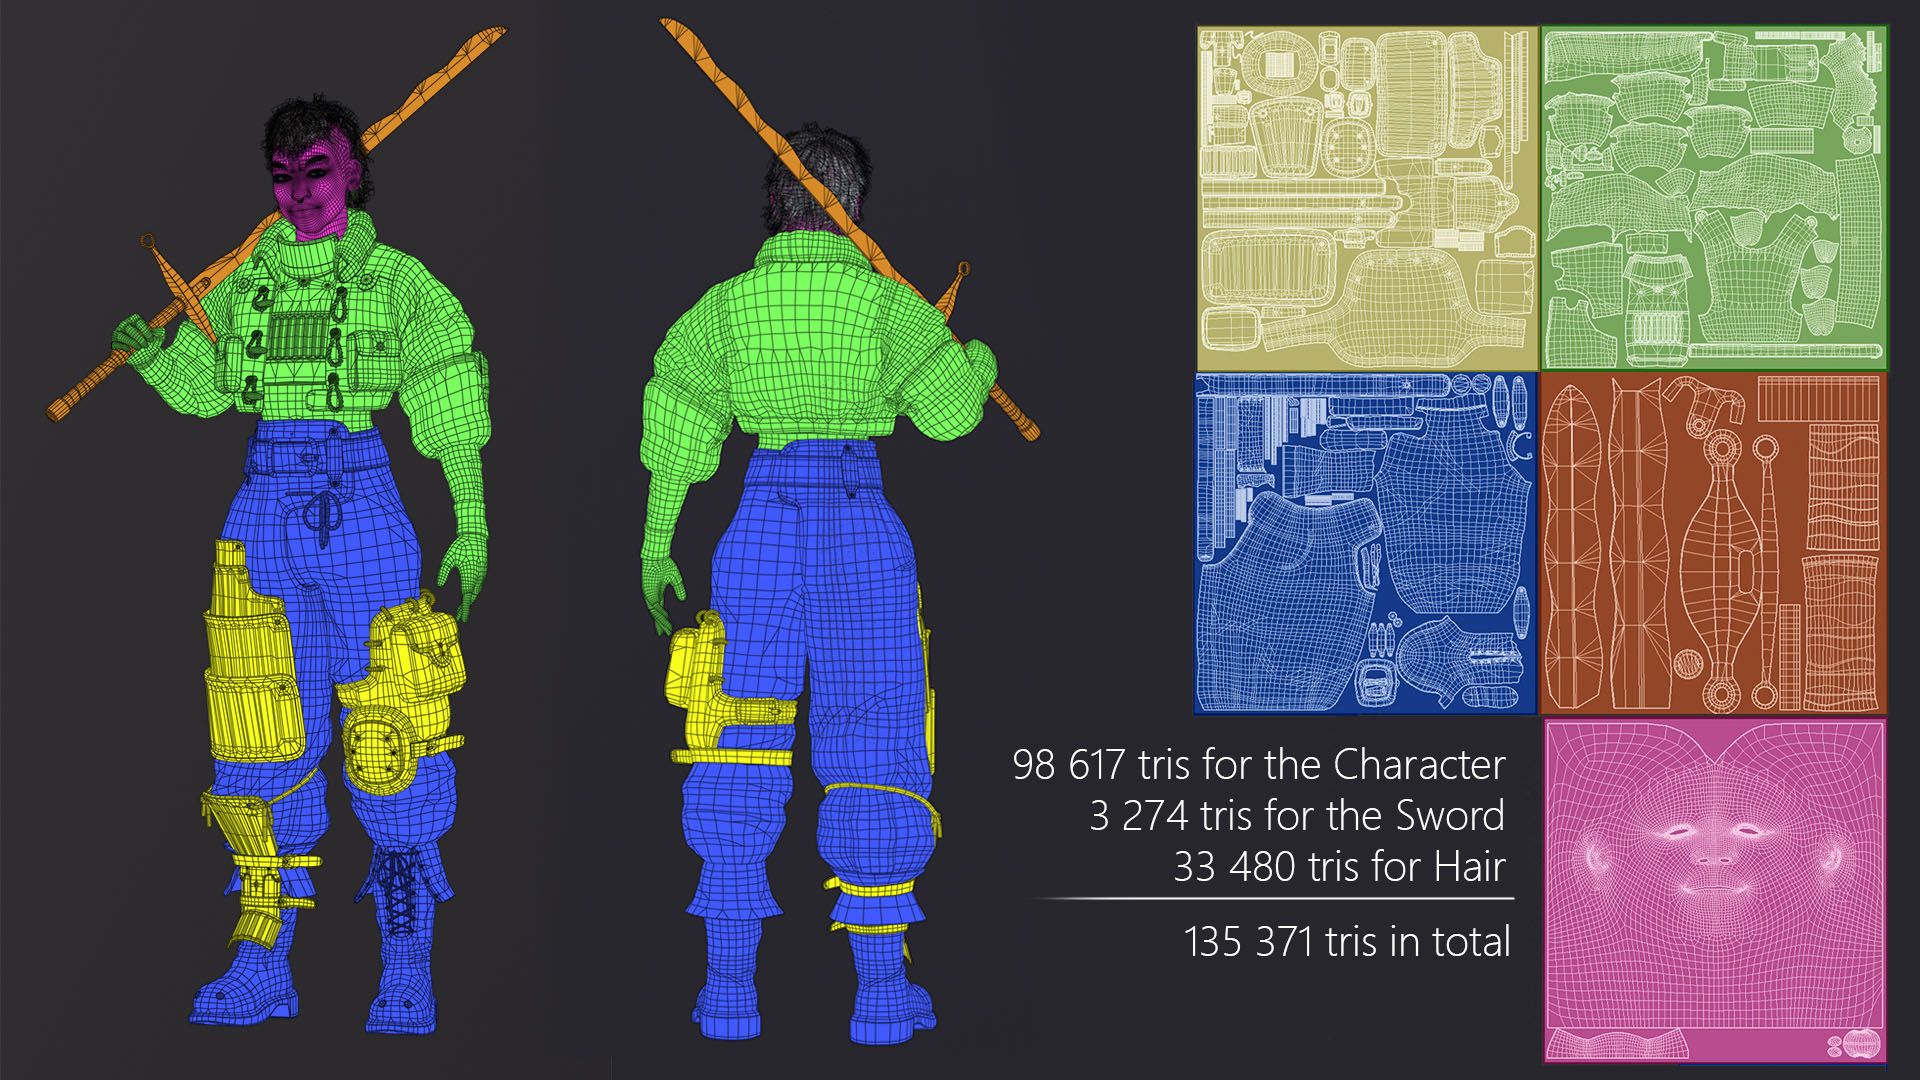
UVs I made also in Maya, by hand. I made 5 principal texture sets - Face, Torso, Pants, Bags and one for the Sword. Also later I made one for the Hair, one for the Eyes and one for the transitional mesh.
Try to make UVs the most straight possible. Especially on pieces you want to fill with details like stitches or patterns.
In total I have 135k tris including hair. It can be more optimised, but I was going for AAA main character topo.
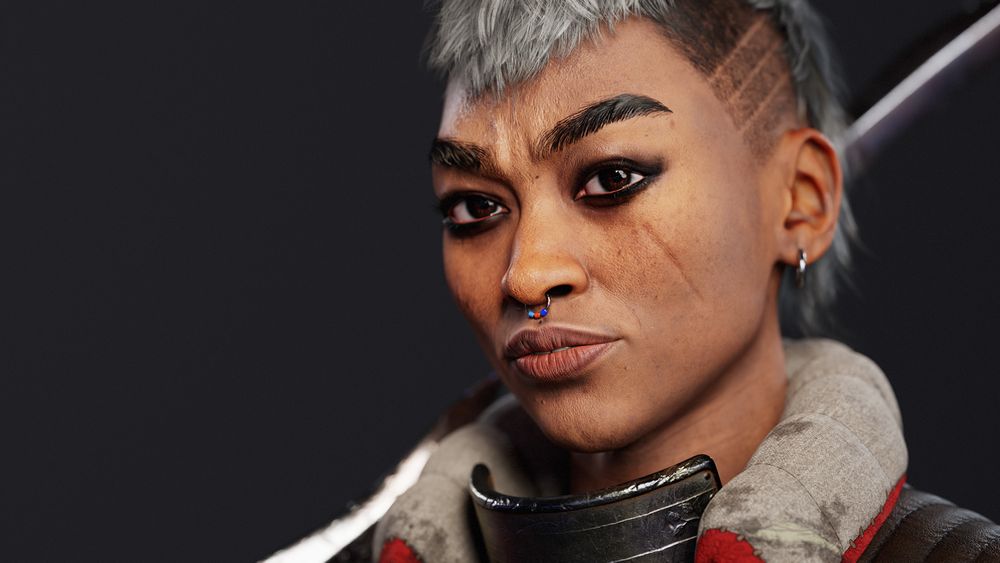
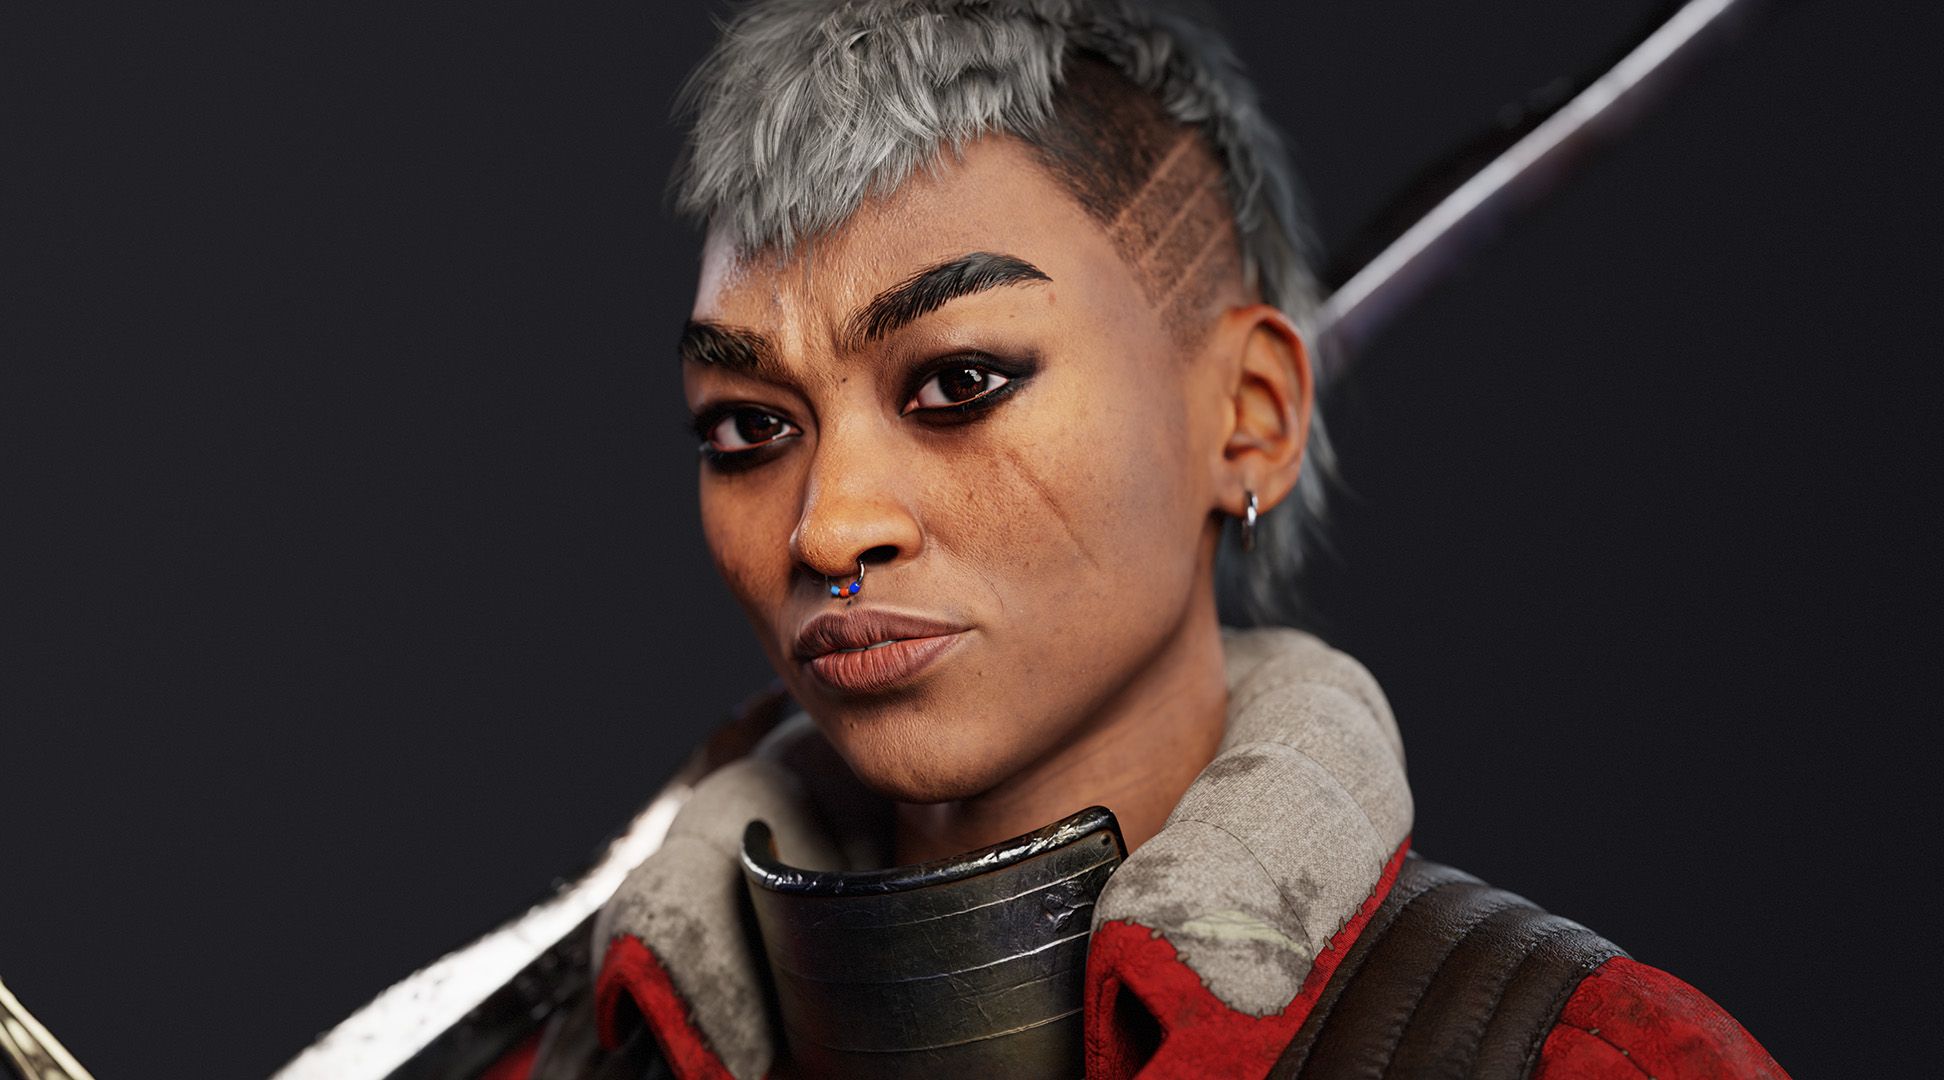
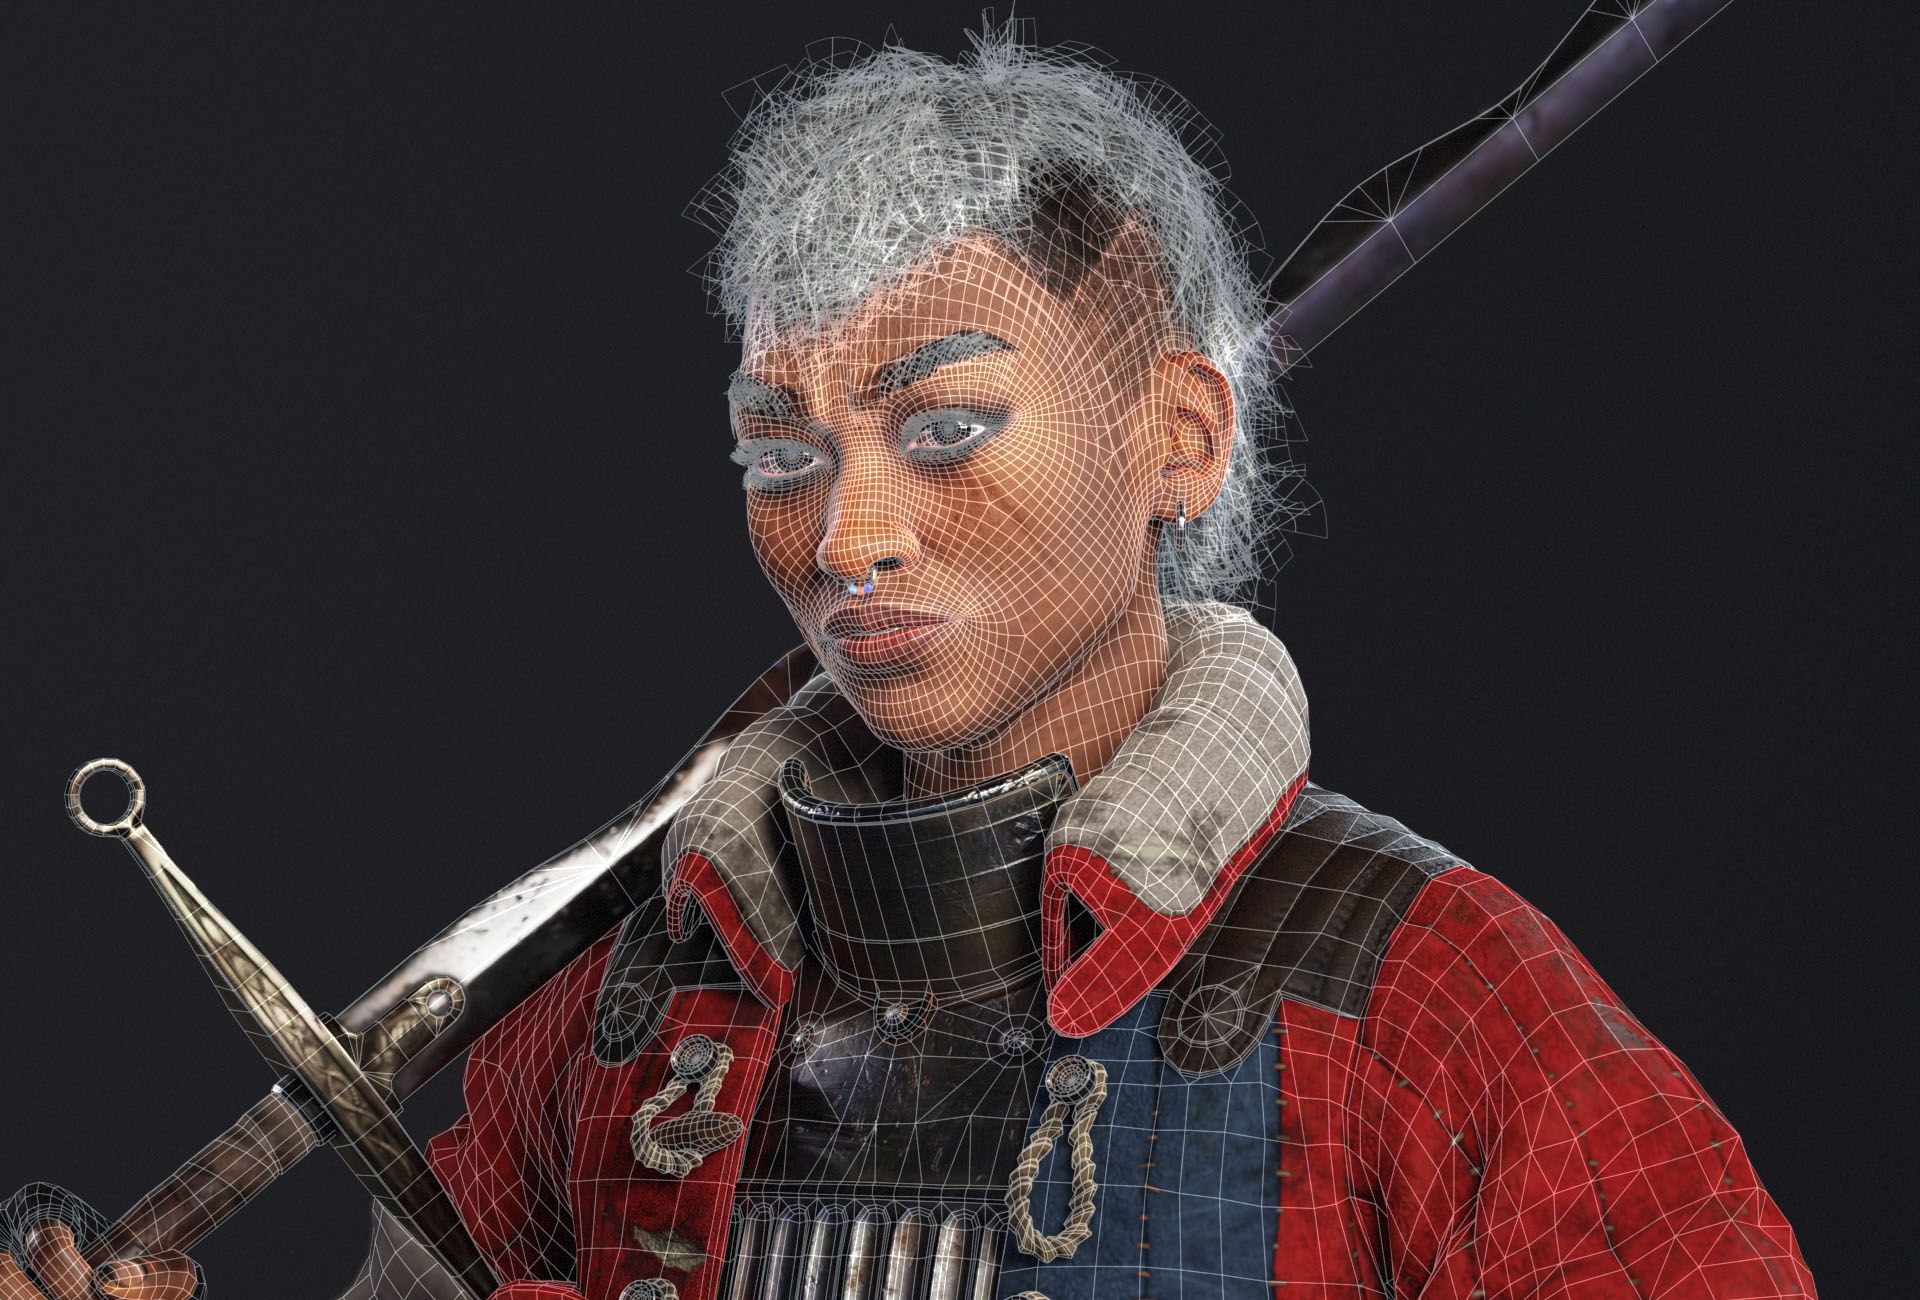
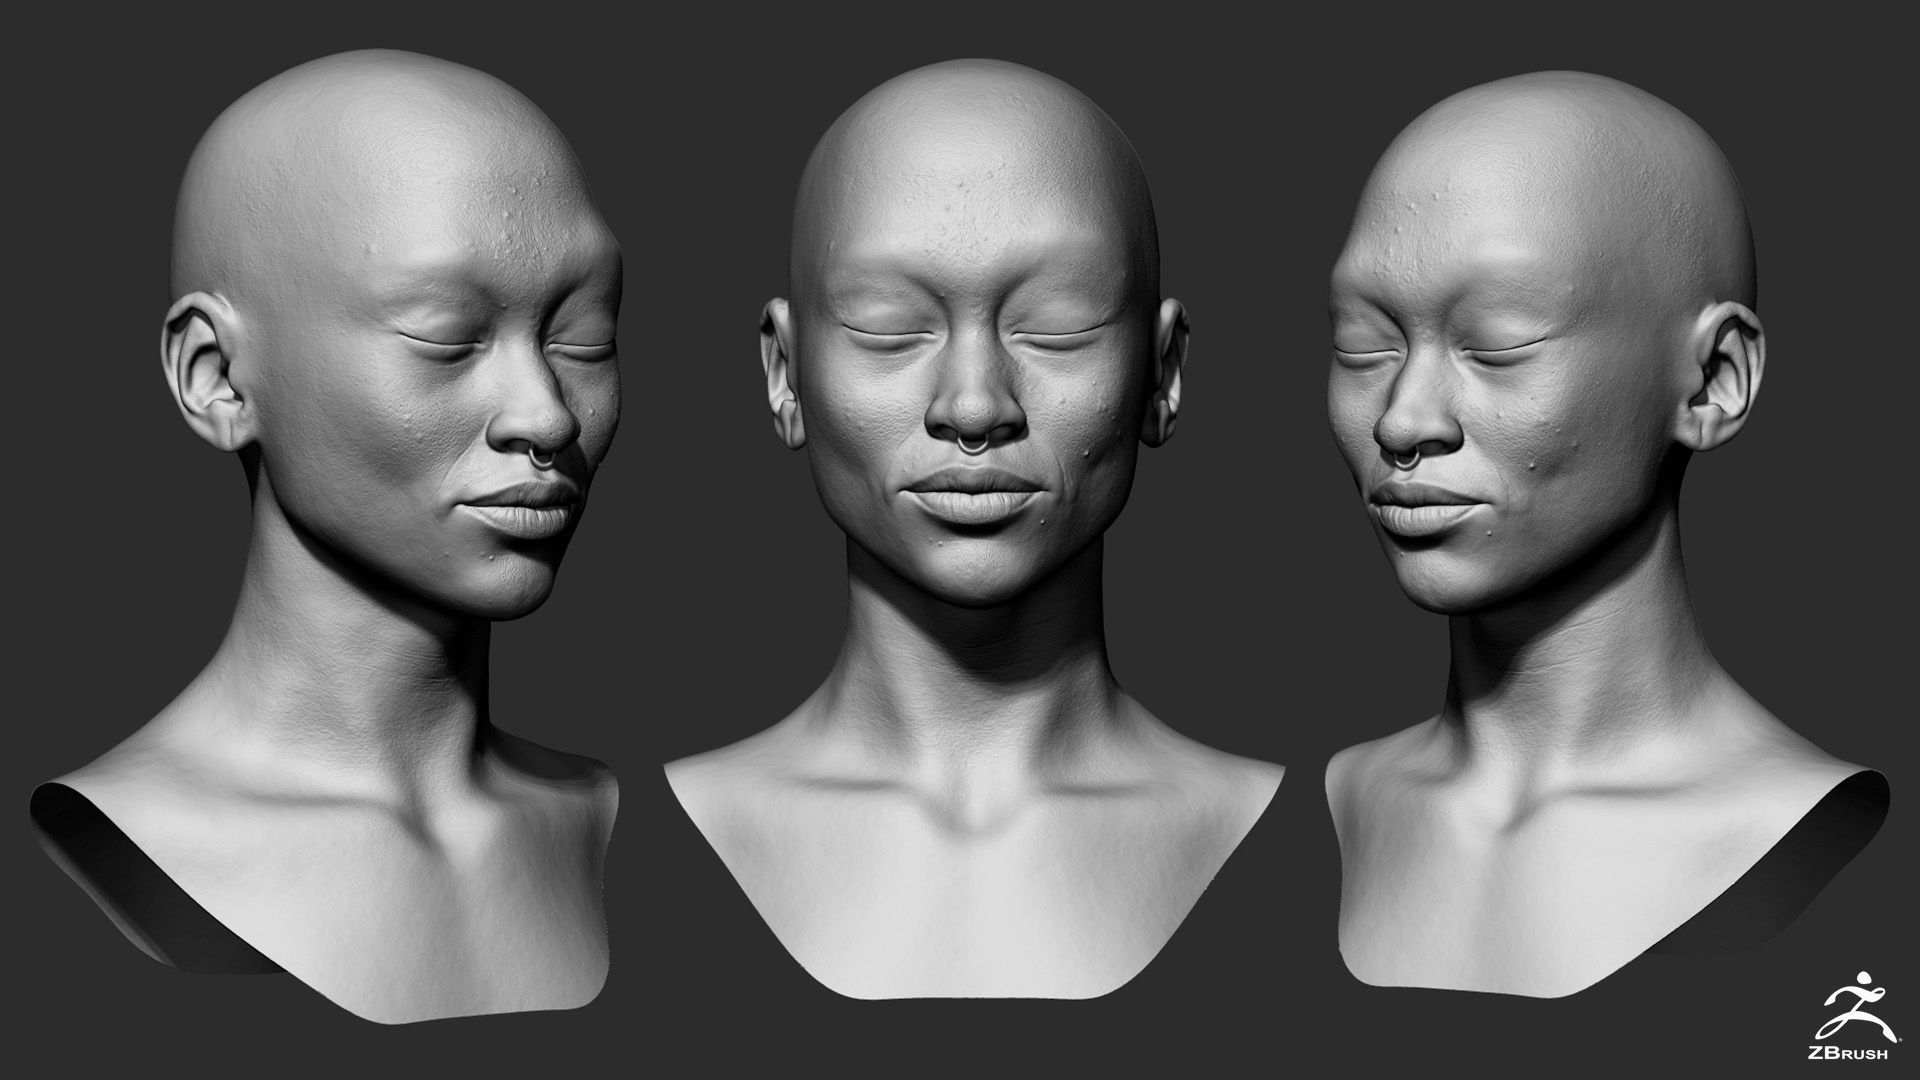
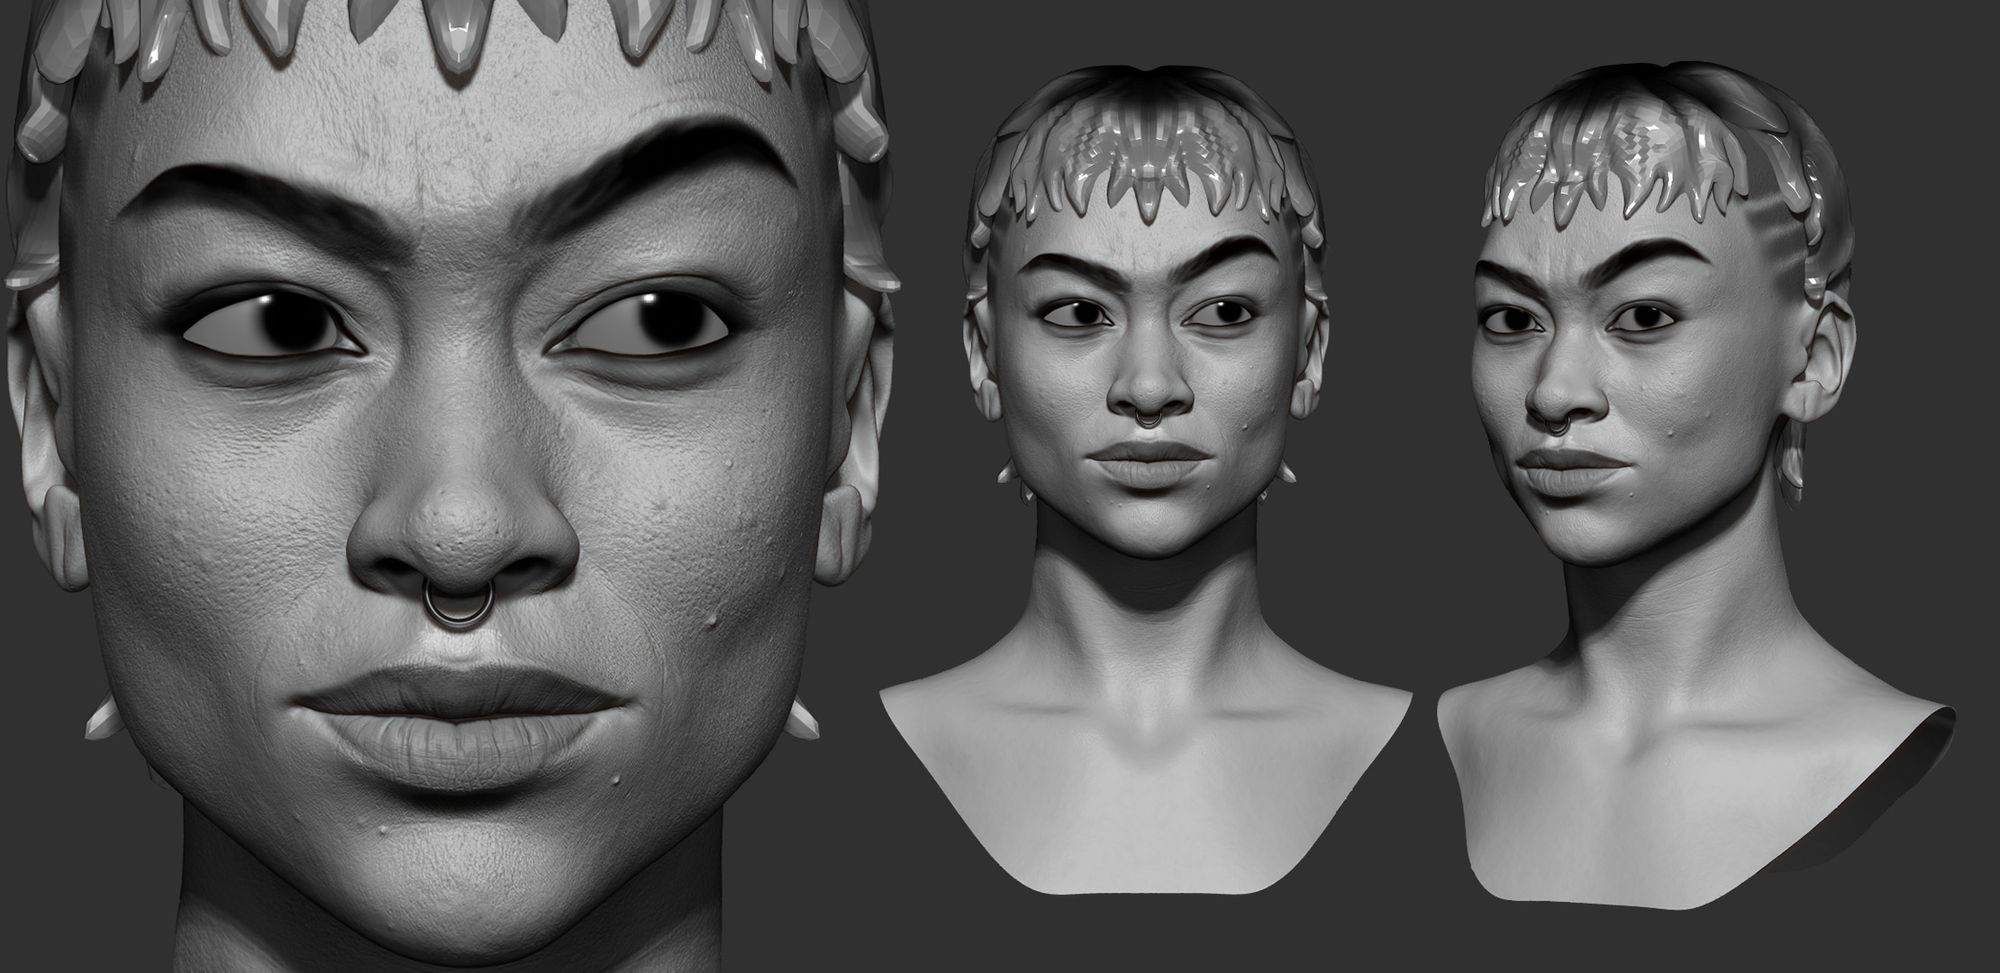
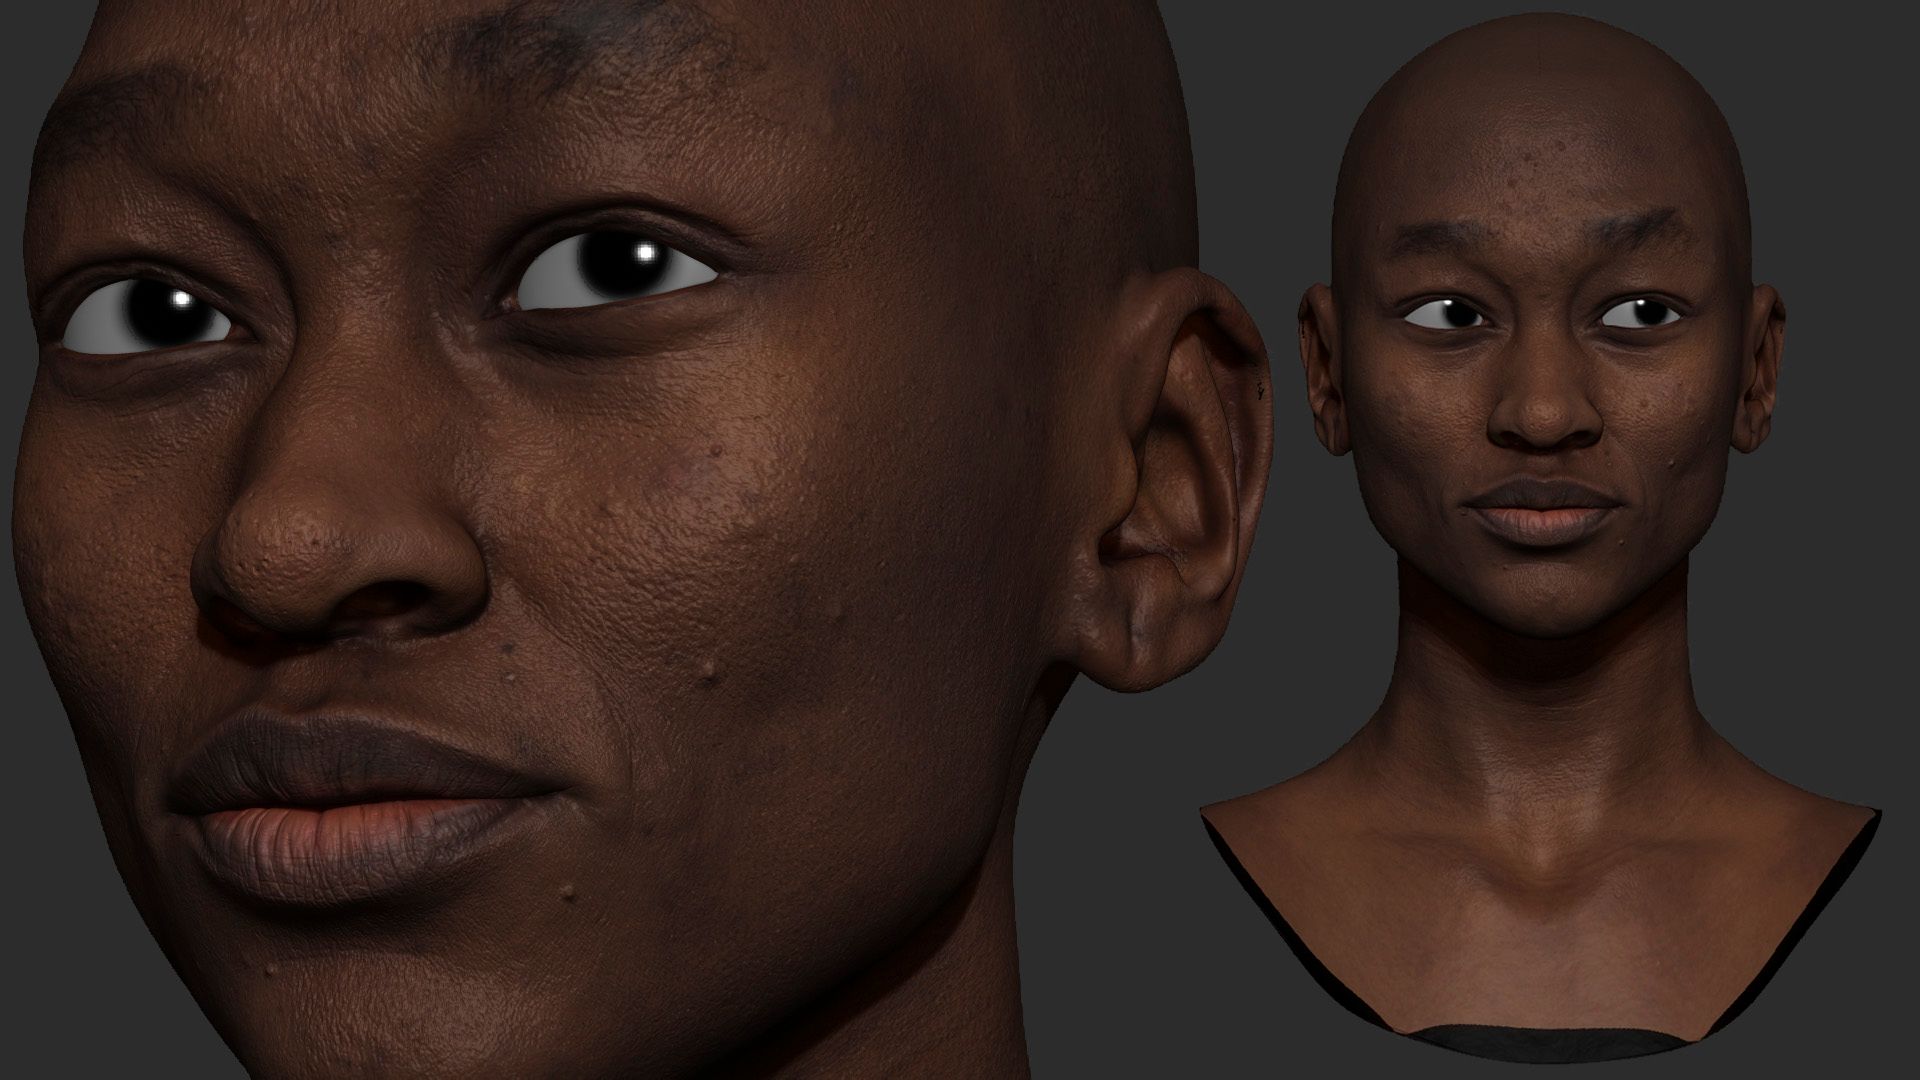
Face Sculpting
For face I made a Likeness of Tati Gabrielle and the first step was to gather references. At this stage the trick is to find a good front and profile pictures. GettyImages is great for finding high resolution shots of celebrities.
Feminine faces are more difficult to sculpt. Understanding anatomy and making pauses while working are crucial. Sometimes a fresh look can help you more than sculpting hours non-stop.
I used ZBrush to sculpt her face and XYZ texture to make a skin texture. Also I used XNormals for baking and transferring XYZ textures to the geo. I learnt all I know about creating digital doubles and face anatomy on ArtHeroes' course.
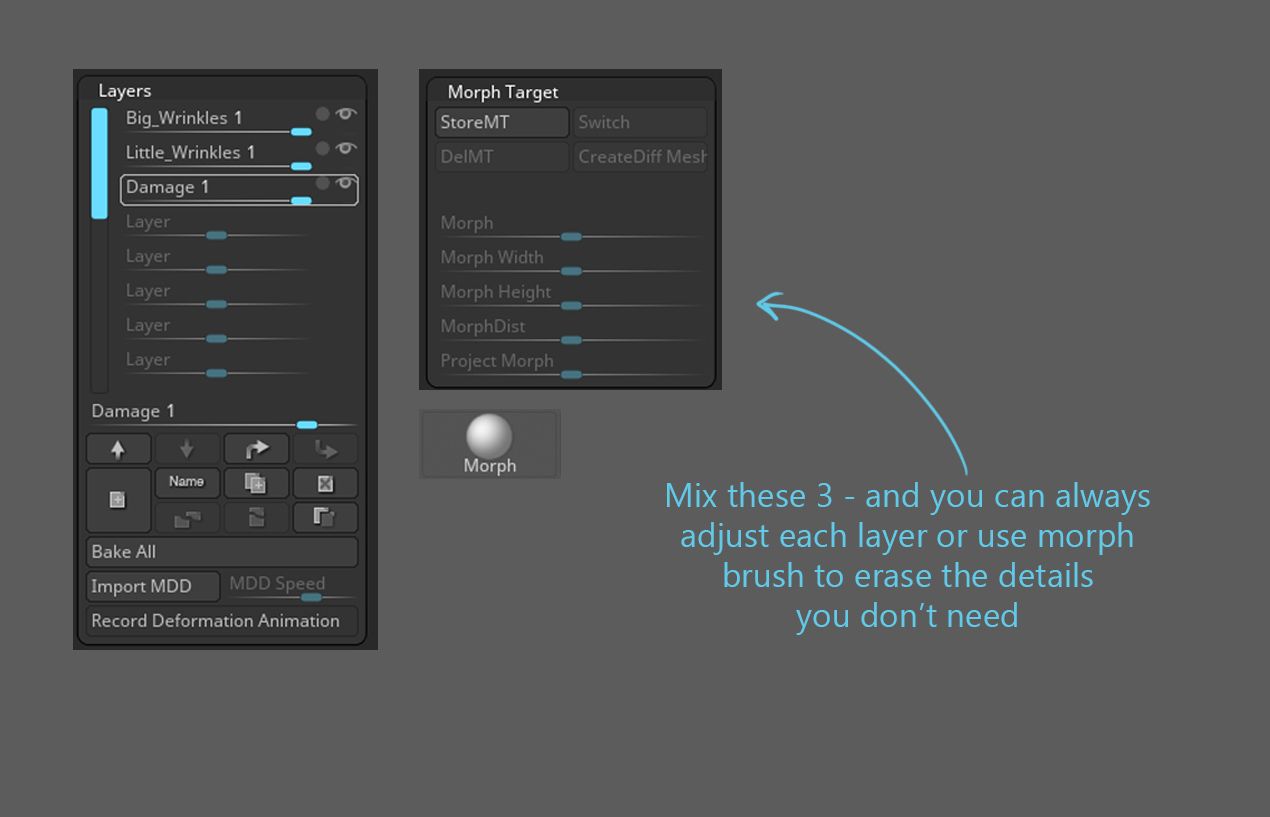
One of the most important things I’ve learnt is to have a lot of adjustable layers. In this project I have 15 different layers. Every one of them goes for different stages of sculpting:
A tip: sometimes you’ll need to do a little painting of brows, eyes and hair. It helps to hit the likeness you want.
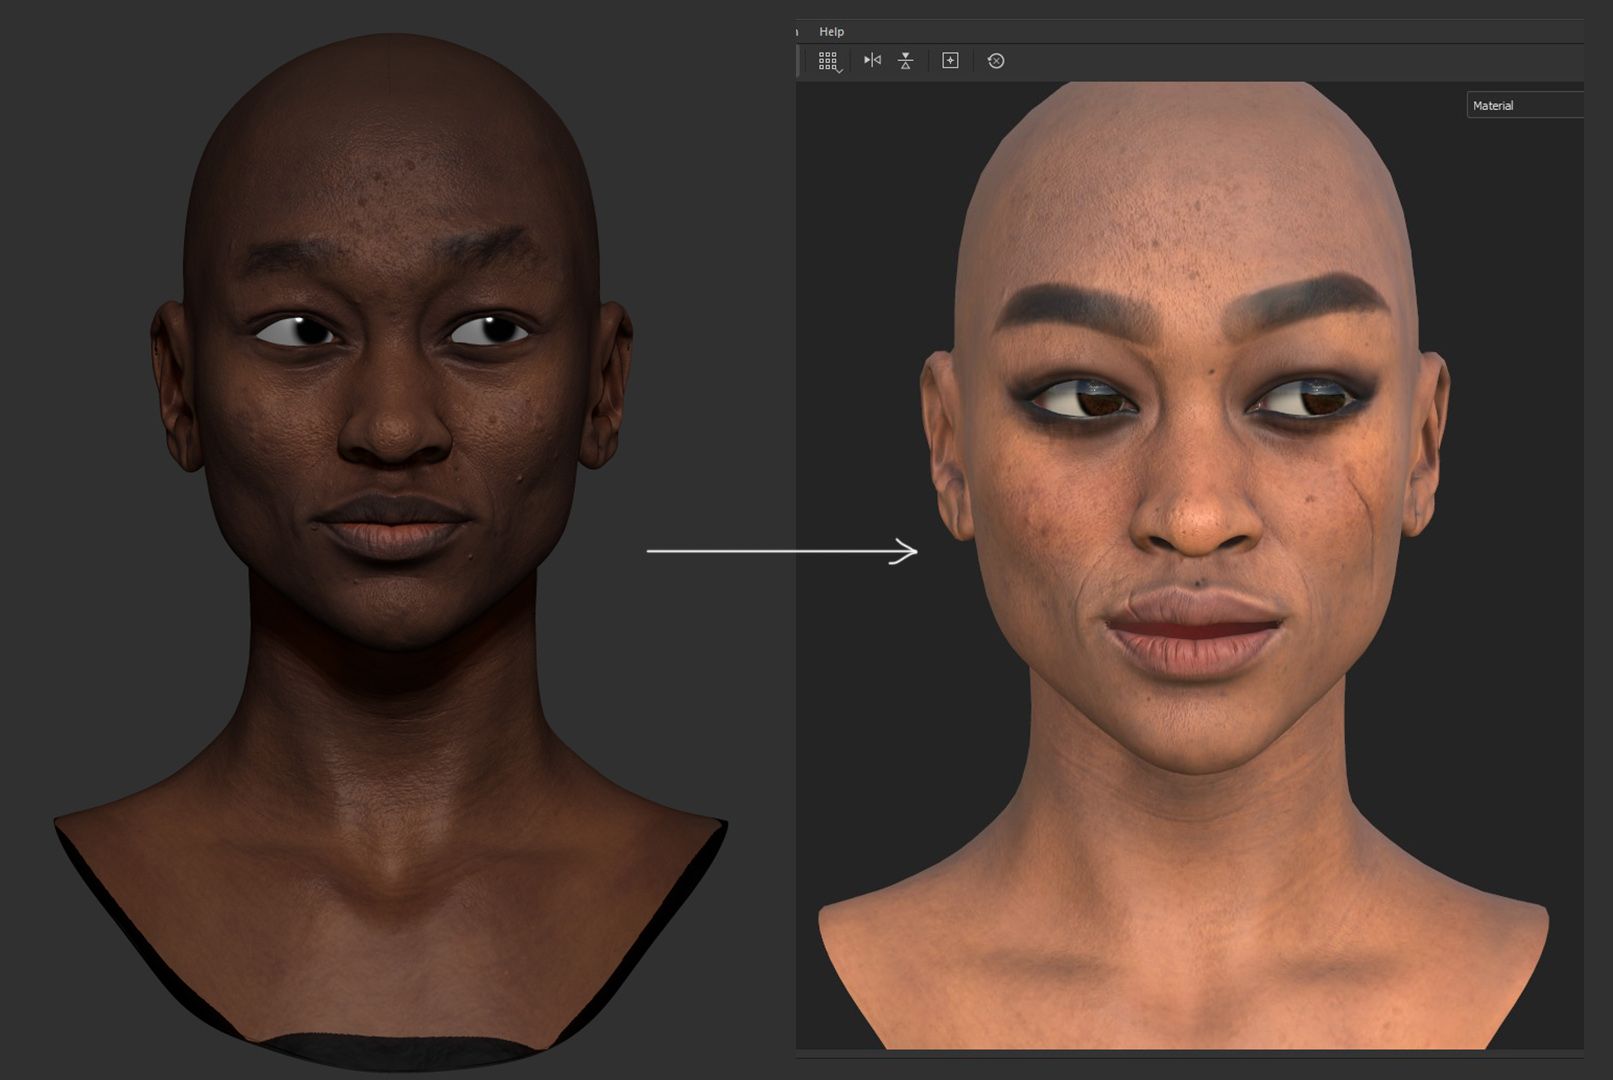
Also, on this stage I’ve applied XYZ Diffuse channel, I used ZWrap transfer textures:
Texturing
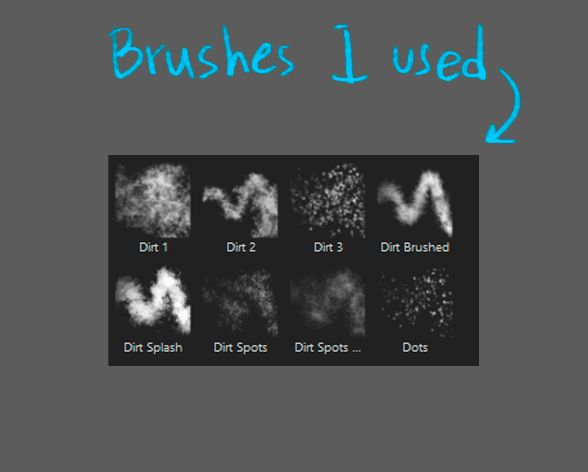
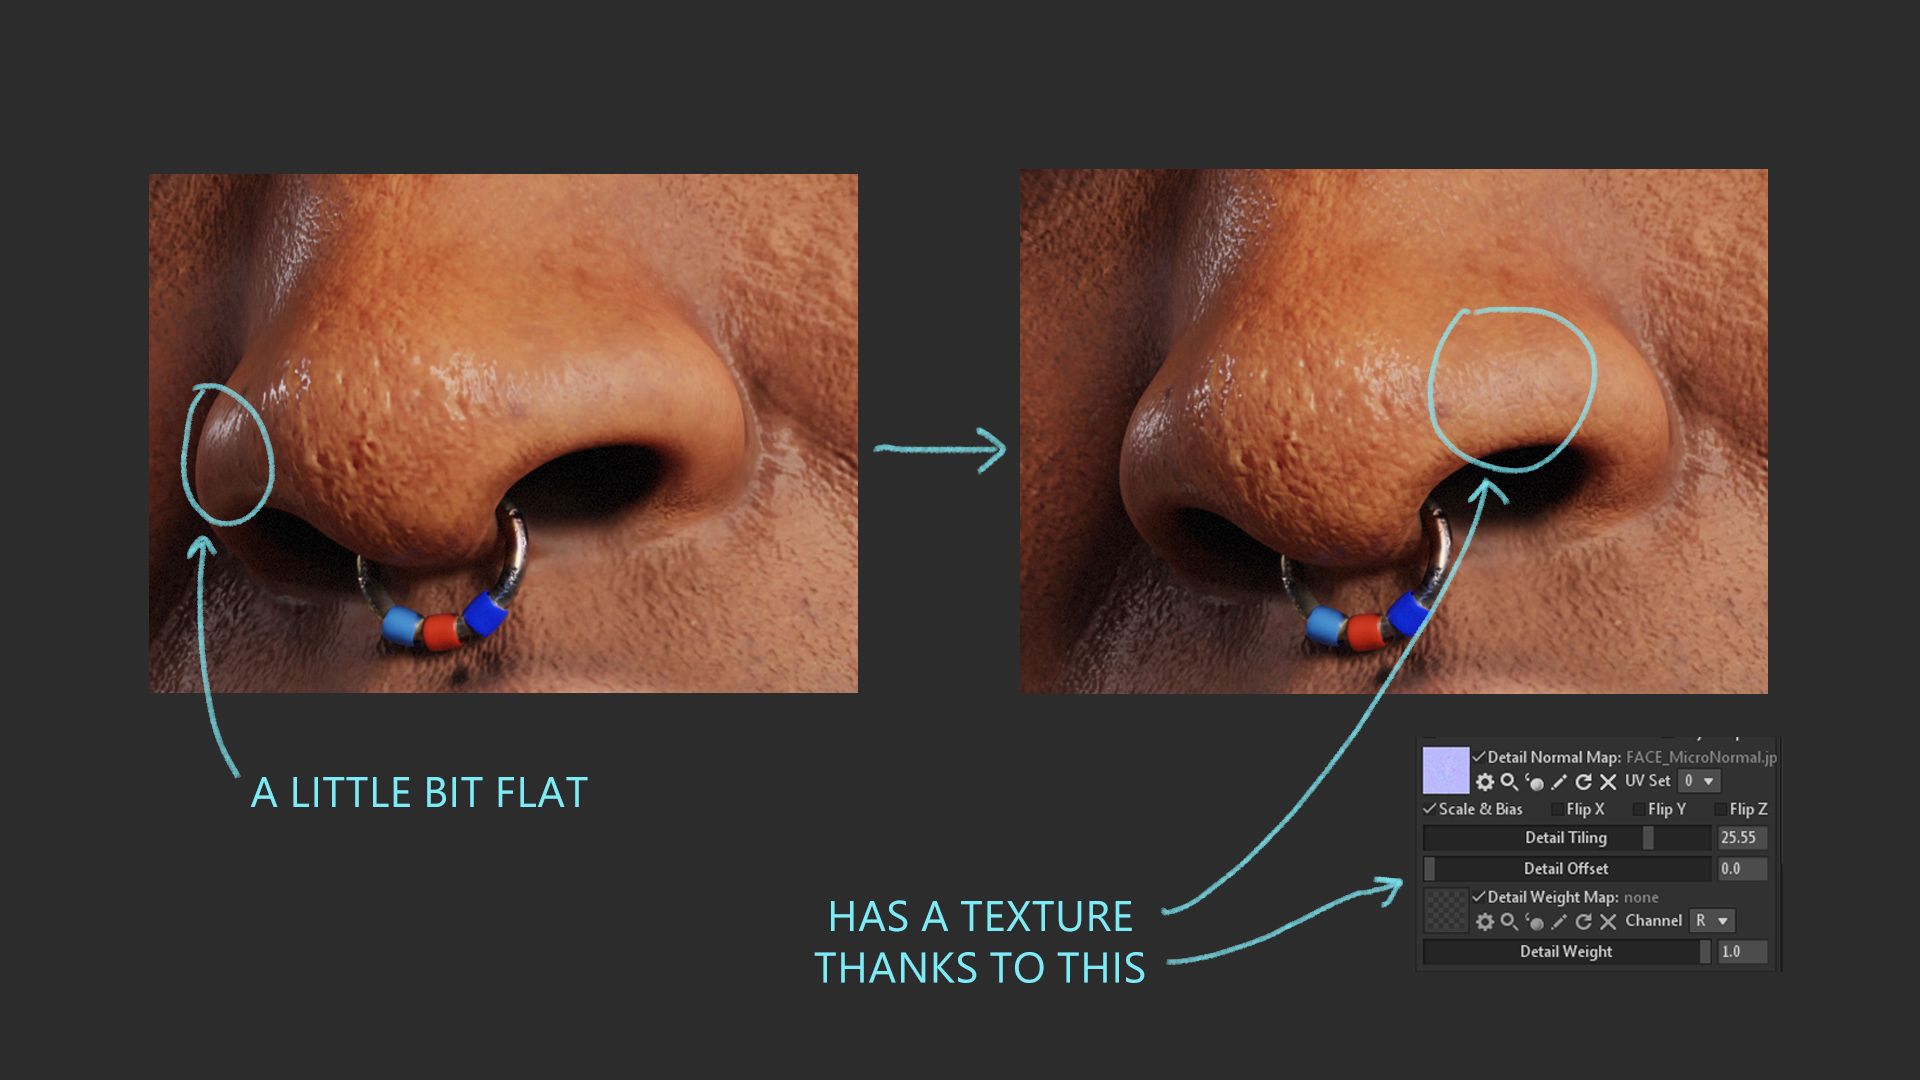
For texturing I use Substance Painter. To texture the face, I used XYZ base and then textured by hand with Dirt brushes. Also I added a scar using height.
At this stage I also try to do look-dev in Marmoset. It’s always better to test the textures in the render engine. Depending if it looks good, the textures need adjusting. For example, for Marmoset and Unreal it happens a lot that the Roughness is too low and the shader is too shiny.
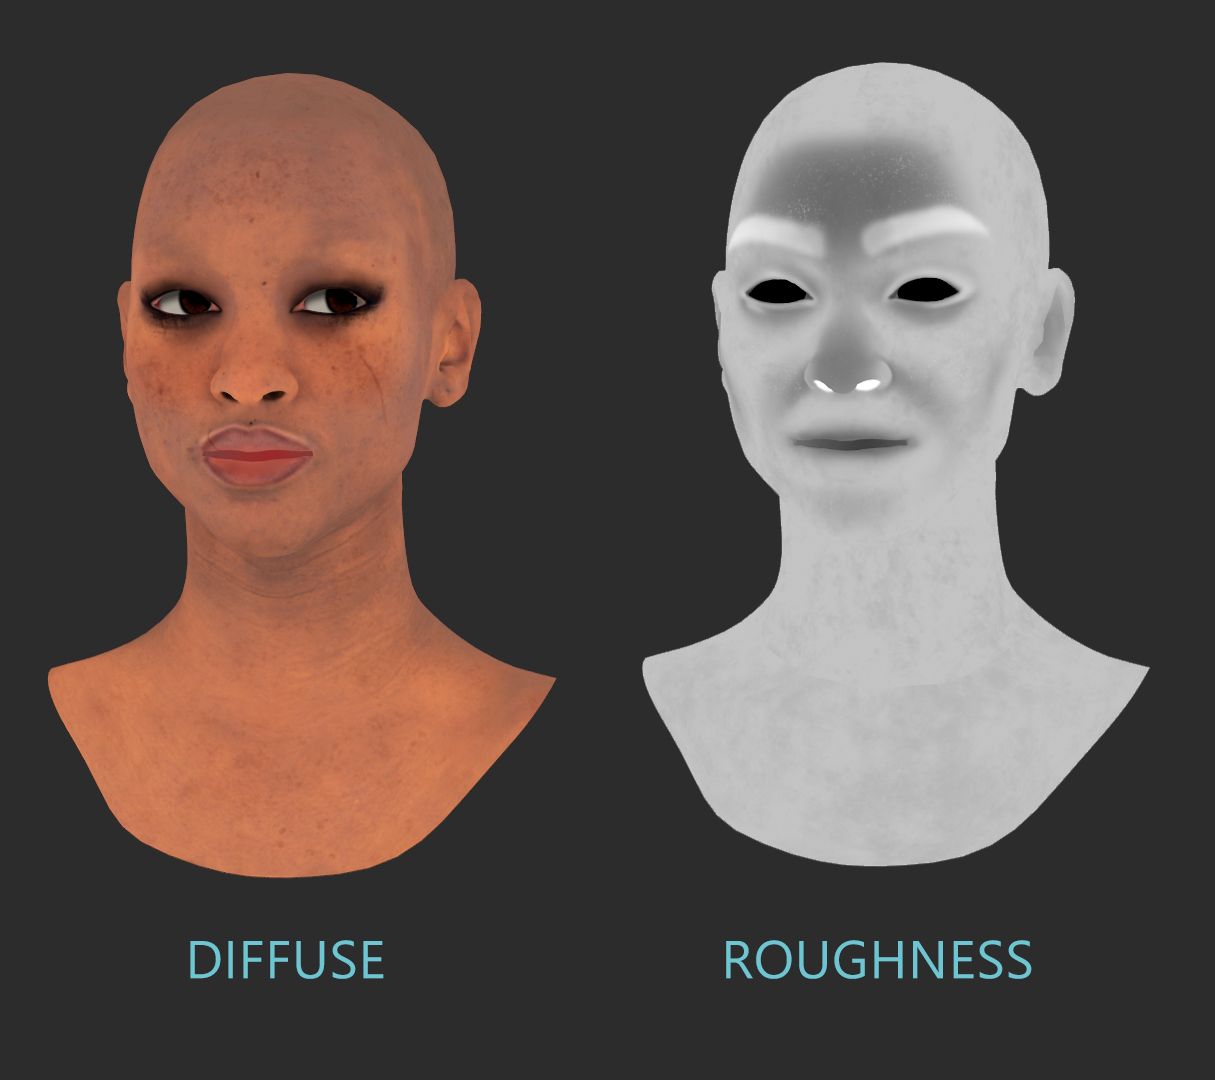
For Diffuse: go layer by layer as if it was a real face. Sunburn, Acne imperfections, Discoloration and Hyperpigmentation.
For SSS: go for the areas that are the finest: Ears, Nose and the Eyes. Also, the hands.
For Roughness: Think about real skin, every race and every ethnicity has its own skin type. The T-Zone is the most shiny.
Use micro normal with a tileable texture of skin to reduce flatness of some areas. It's made in-engine. Depending where you work - Unreal or Marmoset.
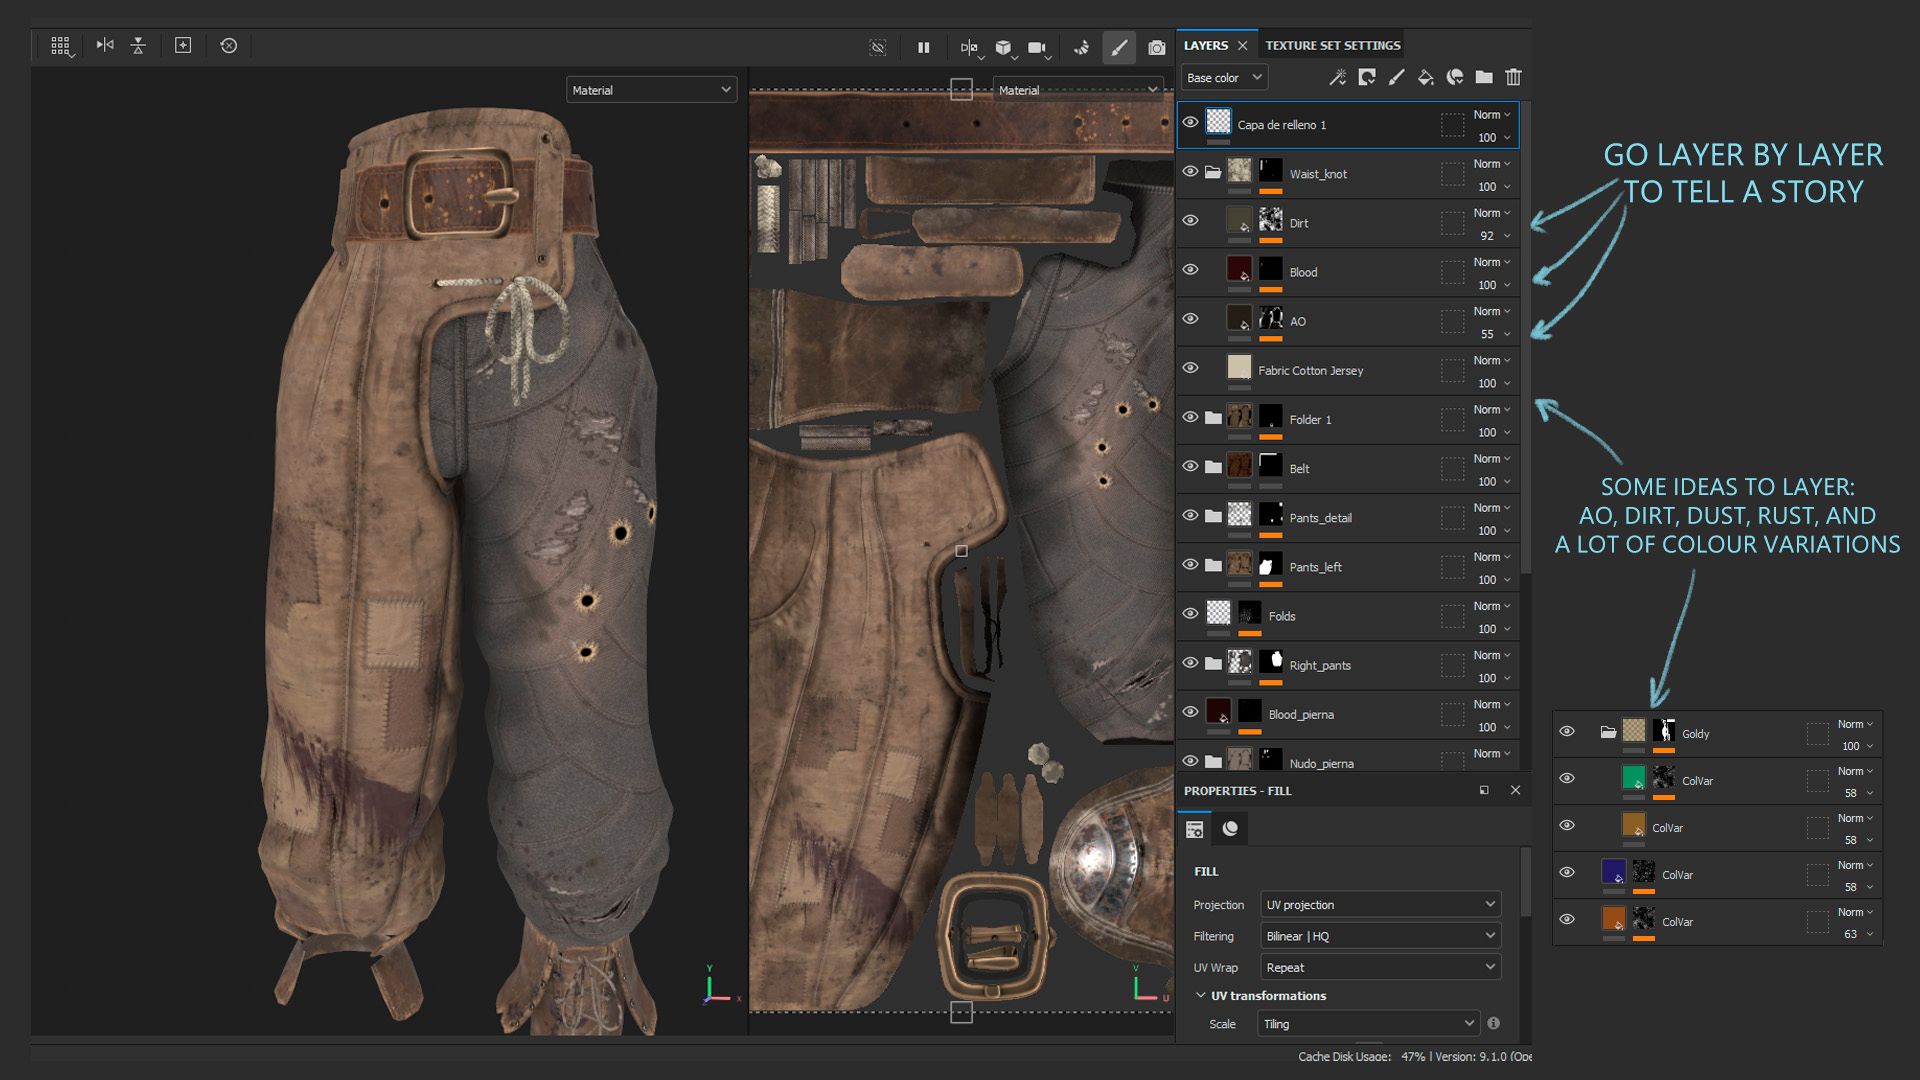
Props
With clothes and props I go layer by layer, working in different channels. I always try to keep variations in Diffuse, Roughness and Height.
Final Textures
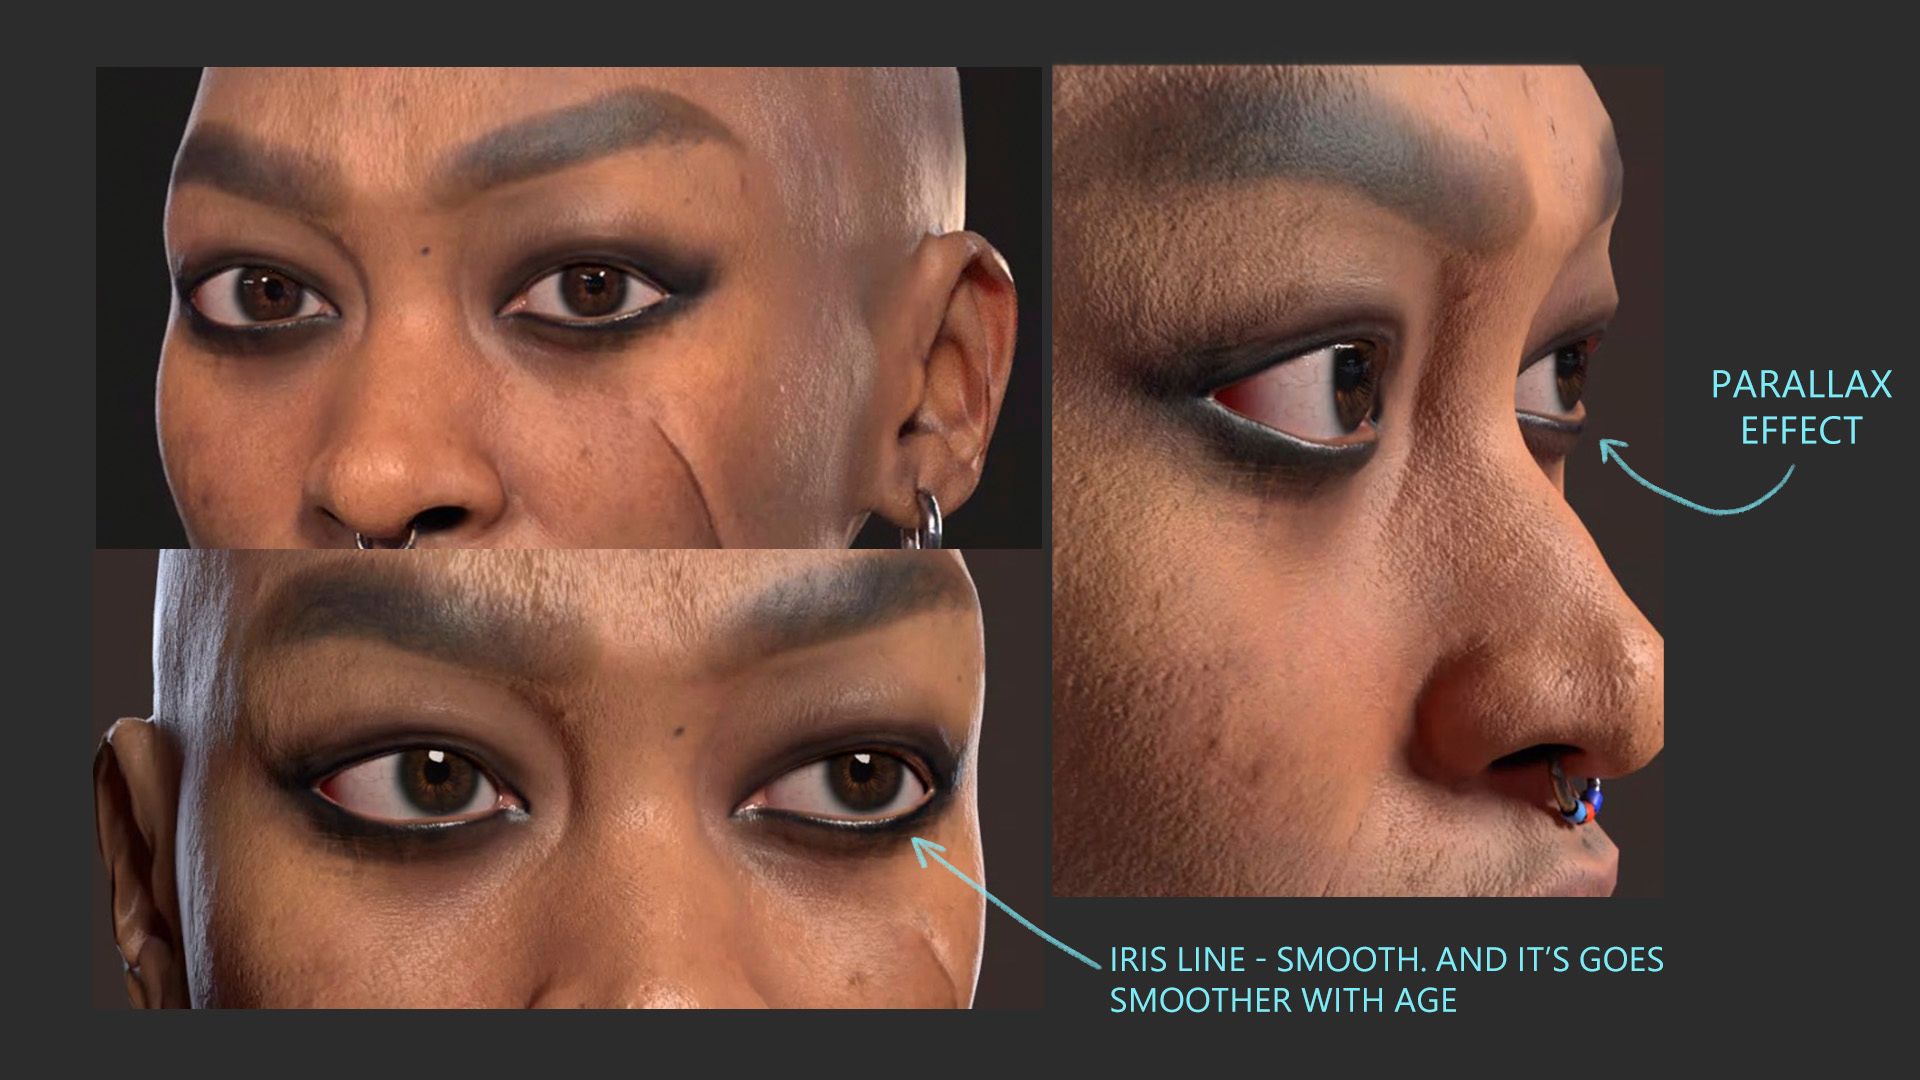
Eyes
For this project I decided to do eyes from zero. I followed this tutorial. I used parallax and sclera mesh, it was pretty tricky. I made a lot of tests during texturing, but it was worth it.
Transitional Mesh
Transitional Mesh is an extra piece of geo that blends eyes (or other geo) with the rest of the character. Moreover, it is also the tear line and the AO of the eye.
This tutorial helped me a lot. It’s for Unreal, but it gives you tips on how to make real-time eyes in general.
What I made isn’t perfect, but here I drop my Marmoset shader that was a big challenge to set up:
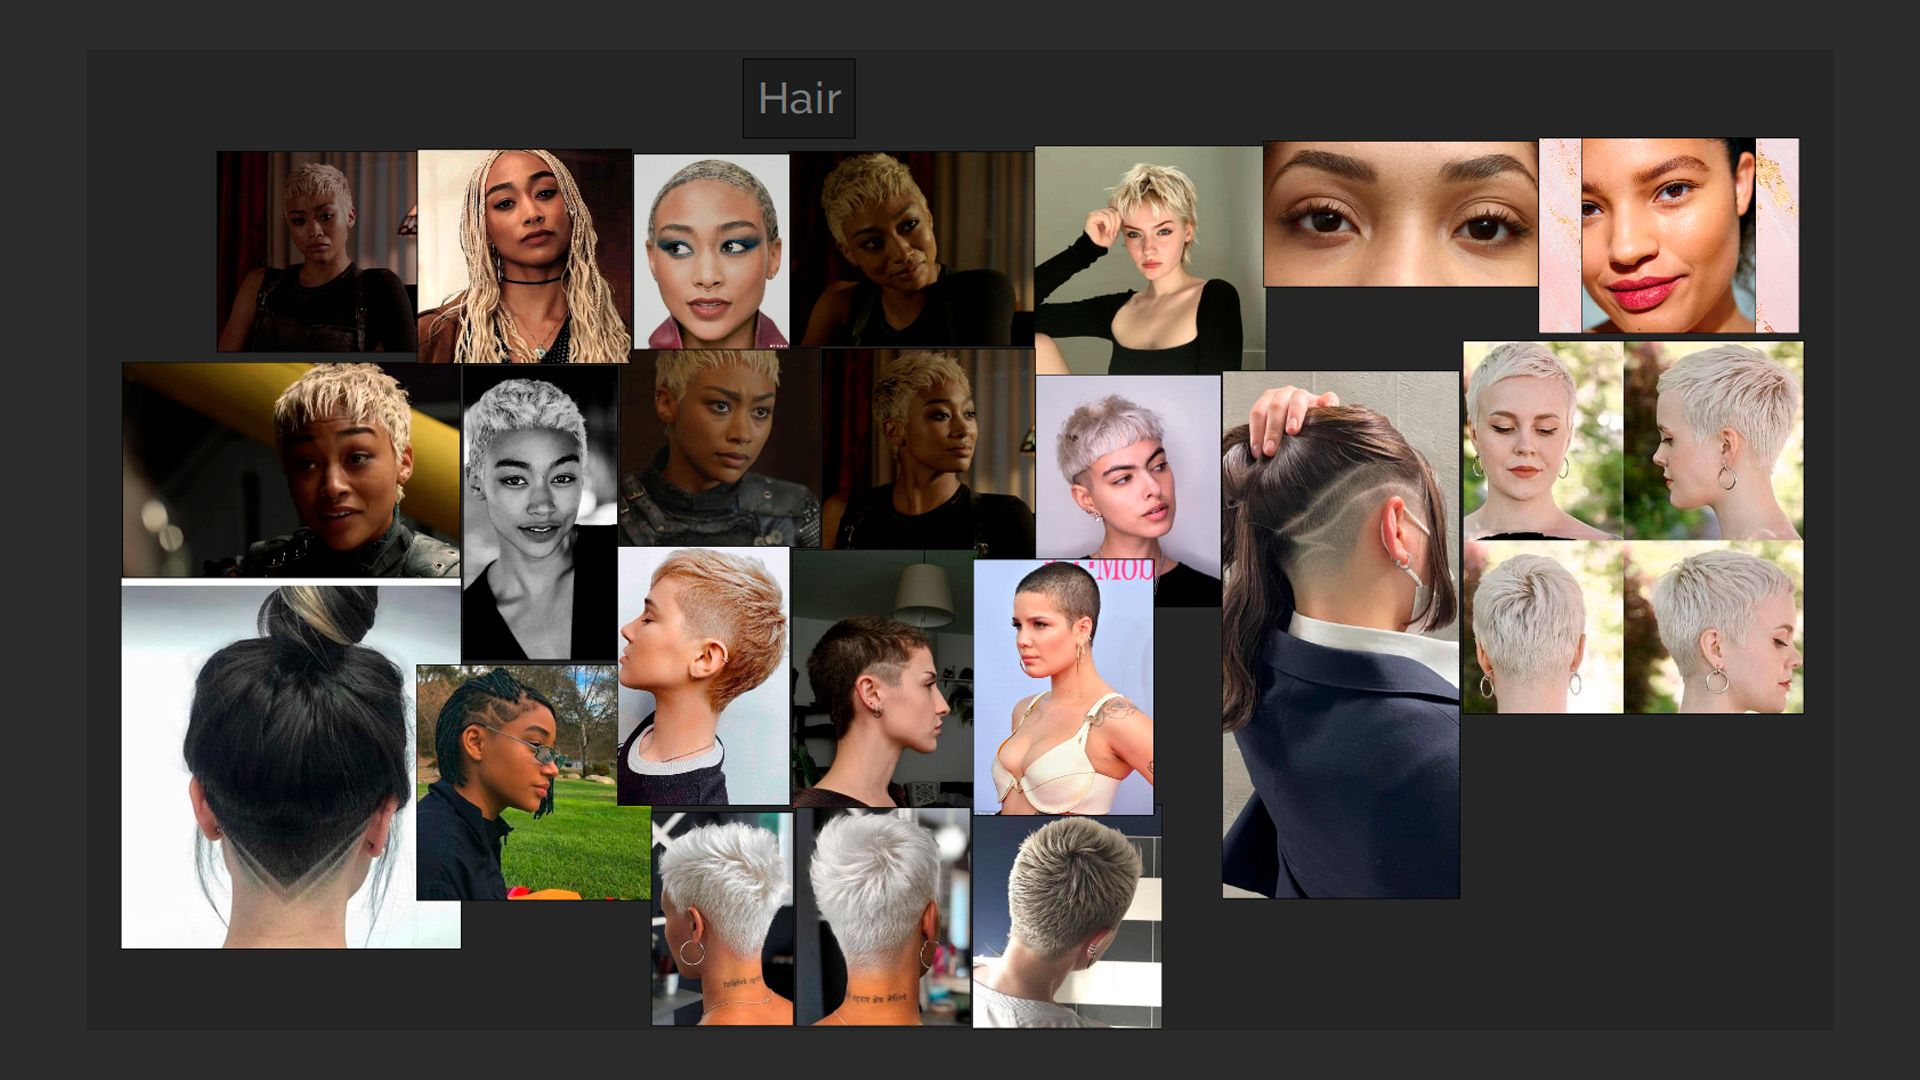
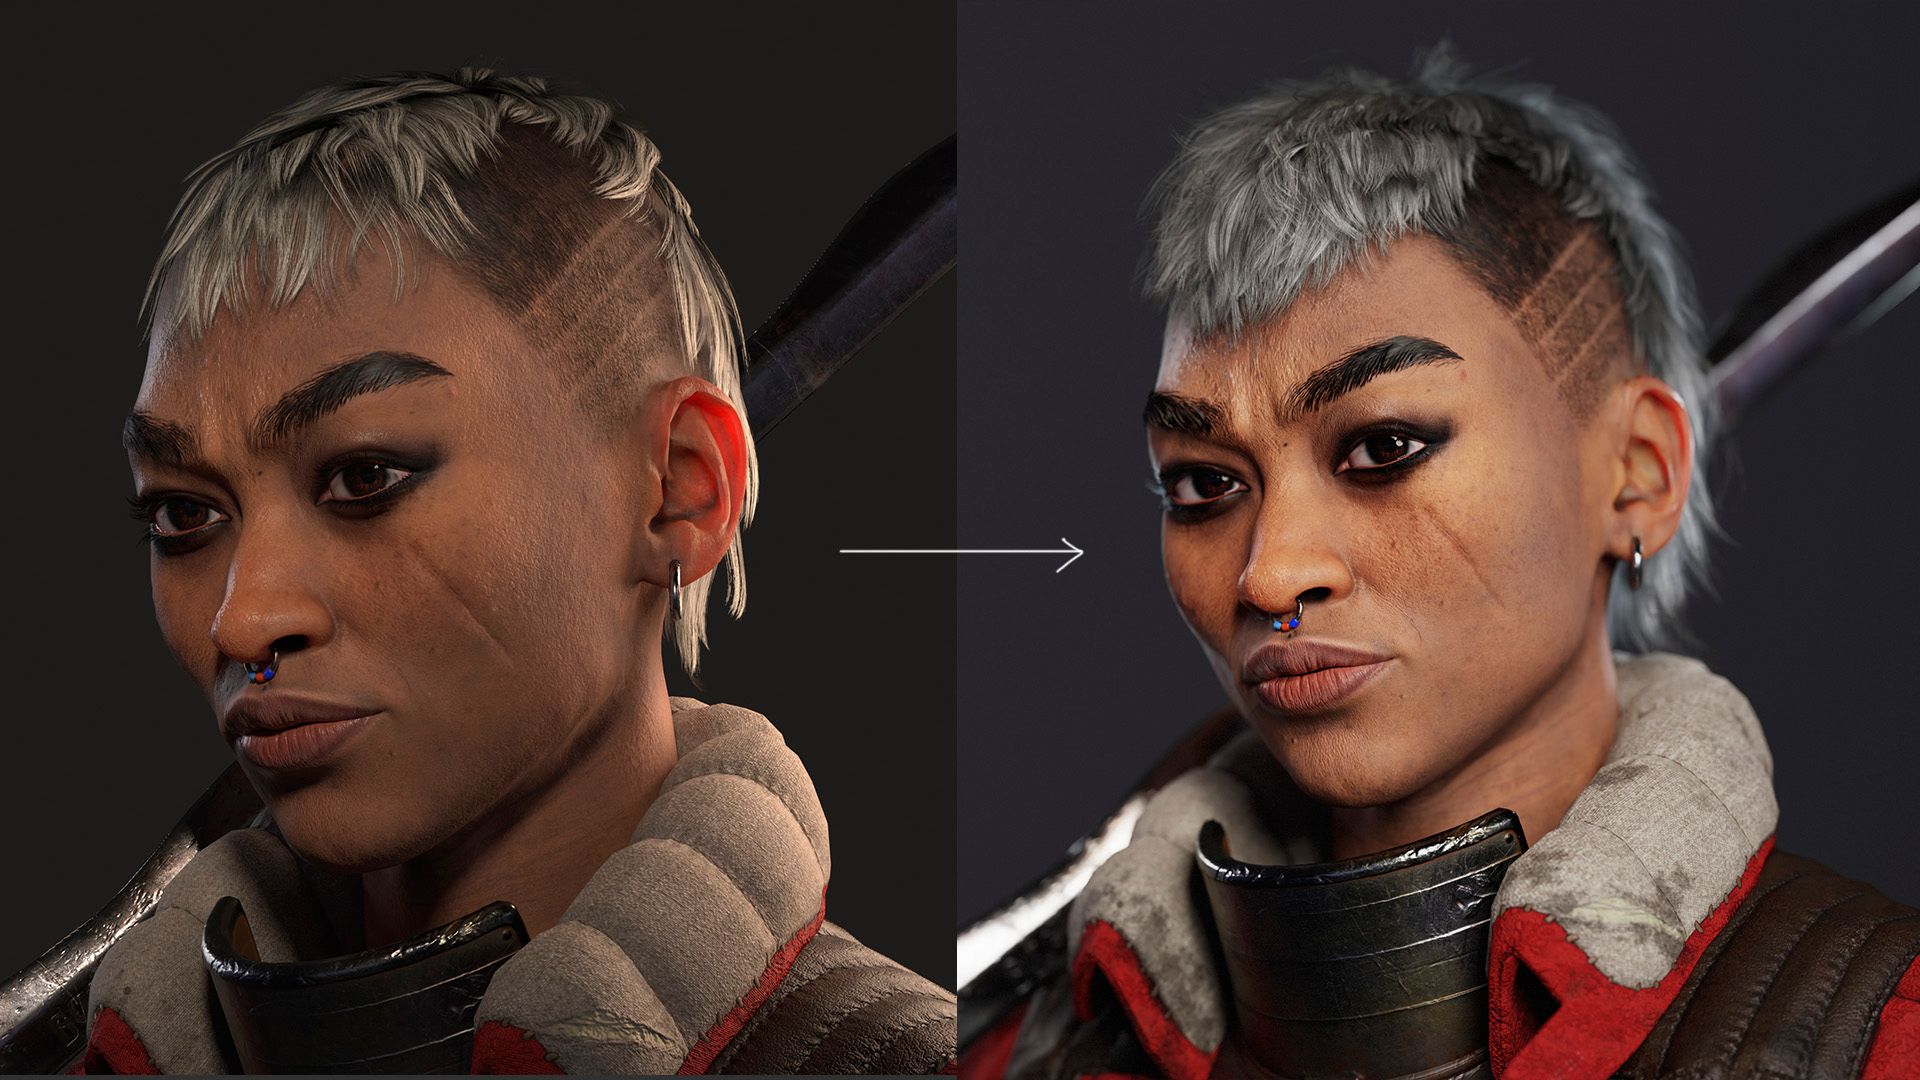
Hair
Last but not least, let’s talk about hair. The challenge of real-time hair is to create volumes from some planes. Let’s dive in.
Gathering references. I wanted to follow the concept but I also wanted to embrace Tati’s style of hair. So I made a mix of both.
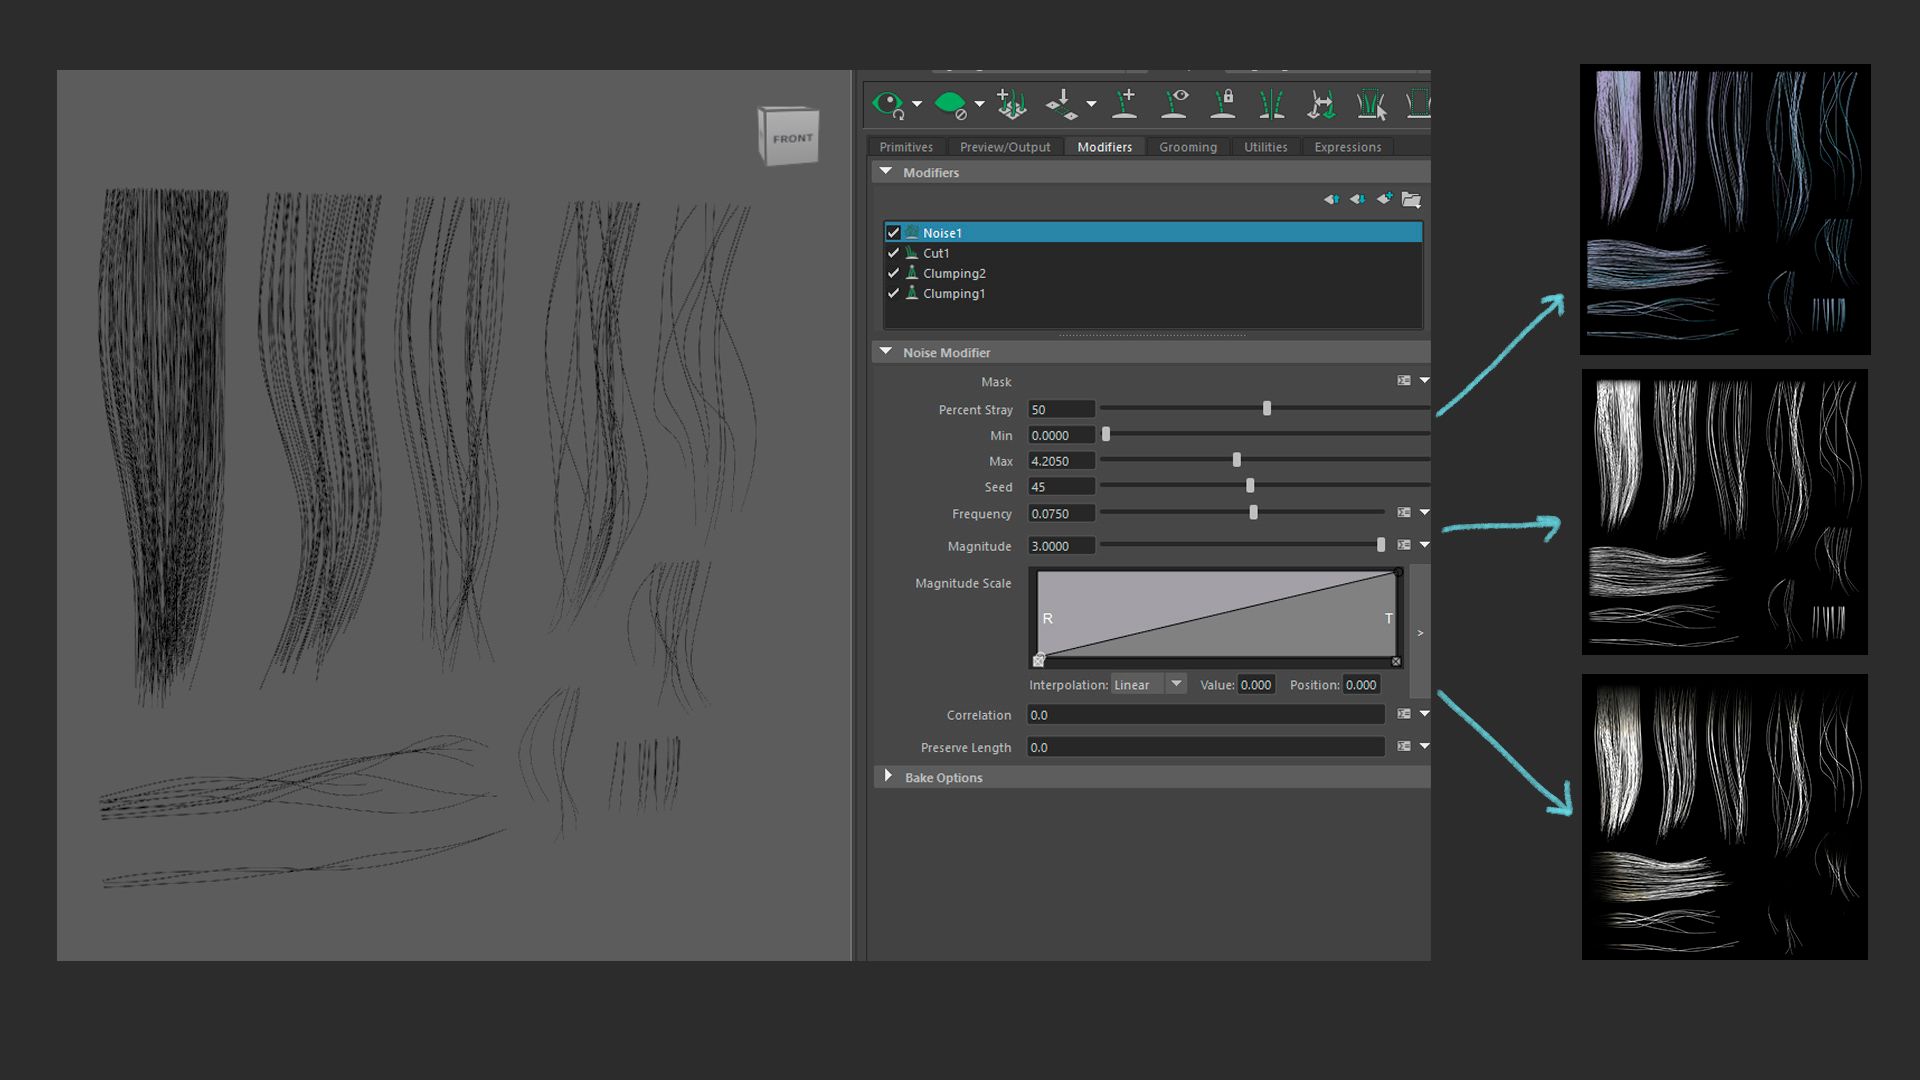
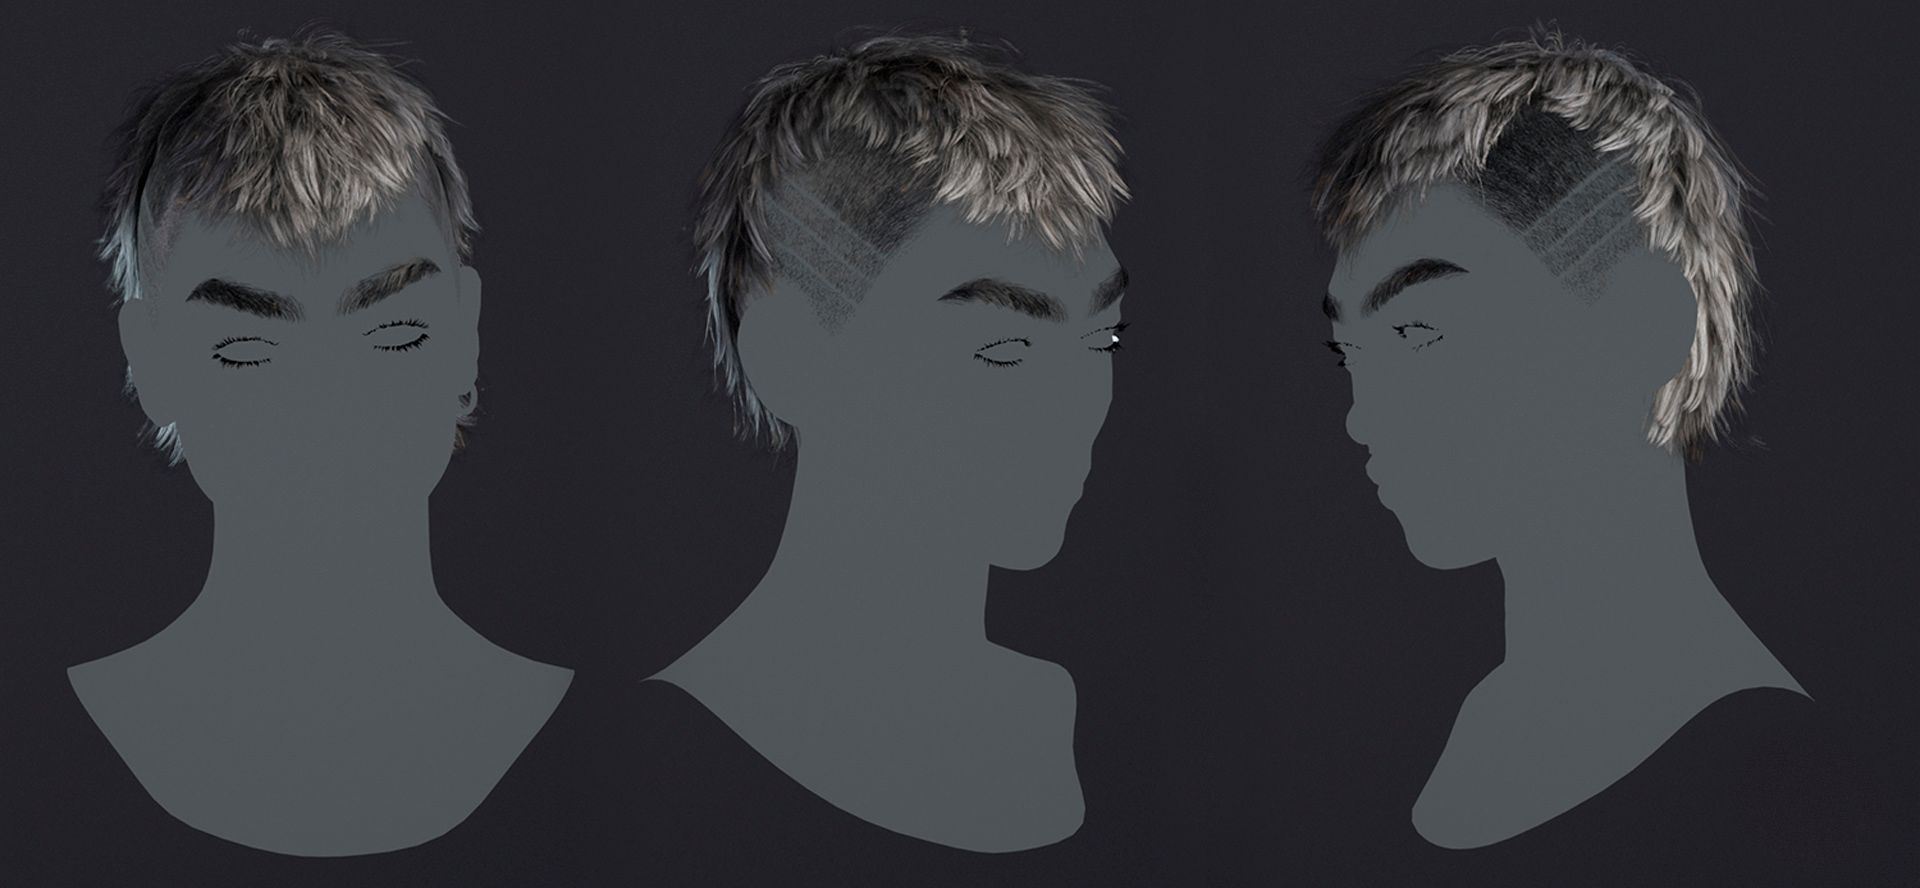
2. I prepared haircards in Maya using Xgen. I baked them in Arnold with aiUtility, channel per channel: Normal, Flow and Opacity. Then I textured it in Photoshop, I wanted some variation between the hairs and the roots to be darker. I used a Flow mask to do that.
3. When I had my hair cards textures, I began to place them one by one. I used GS Curves Plug-in. Here one can go insane, there is no shortcut but there are some recommendations:
Going layer by layer helps a lot, and to start from the nucha going direction to the forehead
Try to not cross the hair cards between themselves
Use deformers, create chaos with fly aways. It brings a more realistic look to the hair
As with the face, you have to always test the hair. Sometimes Maya viewport doesn’t show the crashing hair cards do. Always check in the engine.
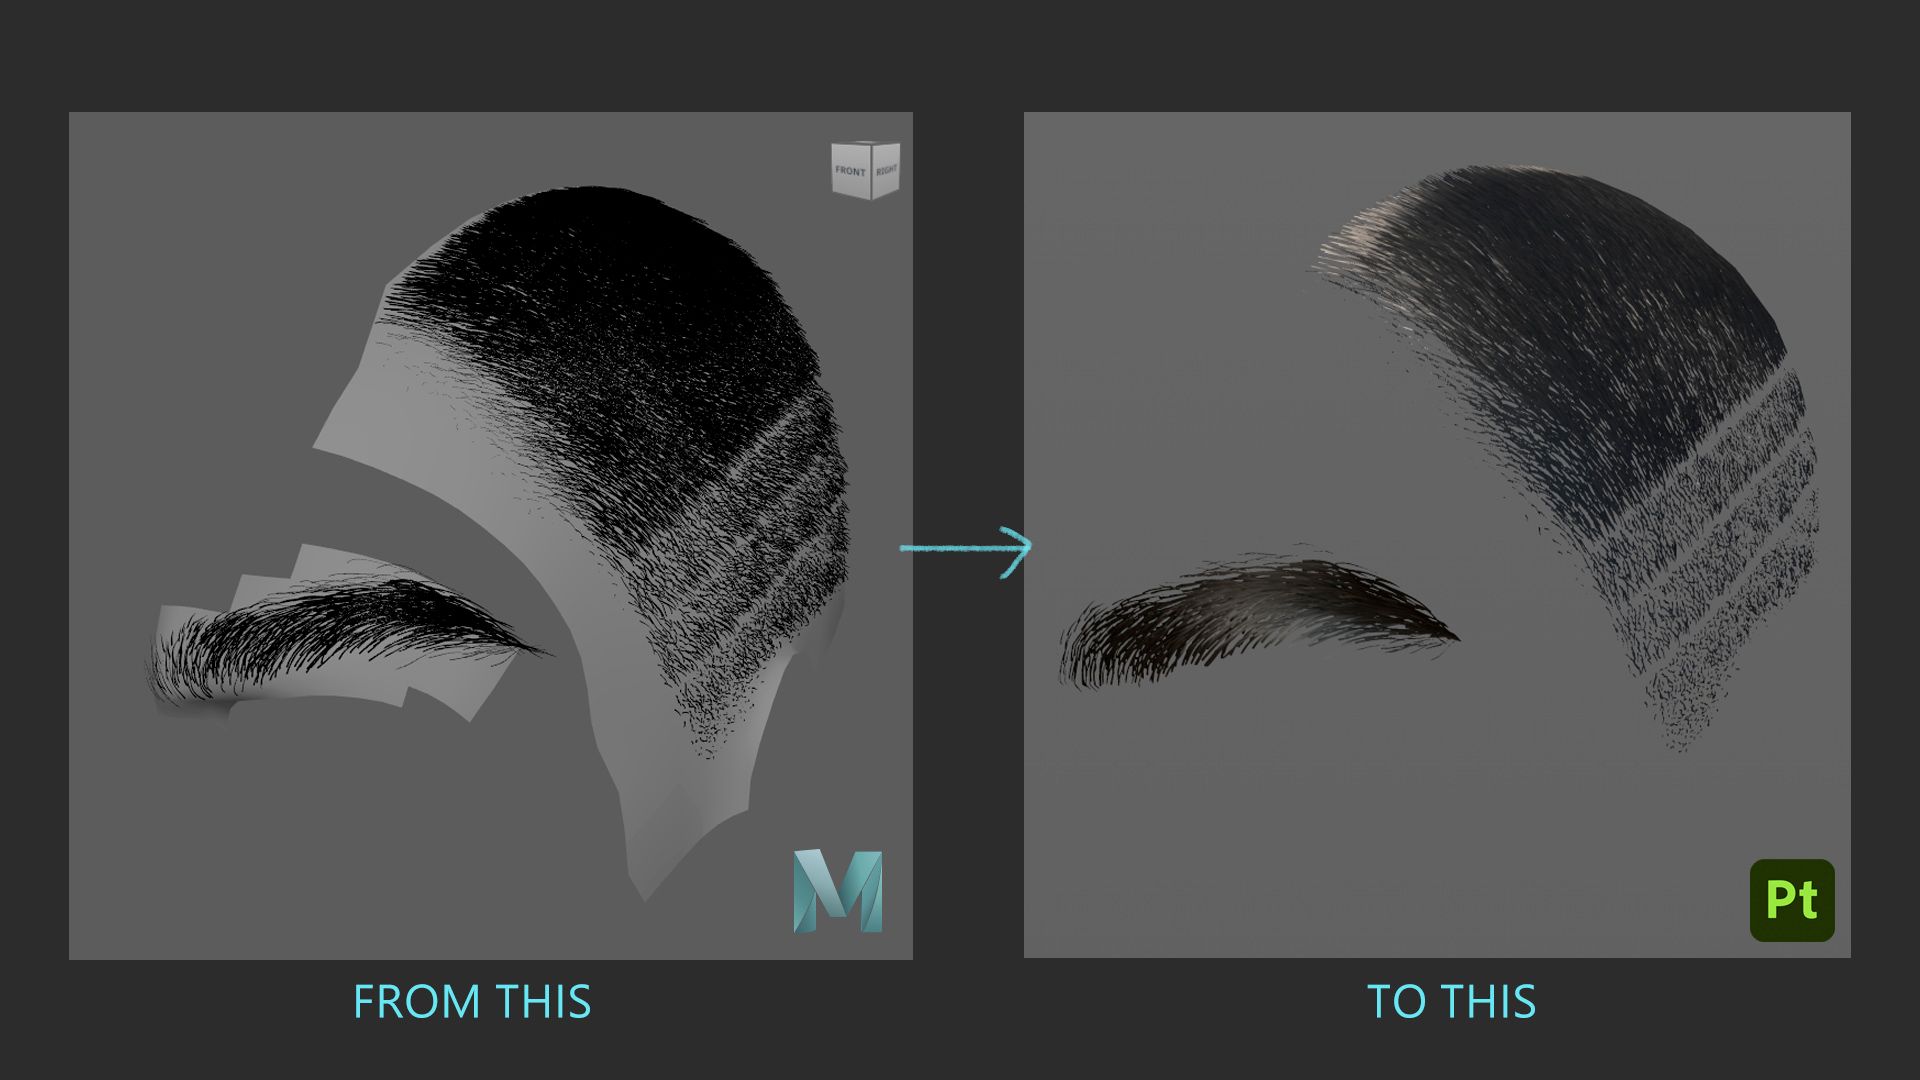
4. For the scalp and the brows, I followed this tutorial by Jansen Turk. Again, I started in Maya, worked on xgen. Then I baked it in Substance to a scalp plane.
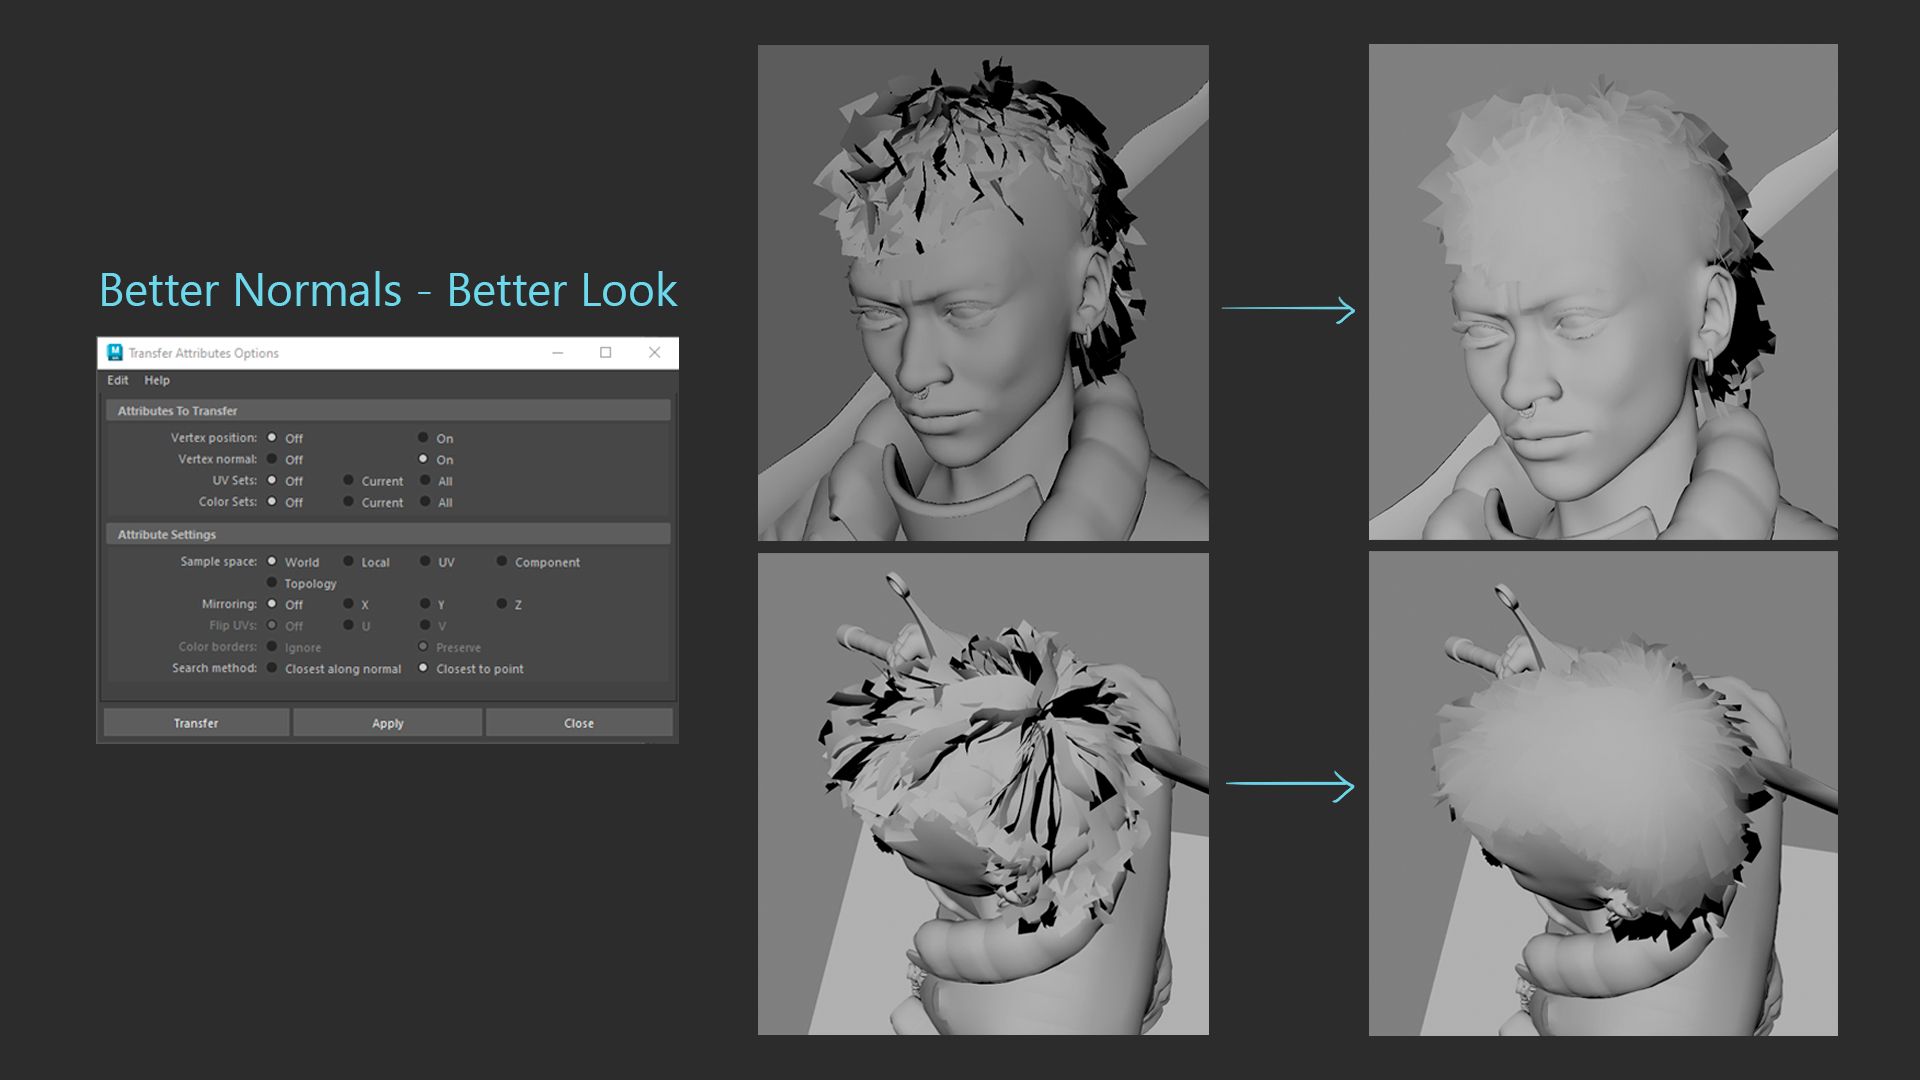
After you’ve done with the hair and combined it into one geo, you can make it look even better. Smooth normals of your hair cards, using Transfer Attribute of Maya:
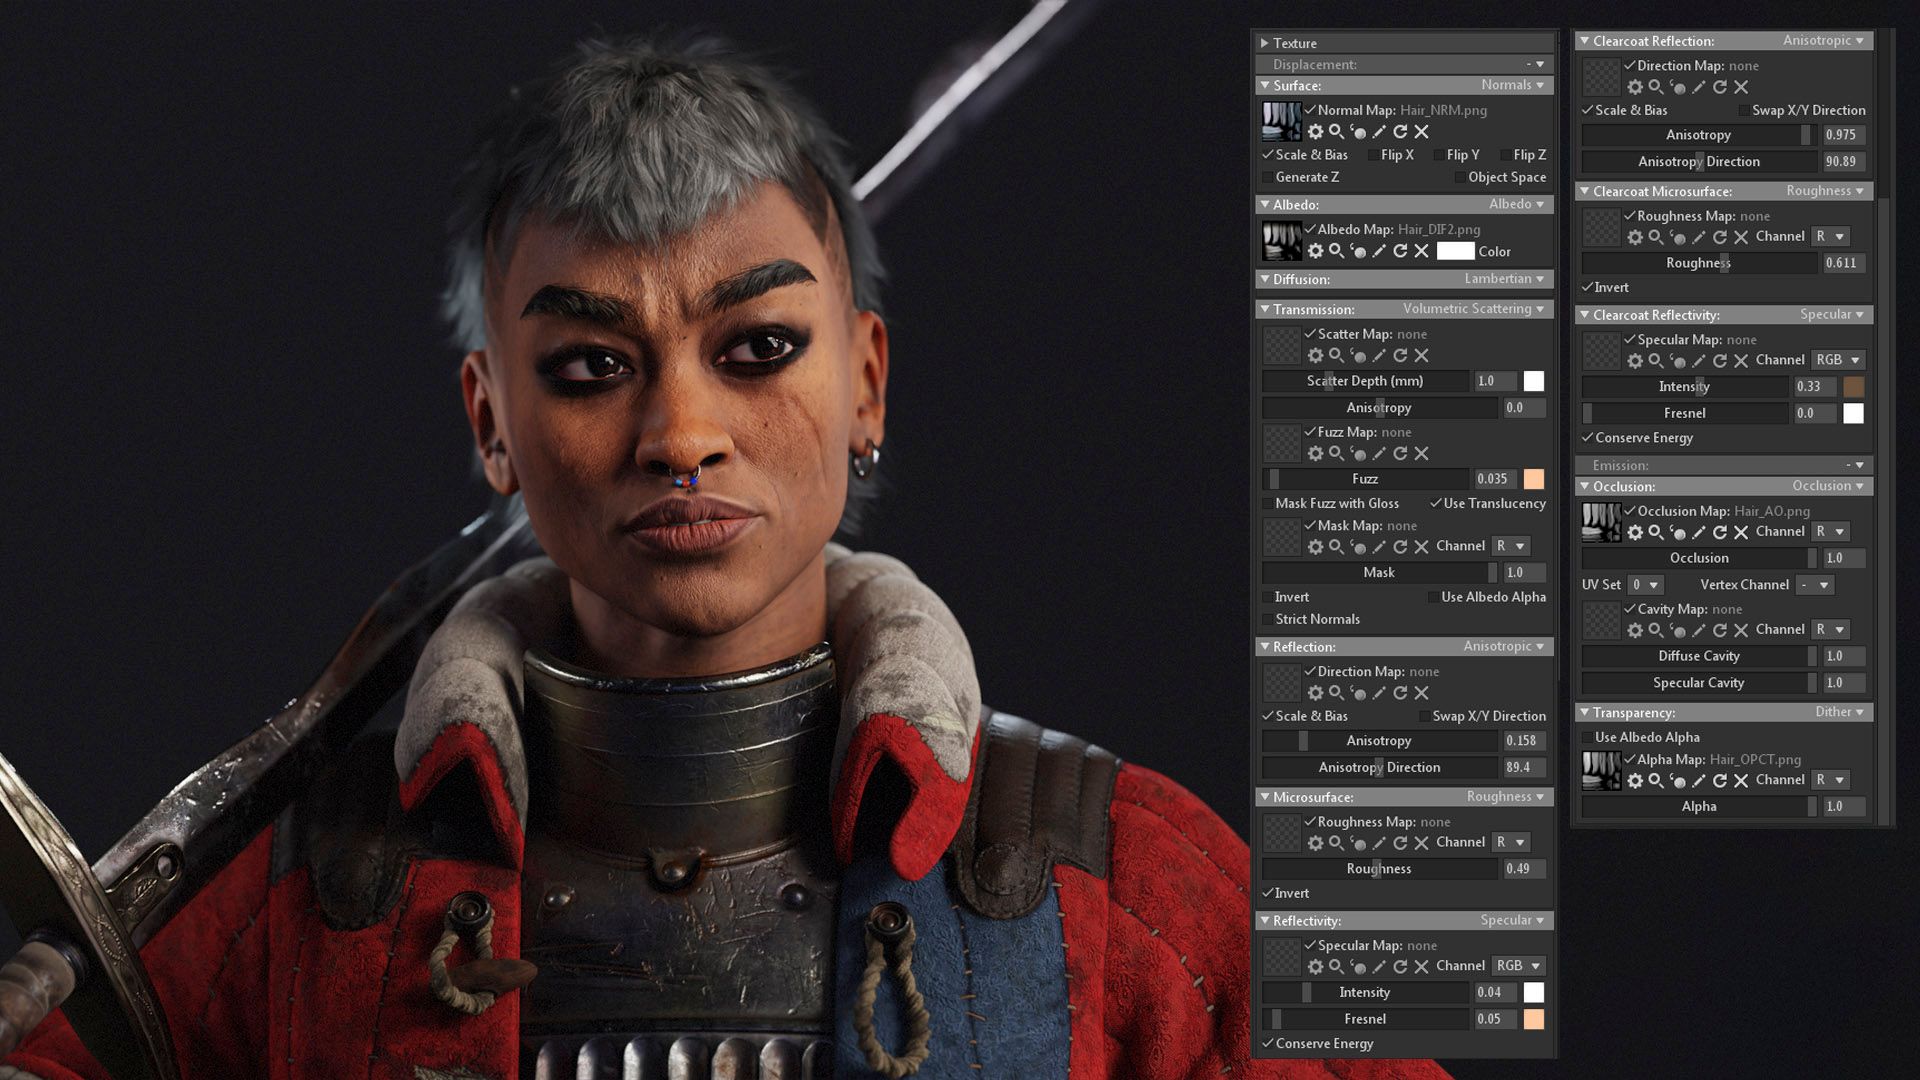
5. To create a realistic hair shader in marmoset, I followed this tutorial. You can see my shader below.
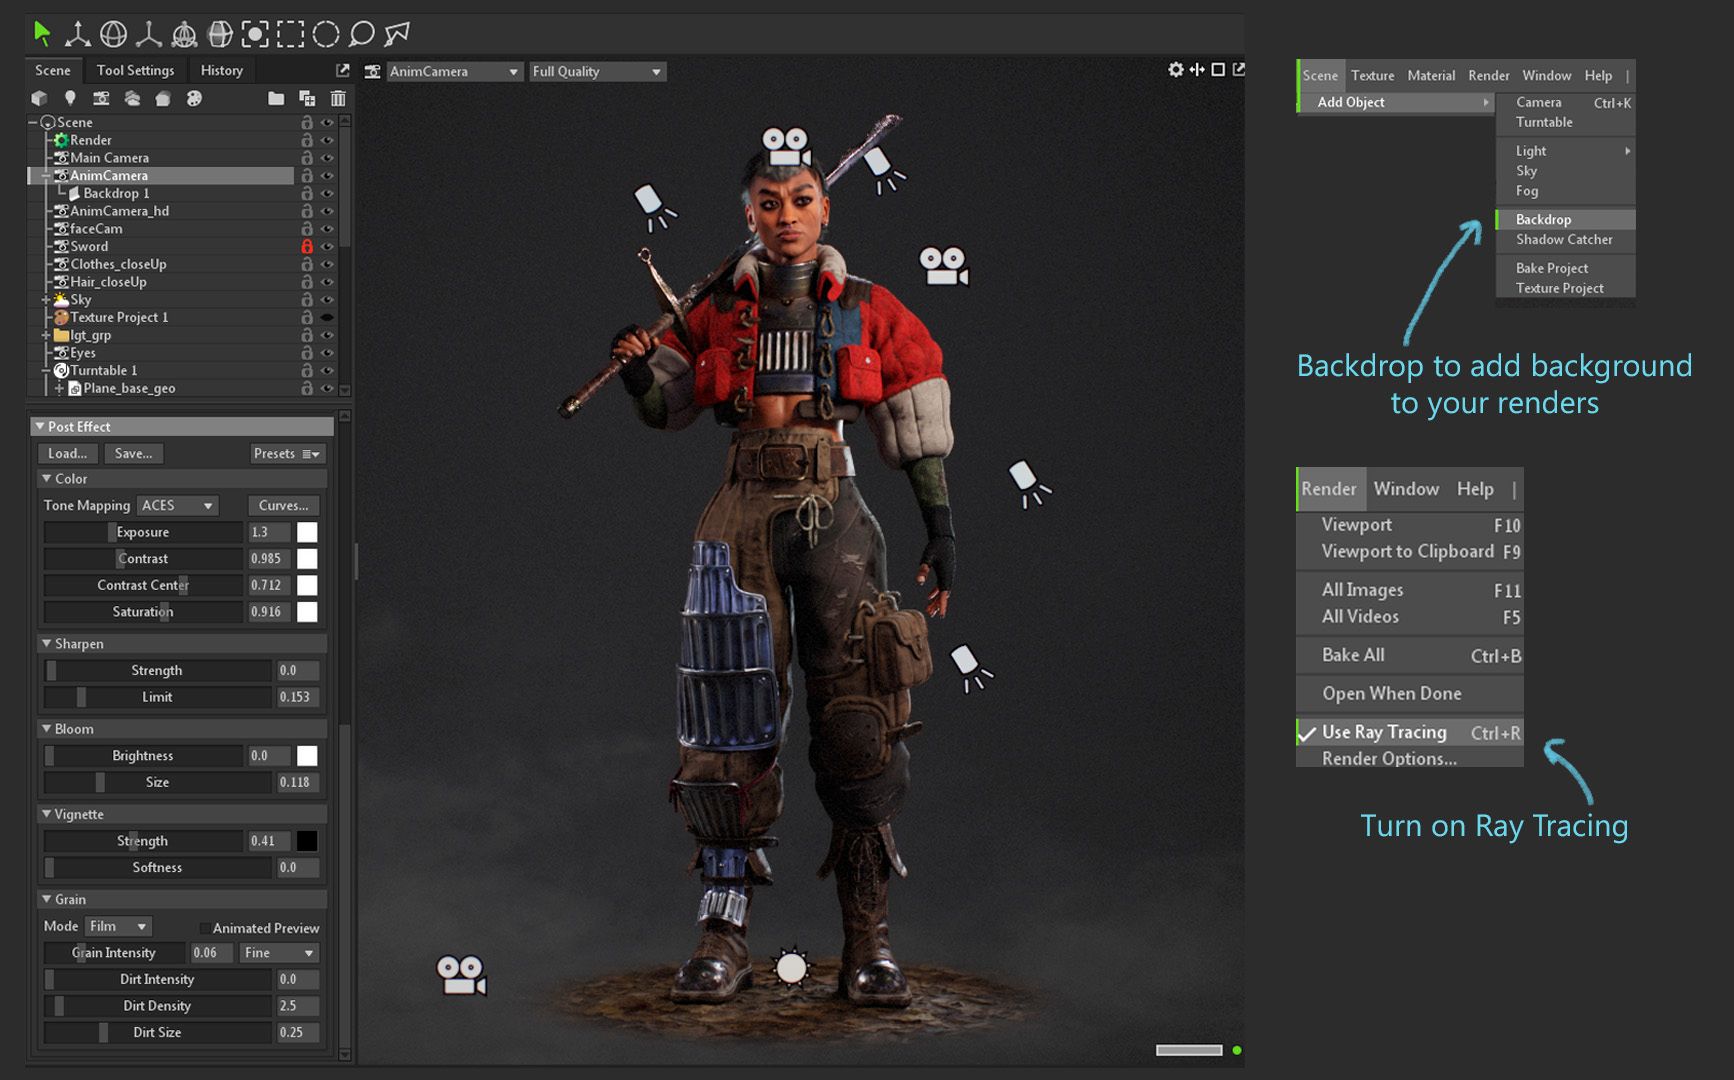
I used the ACES tones mapping to add depth and had to increase brightness a little bit (see my camera configuration below). Also I added noise and used the Ray Tracing. It help a lot with skin and hair shaders.
Conclusion
I have learned a lot thanks to my university program and the extra courses I have taken. Yet, it's always good to investigate and search for new techniques and tutorials! I hope this article helps and you can learn from my mistakes. And I hope you keep improving in Character Art with me!