
Reconstructing a Museum Timepiece in 3D: Rococo Clock
Meet Martiine Mayeur, a student at Vertex School, who impressively reconstructed a museum timepiece in 3D and shares her workflow for creating such a project.
Meet Martiine Mayeur, a student at Vertex School, who impressively reconstructed a museum timepiece in 3D and shares her workflow for creating such a project.

Meet Martiine Mayeur, a student at Vertex School Inc. We were impressed with her reconstruction of a museum timepiece in 3D and asked her to share her process for creating her Rococo grandfather clock project. After taking the time to analyse the beautiful object, Martiine found Blender to be an invaluable tool for modelling, ZBrush for sculpting, Marmoset Toolbag for baking, Substance 3D Painter for texturing, and Unreal Engine 5 for lighting and rendering. Read on for the entire breakdown.
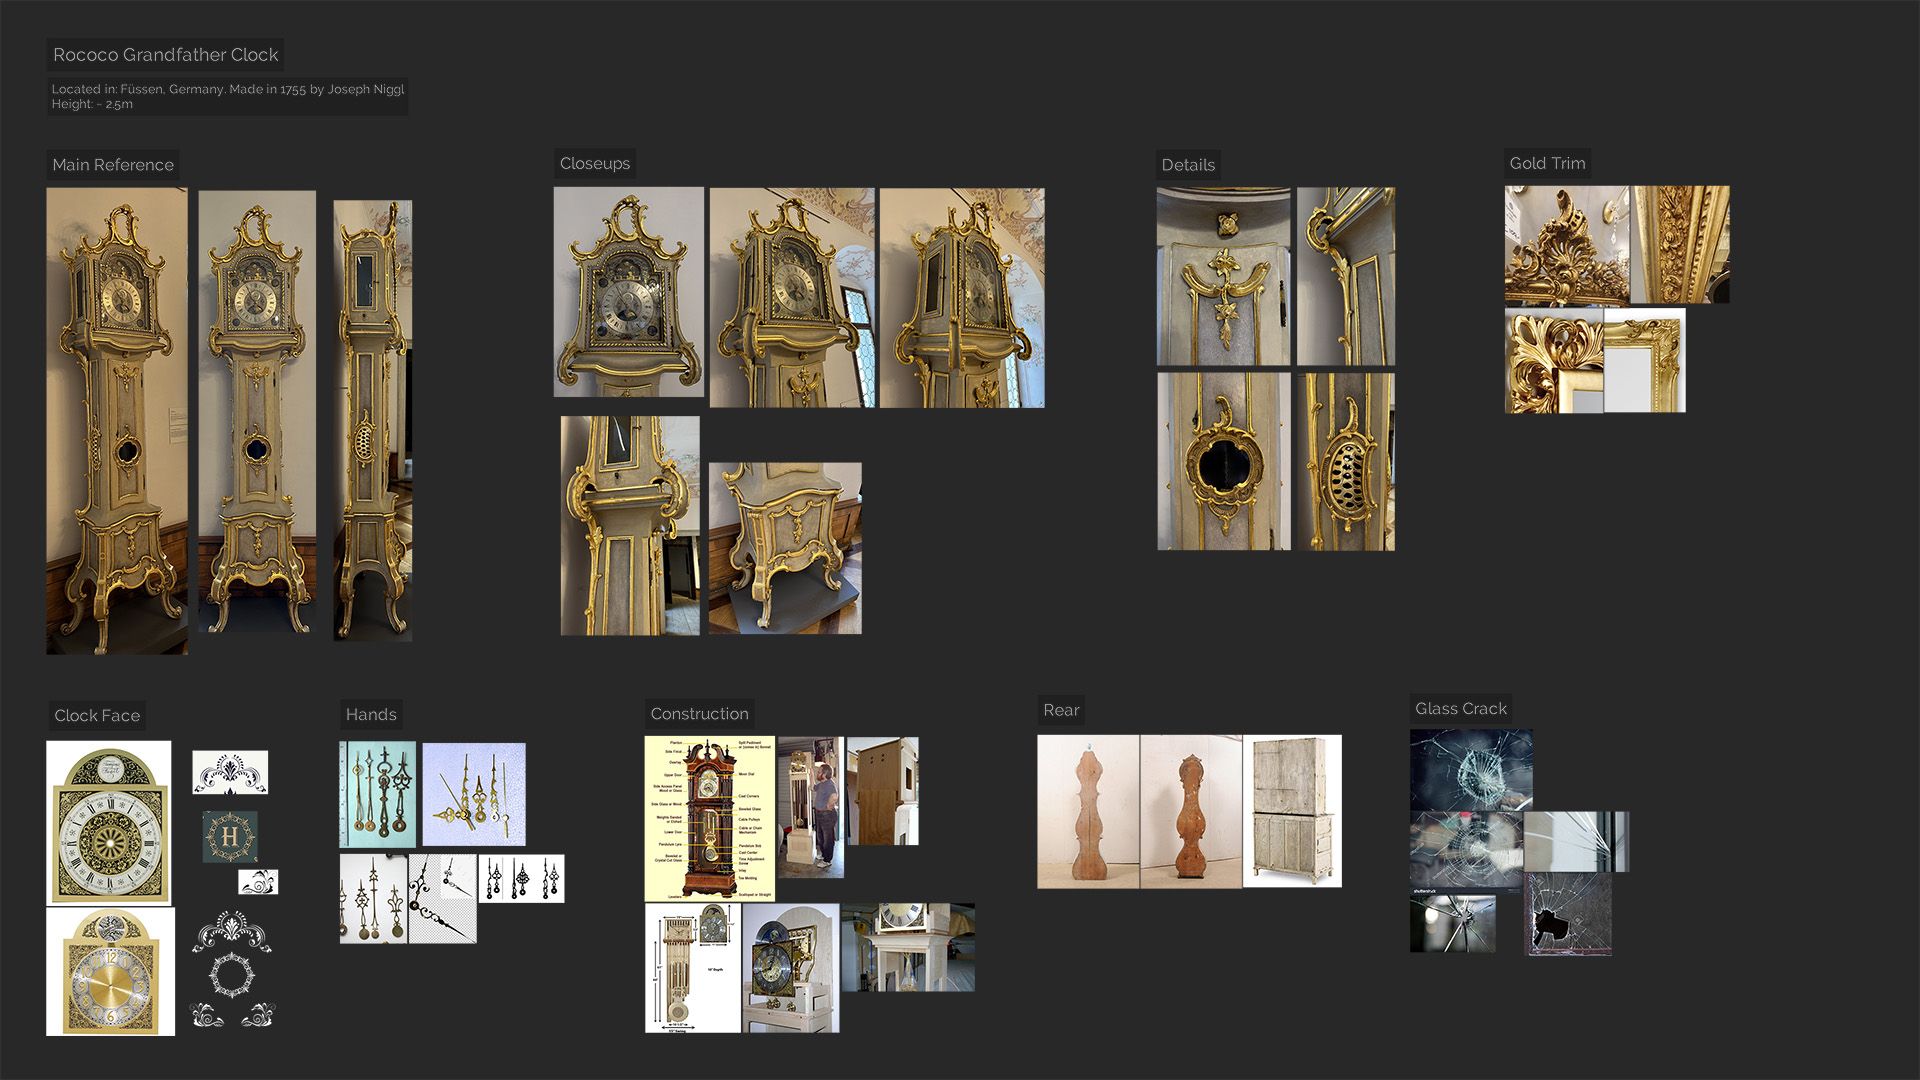
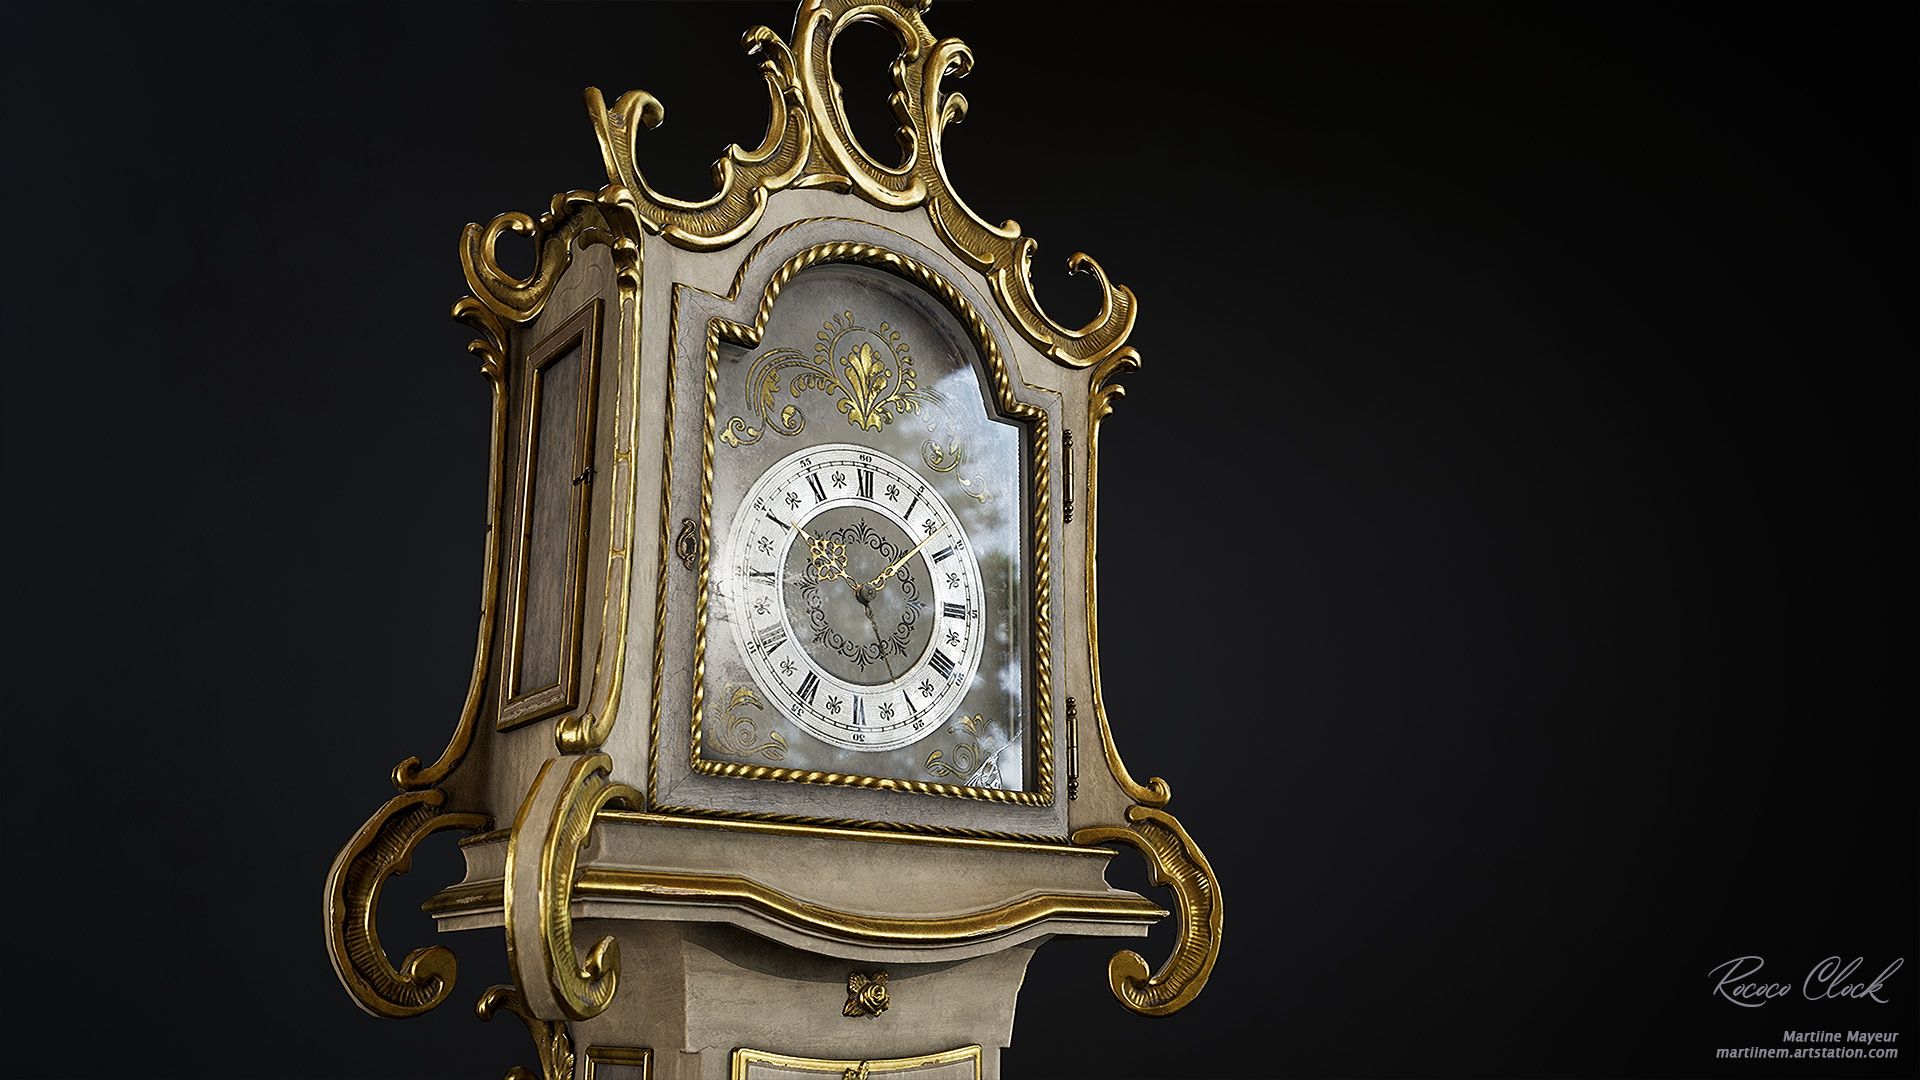
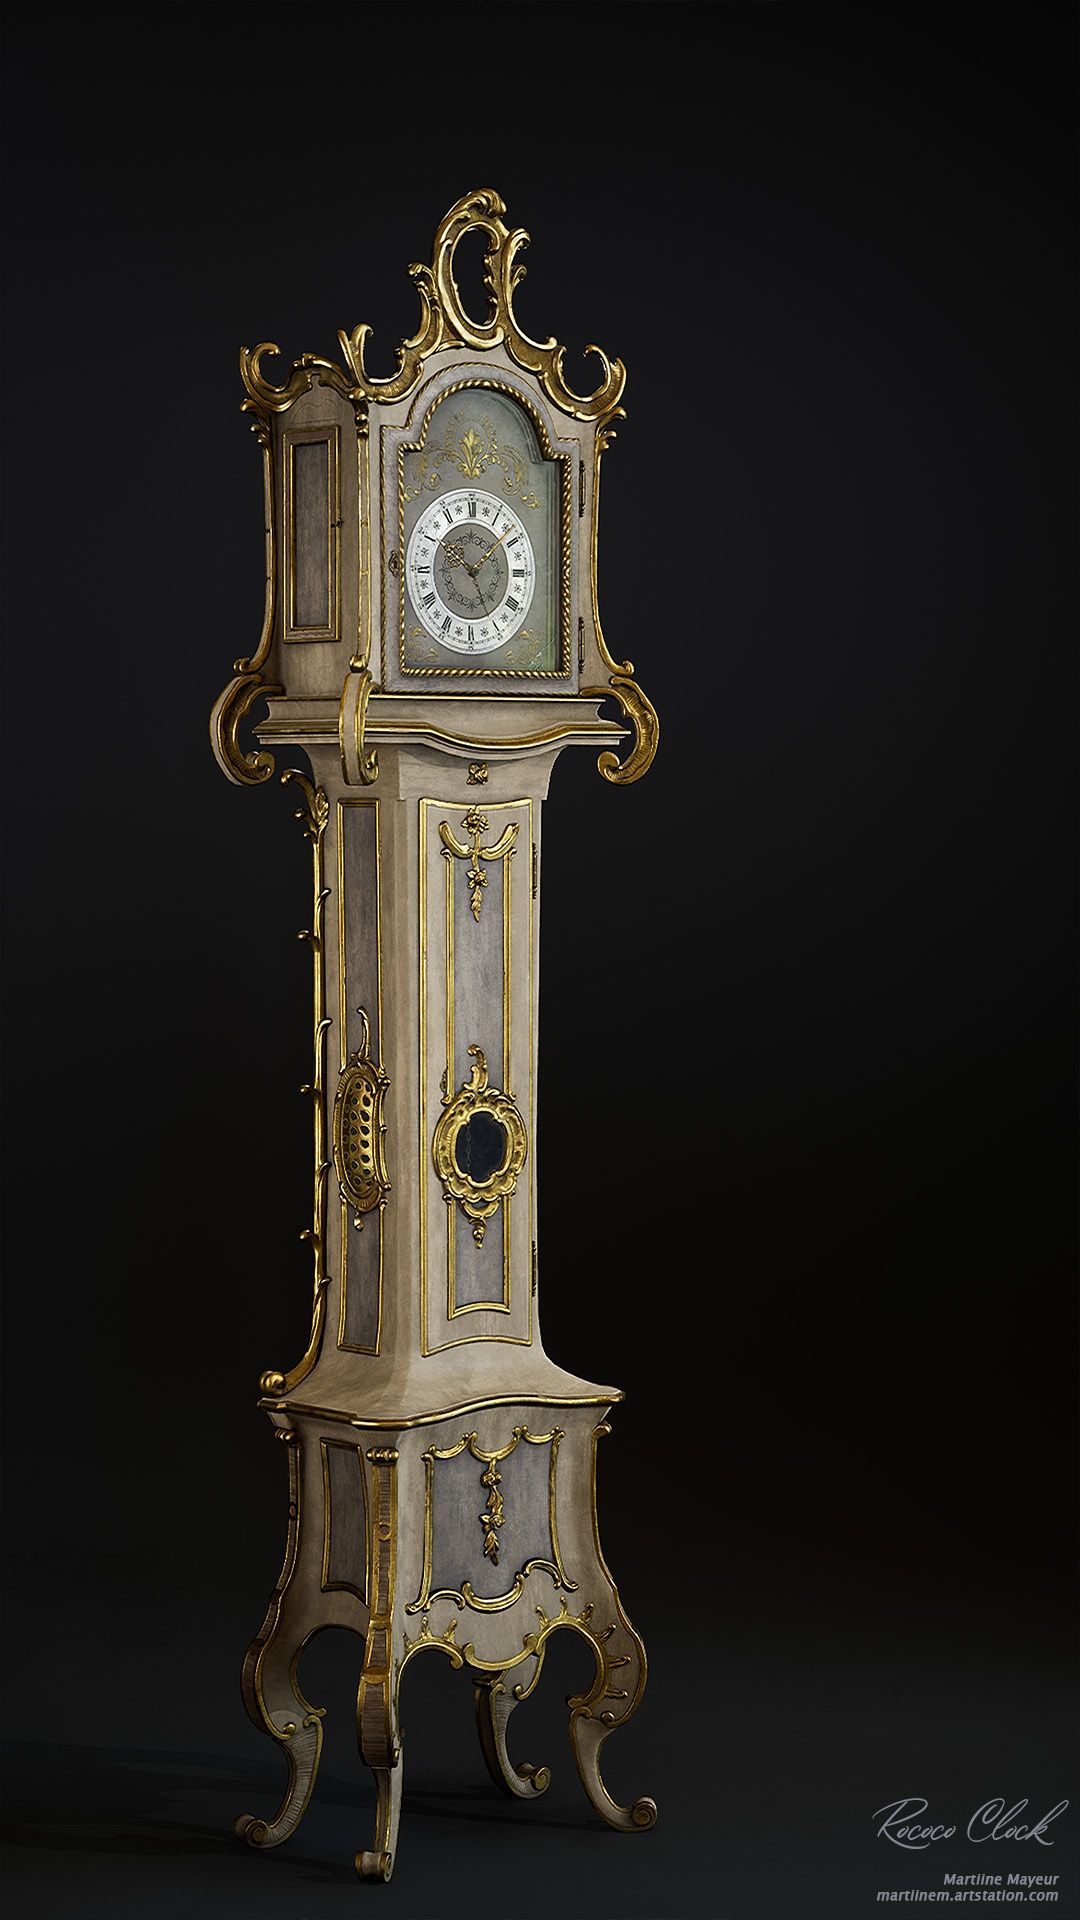
When wandering through The Museum of Füssen in Germany, I stumbled upon a beautiful Rococo grandfather clock. It was created in 1755 by Joseph Niggl and I fell in love with the intricate details and the flow of the object.
Luckily I was allowed to take photos in that museum and I took some from every angle I could; even took a quick video!
After getting home from the trip, I set up a PureRef board and started gathering further references. I looked at how these types of clocks were constructed, what materials were typically used and any additional details I could add to the clock.
Looking at the board now, I would say, gather even more references! Though having a video helped a lot in this case.
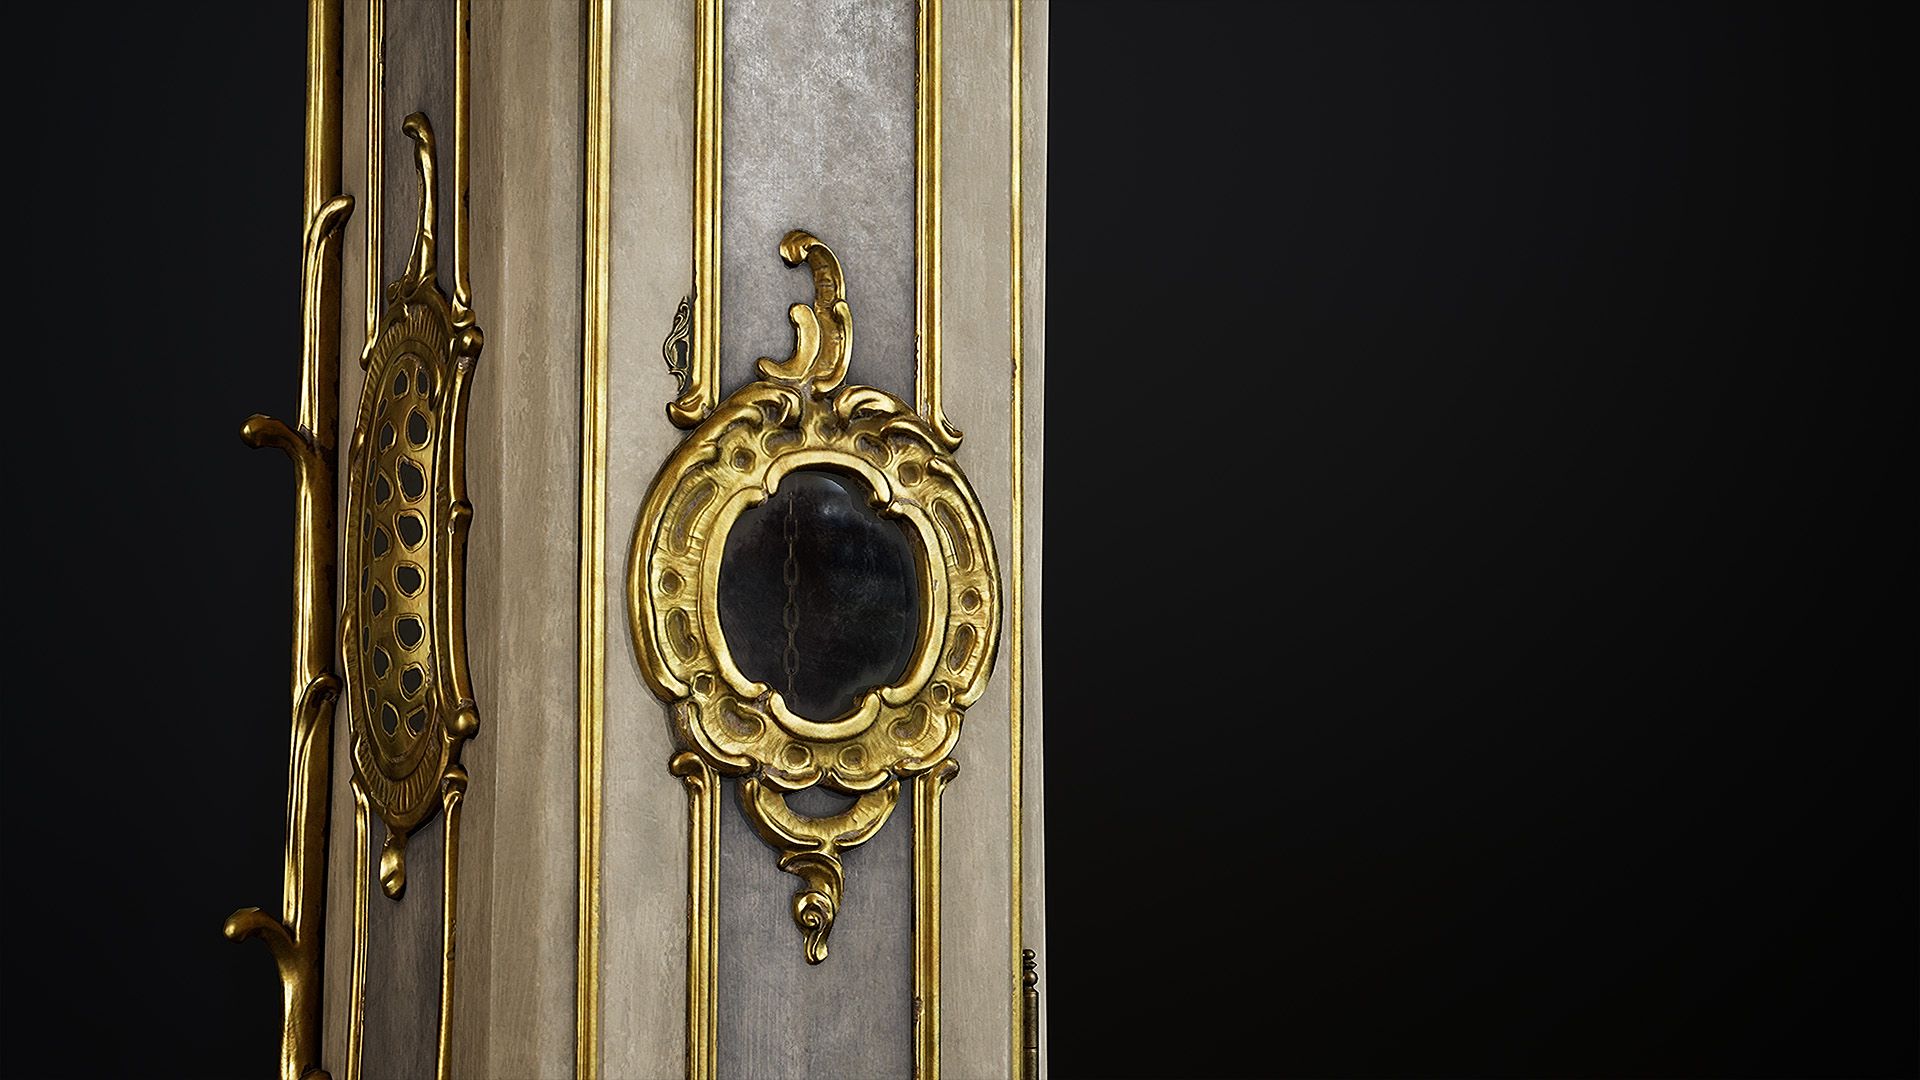
For my work, I decided to keep the main shape of the clock, but to simplify the clock face. Therefore I had to find or create some patterns that could work in that space. I found some free swirl images online, tweaked them a little and saved them for stamping on later at the texturing stage.
Tip! Gather as much reference as you can from various sources and remember to refer back to them throughout the project.
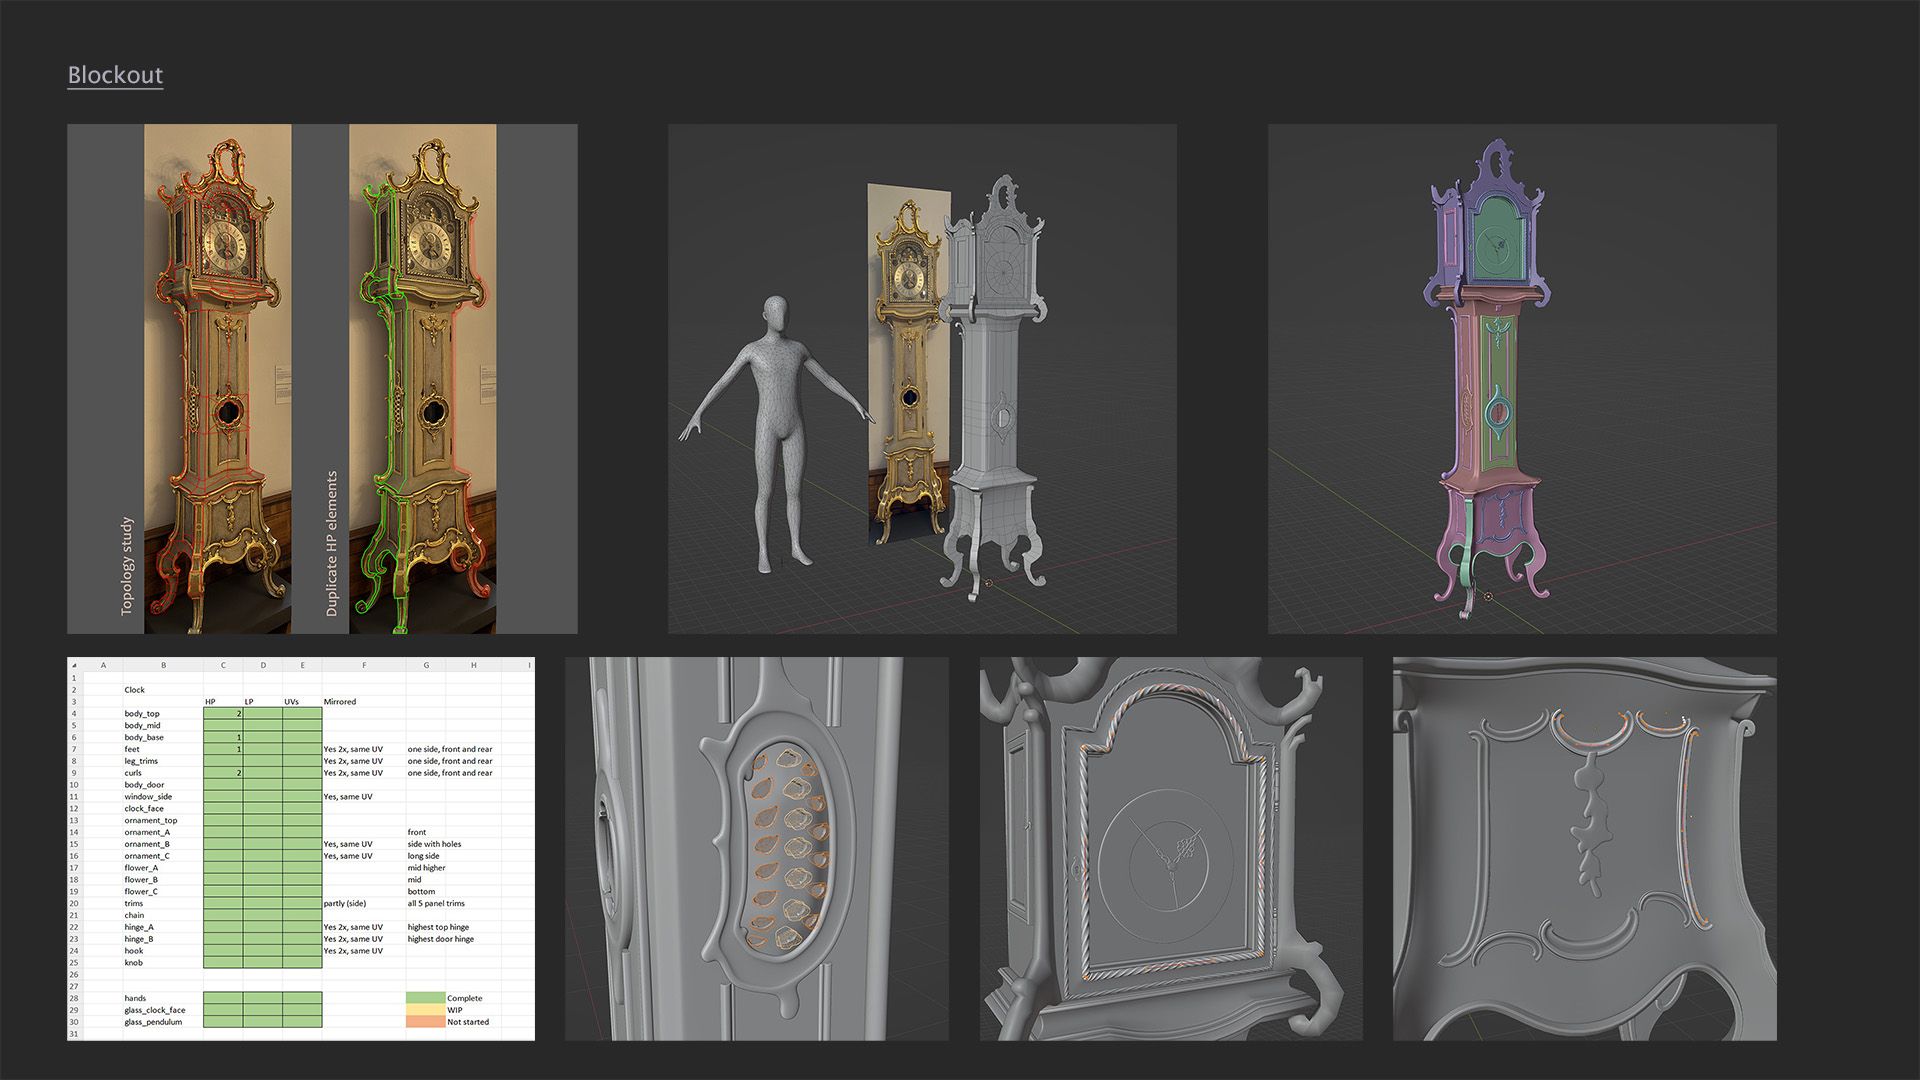
Once I had the references organised, I did a quick topology study sketch and started blocking out the shapes, refining and tweaking as I went along. To make sure the dimensions were as accurate as possible, I added a human scale reference in the scene.
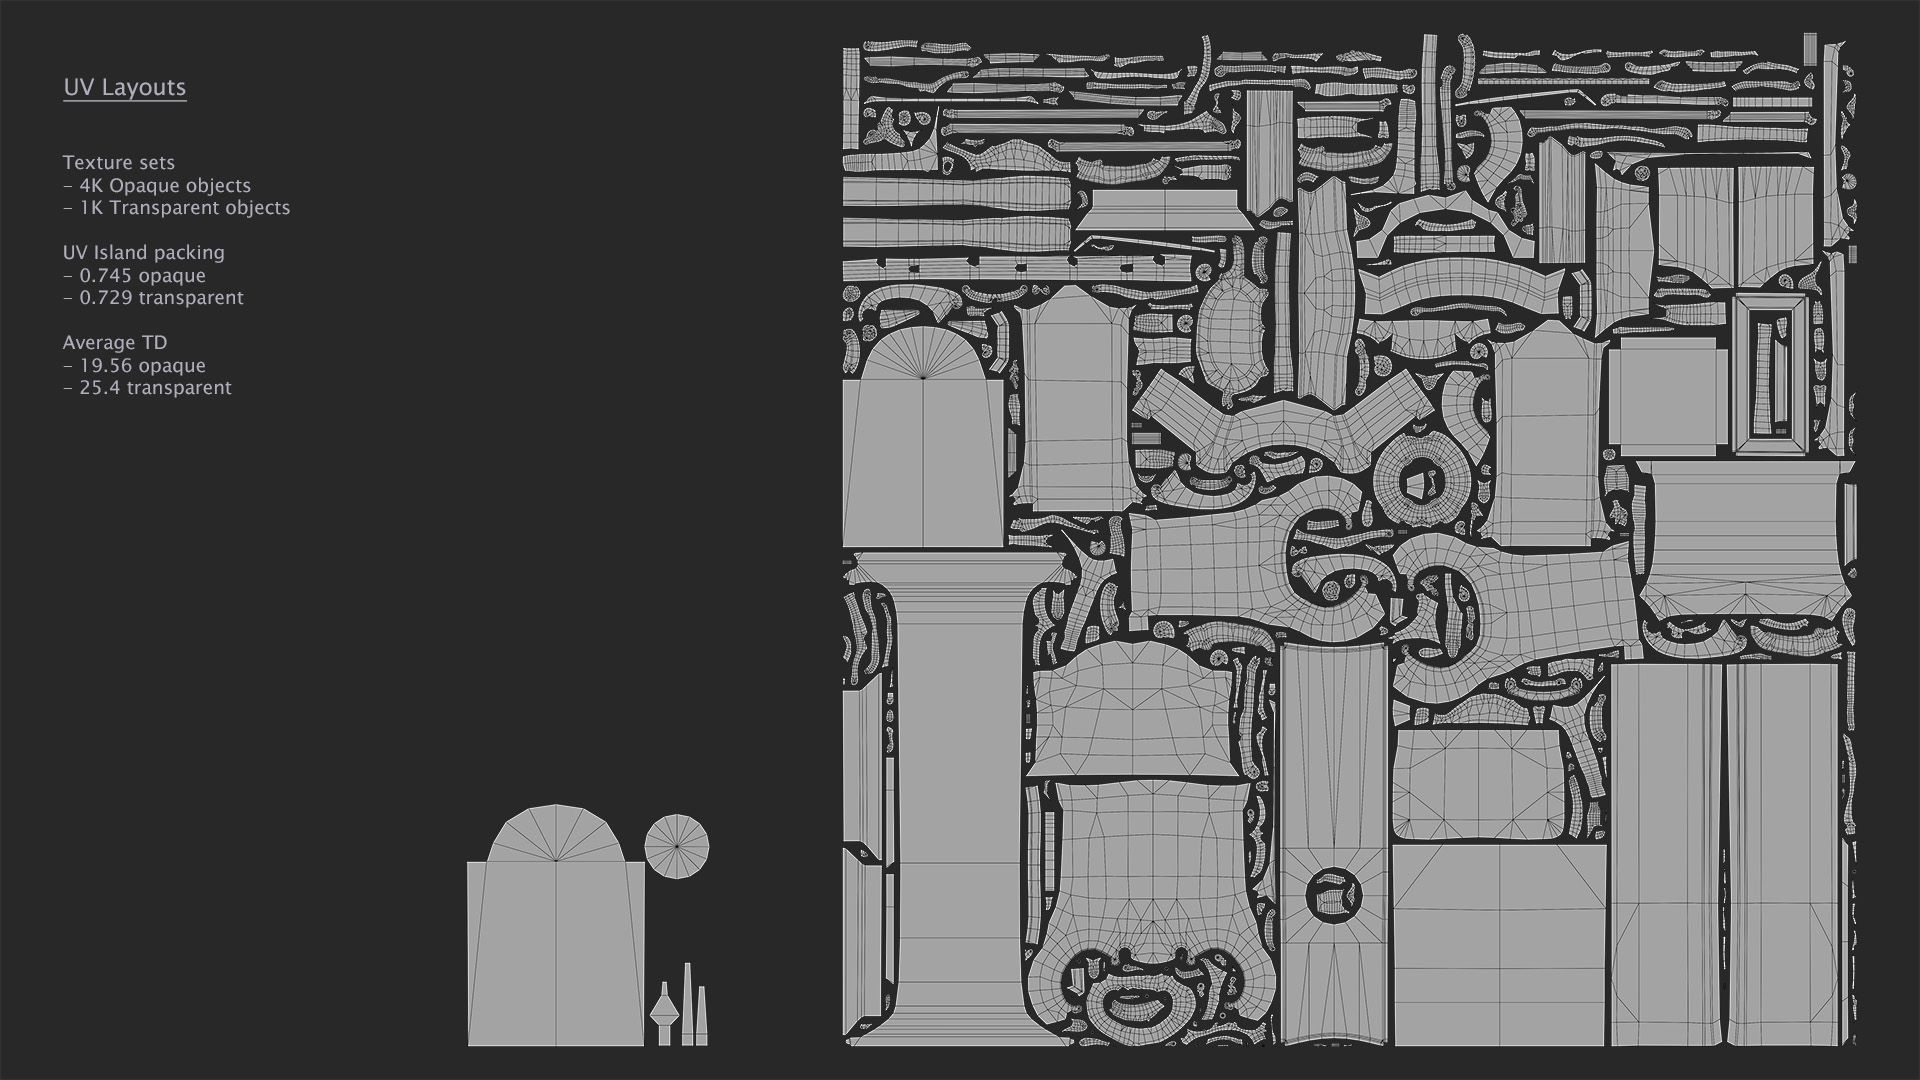
Next I made a list in Excel of object parts and colour-coded columns with HP, LP and UV. Could also add in Blockout and Texture, but for this prop I felt keeping track of the above 3 was more crucial. That way you can mark off which ones you have done and it gives you incentive to carry on.
To save on texture space, I decided to keep some UV parts stacked. That goes mainly for the areas that you wouldn’t see at the same time, in order to minimise visible repetition. For a production piece, even keeping the whole side mirrored could work well. Especially if you’re careful to keep the texturing fairly neutral and without too many unique details.
For the holes on the side I used booleans in Blender to cut out the shapes. It made it easier to iterate and tweak the shapes, rather than committing to a cut straight away.
The swirls around the clock face I modelled with curves and used Ctrl+T to twist the individual spline points.
As a base for the ornaments, I also used curves with a curve object as the bevel profile. Alt+S to scale points smaller/bigger.
I then converted the curves into mesh, split the mesh into parts and prepared them for sculpting in ZBrush, making sure I had applied all the scale and rotation transforms first. In hindsight, I would split the top part of the clock up even more.
Tip! Make a list of objects and various stages and tick them off as you go. Little wins!
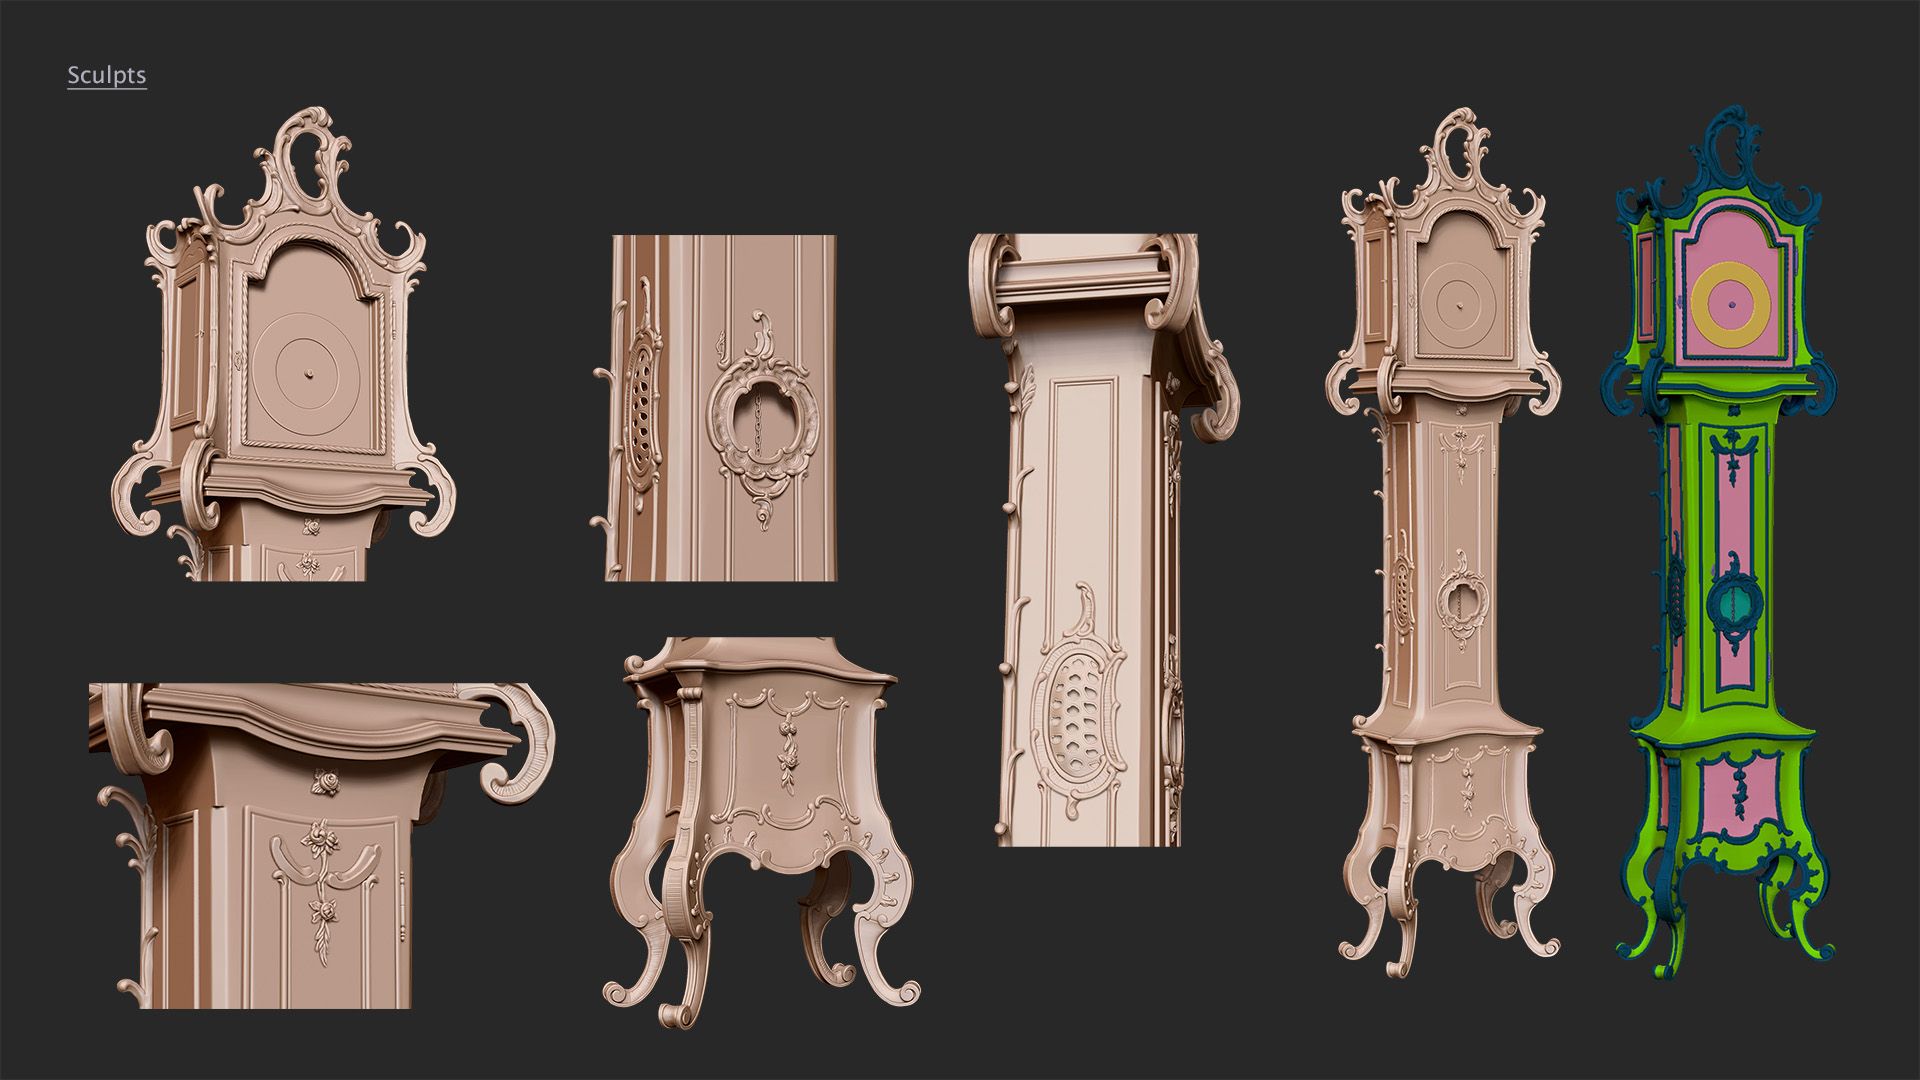
In ZBrush I organised the various parts into folders, subdivided a couple of times, dynameshed and started sculpting.
I used mostly the basic brushes to shape the forms: ClayBuildup with tweaks to the Depth - Imbed settings, DamStandard for thin grooves, hPolish for flat planes, MoveTopologic for better control of moving closely placed geometry. Cool brushes to try are SmoothPeaks and SmoothValleys (in Lightbox - Brushes) to better control which areas are smoothed. Masking areas as you work, comes in handy as well.
I mostly just tried out various brushes, tweaked the settings and had fun with the sculpt!
To reduce the amount of polys on the mesh before exporting, it’s a good idea to use Zplugin - Decimation Master.
For baking material IDs for texturing, I polypainted the different materials in ZBrush. Luckily I had split up most of the pieces and it was fairly easy to do with Color - FillObject. Some areas I had to hand paint however and I will definitely remember to split the model up better for next projects.
Also had some issues with scale when importing/exporting and found two ways that seemed to work the best.
A) FBX option: Import/export one file with all the parts using ZPlugin - FBX ExportImport
B) OBJ option: Import/export multiple files of individual parts using ZPlugin - Subtool Master - MultiAppend
Tip! When moving from a modelling software to ZBrush, do some export/import tests to make sure there are no issues with scale and pivot location. It will be harder to fix later on.
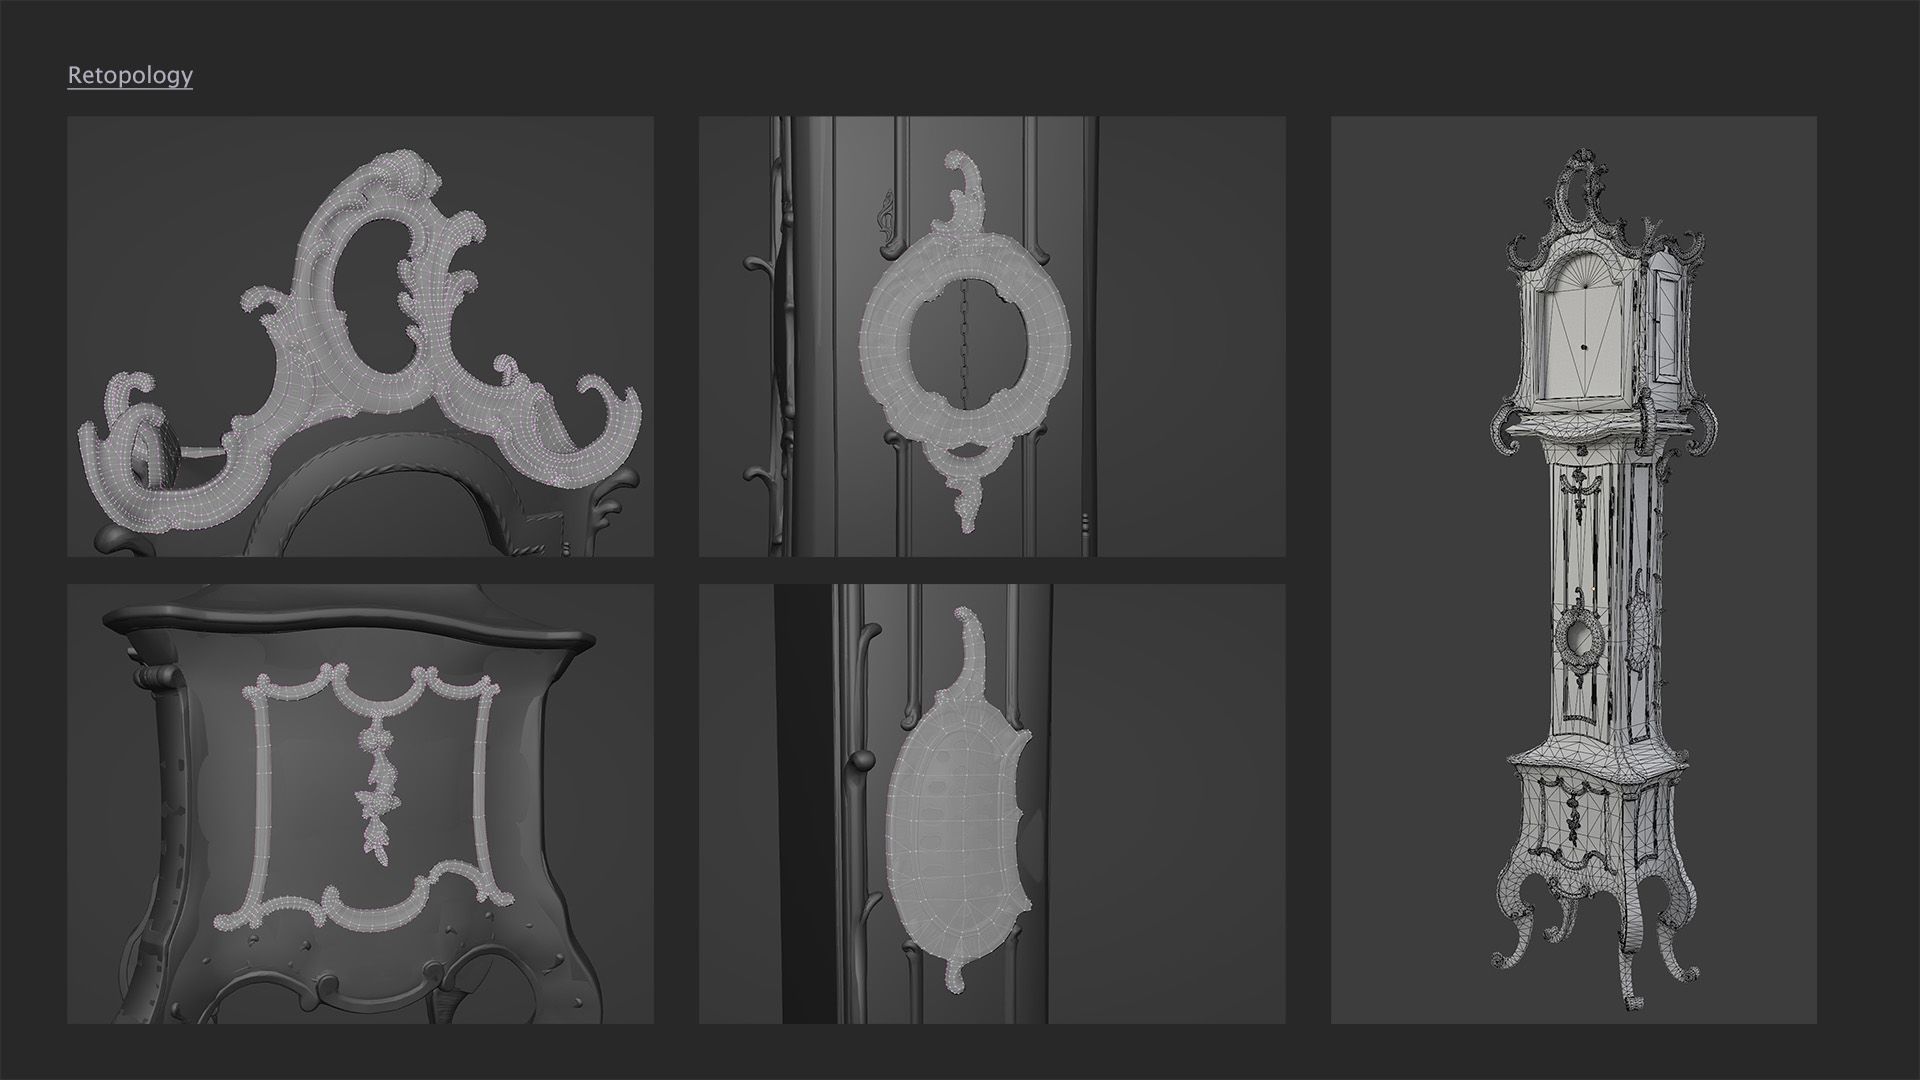
As a base for starting retopology I used my initial blockout in some areas and in others I simply started from scratch. I also tried using lower decimated models as a base, but I wasn’t happy with the edge flow.
Thus I ended up using an addon for Blender called Retopoflow, which came in really handy, especially for the more intricate shapes.
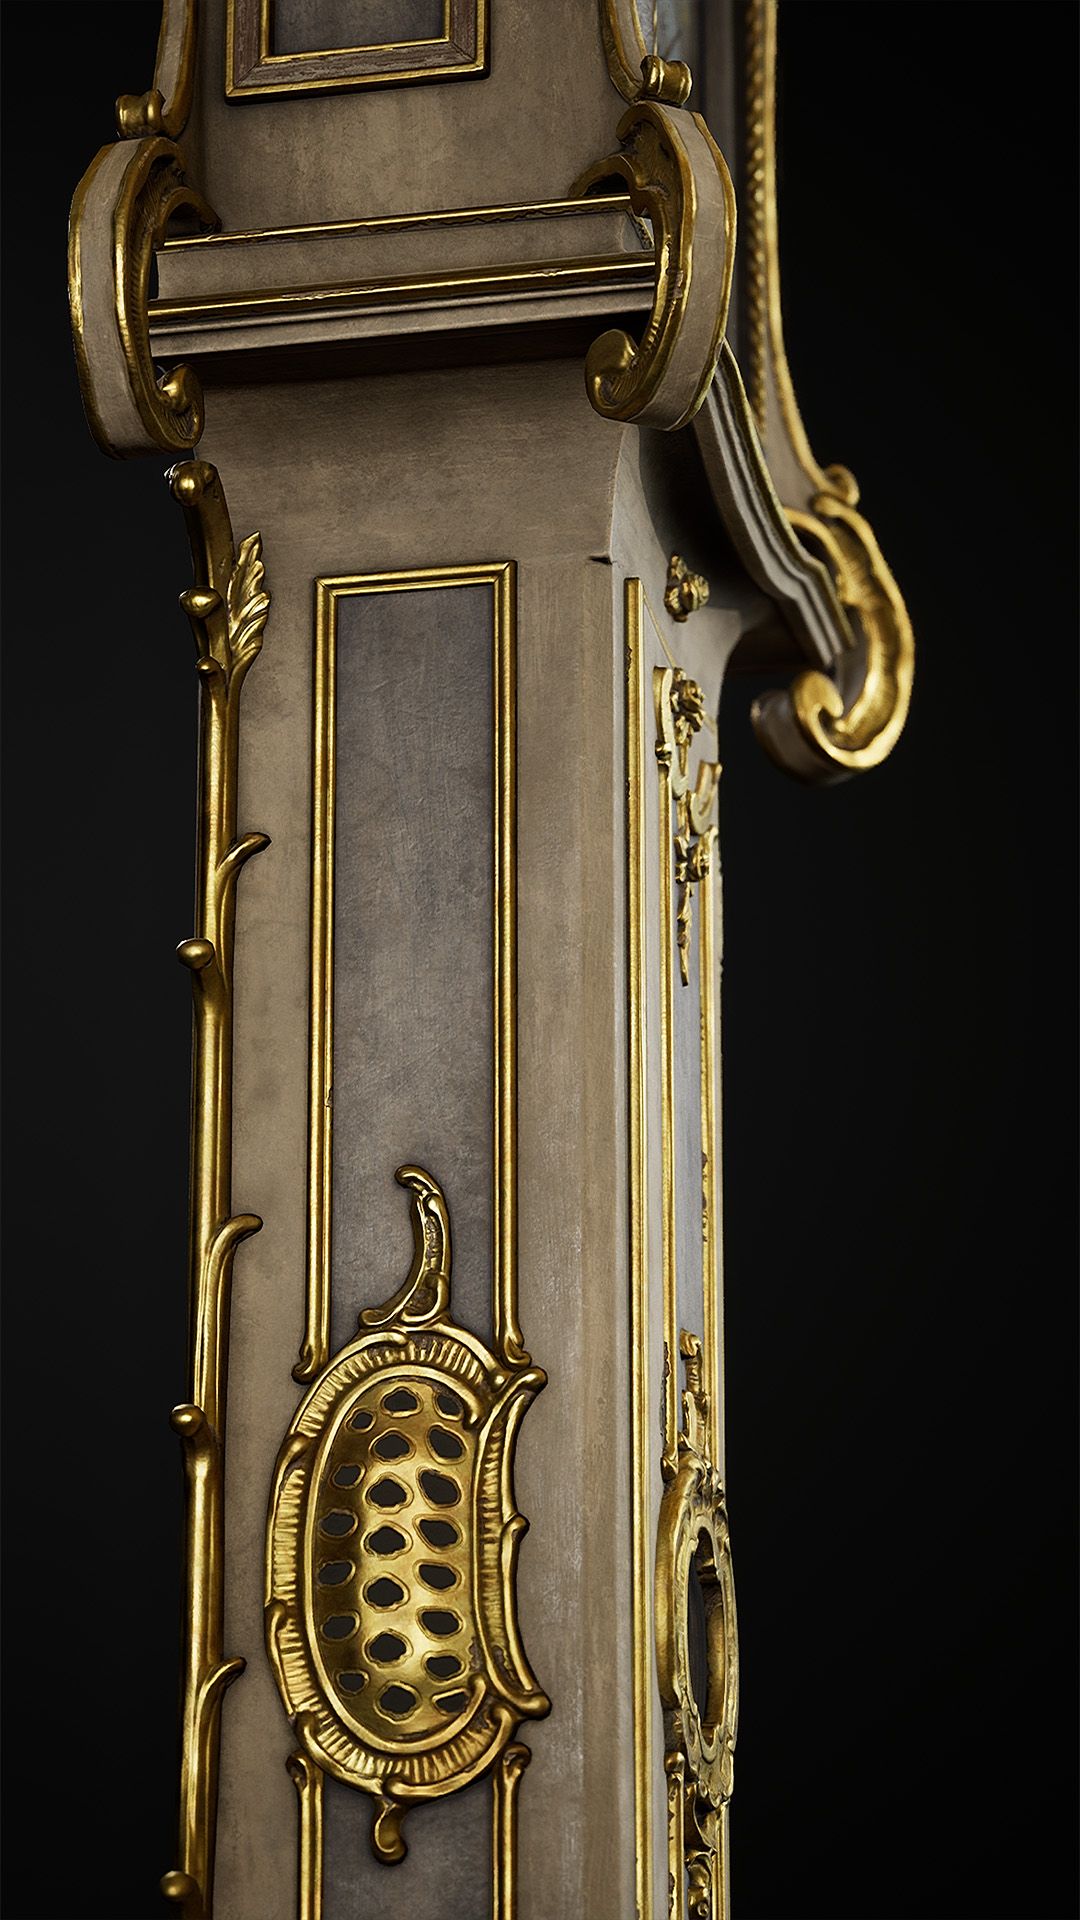
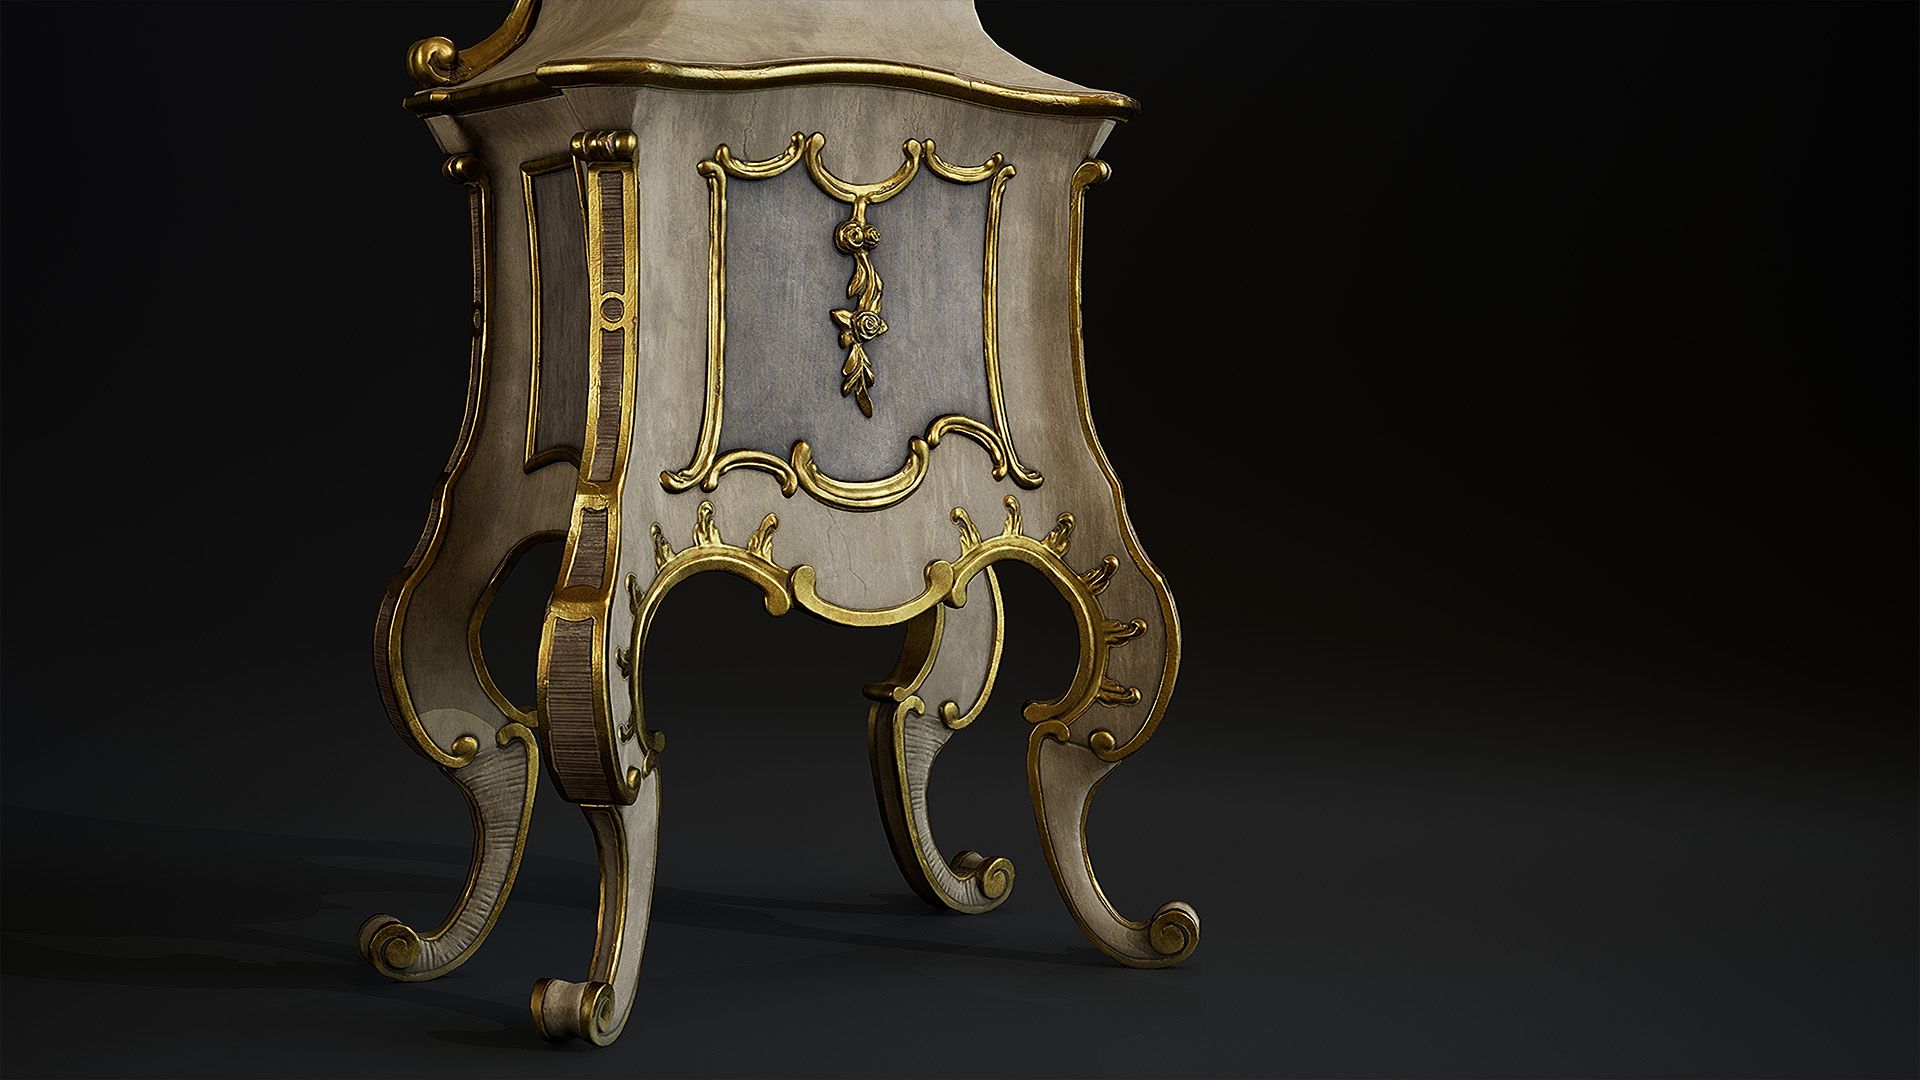
As it was a portfolio piece I wanted to stay true to the form as much as possible and not be too concerned about the tri count. Some high poly elements I still baked down to a more simple shape e.g the chain inside the clock and some of the details at the lower part of the clock were baked to flat geometry. Most of the side ornaments that don’t provide much change to the silhouette could certainly be more simplified or even baked fully flat as well.
I made sure to observe the silhouette from all angles and keep the tri count higher on curvy areas while lowering it where the geometry was more flat.
Tip! Spend on the curves, save on the straights!
I used Blender addons called ZenUV and UVPackmaster to simplify the process of laying out the UVs. By using them I managed to get:
It can also be a good idea to give small objects e.g hinges, smaller ornaments more texture space to capture details more clearly.
All the flat sides I made unique. Some ornaments and feet were mirrored to increase usable texture space.
Thinking about LODing, I included duplicates of some of the ornaments on the flat sides. This was to minimise texture popping when swapping to a lower LOD.
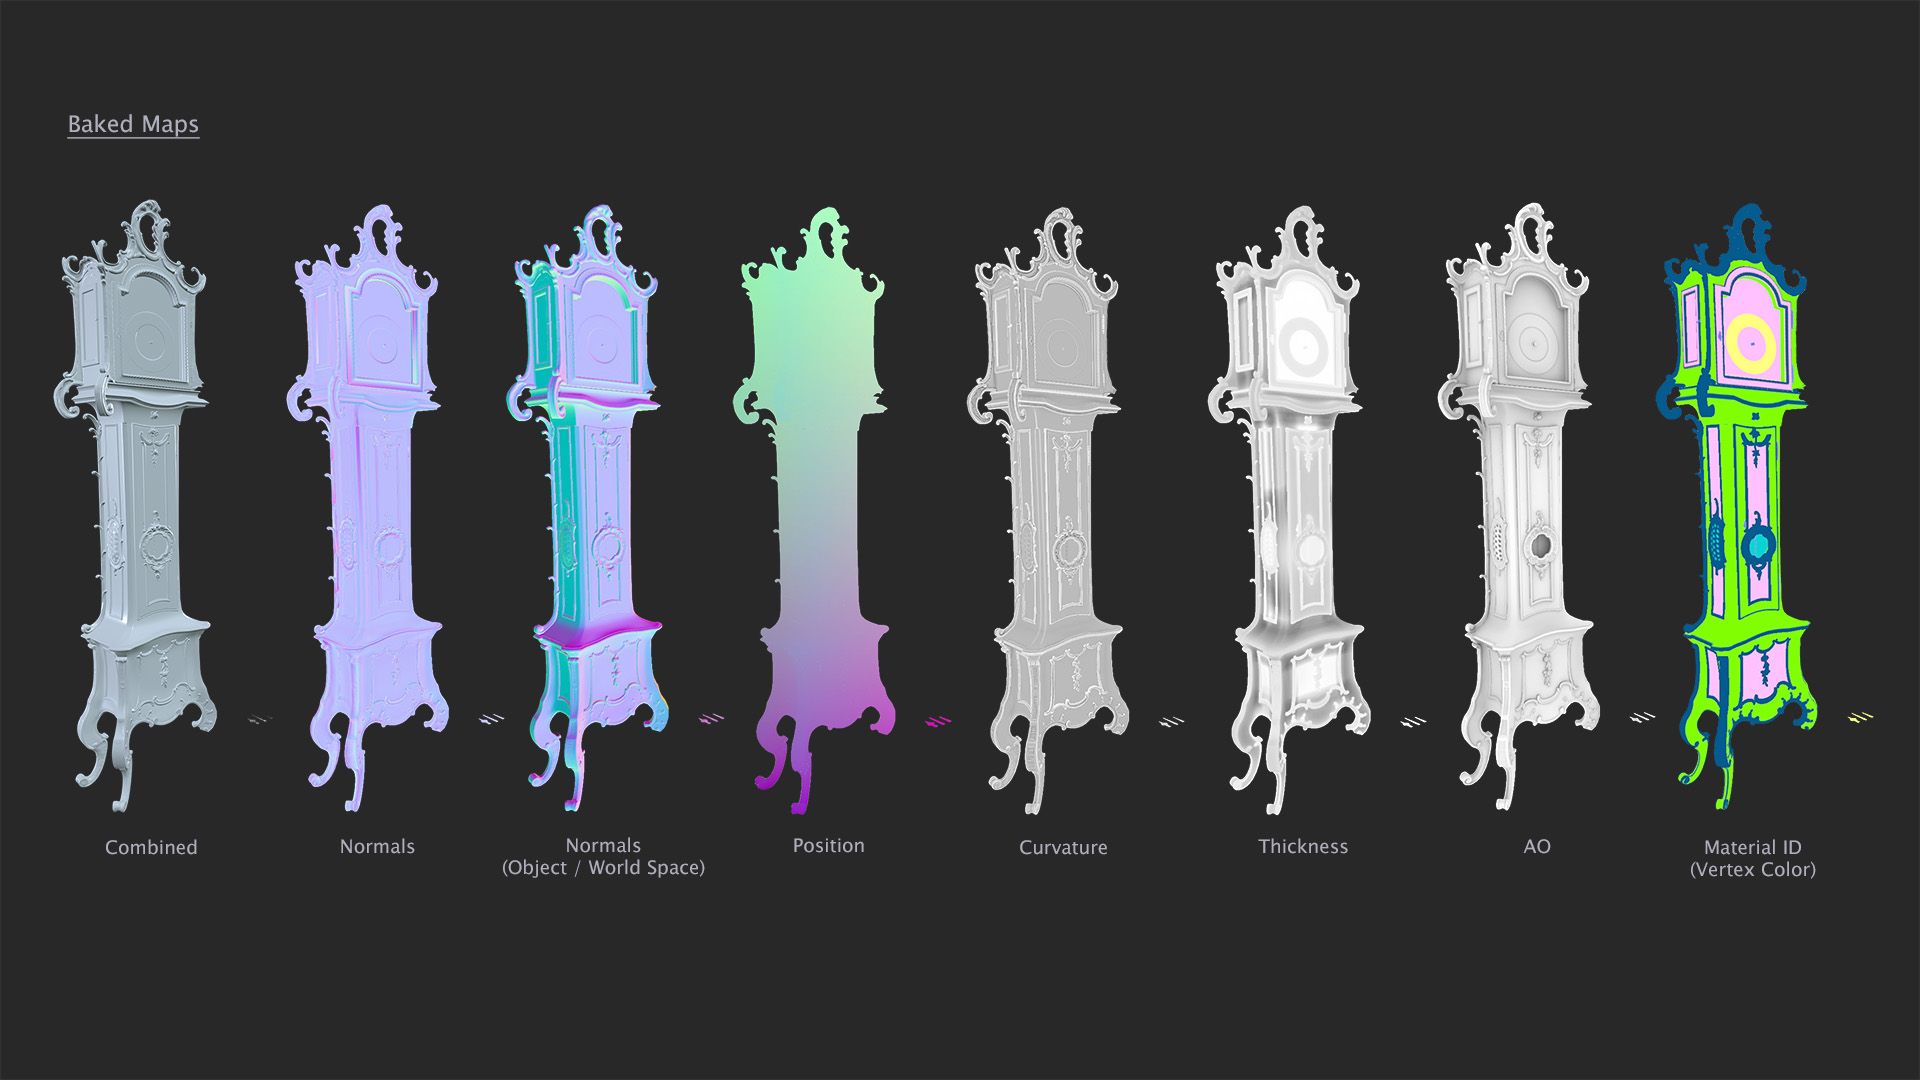
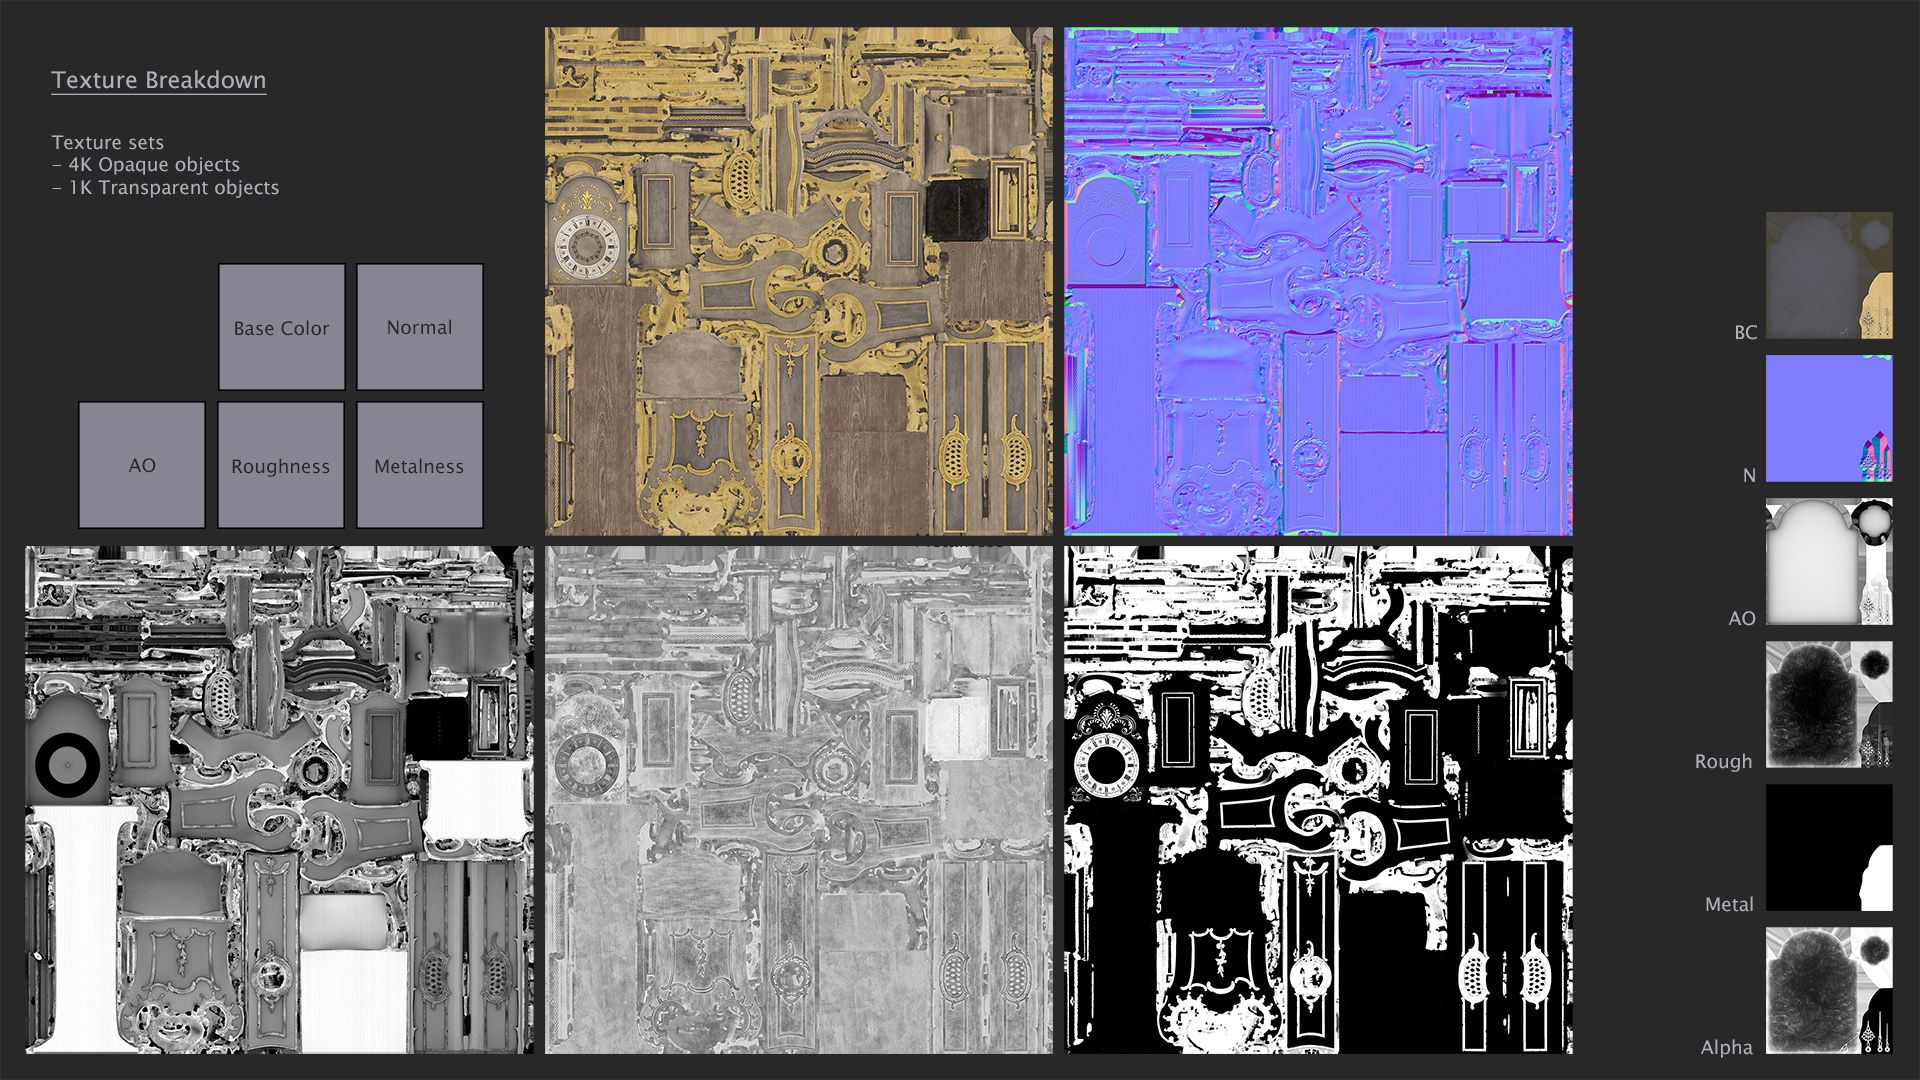
I baked the following maps in Marmoset: Normals, Normals (Object), Position, Curvature, Thickness, AO, Alpha Mask and Vertex Color (used for Material ID).
Tip! Normal map can take care of a lot of details! Trust it. Also, when normals are skewing, you can either add more geometry or paint a skew map.
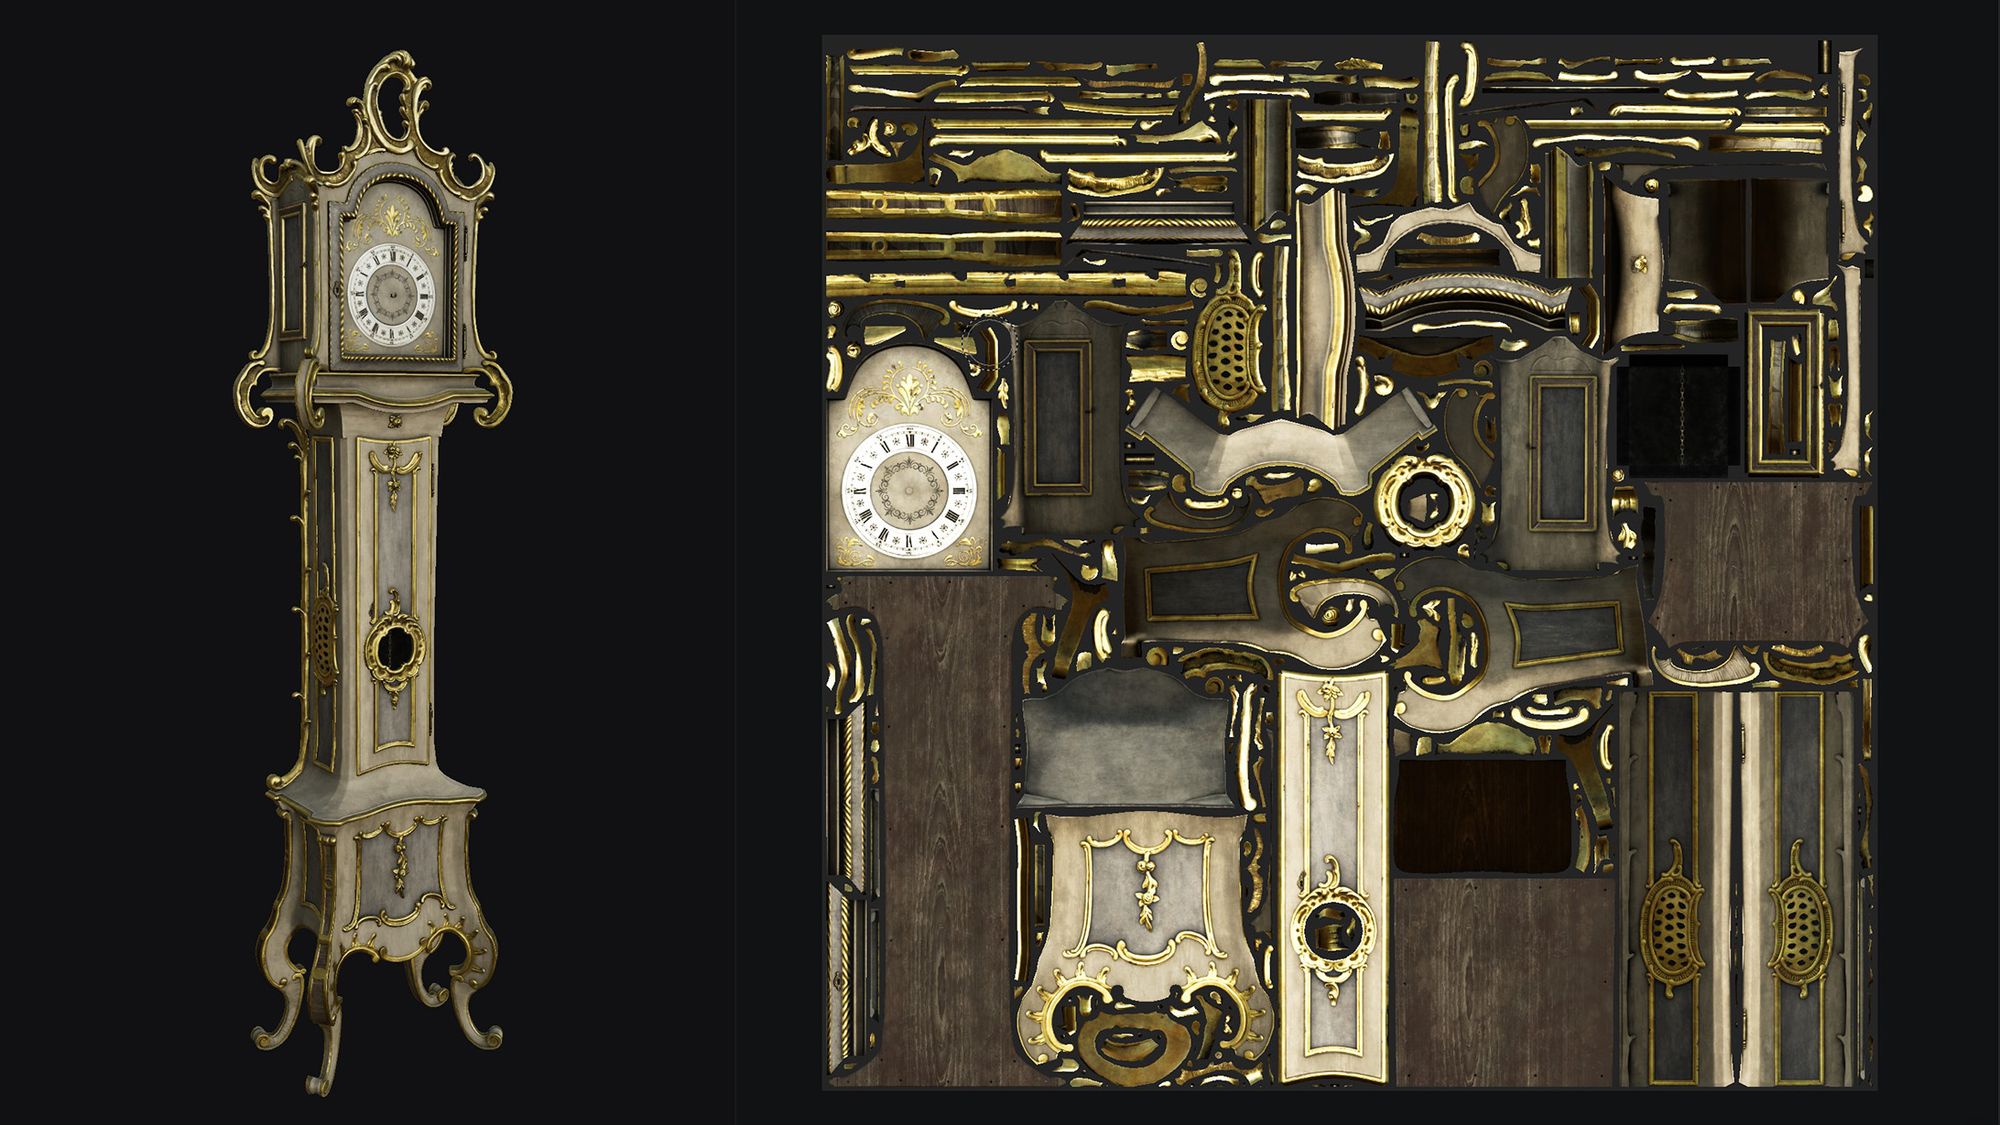
I approached the texturing by building up layers of detail in Substance 3D Painter.
I started with adding in the base materials of the different parts, making sure to blend in variations of colour, value and roughness. I used a subtle addition of a brushed grunge texture to give the wood a hand-painted look.
Next I looked at adding some gradients - darker at the bottom, brighter at the top.
Curvature details played an important part as well, giving the clock some edge highlights and various layers of dirt/dust.
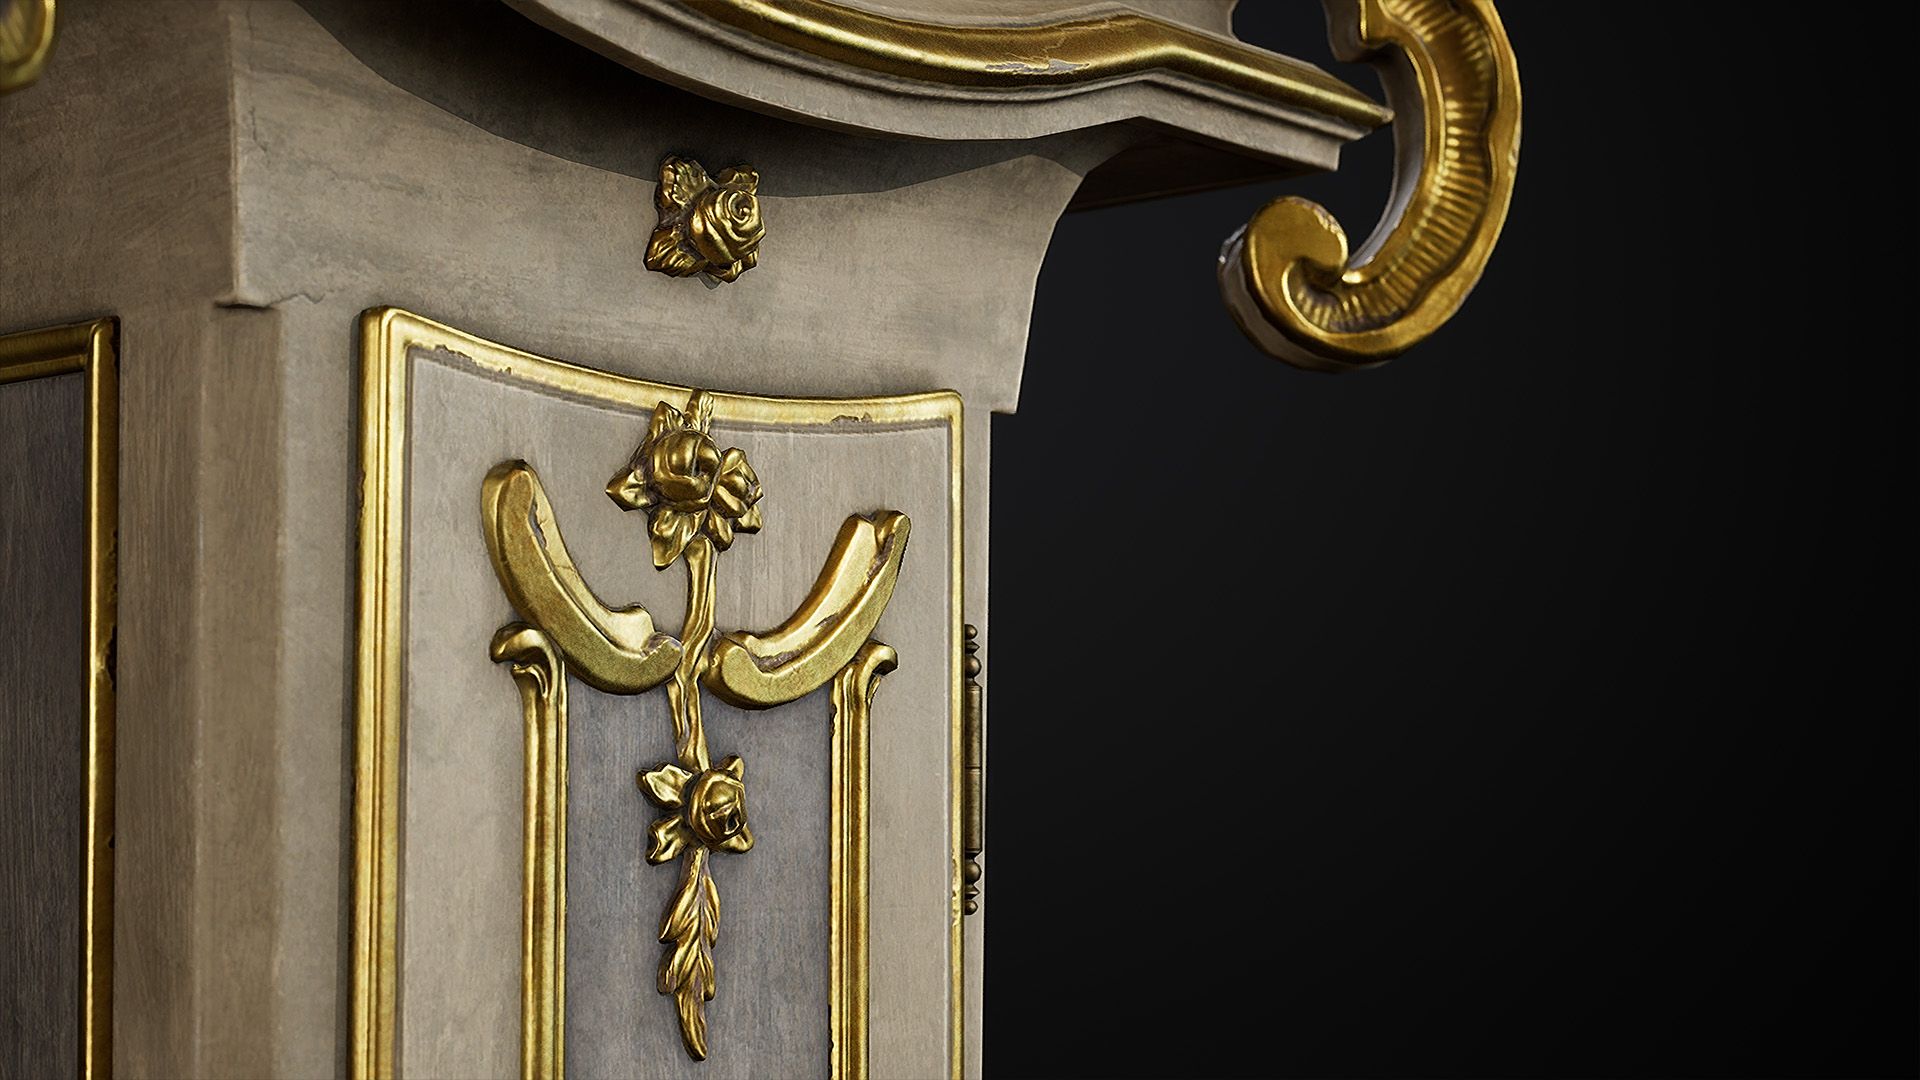
Finally I added in additional details such as nails, some small cracks in the paint and wood and a crack in the glass.
Tip! Layer details as much as you can, don’t be satisfied with just one grunge map overlay. Gradients can be a very good thing to use to ground the object.
I decided to present the clock using Unreal Engine 5.
I brought in a backdrop mesh and set up a studio 3-point lighting configuration with key, fill and rim lights.
Tip! When finding camera angles and placing lights, treat your prop like a product you are trying to sell. Spin the camera around and look for interesting angles. Use DOF (depth of field) to give a better sense of depth.
You can see the final results below.
I really enjoyed the process of reconstructing this clock in 3D - from analysing how it's made to sculpting the intricate details and polishing the textures.
Many thanks for taking the time to read this article and I hope you found it insightful!
Check out Martiine's profile on The Rookies.