
Learn How to Groom a Loveable Character With XGen
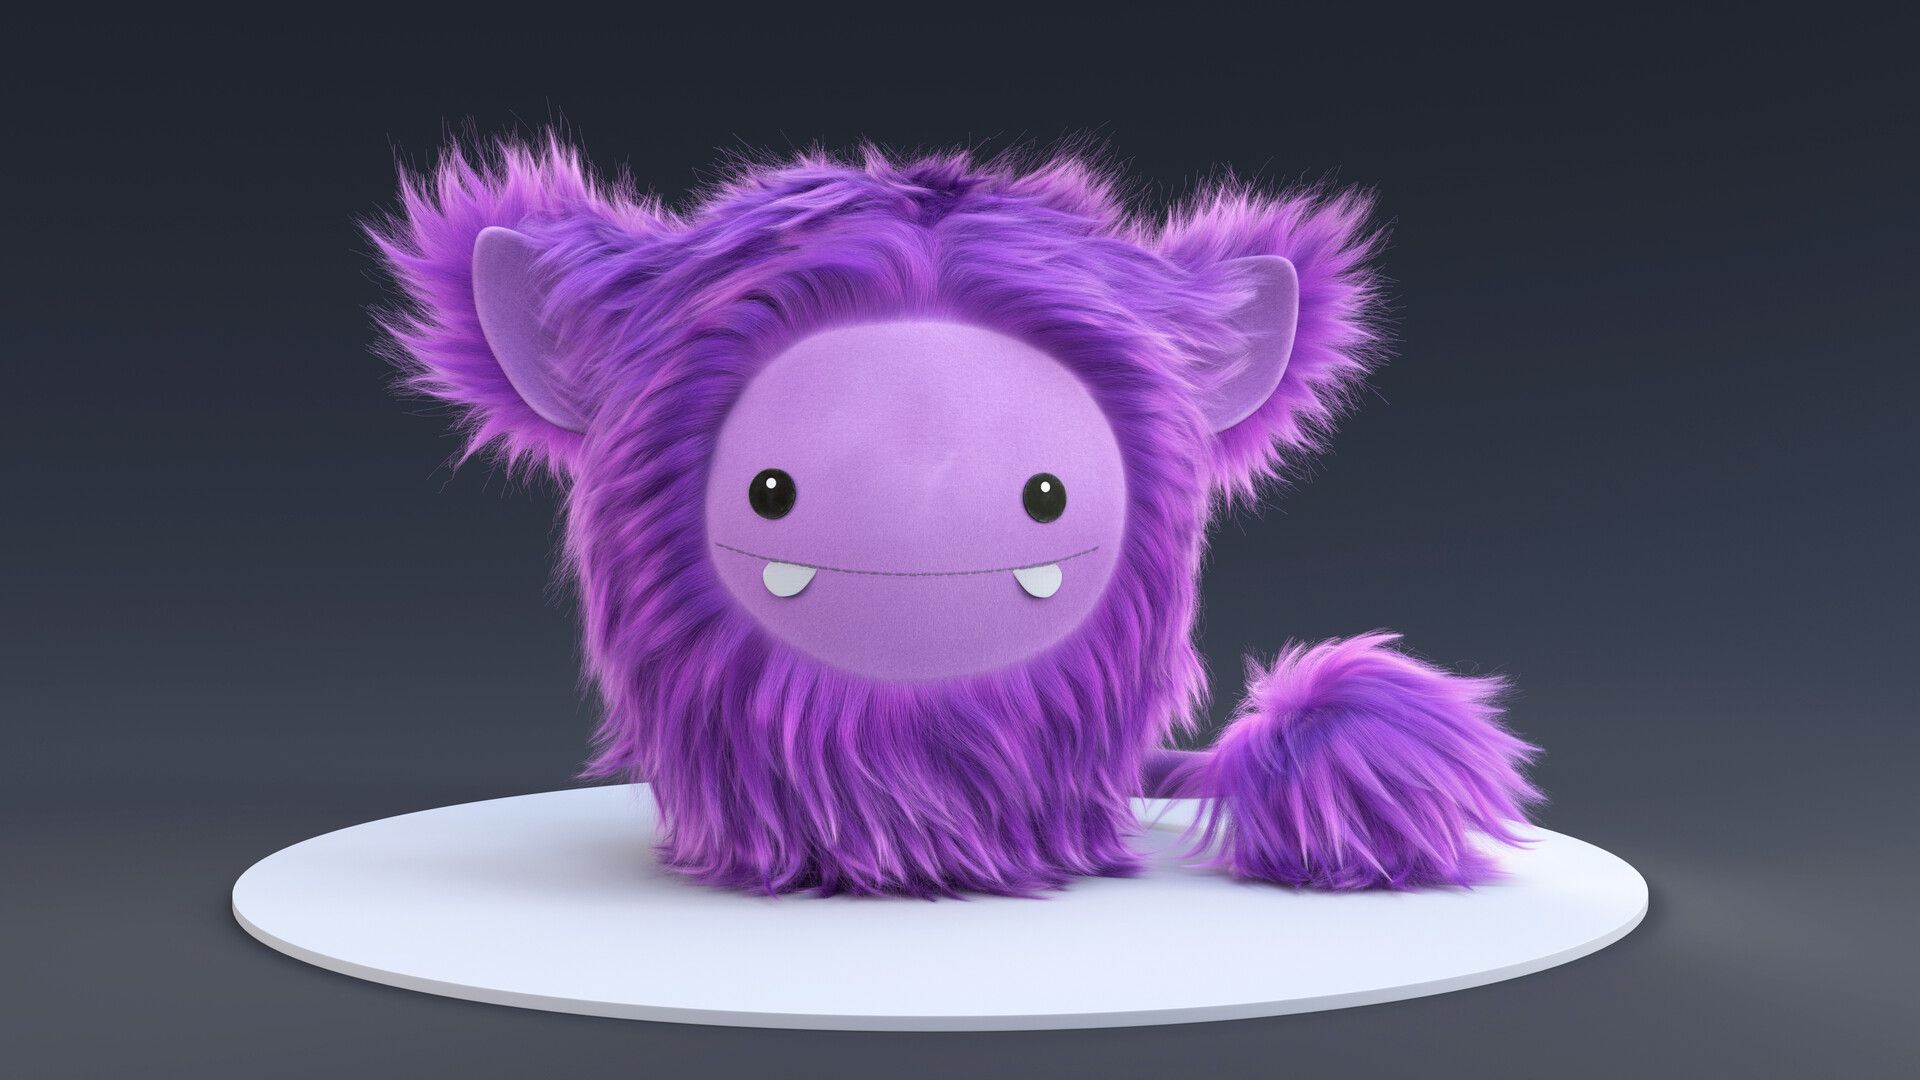
BigRock student Sara Castelli breaks down her latest project: a furry puppet creature made in Maya, Substance 3D Painter and XGen.
BigRock student Sara Castelli breaks down her latest project: a furry puppet creature made in Maya, Substance 3D Painter and XGen.

Sara Castelli graduated with a Master's degree in CGI at BigRock and aspires to be a Groom TD in games and Film. In this article, she shares her latest project and breaks down her process for creating a loveable furry character with XGen.
Studying the references is one of the most important things for the groom. You need to study them, to figure out the correct flow, how many layers of tufts, how many different kinds of noises, and all the details you can add to make the fur more interesting.
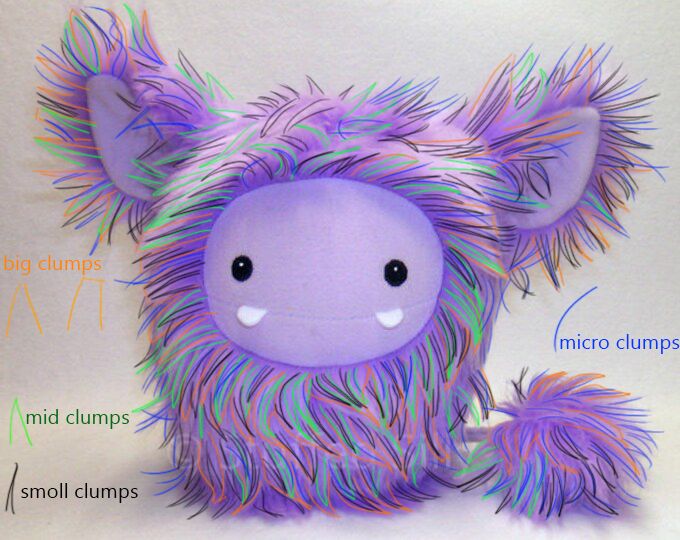
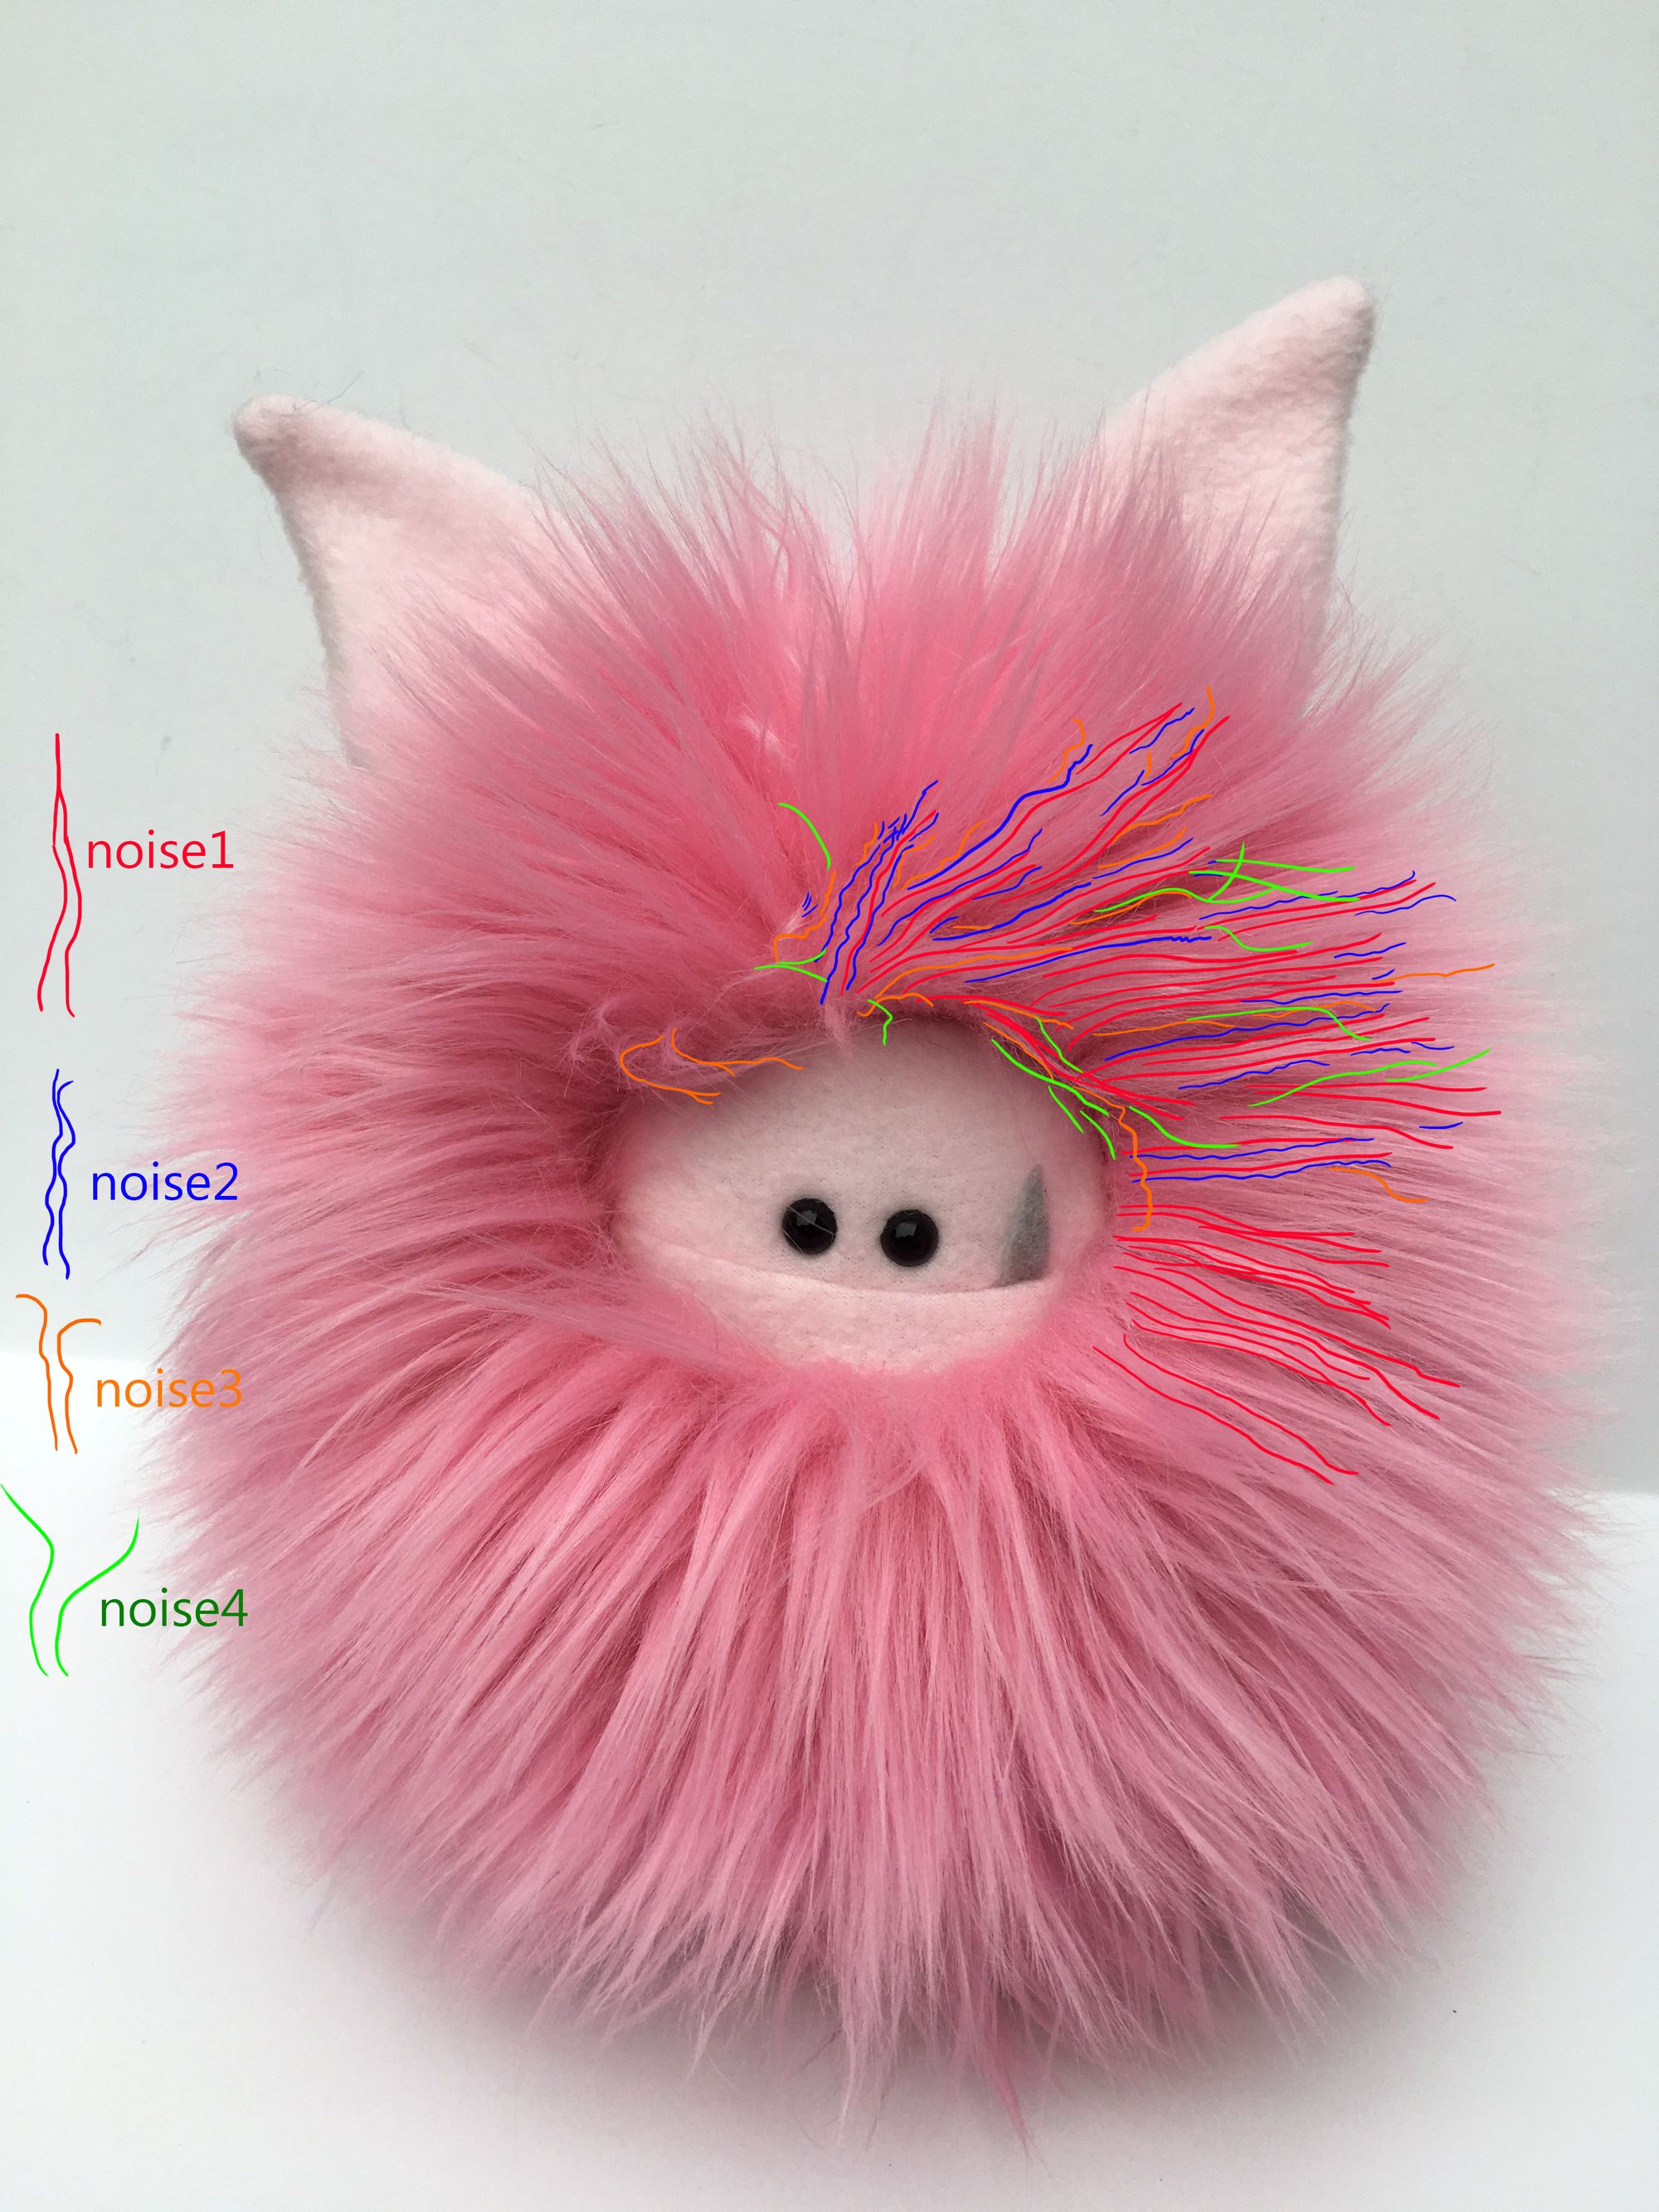
I analyse the different references starting with the more general aspects. Then I move to the details. In this case I started by drawing on the main reference arrows that show the direction of the fur. After that I go on to identify the large clumps and their shape, I proceed in this way for mid clumps and small clumps as well. At first I identify the general noise, uniform across the whole fur and then I go on search for the other types of noises such as fraynoise. I always proceed in the same way: from the most prevalent (basic noise) down to the less evident type of noise that affects only a part of the groom.

In this case, I decided to split the groom into three main parts to handle it better:
I decided upon these groupings, because the face, the inner part of the ear and the tail (the part with short fur) have a different type of grooming from the main body.
There isn't an universal method to follow for the organisation of each part of the groom as each case is different. The number of the parts that make up a fur is variable in this case. In the end I made a total of five setups.
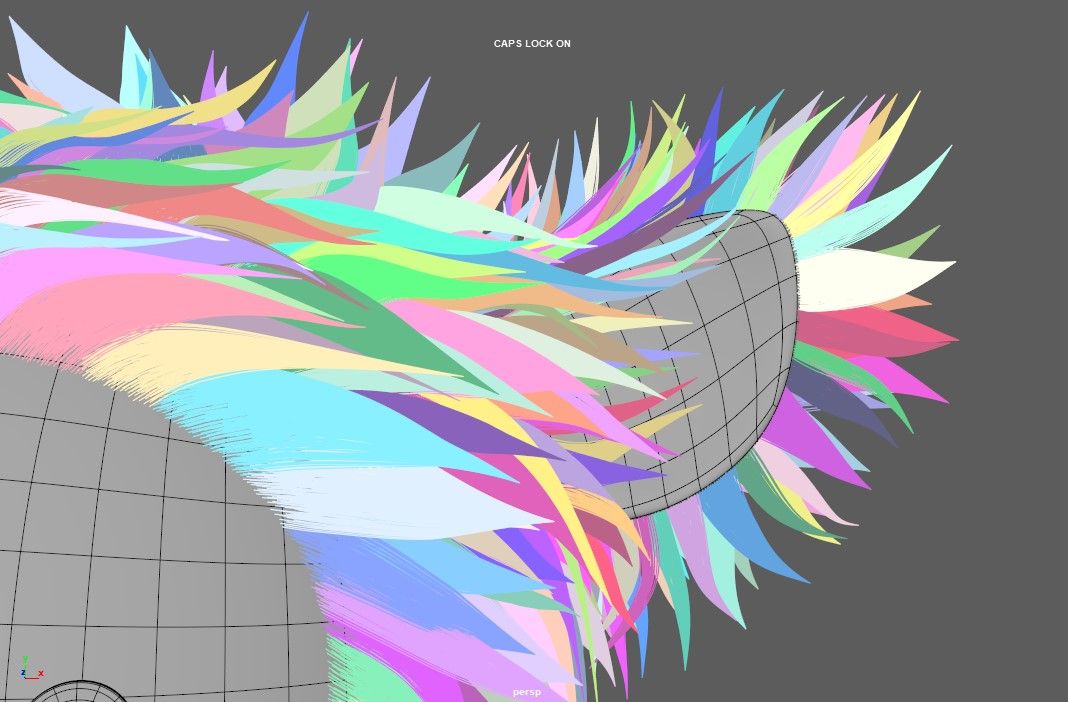
I proceeded to work in Maya. I set the project, saved the fist wip and loaded the main reference in the front view. I checked all the parts of the model have UVs. Especially the parts of the mesh that will have groom on top, They must be in the first Udim. Otherwise you will not be able to create any kind of maps for the groom as the model will not be paintable.
I opened the XGen core menu after checking everything. At first I selected the mesh because I want to generate fur all over. I selected the first option in the XGen core options menu: 'create new description'.
I then named the description and the collection. I chose what kind of primitives are in this description, and in this case I choose: splines (use for long hair, vines, etc...). Then I selected how I intended to control the groom in case: Plasing and shaping guides. I left the option to default " randomly across the surface" in the primitives option.
Now I have everything set up and can start creating the groom. The first thing I did was to create a density map for the body fur. The density map (a black and white map with grayscale) is useful to control both the amount and where the hair grows. In this case the middle part where the face is black while the set of the body is white. After this I began to plant guides and put them in shape.
To get a result more like the reference hair I adjusted the hair shape parameters. In the "width" I used this random script:
$randMin=0.0020;#0.0000,1
$randMax=0.0030;#0.0000,1
$seed=0.5;
$randValue=rand($randMin,$randMax,$seed);
$randValue
Then I adjusted the width ramp and the taper.
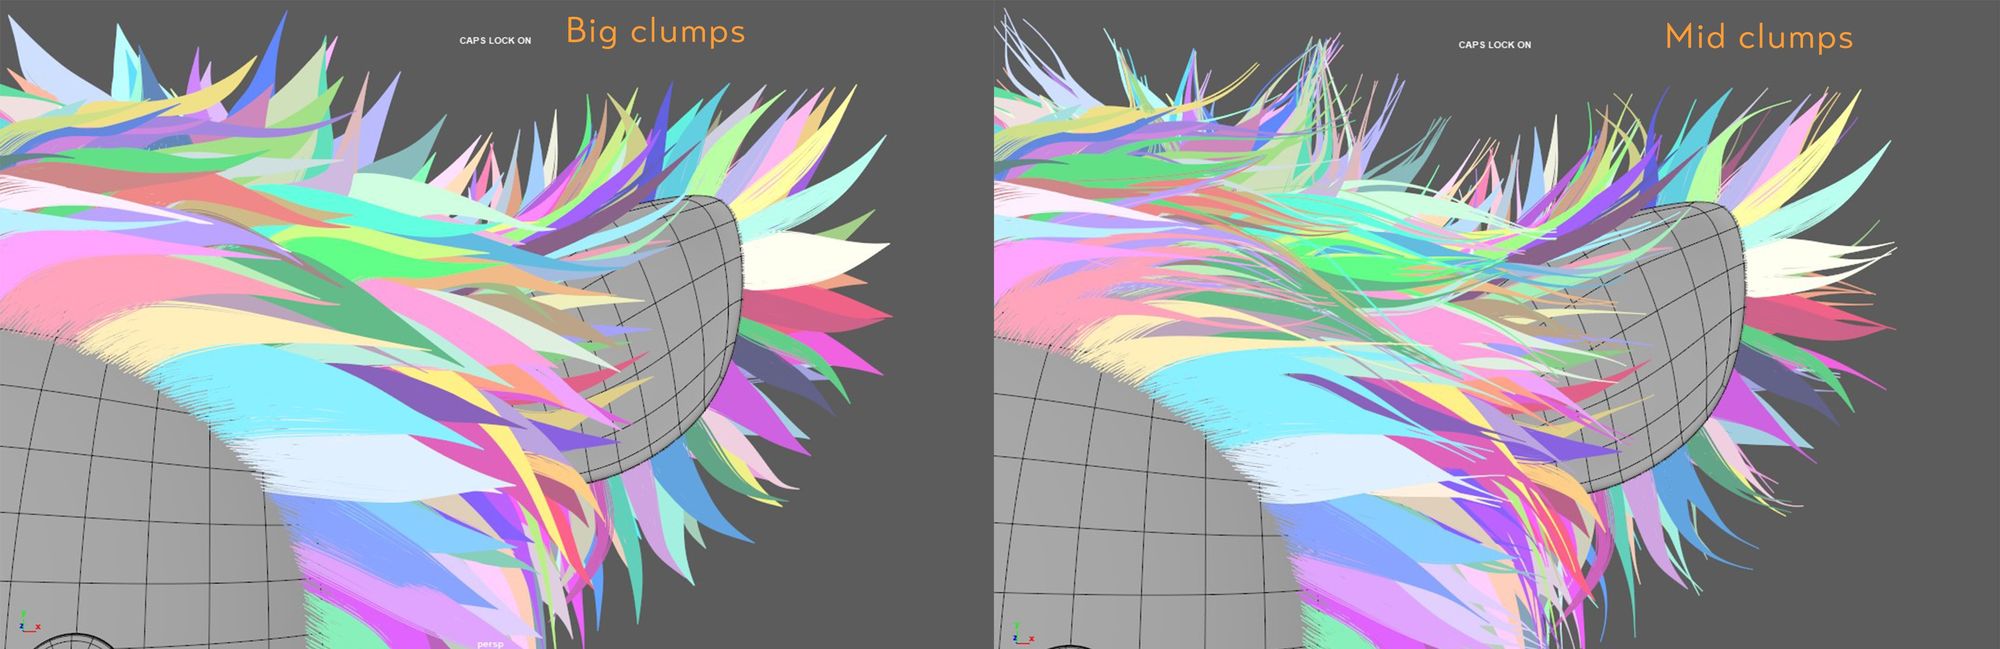
Clump1 = Big Clump The first modifier I'm using is the clump, denoted as clump1, which is responsible for managing the groom's big clump. In this instance, I generated the big clump's guides based on the groom guides I previously planted, ensuring that each guide corresponds to a clump.
Clump2 = Mid Clumps
Following the creation of the initial layer of big clumps, I proceeded to generate mid-sized clumps with a density of 3. To introduce more variation, I applied a mask map and adjusted the noise settings in the sigma menu to add further complexity to the clumps.
I employed a script similar to the one used to randomise hair width at the beginning and fine-tuned the noise scale curve. As a final adjustment, I set the noise frequency to 0.2.
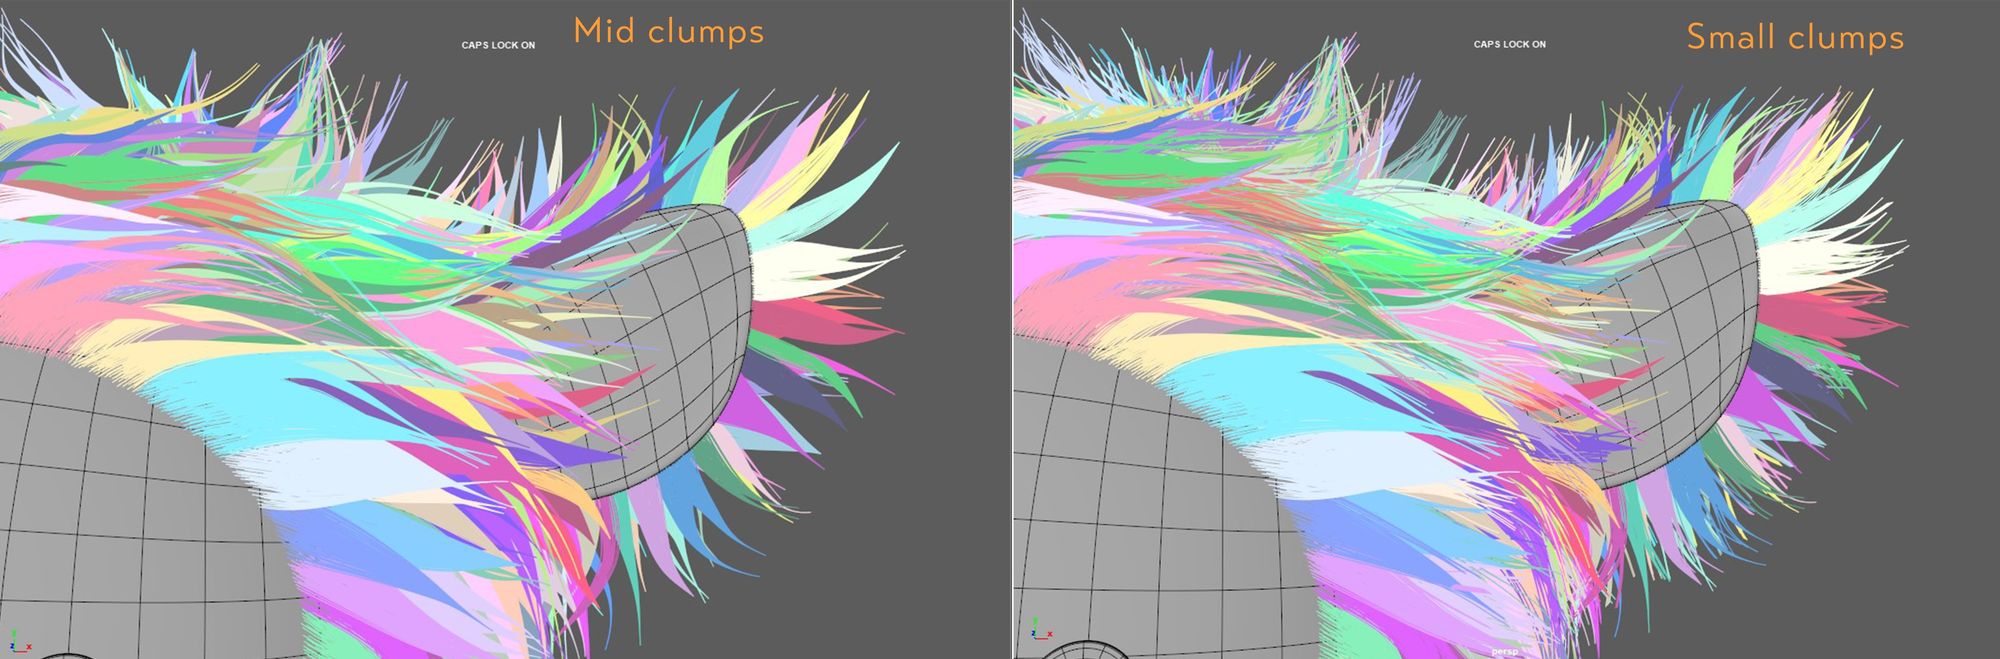
Clump3 = Small Clumps
Next, I introduced Clump3, representing the small clumps. I defined the density for this layer and created a map to control the intensity of these small clumps. Additionally, I utilised a percentage script in the 'mask' parameter to regulate the extent of fur affected by Clump3.
To introduce further variation, I implemented a 'noise effect' parameter and generated a noise map. This map allowed me to precisely control the areas where I wanted to apply more noise.
Here's the script I used to control the percentage of stray hairs affected by Clump3:
$percentstray=5;#0.000,100
rand()$percentstray/100 ? 1:0
This script determines whether each hair is affected by Clump3 based on the defined percentage.
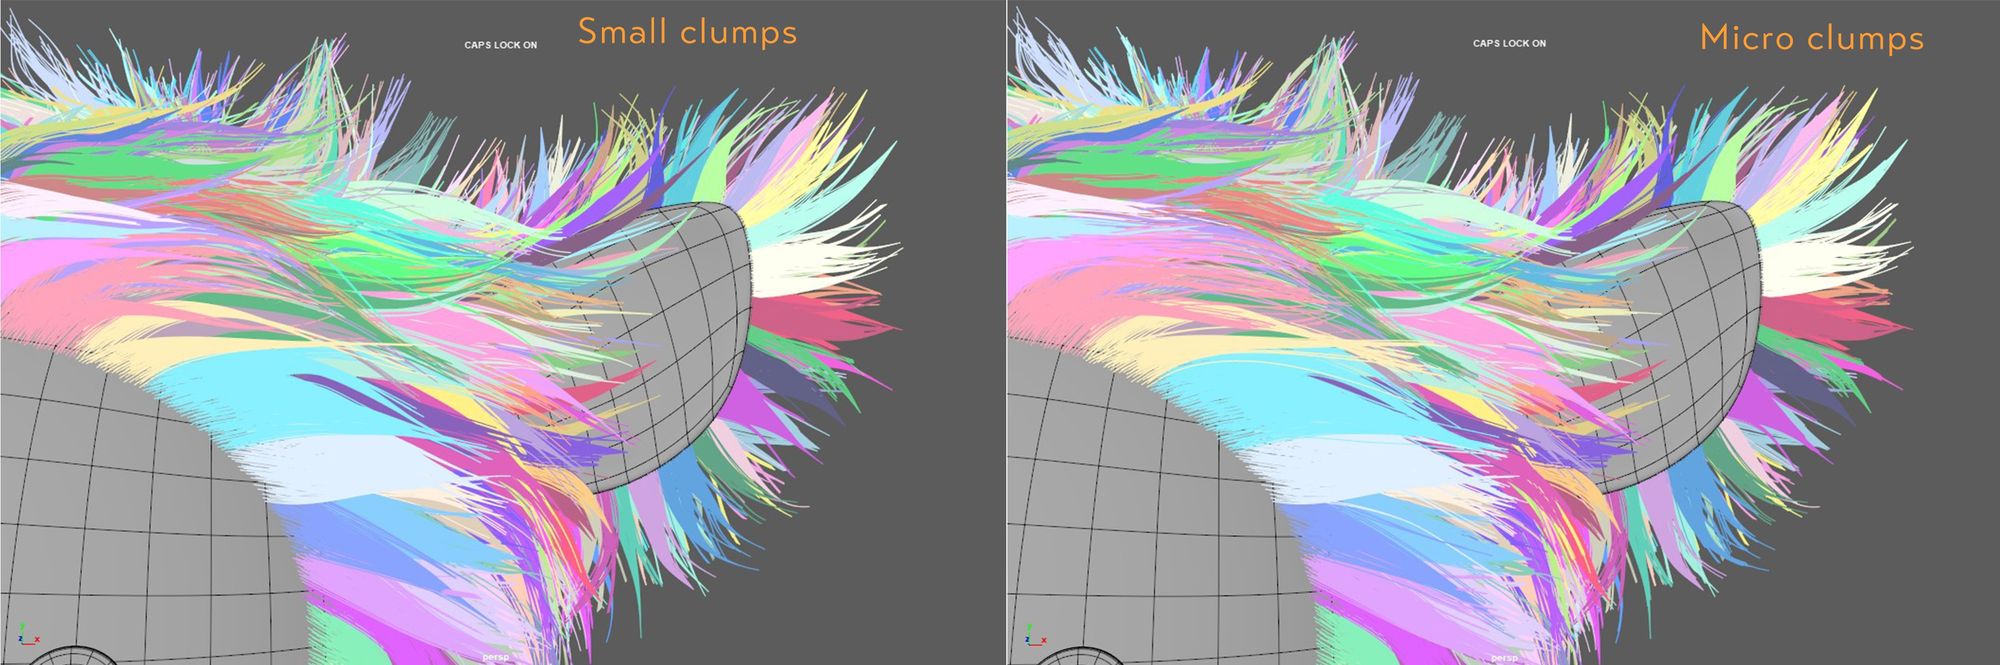
Clump4 = Micro Clumps
For the final clump layer, Clump4, I focused on creating micro clumps, which are tiny clusters of hair. I followed the same process as I did for the small clumps, adjusting the density and using a similar approach.
The key difference here is that I introduced subtle noise, primarily targeting the tips of the micro clumps. This addition added an extra layer of intricacy and visual interest to the overall groom.
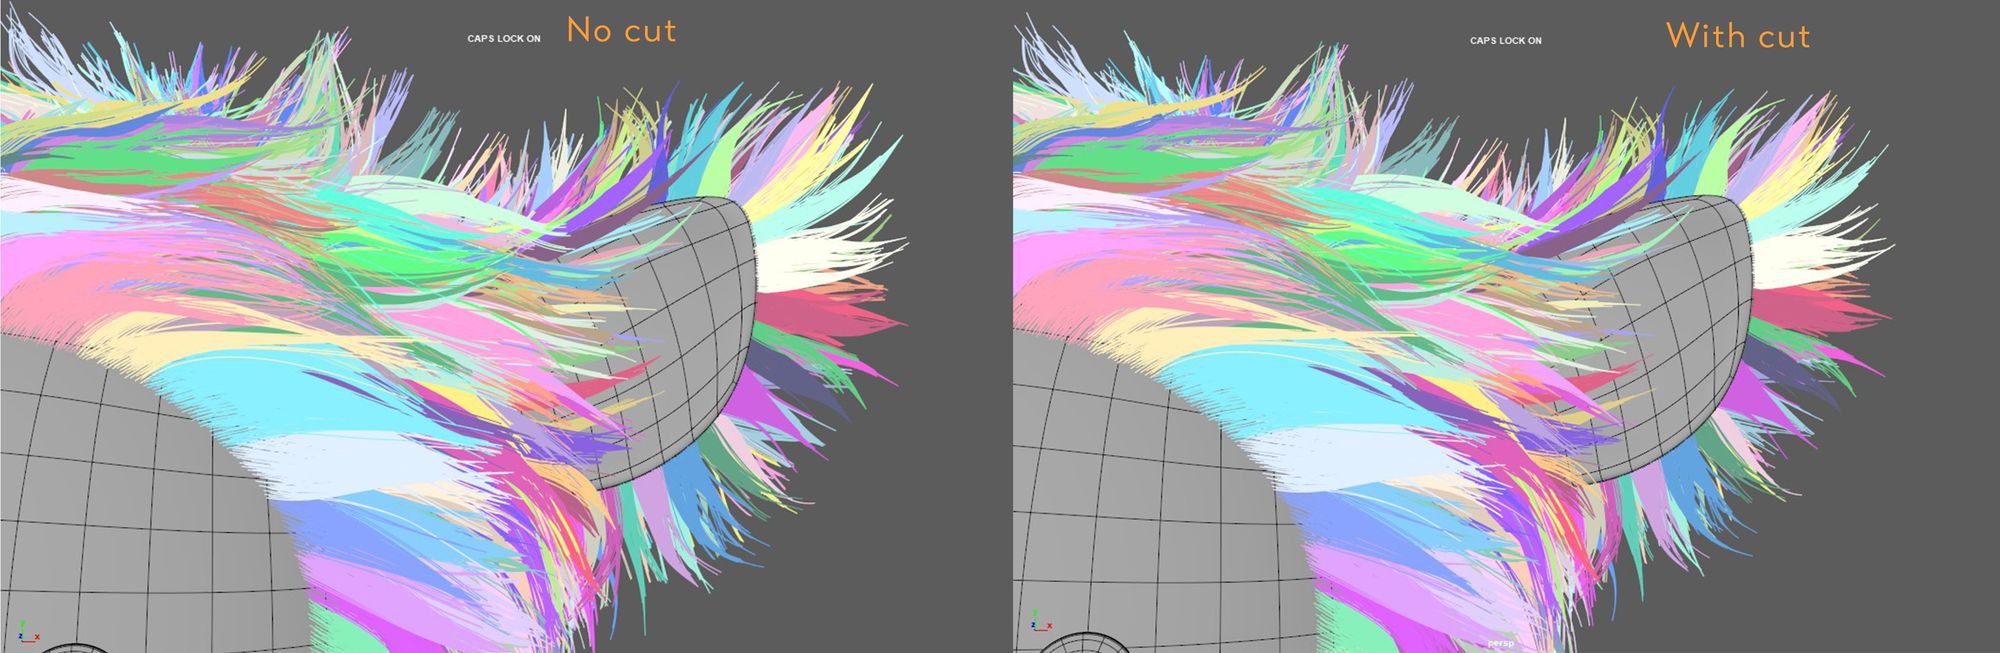
Before moving onto different types of noises, I added a cut modifier. To create variations, in the length of the hair to make everything more believable. I inserted a random script (the same I used before for the width), in the amount parameter of the cut modifiers.
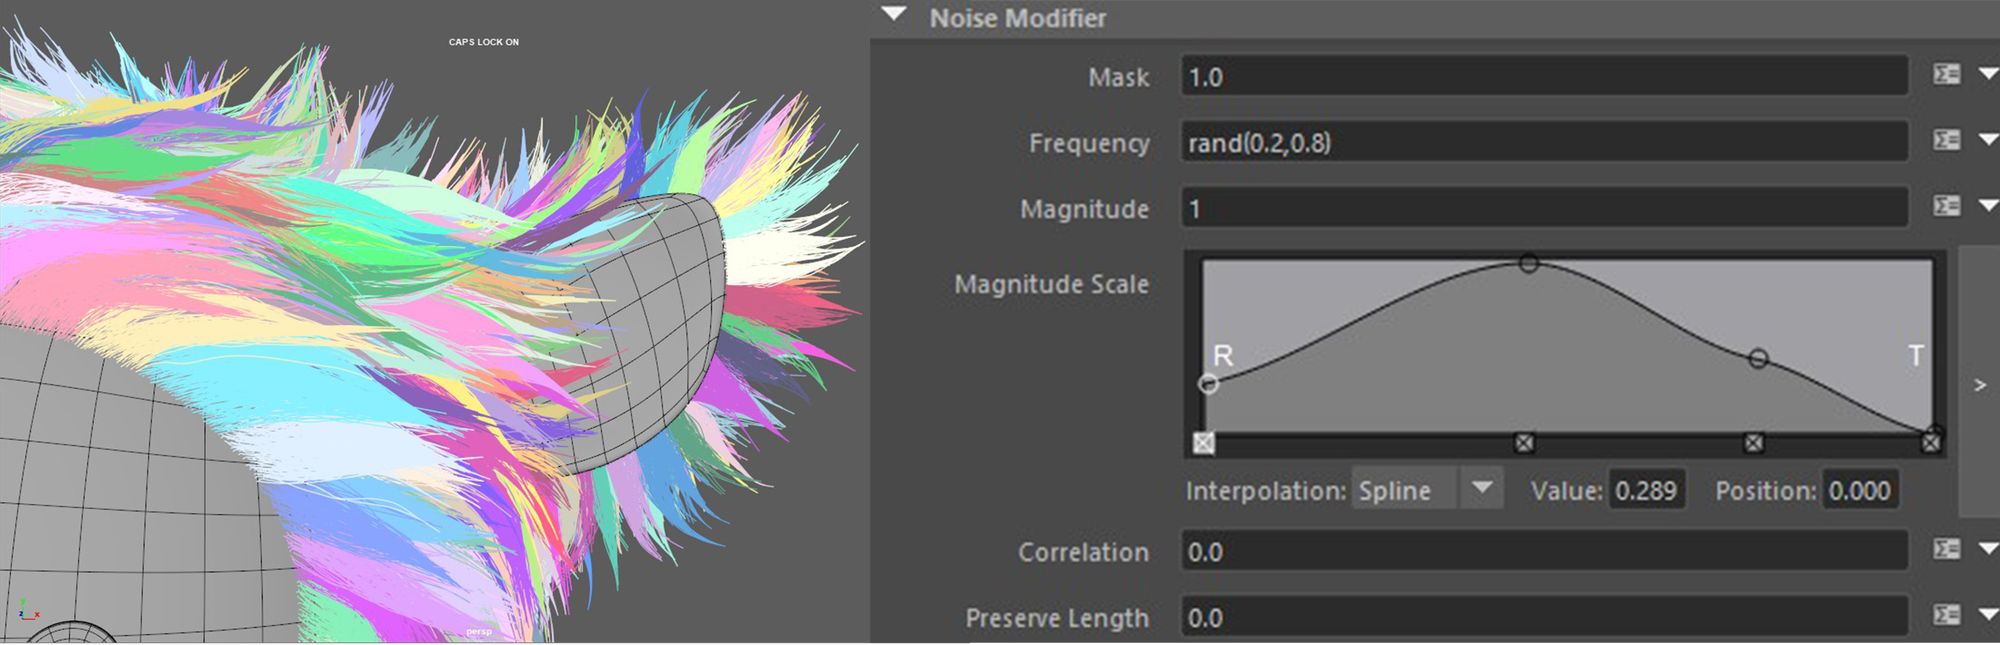
Noise1 = General Noise
The first type of noise I use is the general noise, which is the most common and affects the entire groom. I begin by randomizing the 'frequency' and then fine-tune the 'magnitude scale'.
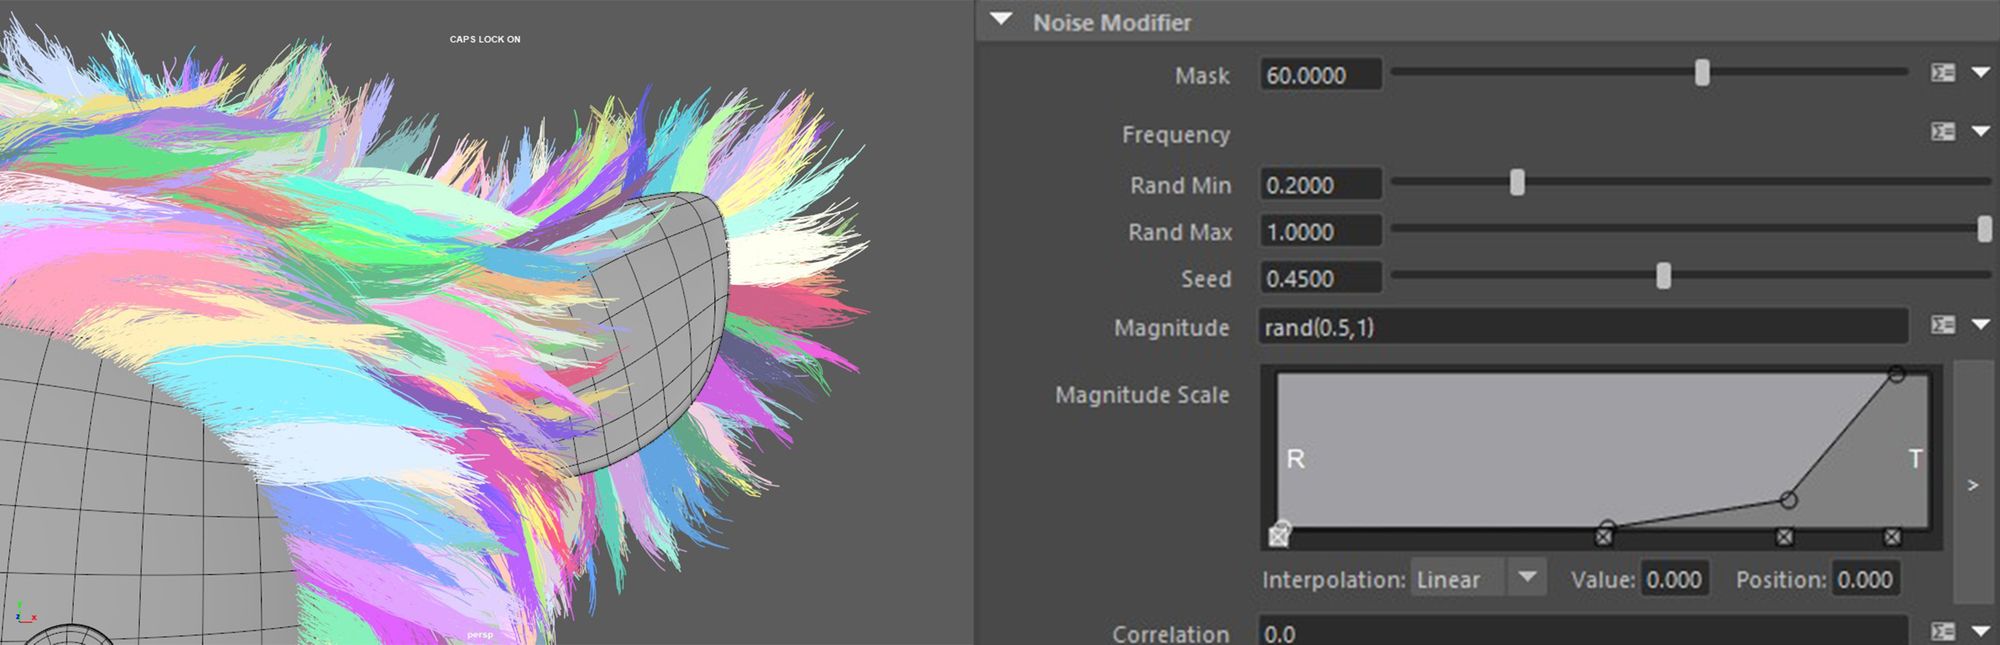
Noise2 = Variation Noise
The second noise is similar to the first but adds more variation. It doesn't affect the whole groom, but only a part of it. It has a higher frequency, so the groom will be fuzzier than before. To achieve this result, I used the same script as before, the 'percentstray' one, in the mask. Then, I randomised the frequency and magnitude using the same random script. Finally, I adjusted the magnitude scale curve.
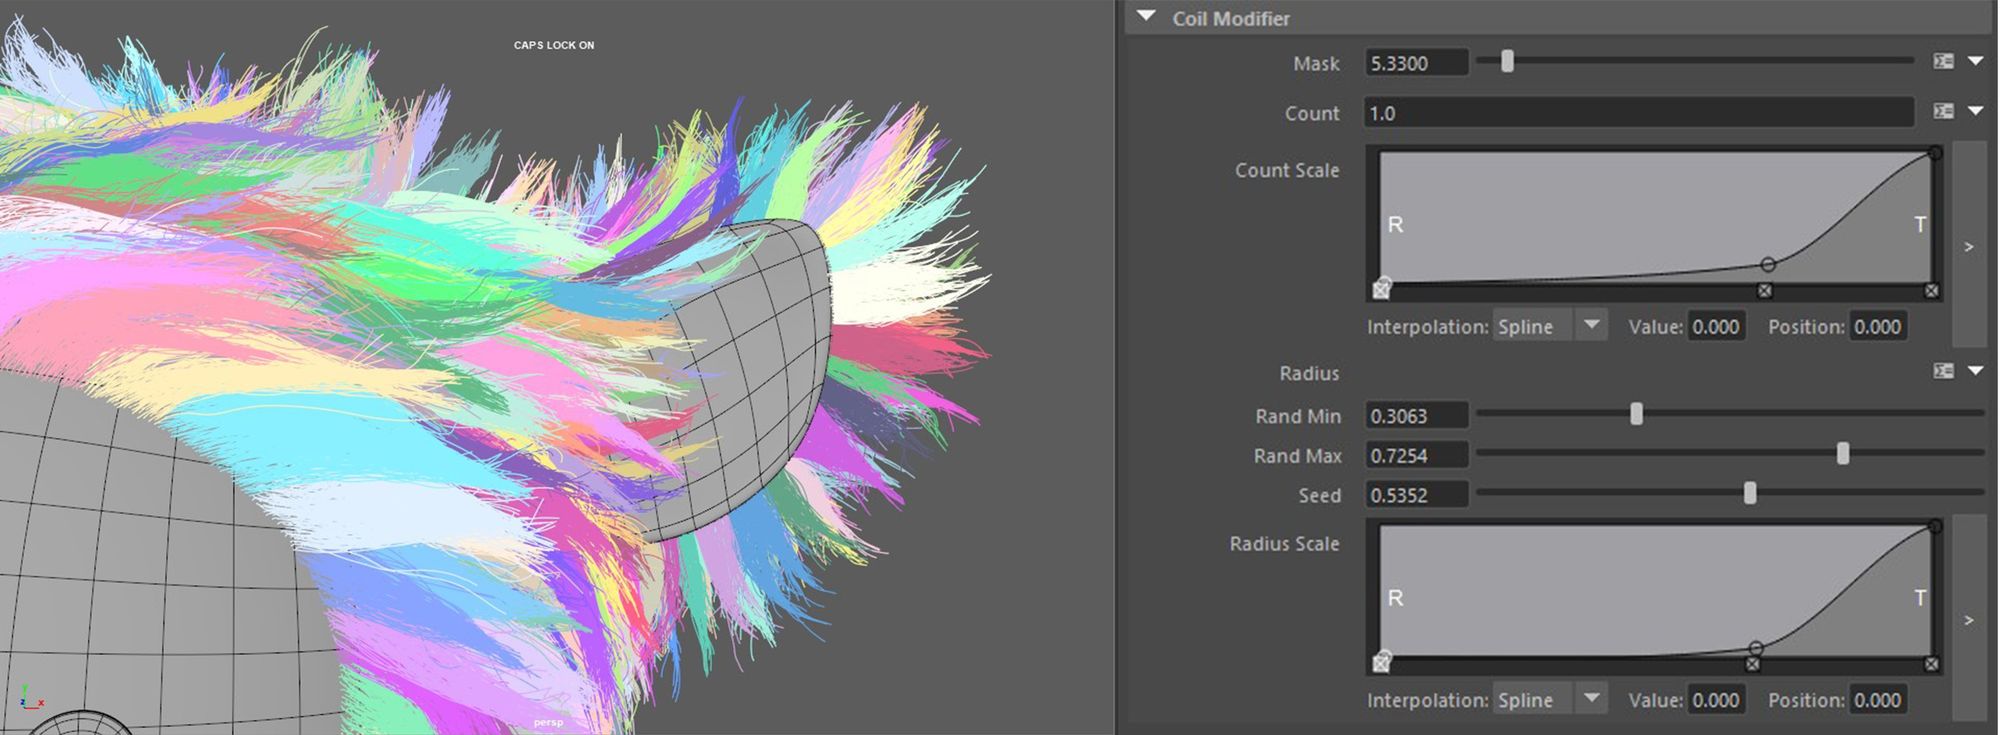
Over the noise2 I put the coil modifier, which I need to start giving the groom a soft and fluffy feeling. This modifier affects only a small part of the groom and creates a result of curved and wavy hairs.
I added in the mask of the coil modifier the percent stray script, then I adjusted the count scale curve. I put the random script in the radius parameter and set the radius scale curves.
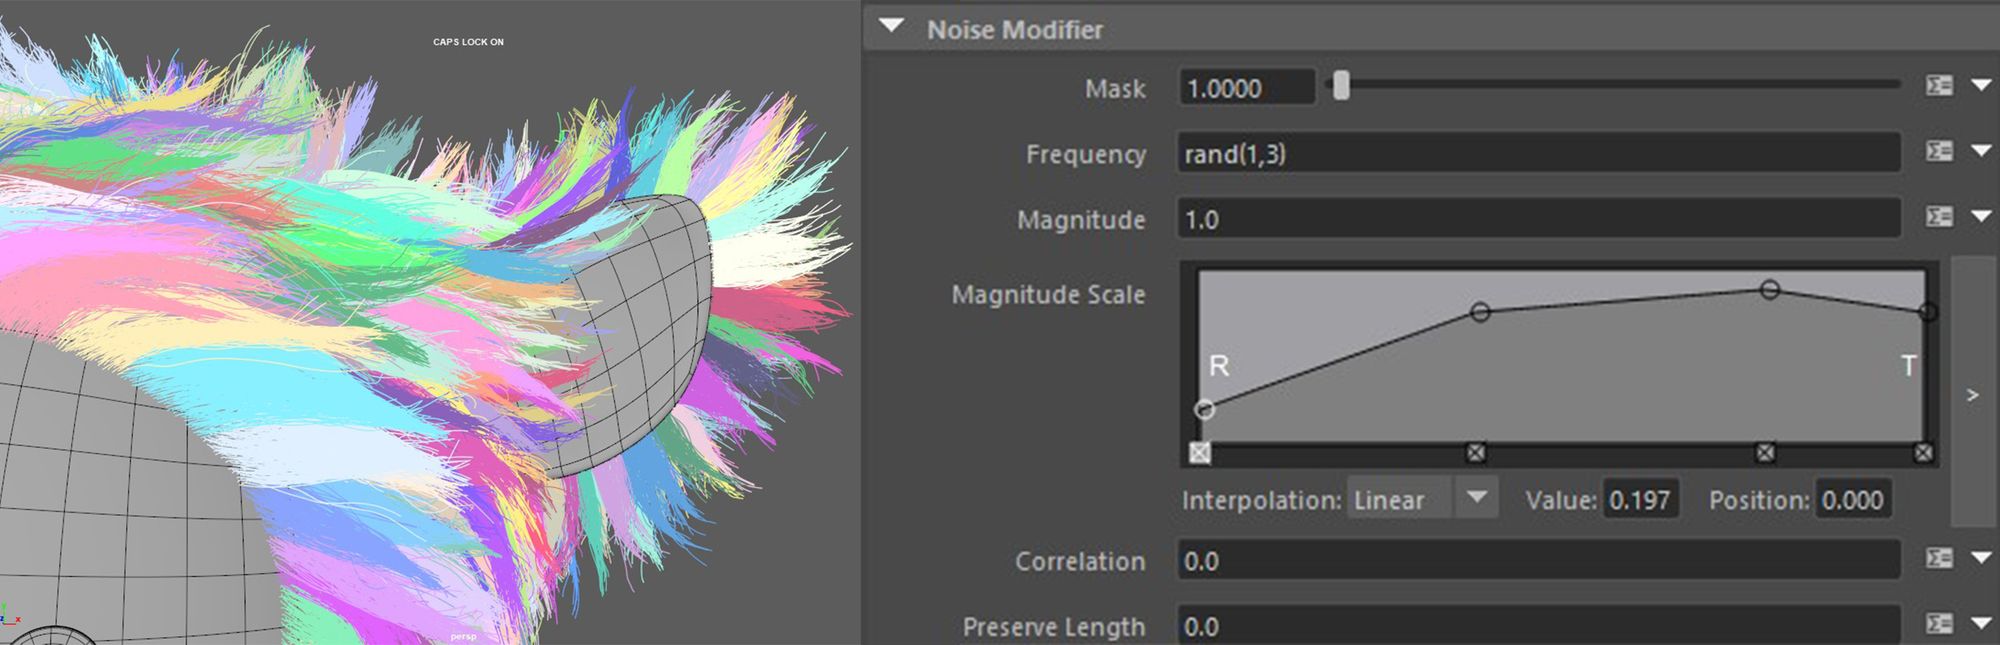
Noise3 = Wavy and Slightly Curly
After the coil, I added another noise that helped me achieve wavy and slightly curly hair. This noise only affects one percent of the groom, so I used the 'percent stray' script in the mask to achieve this. I left the magnitude at its default value and then adjusted the magnitude scale curve.
Noise4 = Flyaway
On top of everything as the last modifier, I added noise4, which creates flyaway hair. Flyaway hair is characterised by high magnitude and low frequency, and it affects only a small part of the groom. Flyaway hair is most visible in backlit conditions.
To achieve this, I inserted the 'percent stray' script into the mask parameter to control the amount of flyaway in the groom. Then, I set the frequency to a low value and increased the magnitude using the same random script I used before. Finally, I adjusted the magnitude scale curve. The same process was applied to the tail groom.

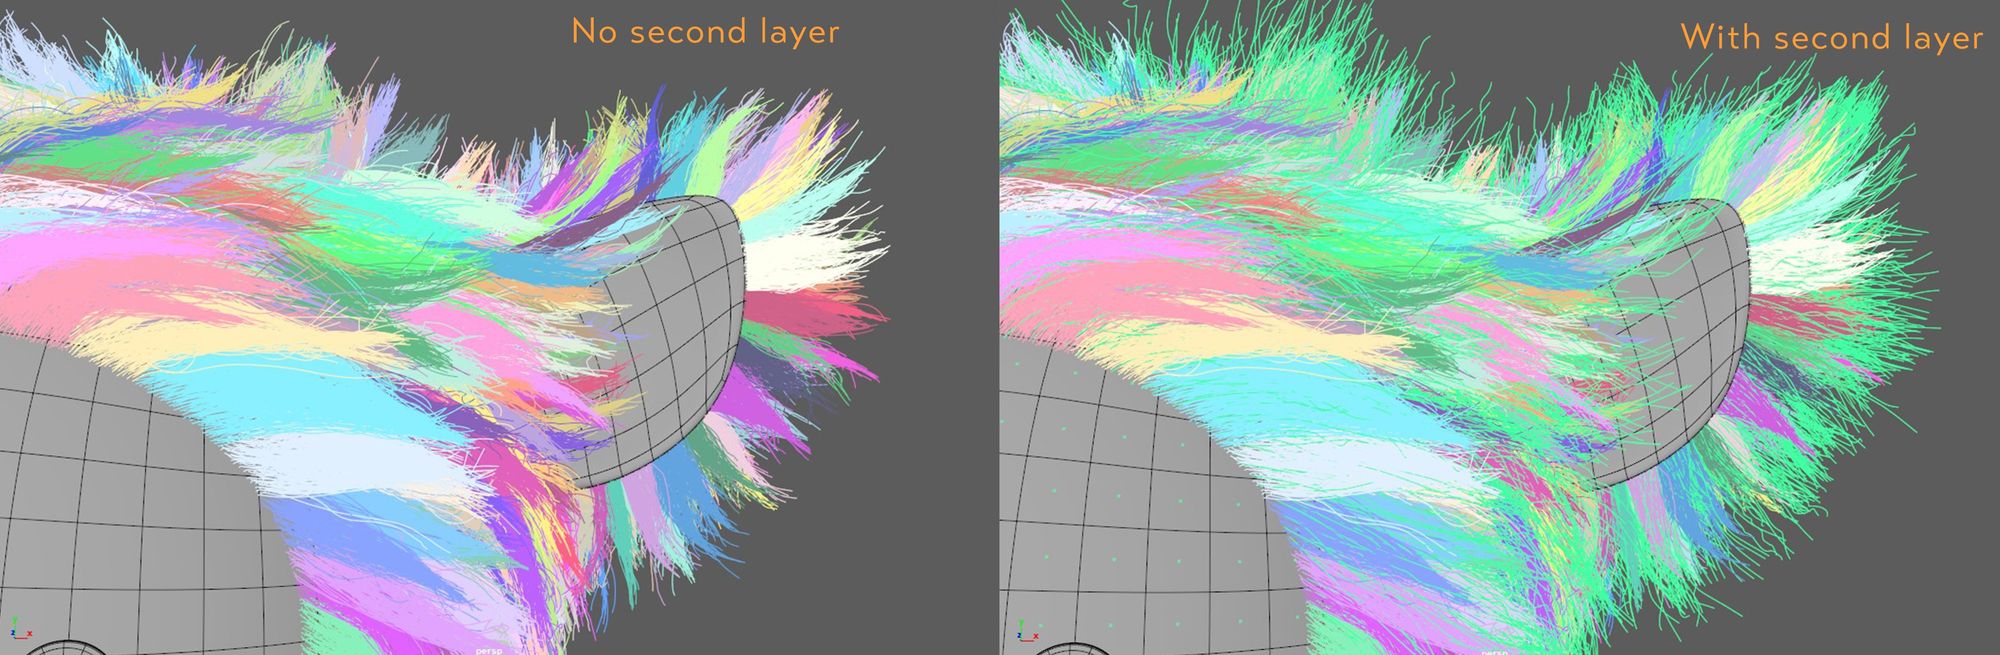
To create a sense of softness and fluffiness, it's beneficial to add a second layer of grooming. This layer should be less dense than the main one but longer. This additional layer can create a kind of 'flyaway hair halo,' which becomes especially prominent in backlighting.
To achieve this effect, I implemented a second layer of fur for both the body and tail. The combination of modifiers I used is very similar to the ones applied to the main grooming layer. The key difference lies in the use of only a clump modifier, with guides based on those of the fur. In the mask value, I incorporated the 'percent stray' script to adjust the percentage of hairs involved. Additionally, I applied two noise modifiers to this layer. Finally, I added a cut modifier on top of everything to introduce more length variation.
Peach Fuzz is a very thin and short layer of hair that is most visible in counter light especially with a rim light. I added a layer of peach fuzz on the face, inside the ears and on the tail. To achieve the result, I layered two noise modifiers and as a last thing I added a cut to give a version to the length.
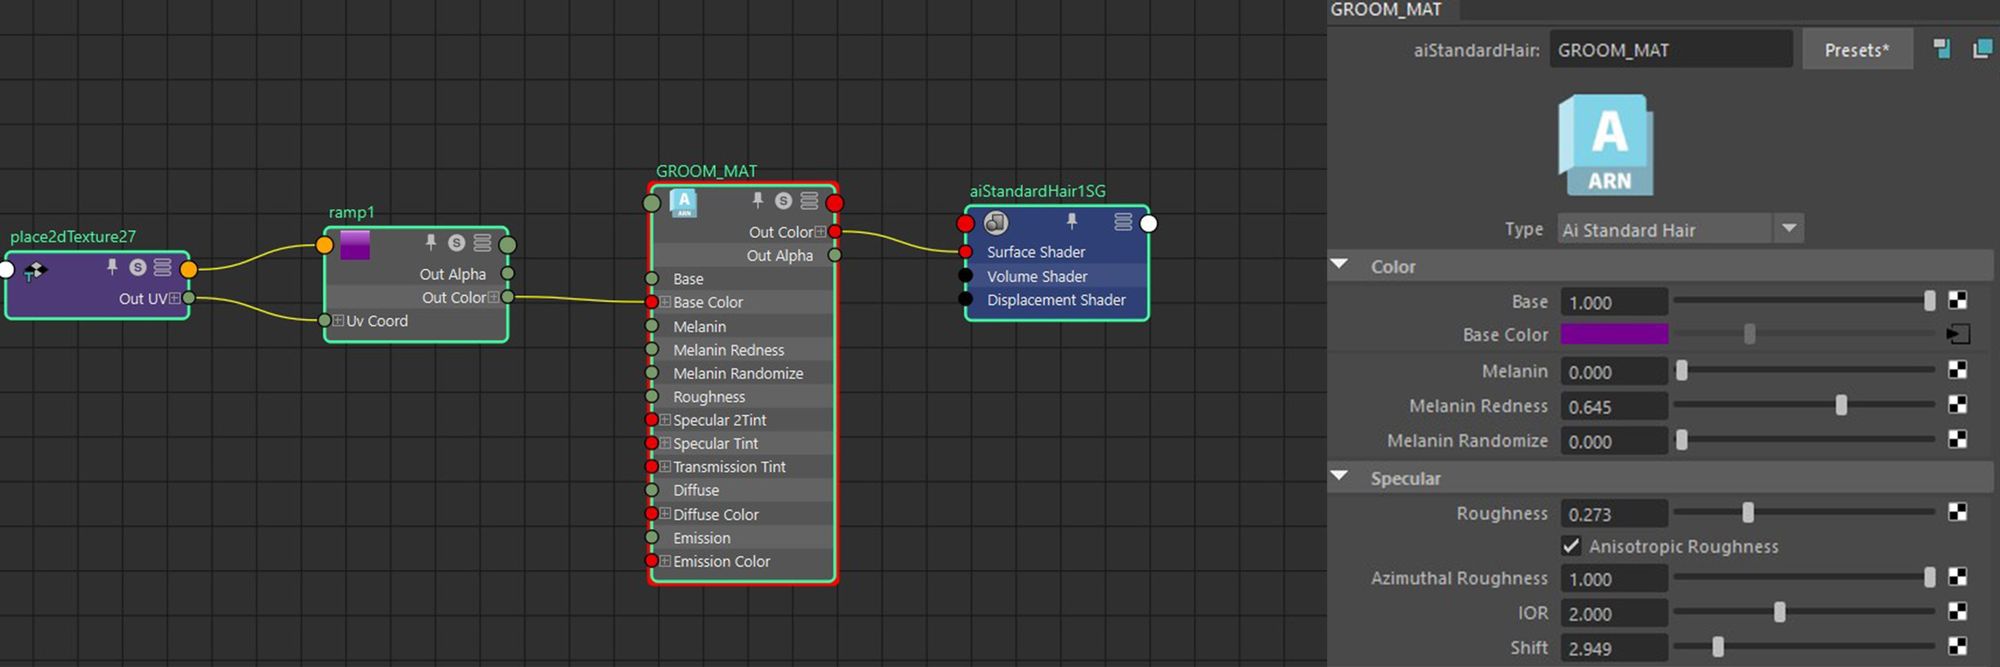
For the groom material I used the Aistandard Hair. to better control the base colour I plugged in a ramp in which I chose the colour of the groom. I turned off the melanin so I could see the base colour better than I turned on the anisotropic roughness. I choose the tint colours, 2dn specular tint and transmission tint. I used the same process for both the body hair and the peach fuzz only with different colours.
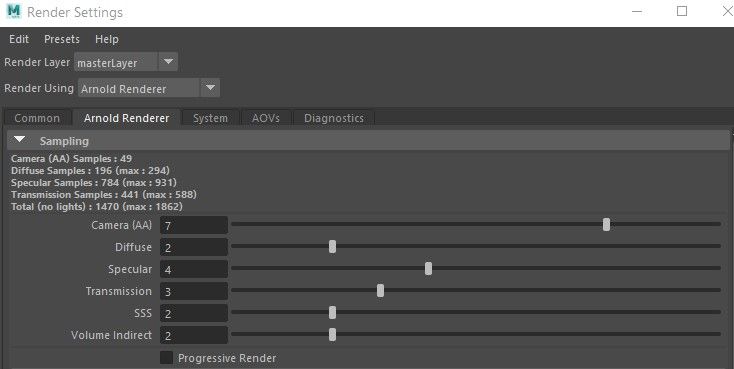
For rendering I used the settings below to get more optimised render times. In this case I exported all the groom in istance, .ass file, including geometry. Then I imported everything into a new Maya scene where I did all the lookdev.
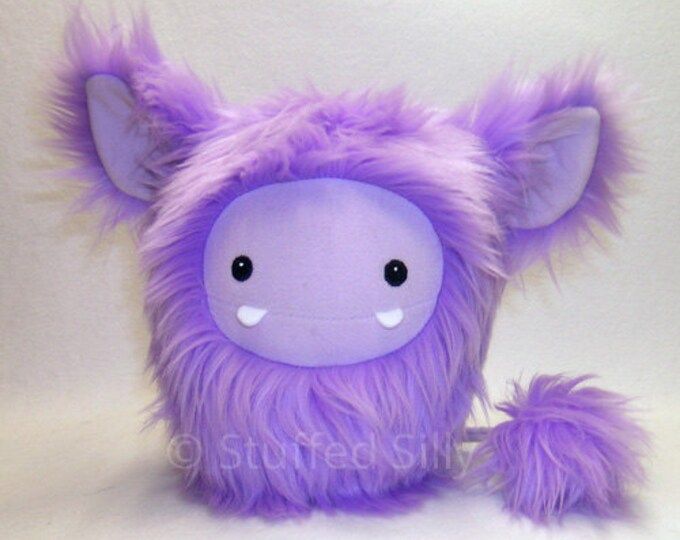
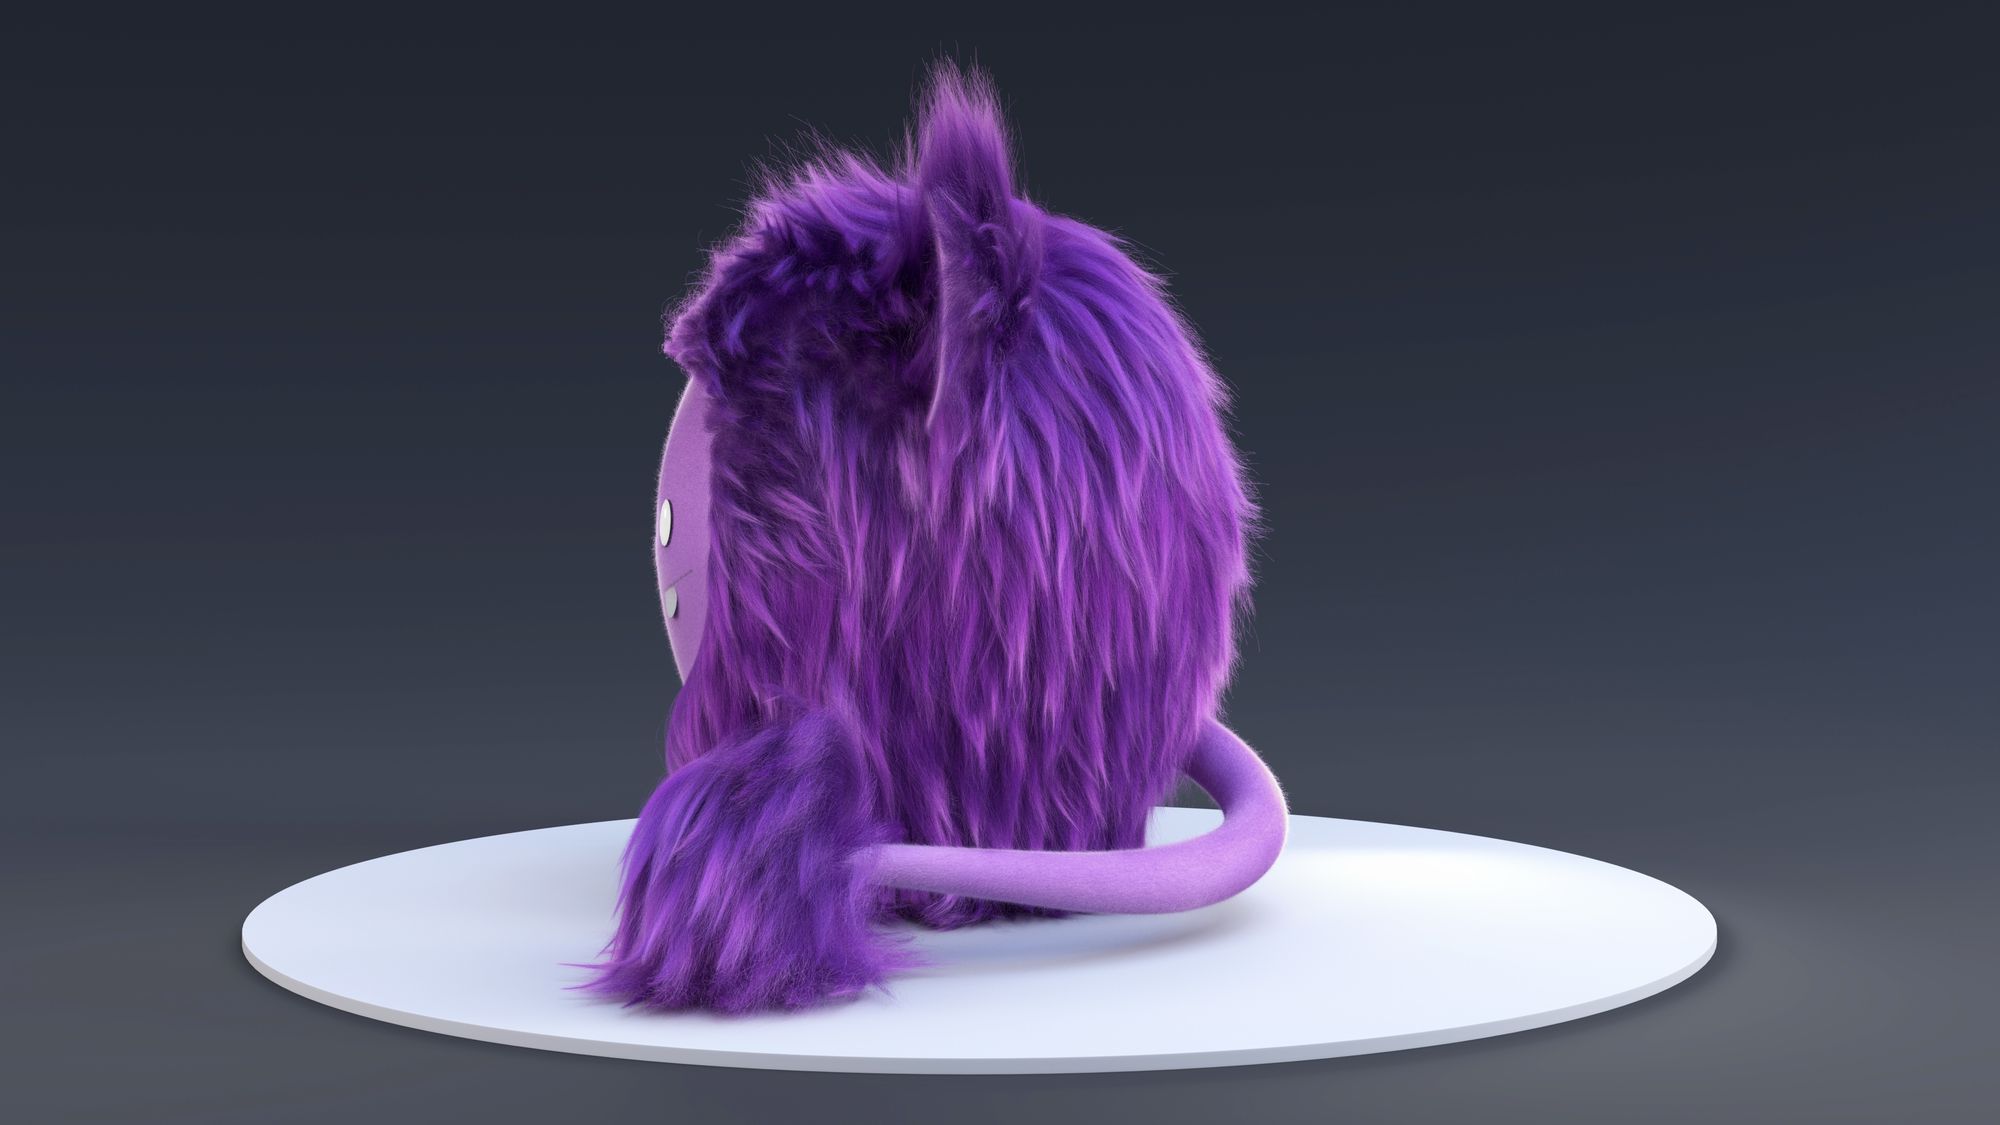
This is the final result, with also all the groom and guide layers.
Thank you to The Rookies for this wonderful opportunity!
Reach out Sara via her Rookies profile here.