Combining Artistic and Technical Skills: A Biped Rigging Breakdown
Anh Ngo explores her journey from Automotive Design Engineering to animation and rigging, discovering the potential of VFX and finally enrolling at Think Tank Training Centre.
Anh Ngo explores her journey from Automotive Design Engineering to animation and rigging, discovering the potential of VFX and finally enrolling at Think Tank Training Centre.
In this article, Anh Ngo, shares her journey and experiences in the world of animation and rigging. After discovering the possibilities of VFX during a career break from Automotive Design Engineering, Anh enrolled at Think Tank Training Centre to explore her passion further. Rigging became Anh's focus, as it allowed her to combine artistic and technical skills while still enjoying the problem-solving aspect of her previous career.
I discovered working in VFX was a possibility when I took a career break a few years ago from Automotive Design Engineer. Then I found Think Tank Training Centre on The Rookies. As much as I enjoy my journey at Think Tank, I still miss the problem-solving aspect of my previous career. I learned that Rigging would allow me to do that while combining both artistic and technical skills, so I decided to learn Rigging during my mentorship term at Think Tank. They introduced me to my mentor - Harris Wu, who taught me rigging from the ground up.
As a result, the goal is to learn to rig using a realistic character that I selected, which is a flexible ballerina. To be honest, I was torn for a while because the realistic character intimidated me. I didn't spend too much time rendering her because rigging is the main goal.
Gathering references is an important part of studying as an artist. Anatomy is rigging artists' best friend. I learned anatomy from the bone structure and body movement. I found these sites a very good reference resource:
I don't know if it's just me, but I tend to get carried away when collecting references. However, I believe that the more references you gather, the better the chances of achieving a high-quality result.

Despite the fact that the model was missing her lovely ballerina gown. She needed to be anatomically correct, so I modeled her base mesh and got help from my good friend for anatomy details, Skylar Jetton.
Good topology allows for natural deformation without weird bumps or creases. To do so, the edge flows should follow the landmarks and the movement of the body.

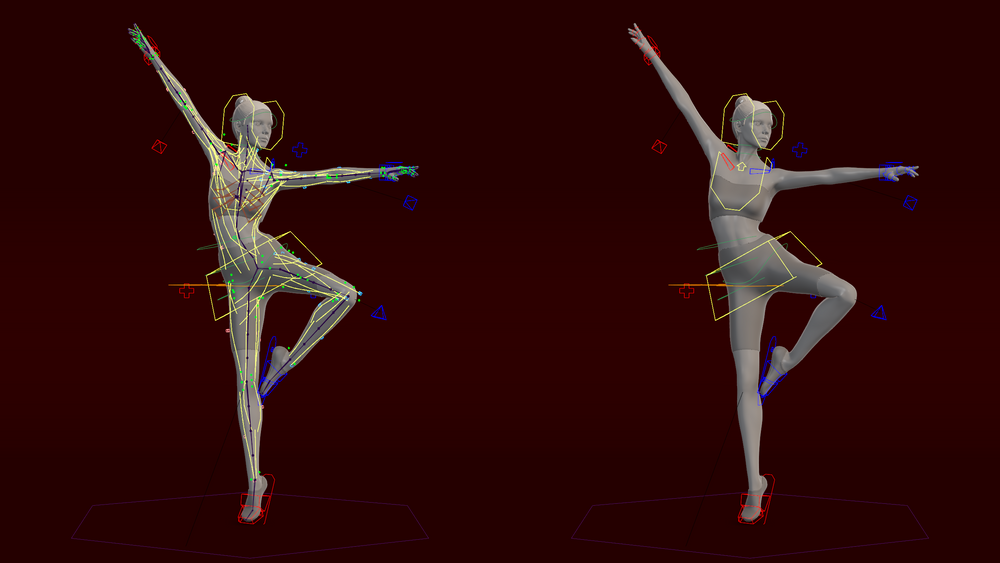
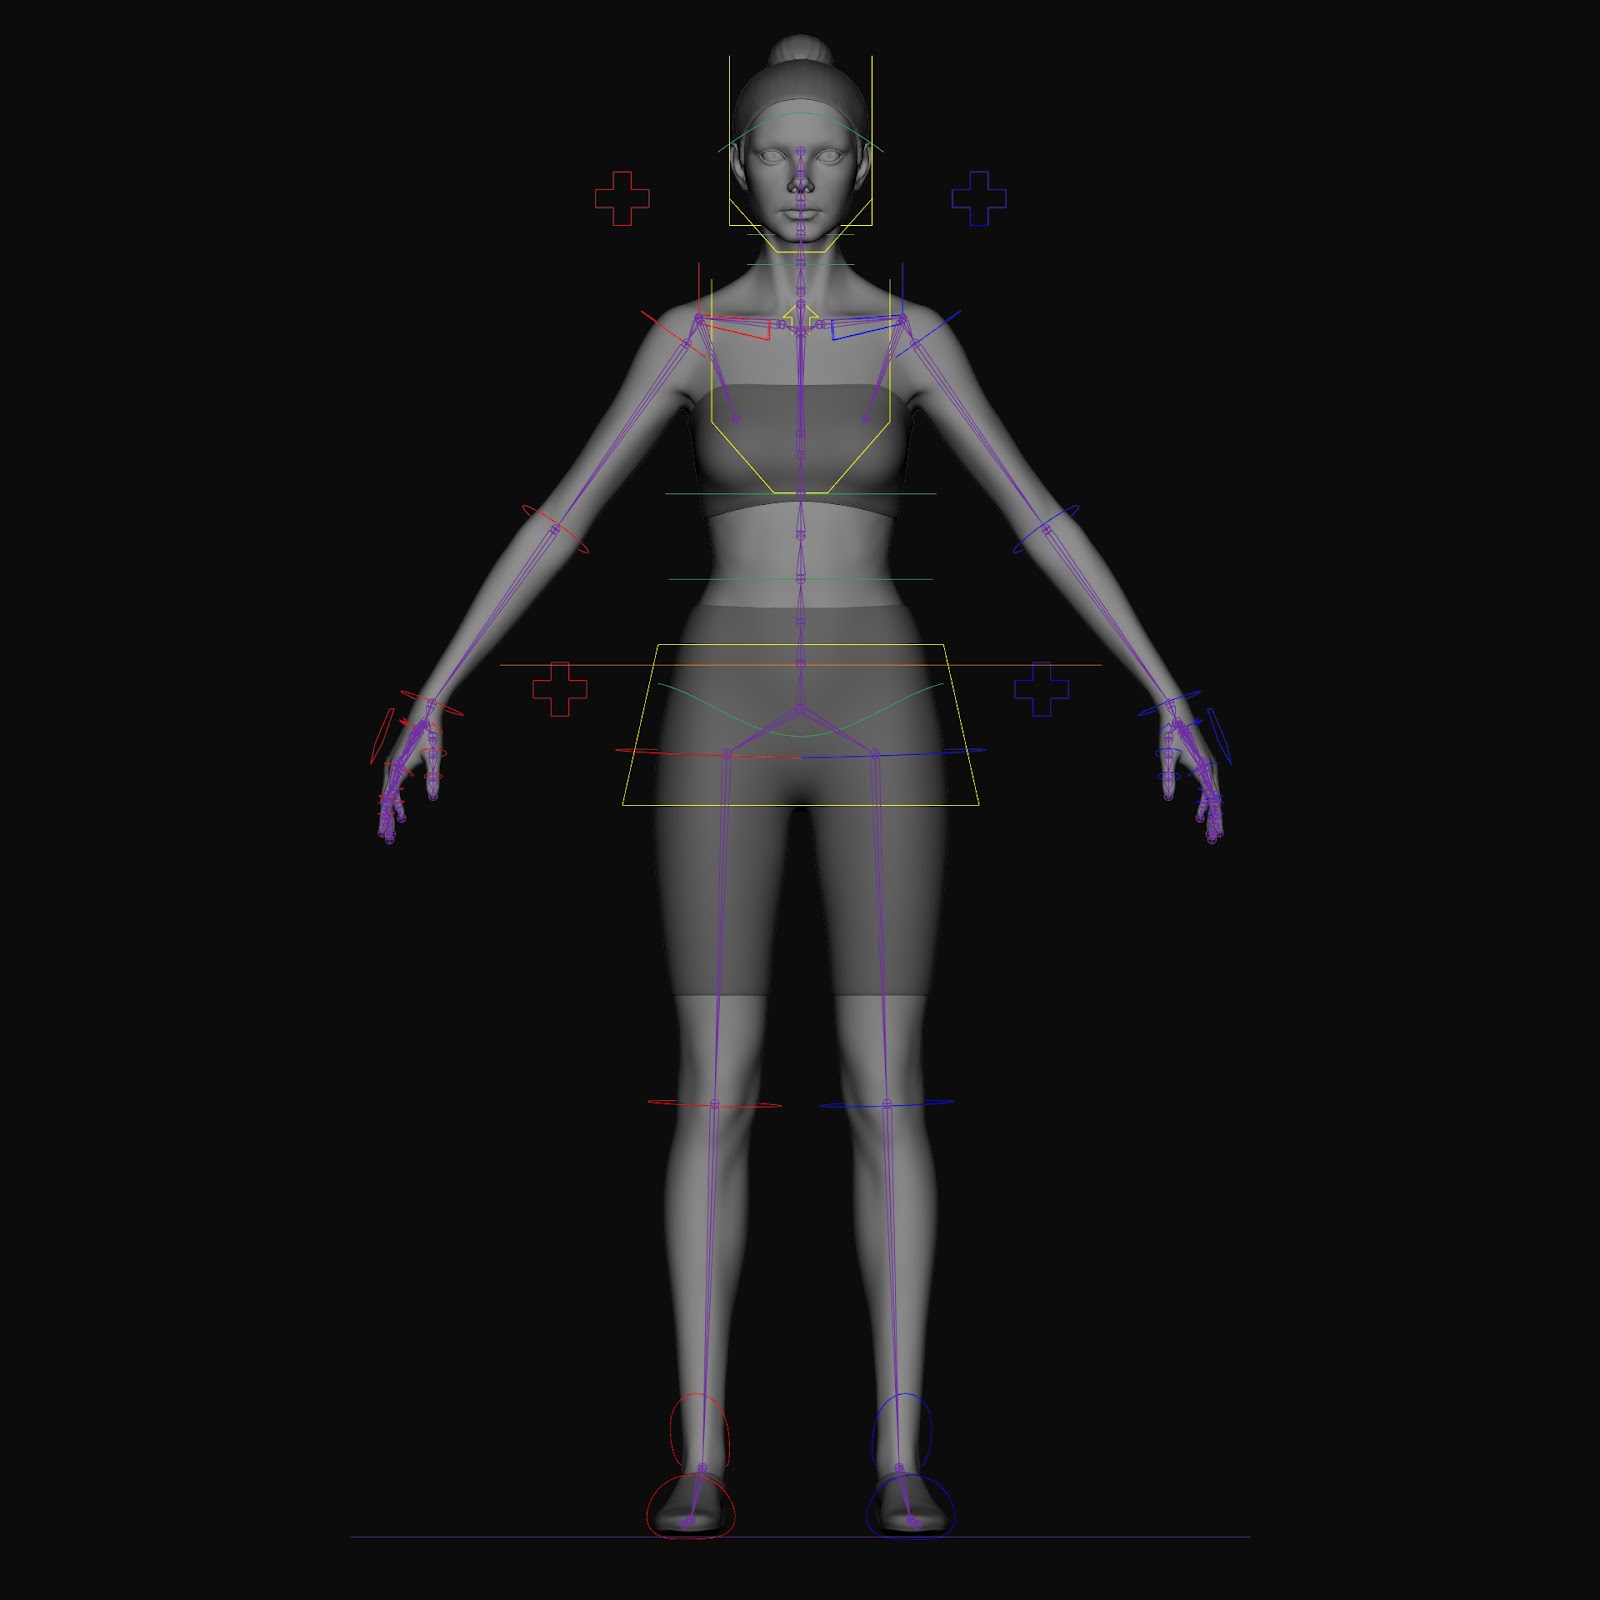
Proper joint placement and orientation are critical for achieving realistic and natural-looking movement.
Most joints should be placed according to human anatomy, with key points of articulation in the character's body aligned.
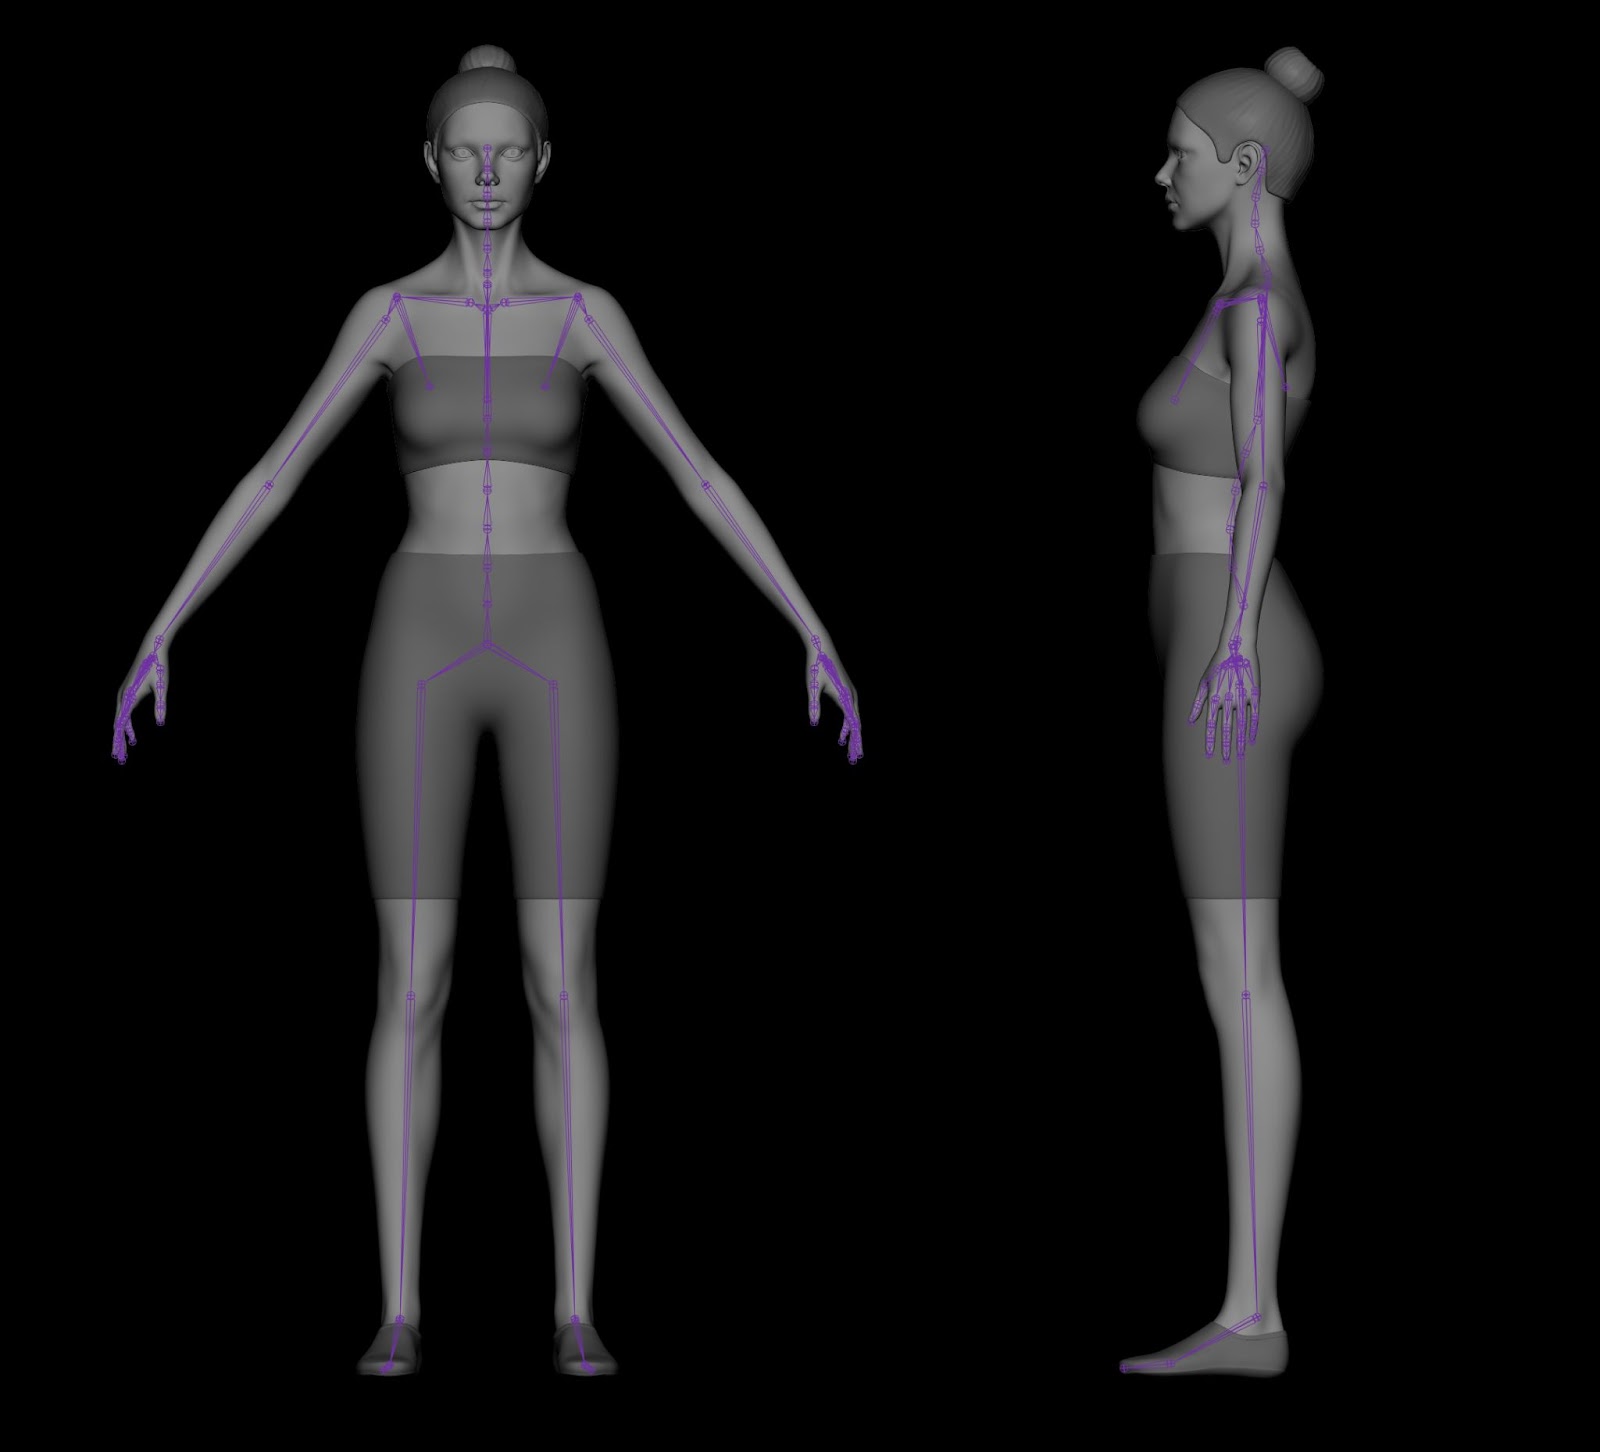
The process of setting the rotational axes of the joints. It is critical in preventing unwanted twisting or flipping while animating. It is critical to align each joint with the natural rotation of the corresponding body part, as this ensures smooth and predictable deformation throughout the rigging process.
Controllers serve as the rig's user interface, allowing animators to easily control the rig. To create controls, we typically use nurbs mesh with simple shapes. Then, using constraints, connect them to their corresponding joints.
Skinning, the process of bringing my mesh to life, connects my rig (the skeleton) to my character's mesh. Even though it is still somewhat technical, I would say that this is where my artistic side comes into play. I assigned/painted weight values to each vertex to their corresponding joint in the same way as texture mask painting.
Even though I did not create a proxy model, it would be a useful visual aid before skinning.

When testing the basic puppet rig, the skinning deformation would be limited to a certain range of movement. This is where the deformation rig comes into play.
Twist joints help the twisting / rotating movement of body parts such as legs and arms. These joints are placed between the main joints.
Its sole purpose is to improve the deformation. They are typically placed in areas that were previously restricted by the base skeleton, such as the shoulder, elbow, knees, and so on.
Along with helper joints, curve joints improve the organic movement of the muscles. Different people work with different pipelines, some people will use ribbons, Ziva muscle simulation, or additional helper joints.
The corrective blend shapes help in enhancing and detailing the deformation.
Everyone has a different workflow; some stop at the helper joints and curve joints, others only do blend shapes, and some do both. There is no right or wrong, but my rig has both to get the most out of both helper joints and blend shapes and to achieve a smooth deformation movement.
While blend shapes allow you to precisely control how the deformation should look at each pose, it is a linear blending, so there is no seamless transition. It's also expensive to use because it significantly increases file size, and takes time to sculpt at each pose. Helper joints, on the other hand, provide smooth deformations but have the disadvantage of increasing the complexity of the joint structure.
Along with the rig, a few basic functions are a must:
Rigging functions are the rig's user experience. They are tools that give animators more control and flexibility, allowing them to unleash their creativity and create the best animations possible.
To show what my rig can do, I did a few basic animations for each body part movement by myself and the help from Mixamo. To use Mixamo data, I used Human IK based on this tutorial:
As I animate the character, there will be a few shots that look a little off. Instead of going back to the rig and doing corrective blend shapes, shot sculpting could help to make a small adjustment to a specific sequence or shots.
Before the course, I had no prior experience with Python. So I strongly advise everyone to learn Python before diving into rigging. Python is useful for tedious repetitive tasks. Here are some examples:
There is much more that scripting can do, and to get started, you can use online and/or provided tools and scripts, then learn from them.
Throughout the journey, I got to encounter a few problems that require creative thinking and troubleshooting to solve. As an example of an auto breathing system, I needed to build a rig for the rib cage with proper anatomy structure and movement.
Based on the anatomy, I learned that the upper rib cage has a "pump-handle" movement and the lower ribs have a "bucket-handle" movement.

Then, I analyse the movement and go over what I've learned to help me mimic the movement. The exciting part comes next: trial and error.
Asking questions and getting feedback. While you can do research on Google and ask ChatGPT, asking experienced artists will provide you with a wealth of information. As an introvert, I'm still working on it, but I strongly encourage everyone to try it.
Thank you for reading to the end! If you guys have any questions or any advice, please reach out via my Rookies profile. I'd like to learn more about everyone's workflow and hear your opinions so that we can all grow together.