Industrial Engineer Turned Aspiring 3D Artist: A CG Spectrum Student's Journey
Syed Ali, a 3D artist and CG Spectrum student from Pakistan, shares his background, highlighting his enriching experience at CG Spectrum, and offers insights into his workflow for his Rookies Award 2023 entry.
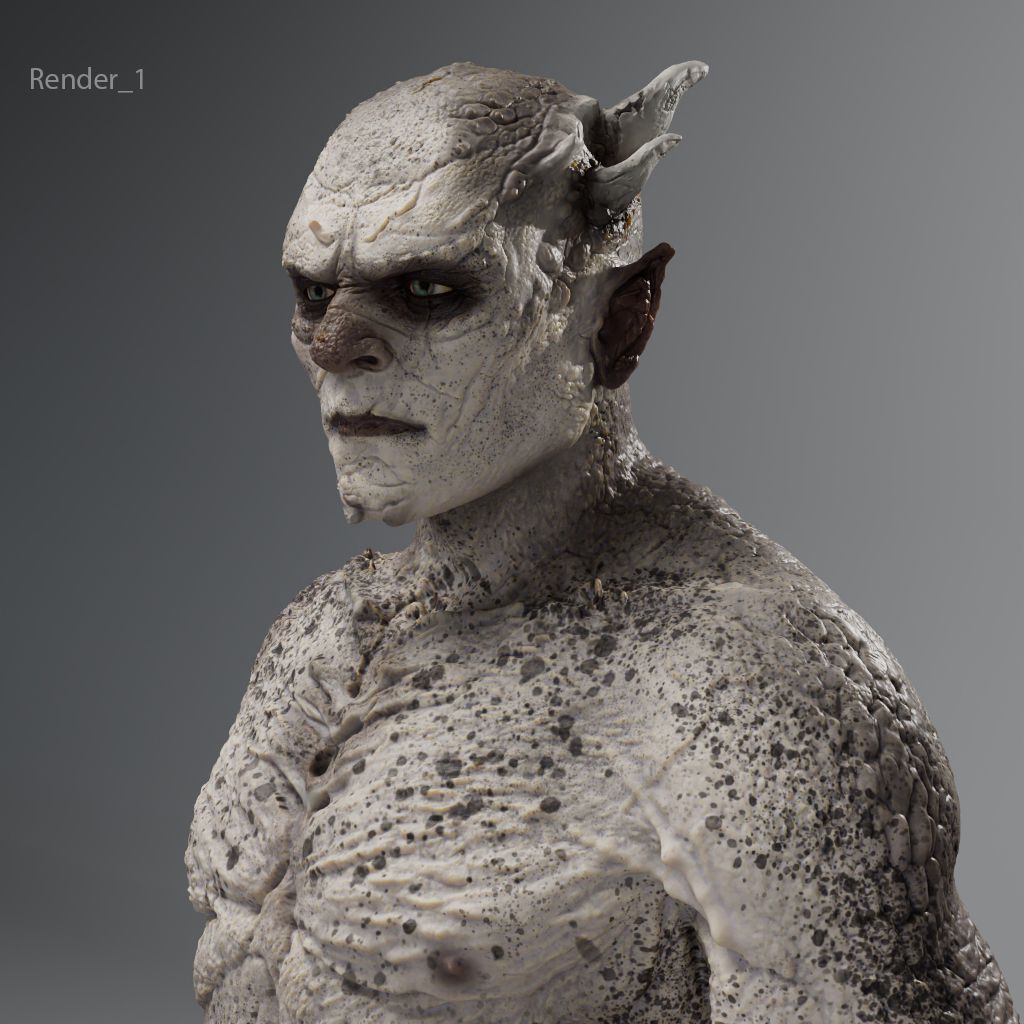
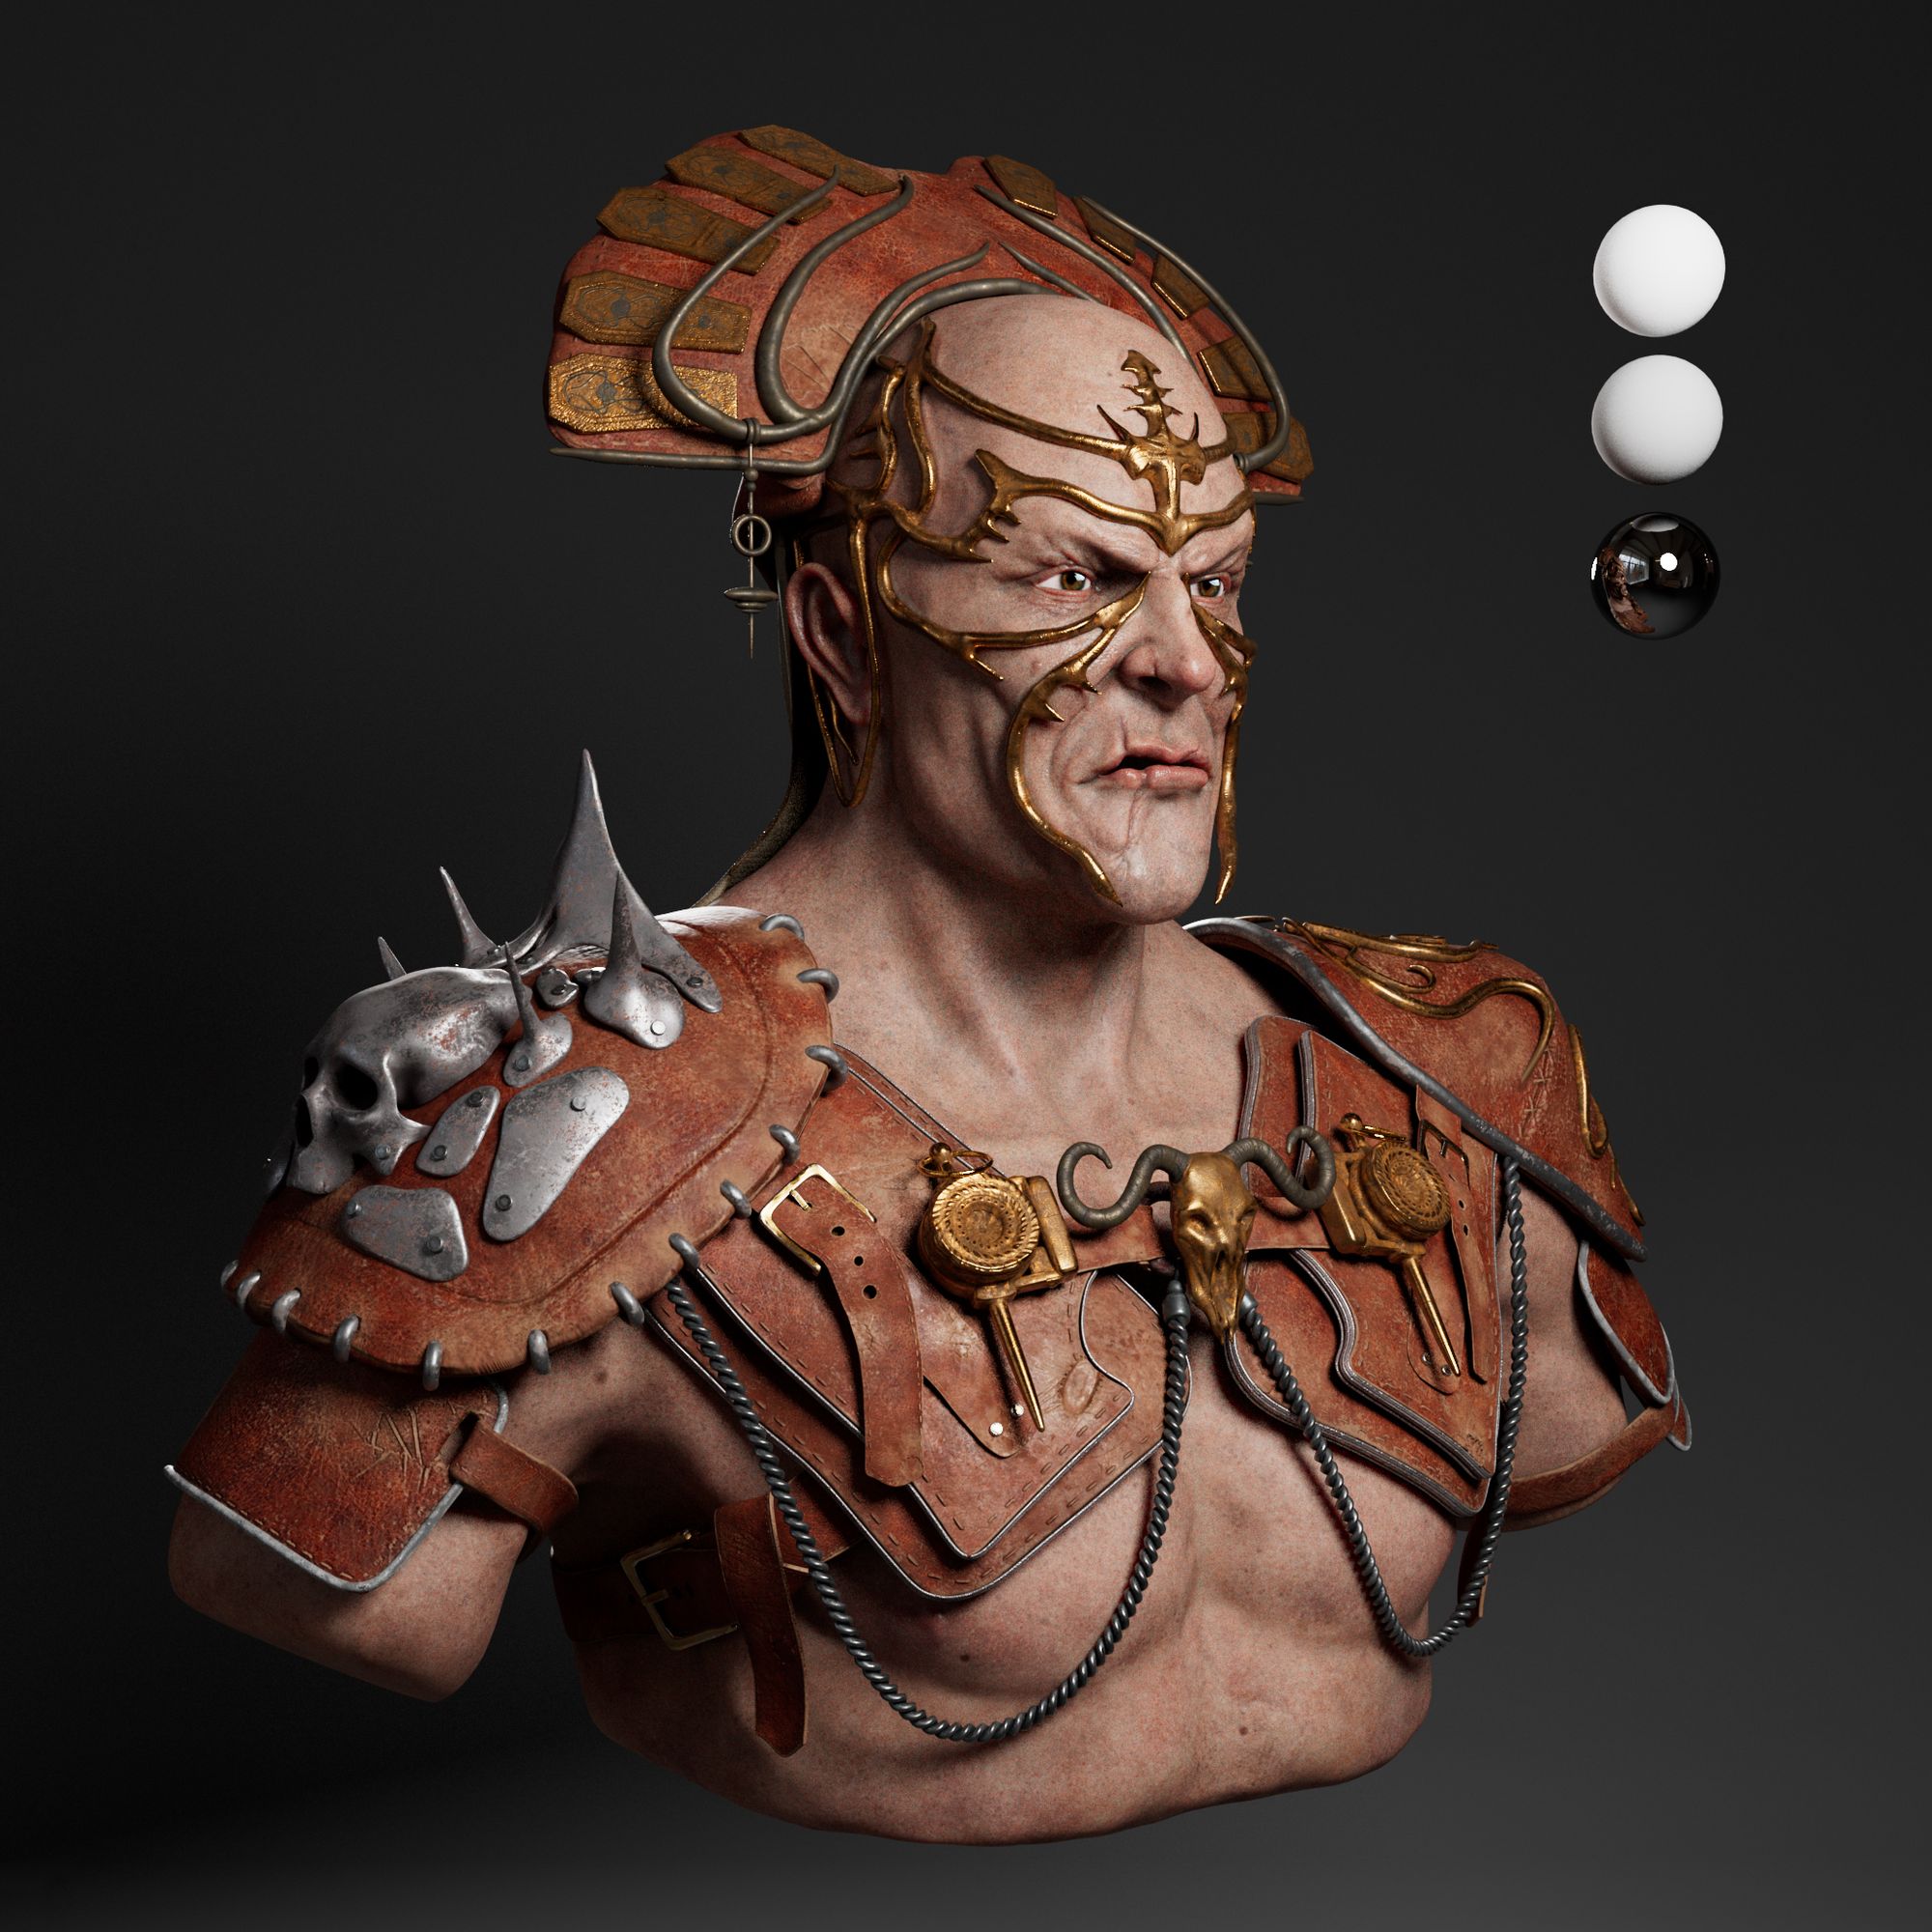
"Featured art piece submitted for the rookies award 2023"
Round of applause for our sponsors
Meet Syed Ali, a CG Spectrum student and 3D Artist from Pakistan. In this article, Syed will provide you with a glimpse into his background, including his enriching experience at CG Spectrum and the valuable lessons he learned there. You'll also get an insight into Syed's meticulous workflow for the character he submitted for the Rookie Award 2023, where he delves into the art of hand painting skin textures in Substance 3D Painter and the intricacies of look development.
Introduction
Originally I was an Industrial Engineer. I have a Master’s Degree in industrial and systems engineering from Wayne State University in Michigan. I was always drawn to the Arts but never really got the chance to go for it, that was until COVID hit. It changed a lot of things for a lot of people. It gave me a chance to go for what I wanted to do. I was introduced to the world of 3D Art during my time in USA, I was in such awe of all the amazing things people were doing in this industry.
For the first few months I was just like any other newbie watching YouTube tutorials to learn from and research about this field and industry in general. I did learn some stuff but what I needed was a structured approach to my studies, and that is when I found out about CG Spectrum.
My final year project for the CG Spectrum
An insight into CG Spectrum
CG Spectrum has been very instrumental in my growth as a 3D Artist in general. Their Introduction to 3D Modelling course gives a comprehensive approach to enter into the world of 3D as it's not too overwhelming for a beginner nor is it too basic. The best thing about them is that they give you a 3D mentor and a great community that you become a part of forever.
I was lucky enough to get a great mentor, his name was “Rajbir Dhalla” R.DHALLA. His guidance in all three terms along the way shaped me into the artist I am at this moment.
Because of CG Spectrum I not only knew the standard of quality to aim for but also how to effectively get there.
Being a rookie in 3D is very overwhelming and I strongly believe that the source from where you get your information is very important. The second best thing about them is the slack community, they are always there to support you and provide you with valuable feedback whenever it is needed.
The Creation of Jabaar Mudihr (Guardian of Sand Towers)
This project was done as an inspiration art piece from the concept of Johnny Rampant & Lukas Kutschera. This is a realistic version of the character I named "Jabaar Mudihr "(The Guardian of Sand Towers).The model was sculpted in ZBrush with skin hand painted in Substance 3D Painter and all the accessories were modelled using Maya and ZBrush.
Sculpting realistic anatomy
One of the greatest challenges I had to face was anatomy of the face and a portion of the body. Anatomy is something that a character artist would learn all his career as it is one of the most challenging skills to learn for any artist. That being said I used a bunch of references from already sculpted figures & real human images to sculpt this character. My final project for CG Spectrum was also a character/creature that incorporated human anatomy, so I learned a lot from the feedback given to me by the mentor.
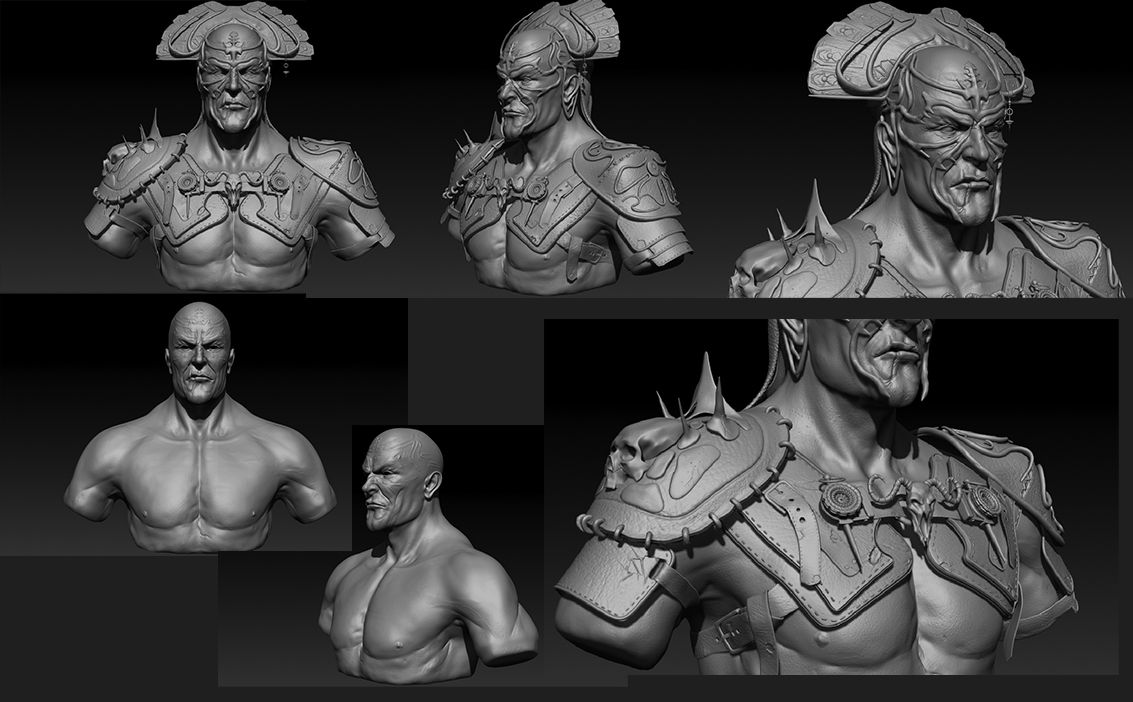
Usually I start from primitives and build my way up to a more finished look without any detail but with all the secondary forms made. The accessories and clothing depends on the character you are making; for this one I made some accessories in Maya and brought them into ZBrush to shape them.
I prefer to go back and forth between Maya and ZBrush to properly make and shape my accessories while also keeping them low poly. Below is the image showing my sculpted character with base and all accessories.
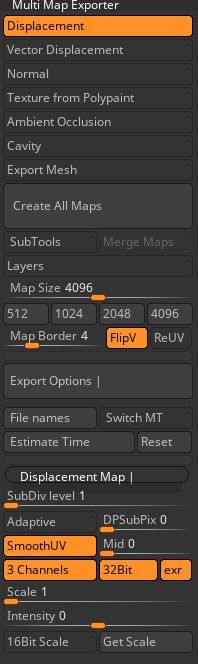
For detailing the skin, I have used skin alpha’s kit offered by FlippedNormals. It’s a quick and effective way to detail the skin other than using scanned maps. Once I have sculpted the details I export the displacement and normal maps out of Zbrush to check the details in Maya and do a little lookdev to set up my lighting arrangement in Maya. Below is A ZBrush screenshot of the displacement map settings I use to get my displacement out of ZBrush.
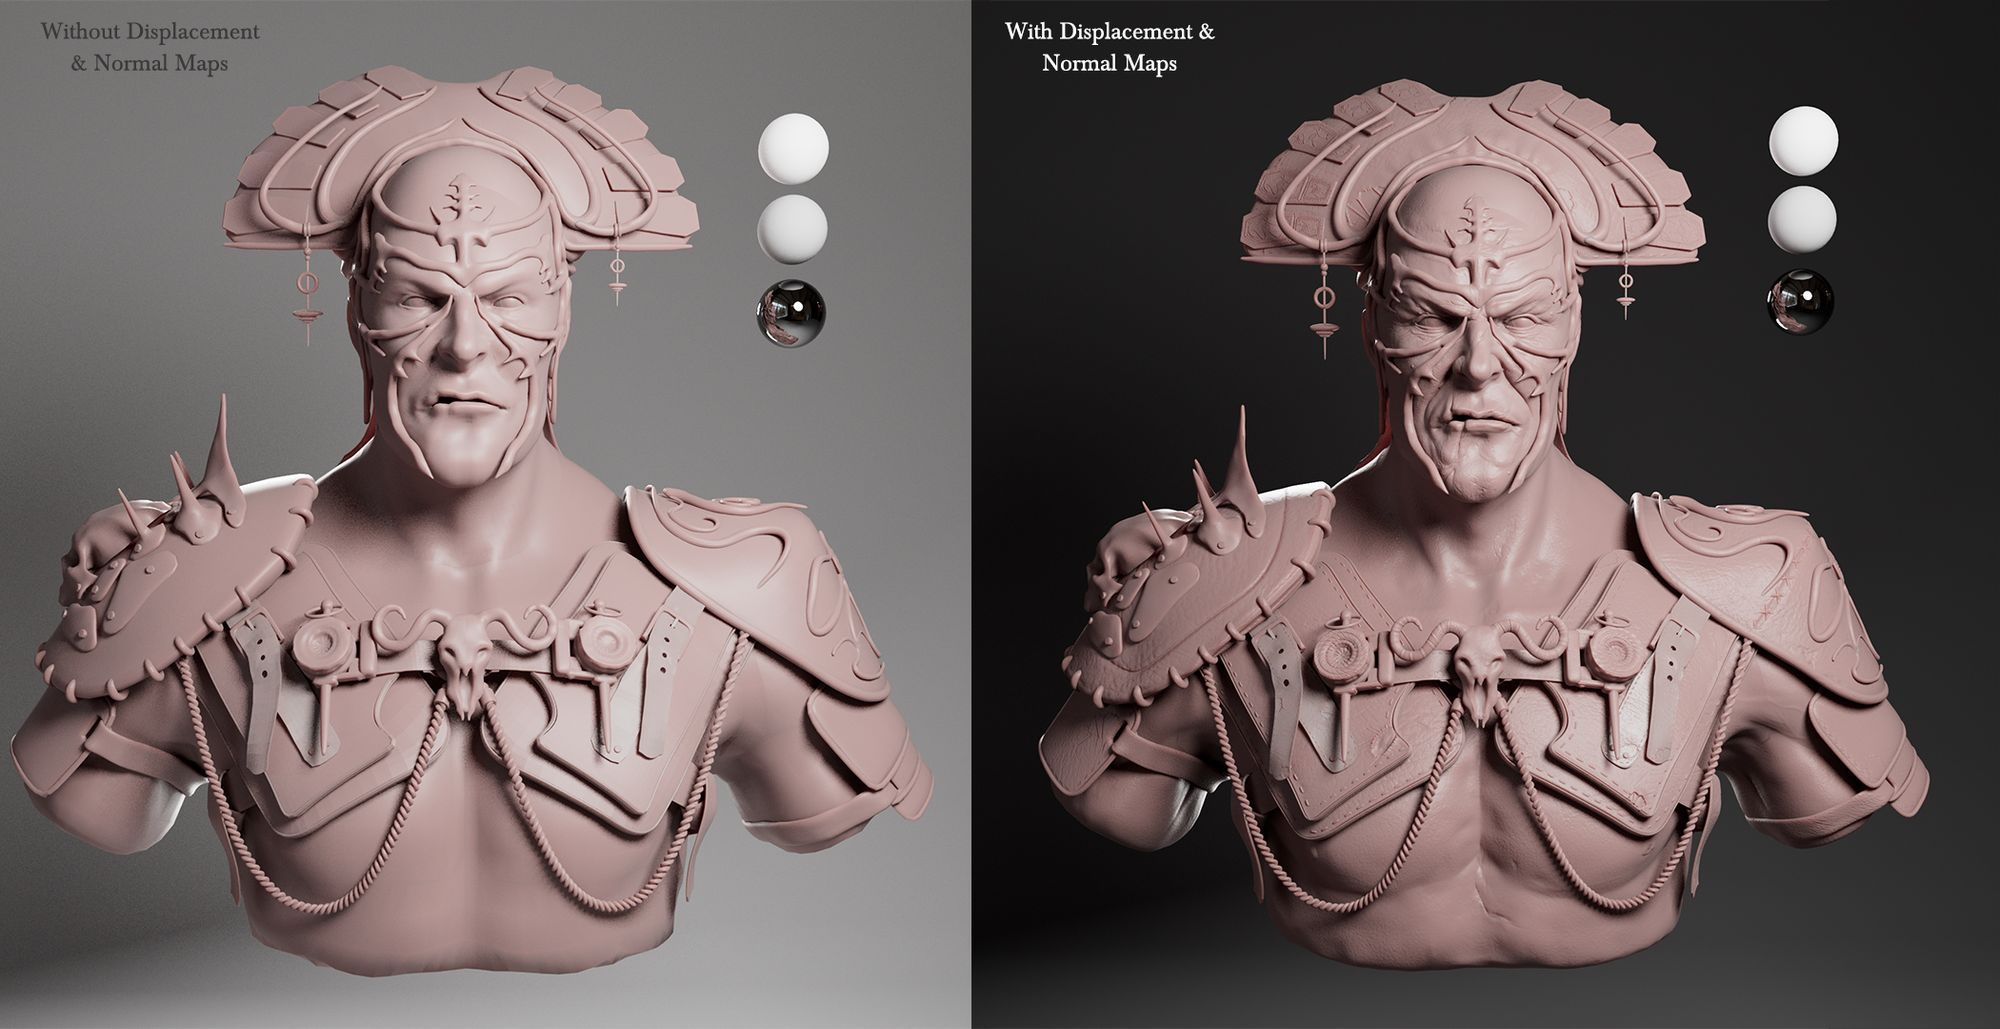
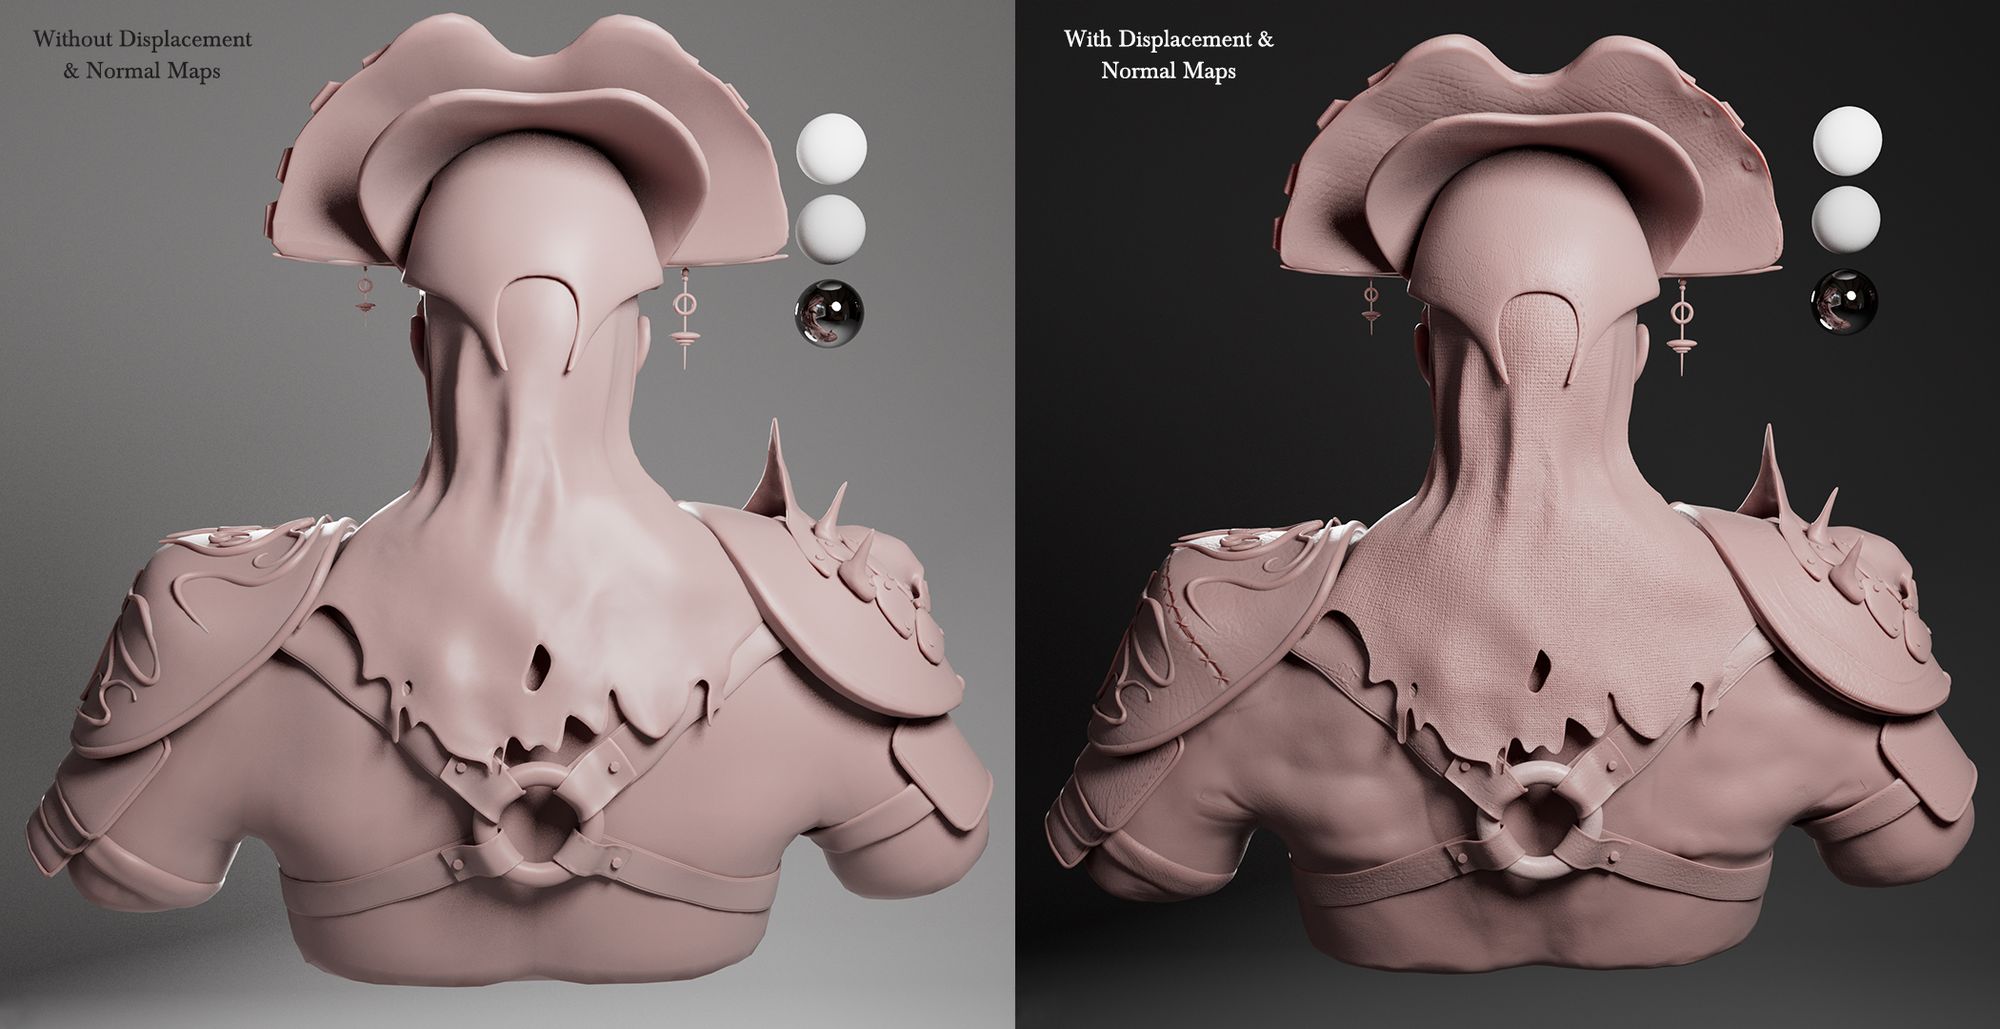
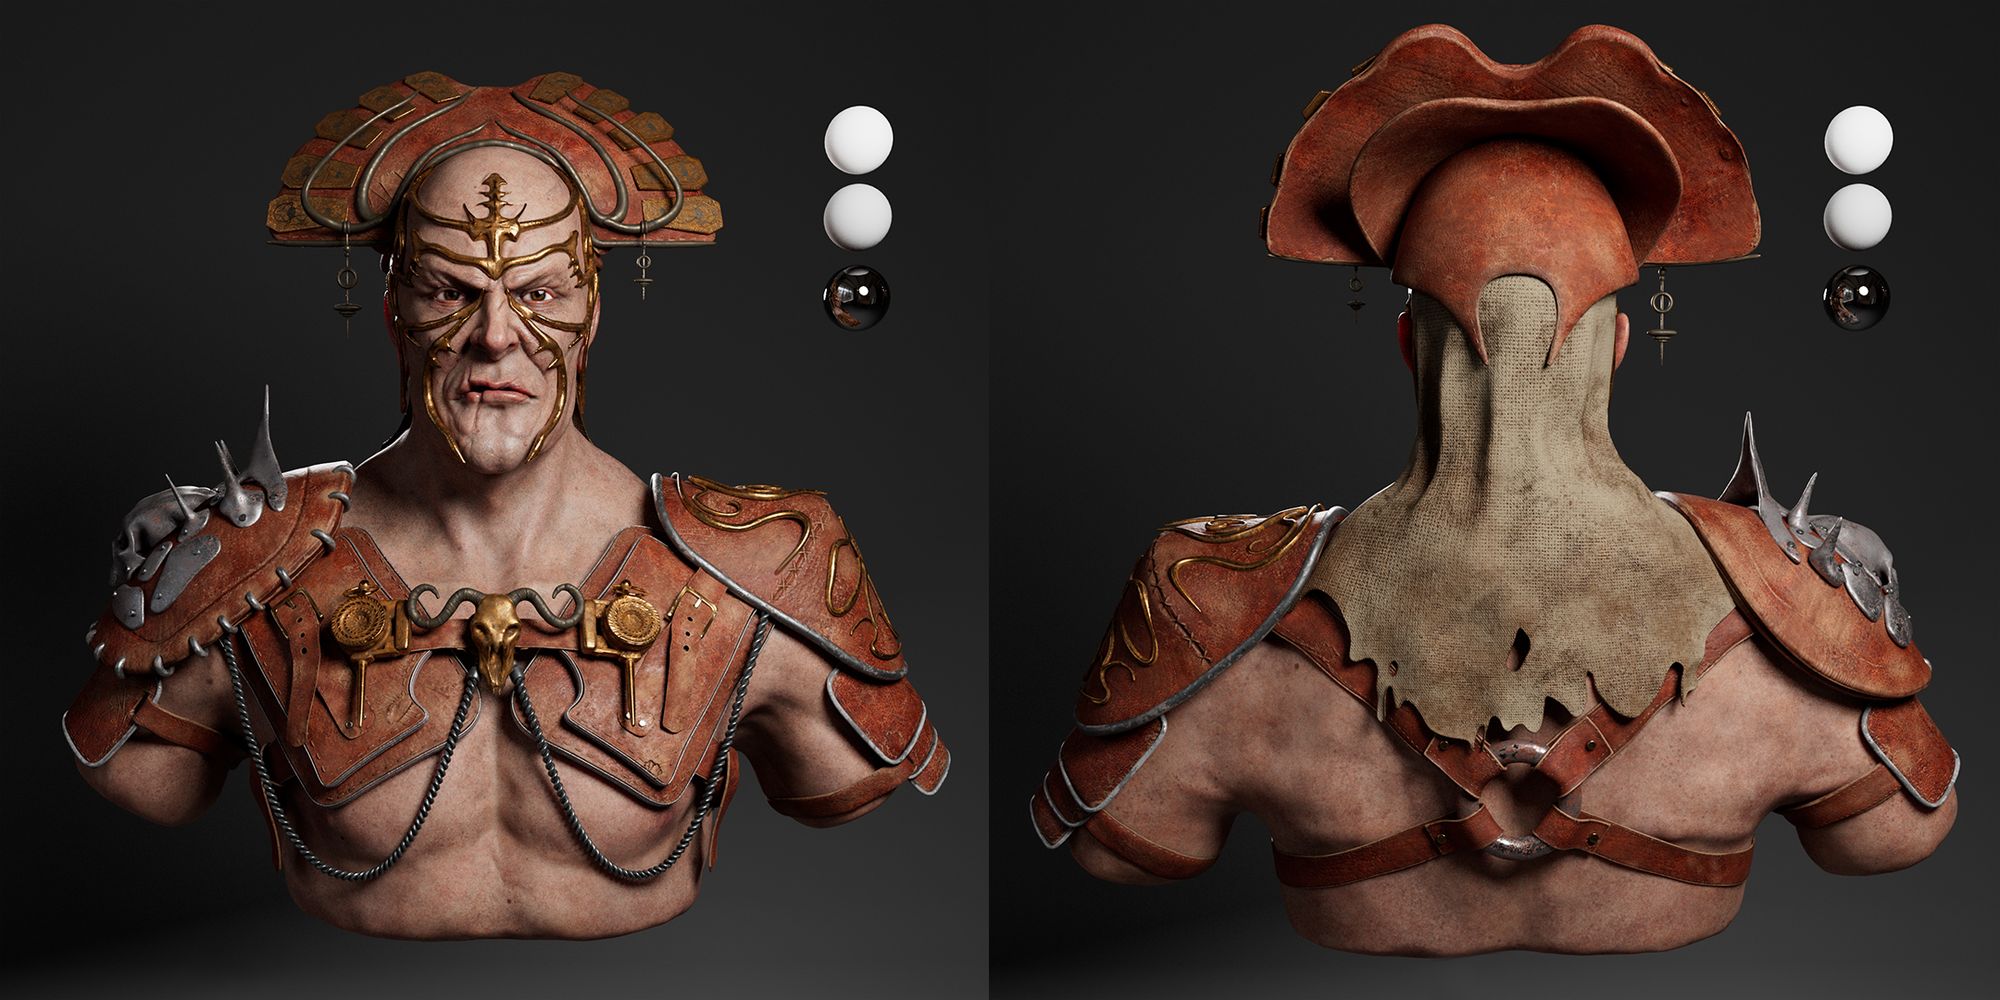
Once the maps are exported I set up the displacement shader in Maya to check the displacements in Maya. Below shows a comparison of both with and without displacement maps. I simply used “aistandard surface” shader and a displacement shader to get this result.
Front showing base mesh with & without displacement and normal mapsBack showing base mesh with & without displacement and normal maps
💡
Tip: make sure to check that catclark subdivision is enabled for each geo under attributes < arnold < subdivisions < catclark & when connecting displacement maps always use the R-channel in the shader to connect.
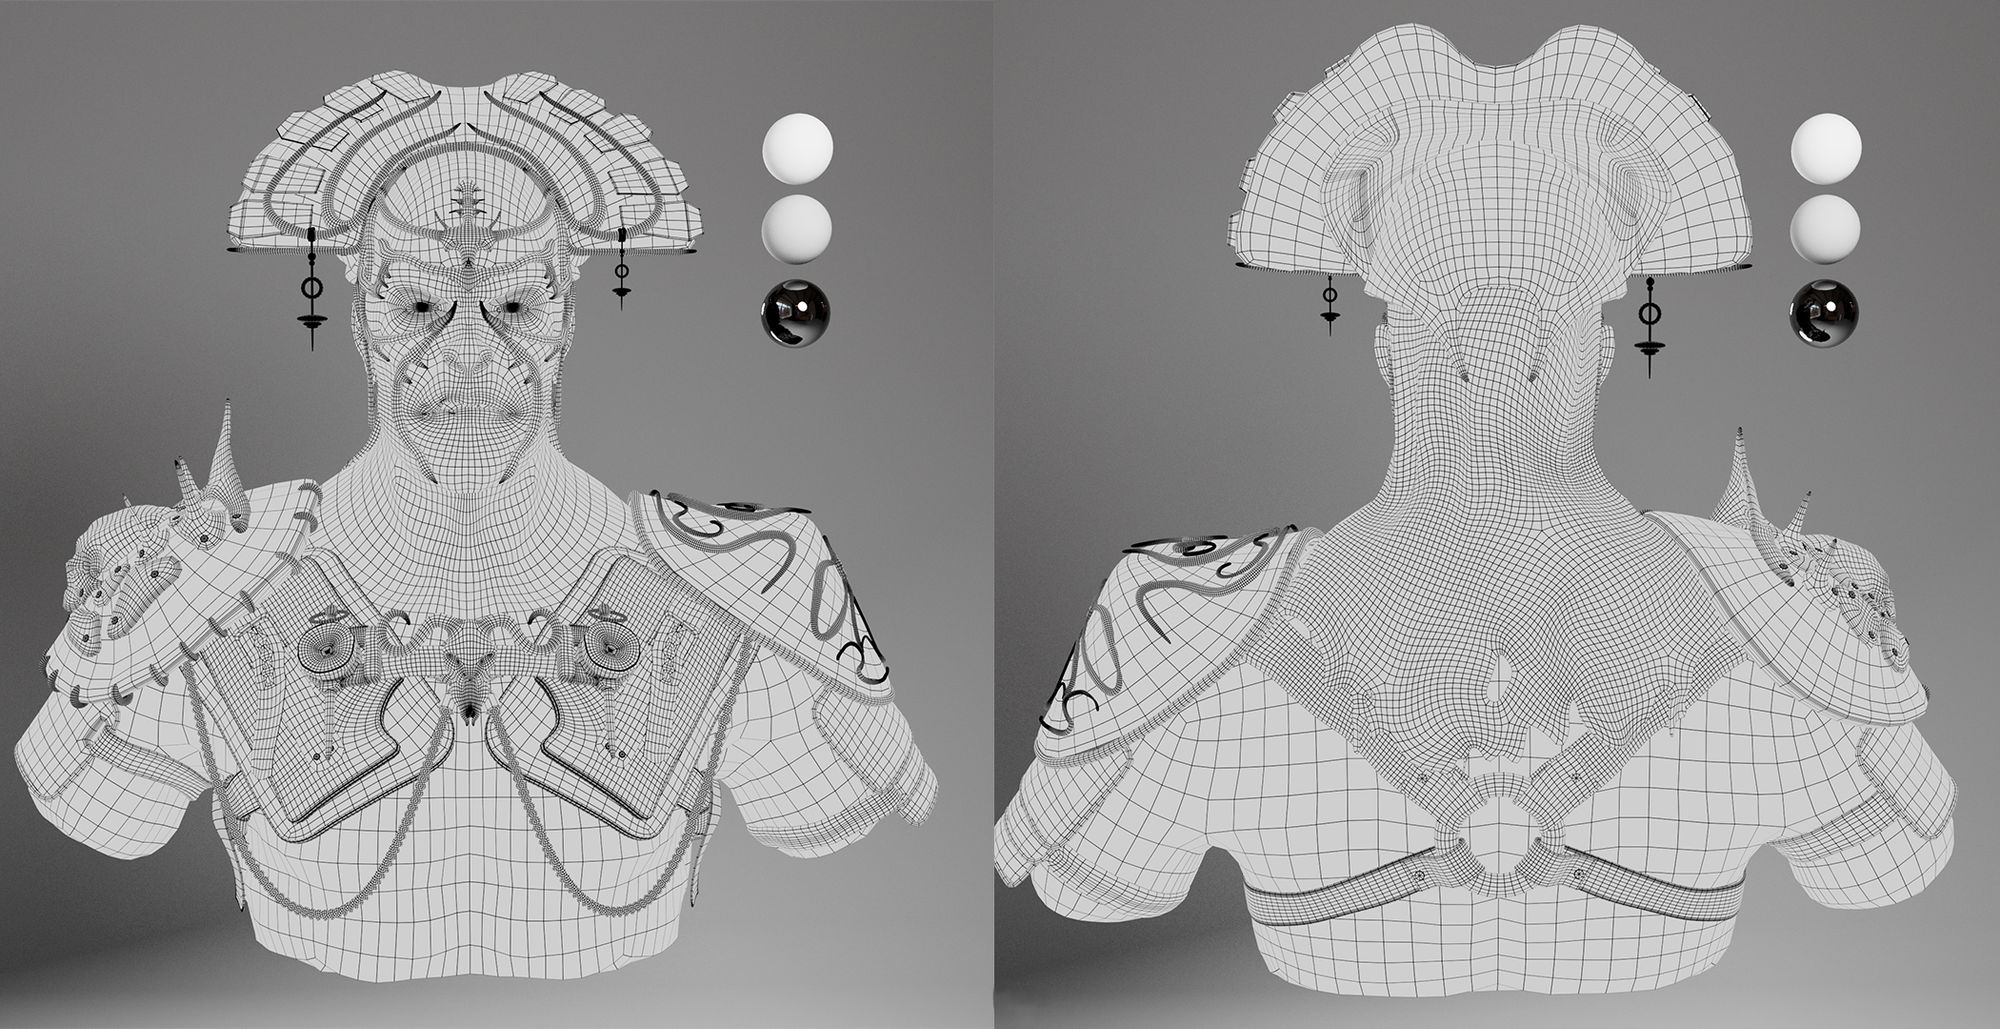
Topology is also very important when you are making characters with such high details and with a lot of accessories, you have to make sure that it is not only animation friendly but also render friendly. The higher the poly count, the higher the render times and more computing power needed.
Below is my wireframe render showing my topology. It is definitely a challenging stage as you don't want to lose any details and also keep the poly count as low as possible.
"Front & Back wireframe renders"
Texturing
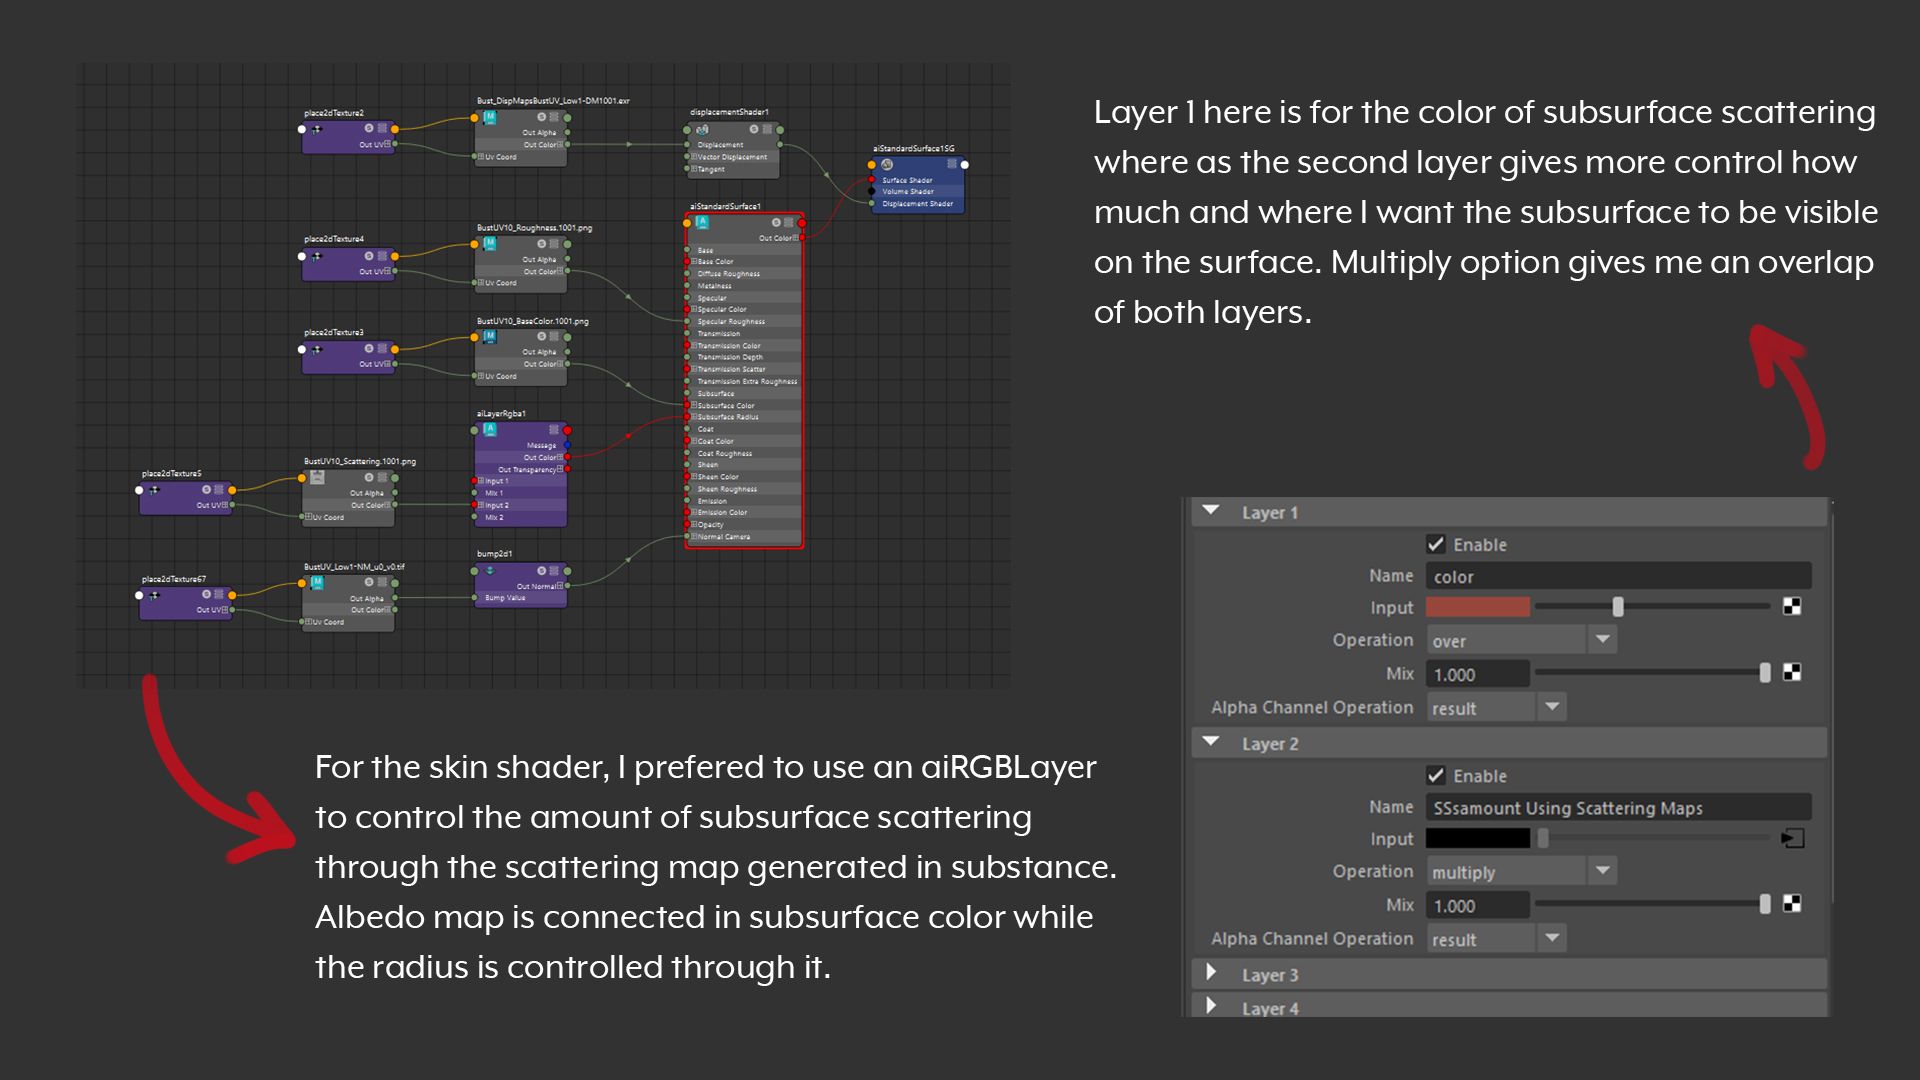
During this project I learned how to hand paint realistic skin textures in Substance 3D Painter, which was quite challenging as it was my first time. I mostly learned through trial and error. I also learned to setup skin shaders in Maya and work with subsurface scattering through scattering maps generated using Substance 3D Painter.
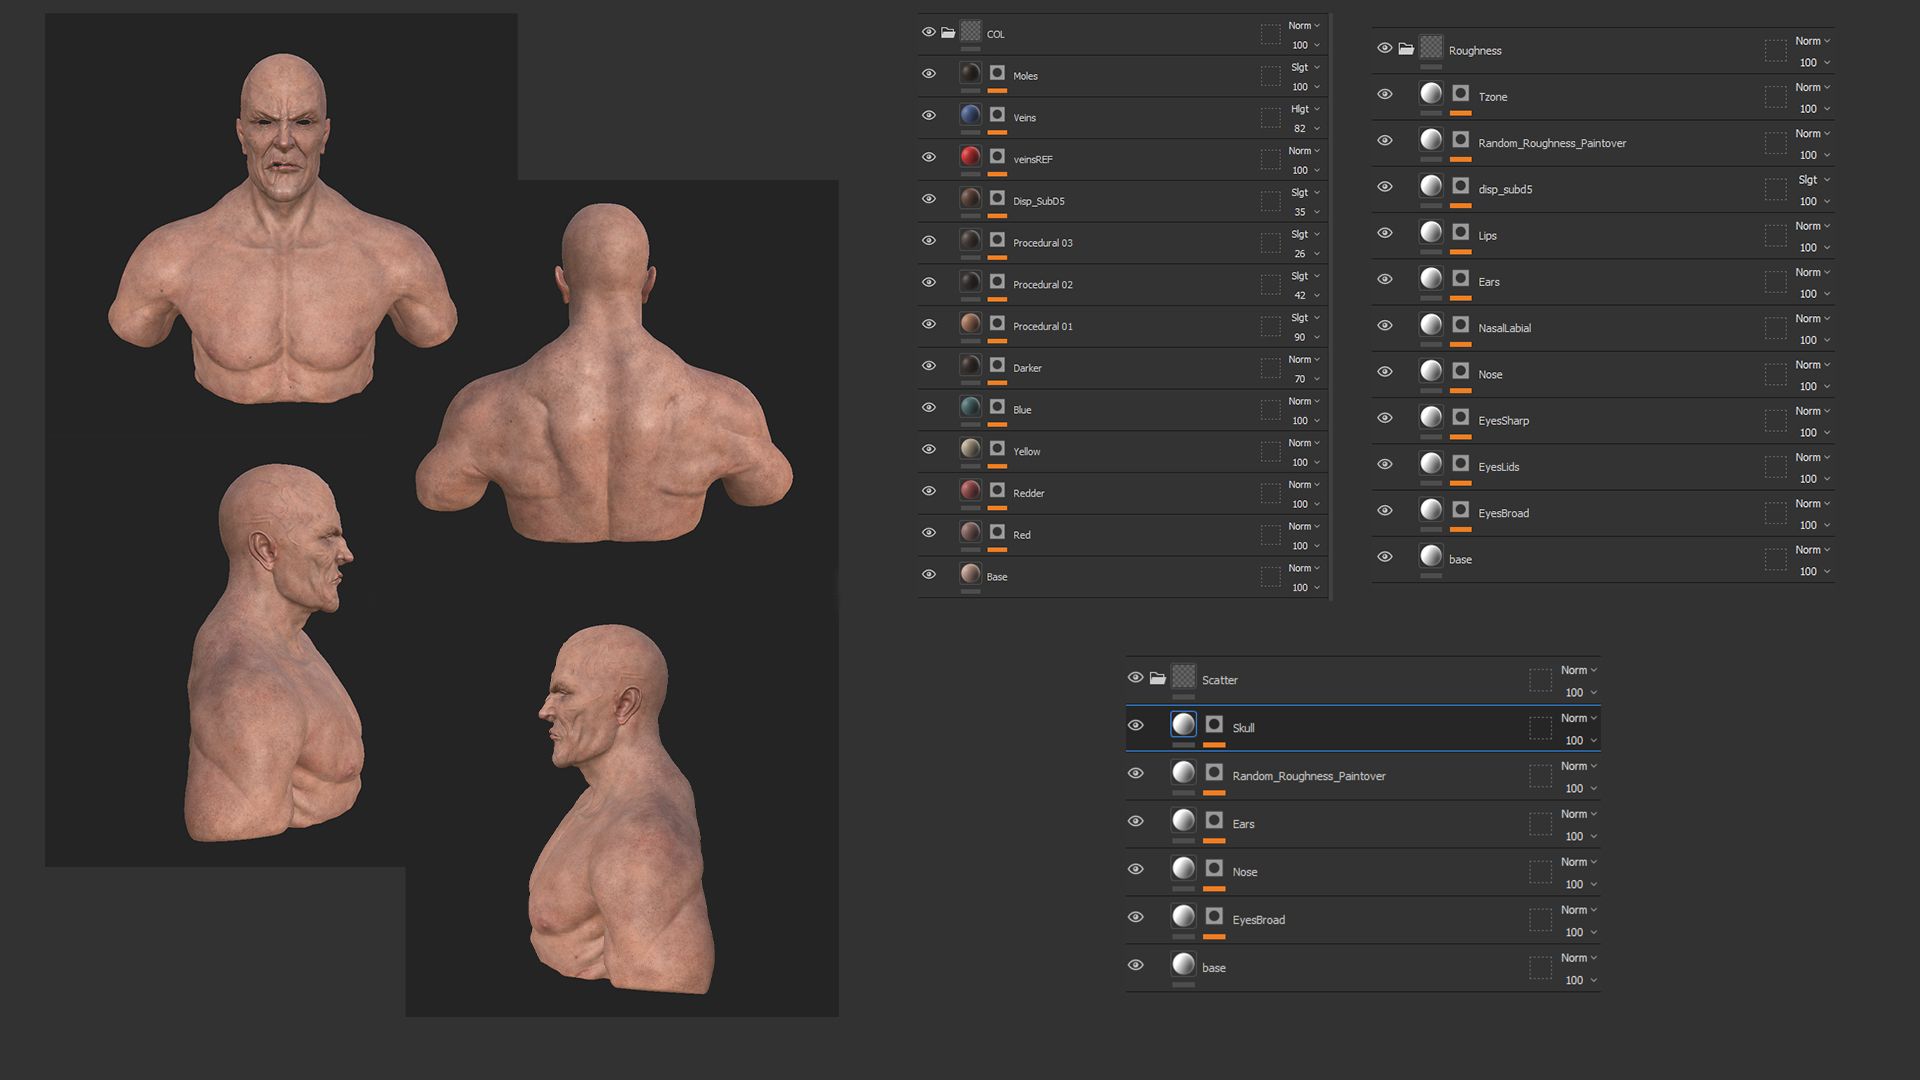
Uv’s are also very important as you have to make sure there is no stretching otherwise the textures will appear stretched in the renders too. I selected the most dense mesh in my character and set the texel density of all my geo's the same as that object to get my texture densities correct. Below is the image showing my painted skin in Substance 3D Painter with all my layers visible. First I made the colour layer, then worked on the roughness and then scatter maps.
The most effective workflow is to make smart masks first, for eyes, nose, ears, nasal labial folds and chin, as you will be needing them for controlling the roughness and scattering of the subsurface later too.
"Painter screenshots of final skin paint along with the layers"
What I learned is that we start with a base colour that defines your base skin colour and then add other colours like variations of red for blood and yellow for where the bones are. Variation is key here and I prefer to use multiple brushes to get as much variation while still keeping it subtle. Once you nail the base colours, the rest is just procedural variation that depends on what kind of character you are making.
For the roughness we use the previously made smart masks to slowly add variation in the roughness of skin, here real life references are key to see how light behaves on skin. Scattering map comes later after we have established the skin shader in Maya.
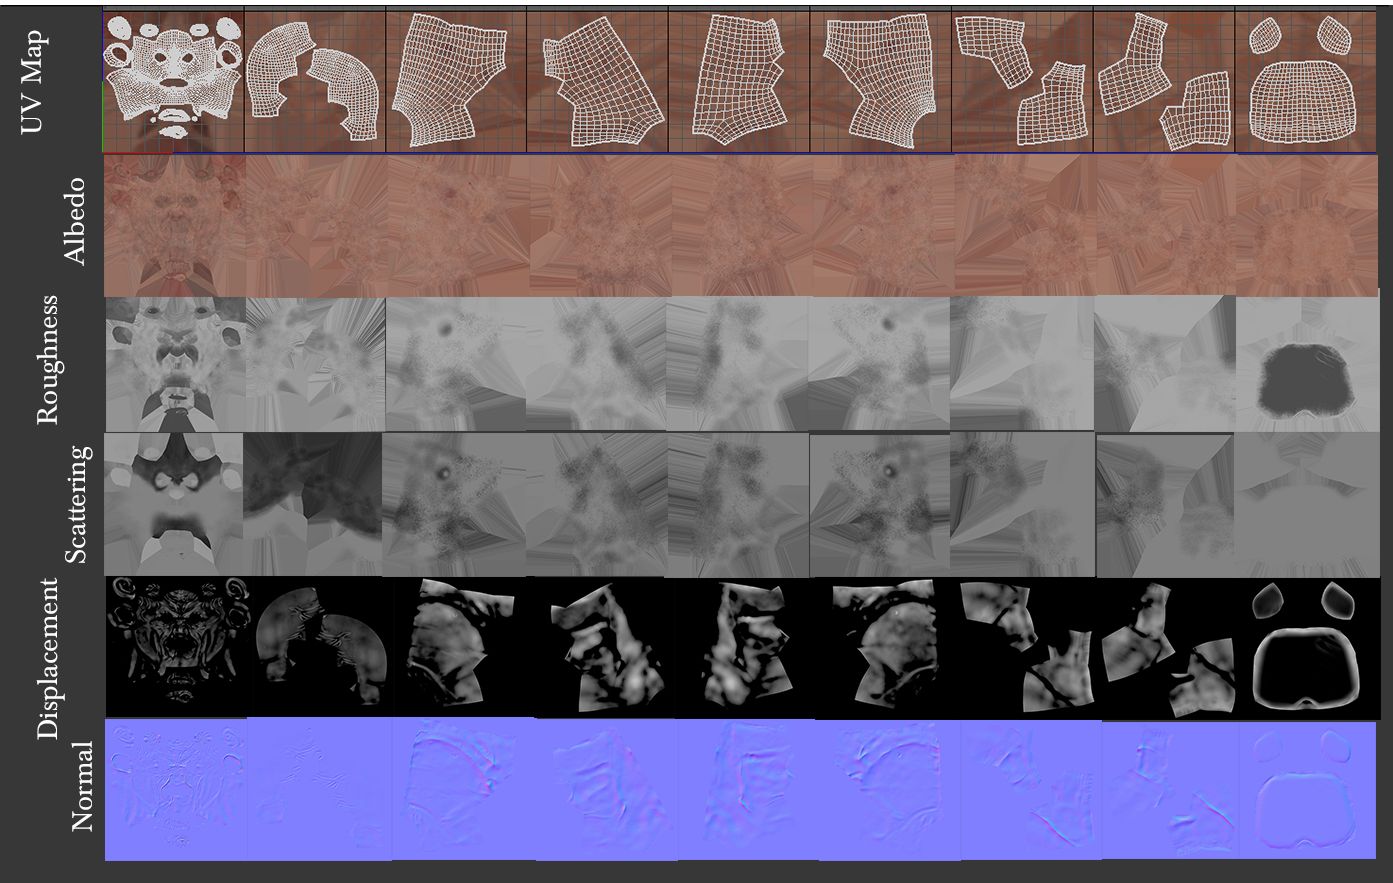
Below is the image of my UV’s and all the maps that I exported out of Substance Painter, along with the skin shader set up in Maya.
UV maps and maps exported out of painter to be plugged into the shader in MayaThe shader network and settings done in Maya
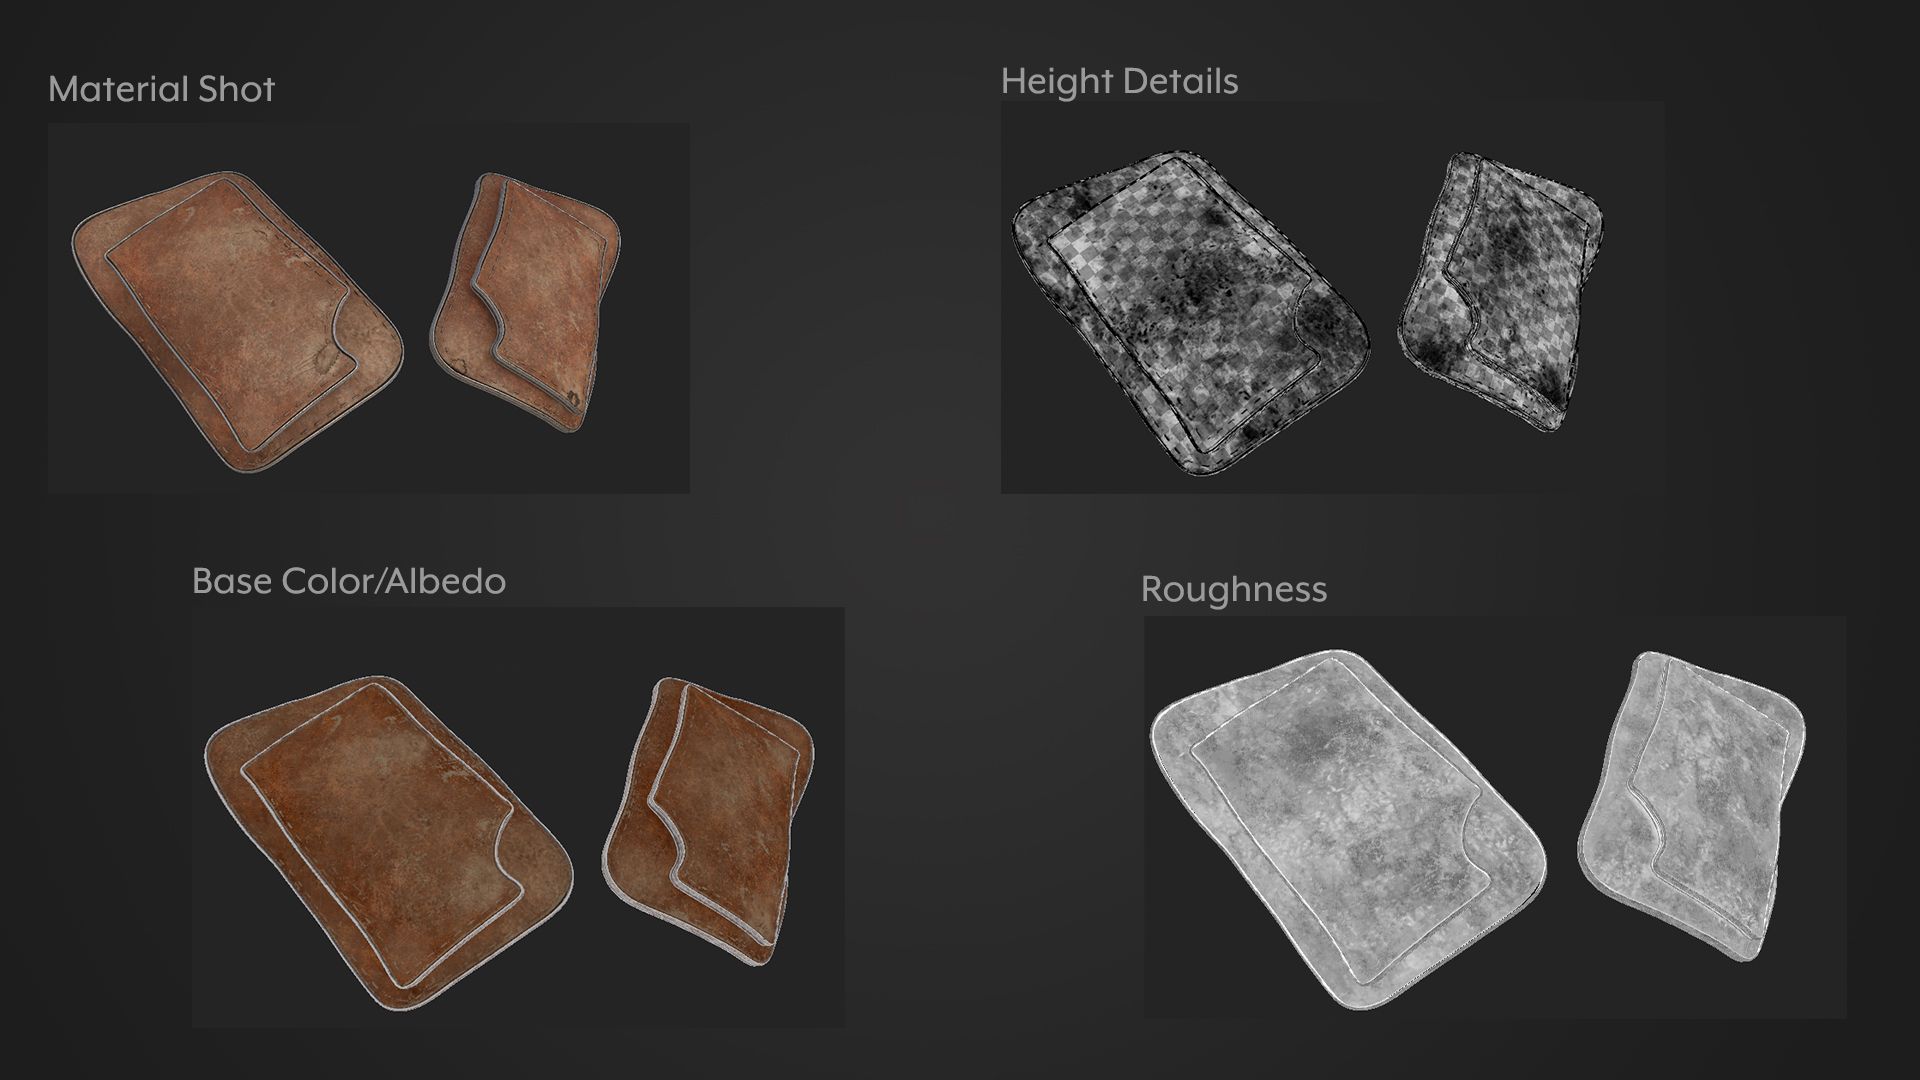
Once the skin shader was set up and I was satisfied with the outcome, I moved to texturing the accessories. The biggest challenge was to texture leather; I learned how to texture leather during this project as well. SInce most of the accessories are made out of leather I just had to be accurate.
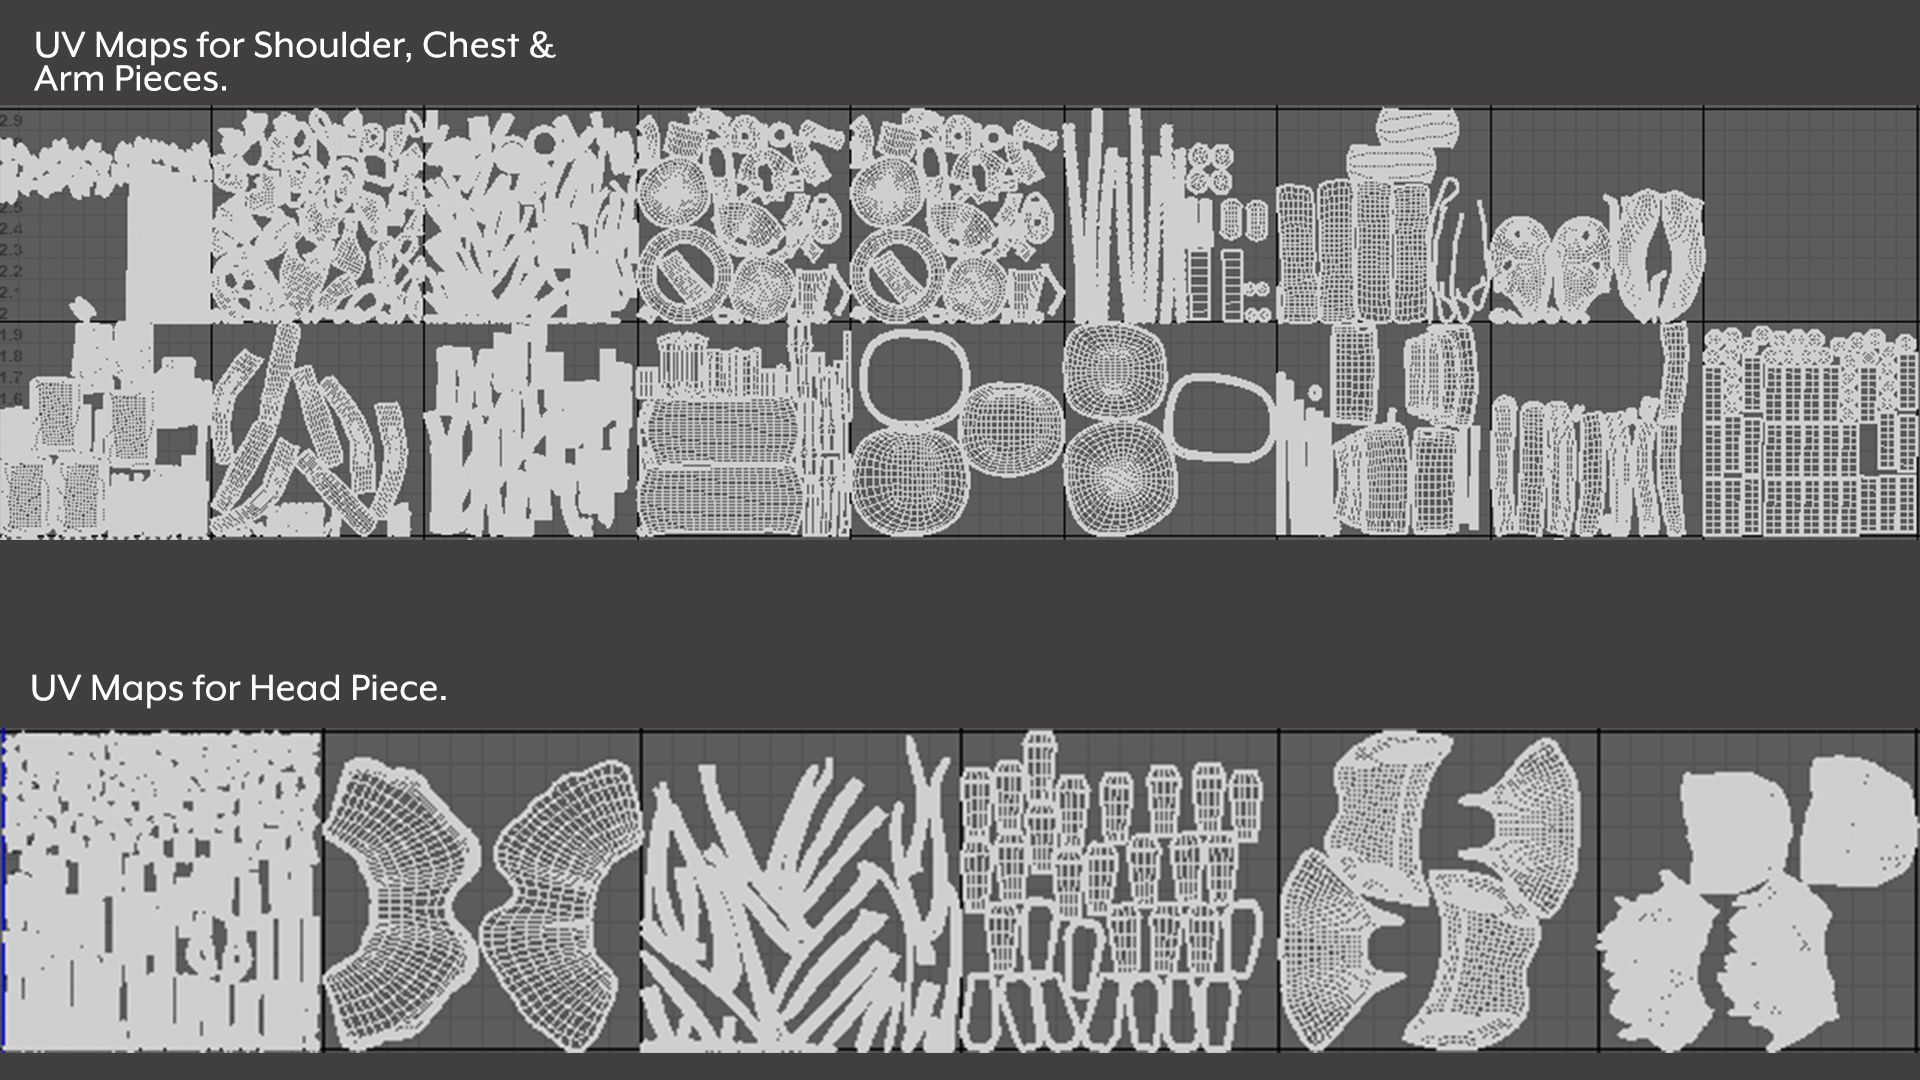
Again, the first step is to make sure you have the UV’s done correctly. There are two ways I could have approached this, first is to make the detailed versions of the accessories and retopologise them later where I would bake the details and then texture them. Second is to make sure I am keeping all my accessories low poly and do my UV’s before I bring them in ZBrush for detailing. For this project I used both processes to see how each workflow would work. Below is the image of my UV’s for all the accessories.
"UV layout for the accessories"
Once the UV’s were made, I began my texturing process. Below is the image showing my process how I made the leather material and the screenshots of the base colour, height and roughness.
Painter screenshots for the leather material
Look development and Rendering
I believe look development which includes your lighting and camera setup, is equally important as the sculpt itself. If the lighting is not correct or does not conveys the right emotion all that detail and effort will go to waste. So, for my character I wanted to land somewhere in between dramatic and neutral lighting.
I used a HDRI with very dim light as a base to set up my natural light. Then I used a basic three point light setup with adjustments as per my need. I used one extra light in the back to separate the object from my background as shown in my final renders above.
I want to thank The Rookies for giving me the opportunity to explain my workflows and thought process, giving a more in depth look on how I approach the character modelling process. Art is an ever learning process and that is what I love about it the most. I hope to keep learning and improving, and also keep sharing what I learn with others along the way.