Organic 3D Environment Modeling: Creating a Game-ready Dark Fantasy Diorama
In this article, recent Escape Studios graduate Rodolfo Silva shares the process behind creating his Rookies Awards 2023 entry. Focused on a Diablo game series fan art environment, Rodolfo takes us through his inspiration and process, including the tools and techniques he used.
This article is written by a recent graduate, Rodolfo Silva, who has just finished his MA course in Game Art at Escape Studios. Rodolfo is also a participant in the Rookies Awards 2023, and we have invited him to write an article about some of the work included in his entry. This article focuses on the process behind the creation of “Gate of Sanctuary”, which is a fan art environment centred around the Diablo game series. In this article, Rodolfo walks us through the inspiration, theme, pre-production and production stages involved in creating this environment, highlighting the tools and techniques he used along the way.
I’m super excited to have been invited to write this article by The Rookies about some of the work included in my entry. For this article we’re going to go through the process that went into the creation of “Gate of sanctuary”.
At Escape Studios students were tasked to conceive a creative project for each module, apart from the class exercises and lessons. This was a project executed for module 2 which was centred around sculpting techniques and using ZBrush as a key part of the game art pipeline.
Inspiration and theme
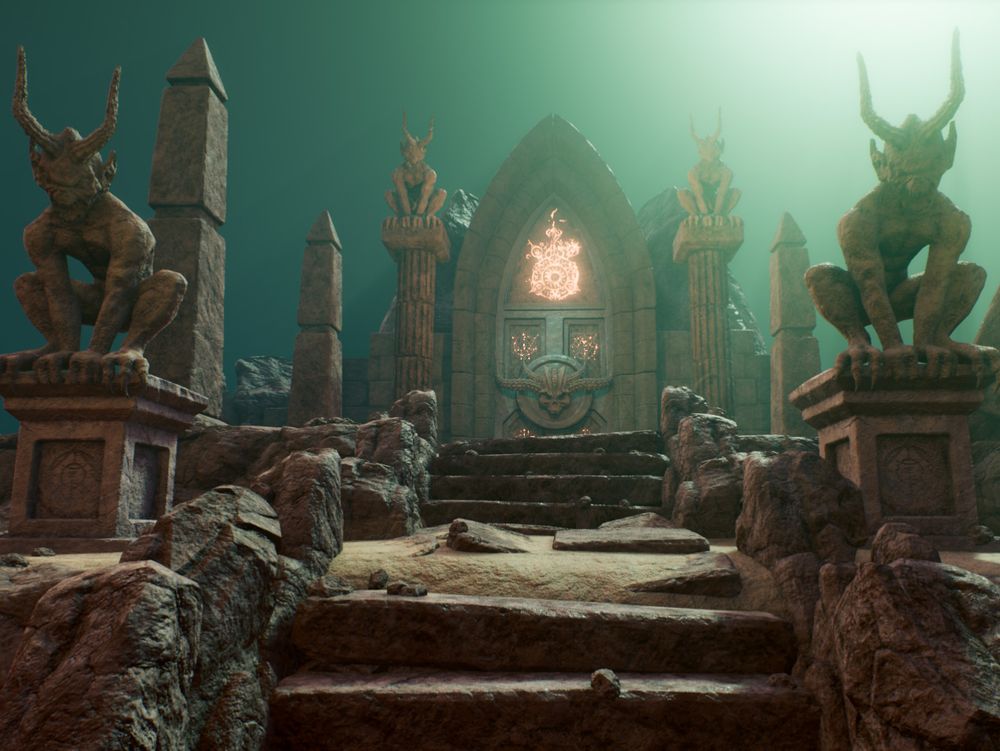
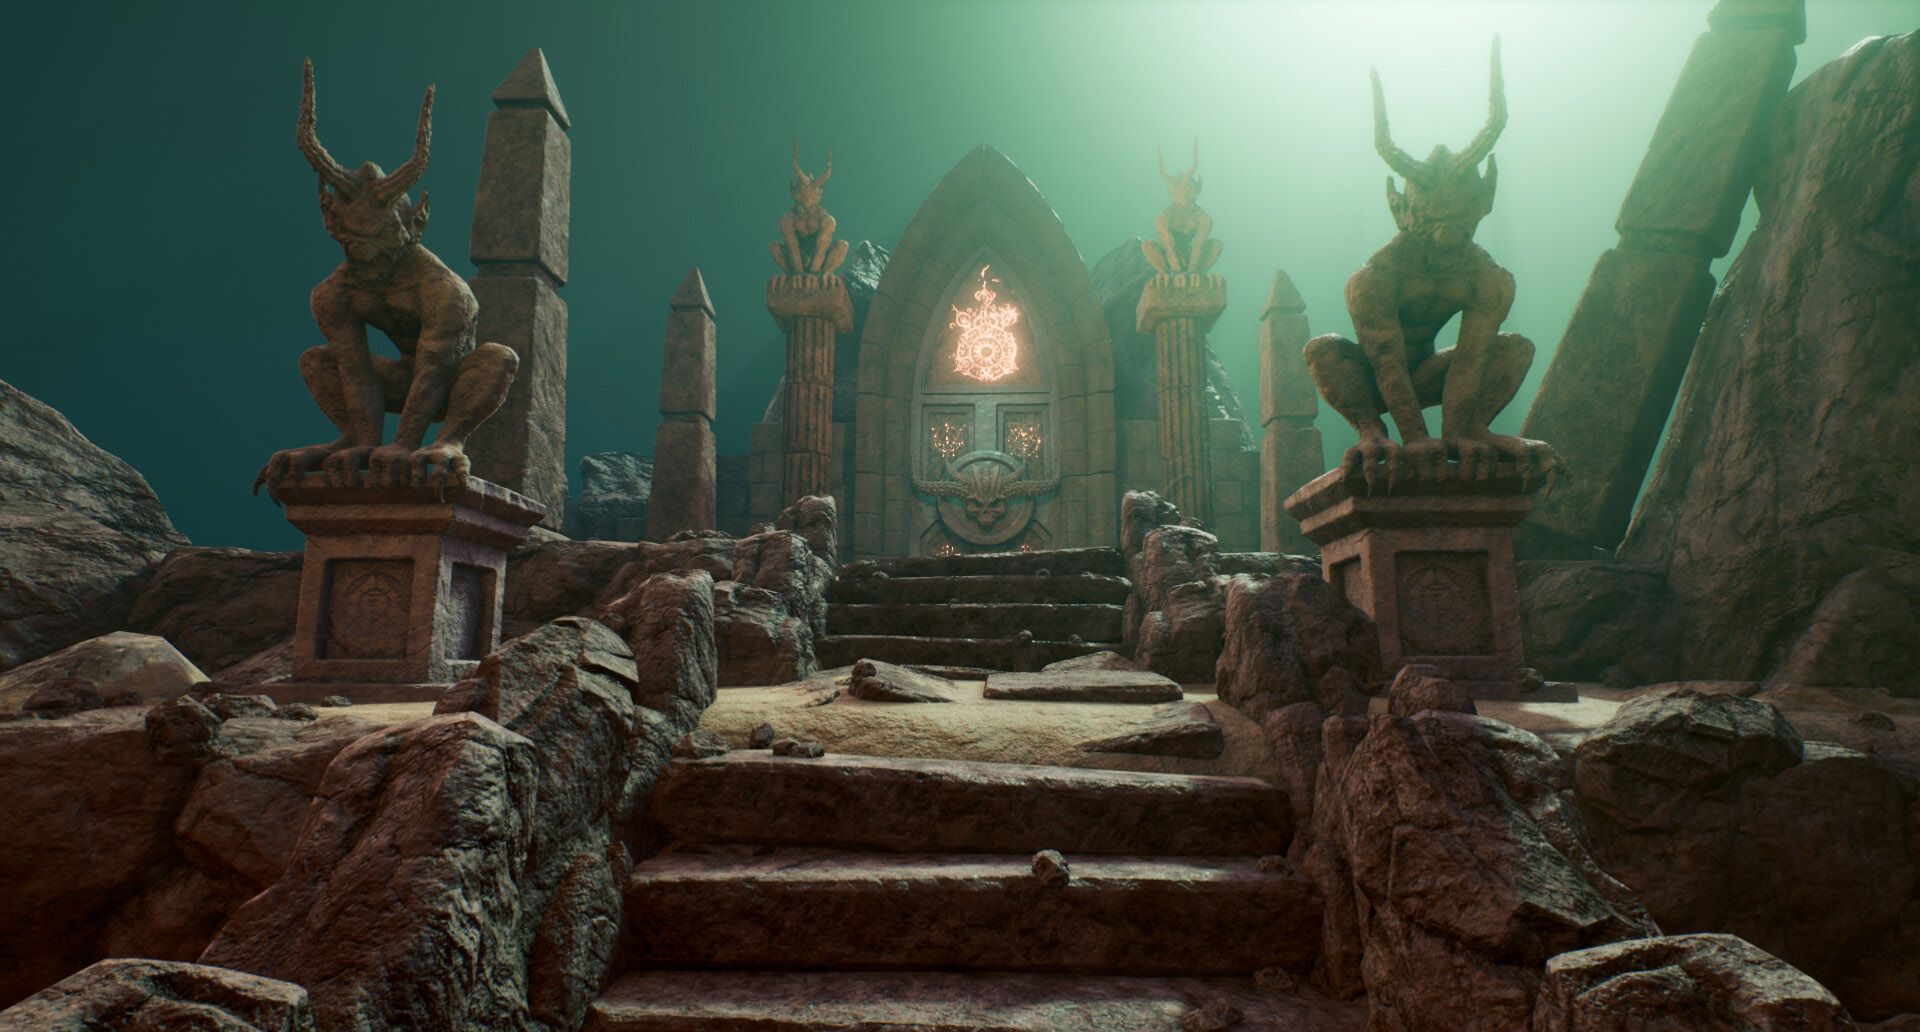
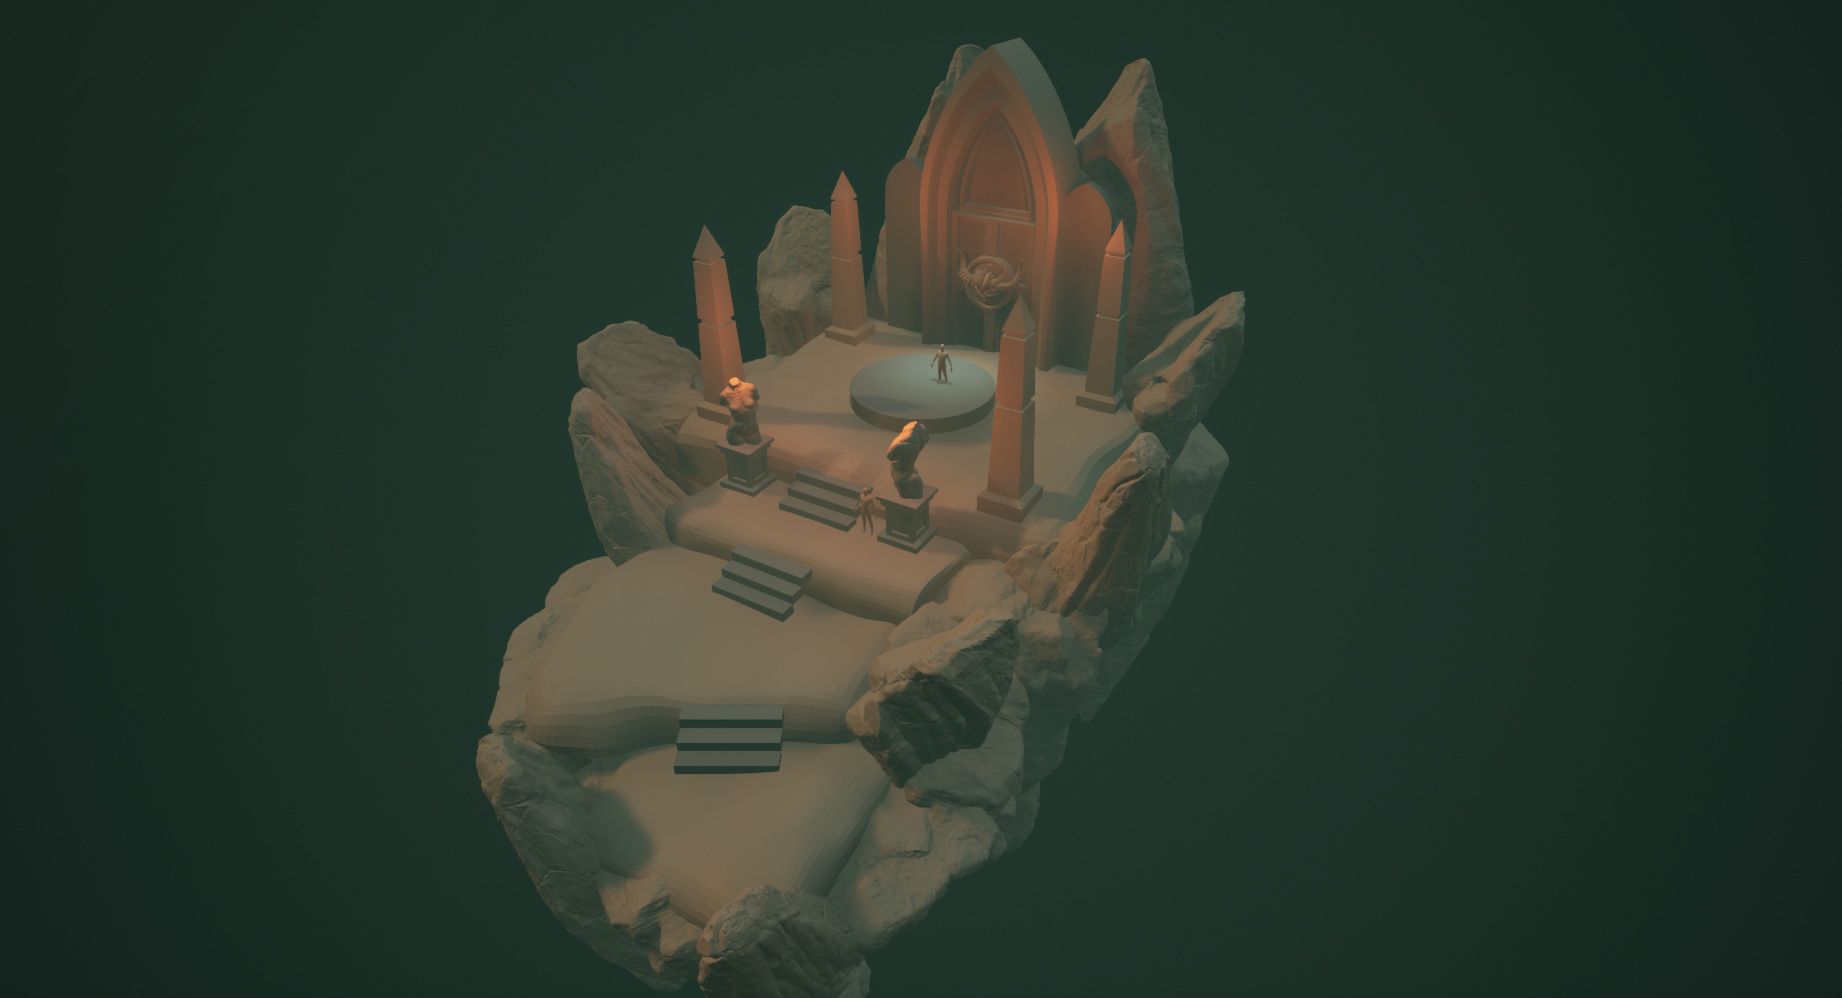
I decided to make a fan art environment centered around the Diablo game series, which is my favourite game series when it comes to visual storytelling, lore and mood.
A few examples of images gathered
To capture that eerie mood and dark tone the Diablo series is known for, I developed extensive research looking at images from real life, Diablo and Castlevania artbooks, and even took a few screenshots from Diablo 2: Resurrected to serve as inspiration whenever I was working.
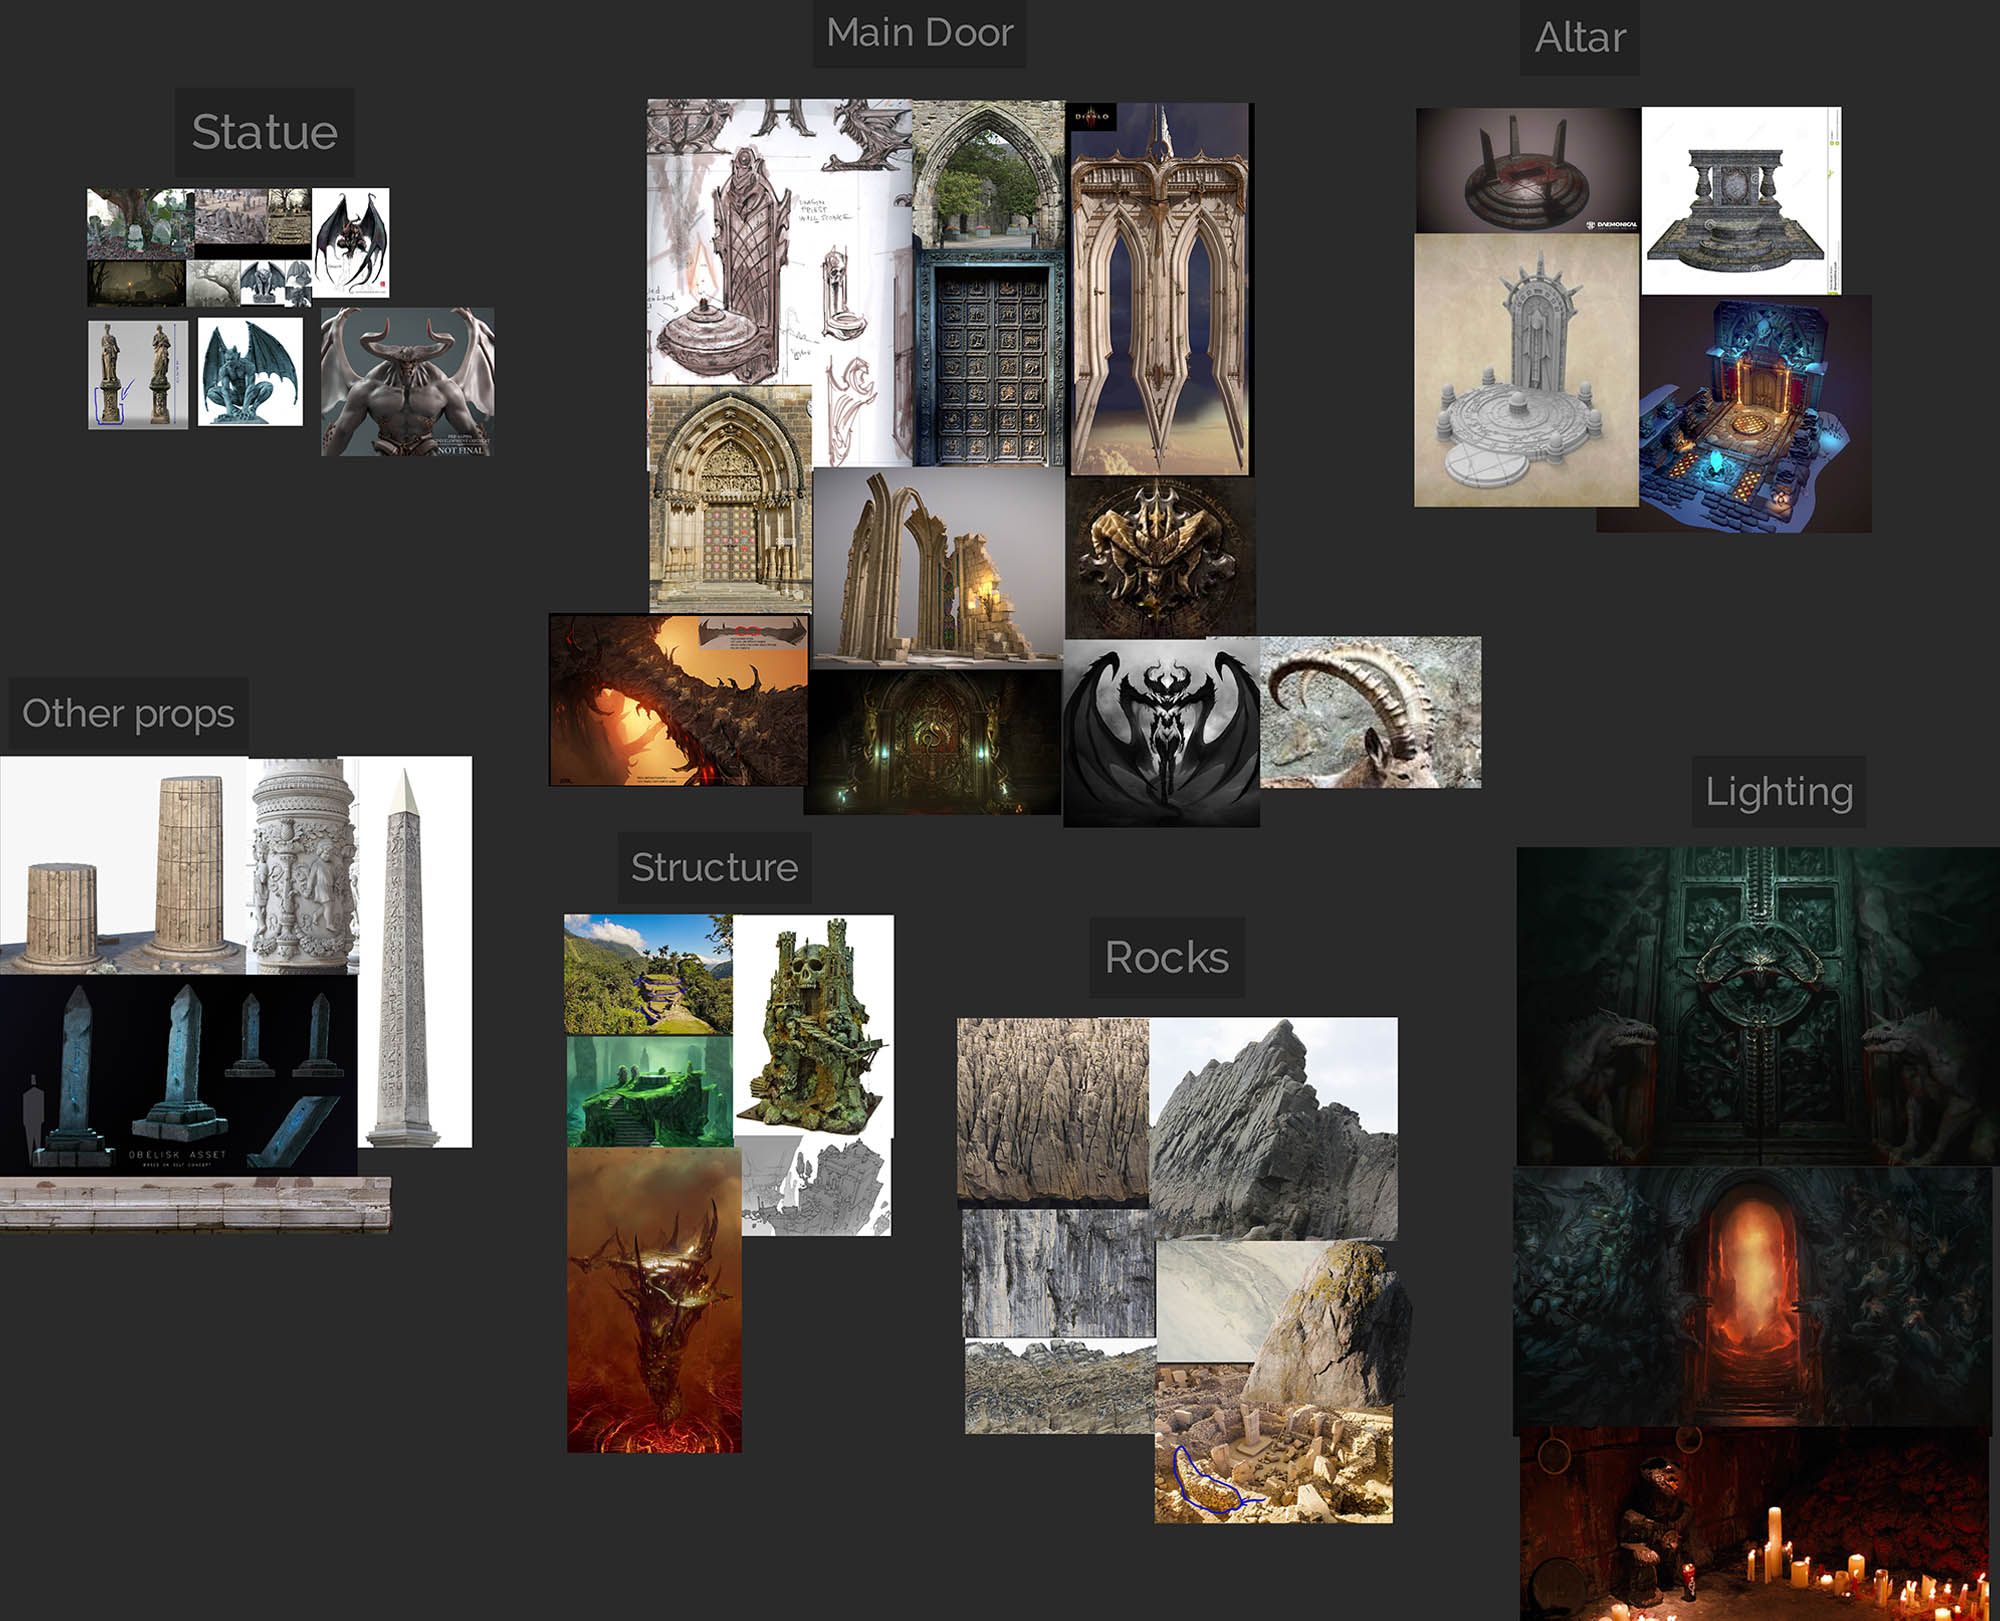
The moodboard
The mood board was developed solely for that same purpose and to keep on one of my monitors at all times while working. That way, I knew whenever I was modeling, sculpting, texturing, lighting or set dressing, I would stick to the mood established in the research phase. During the research stage it was important to get a mental picture of what the final environment would look like, more or less.
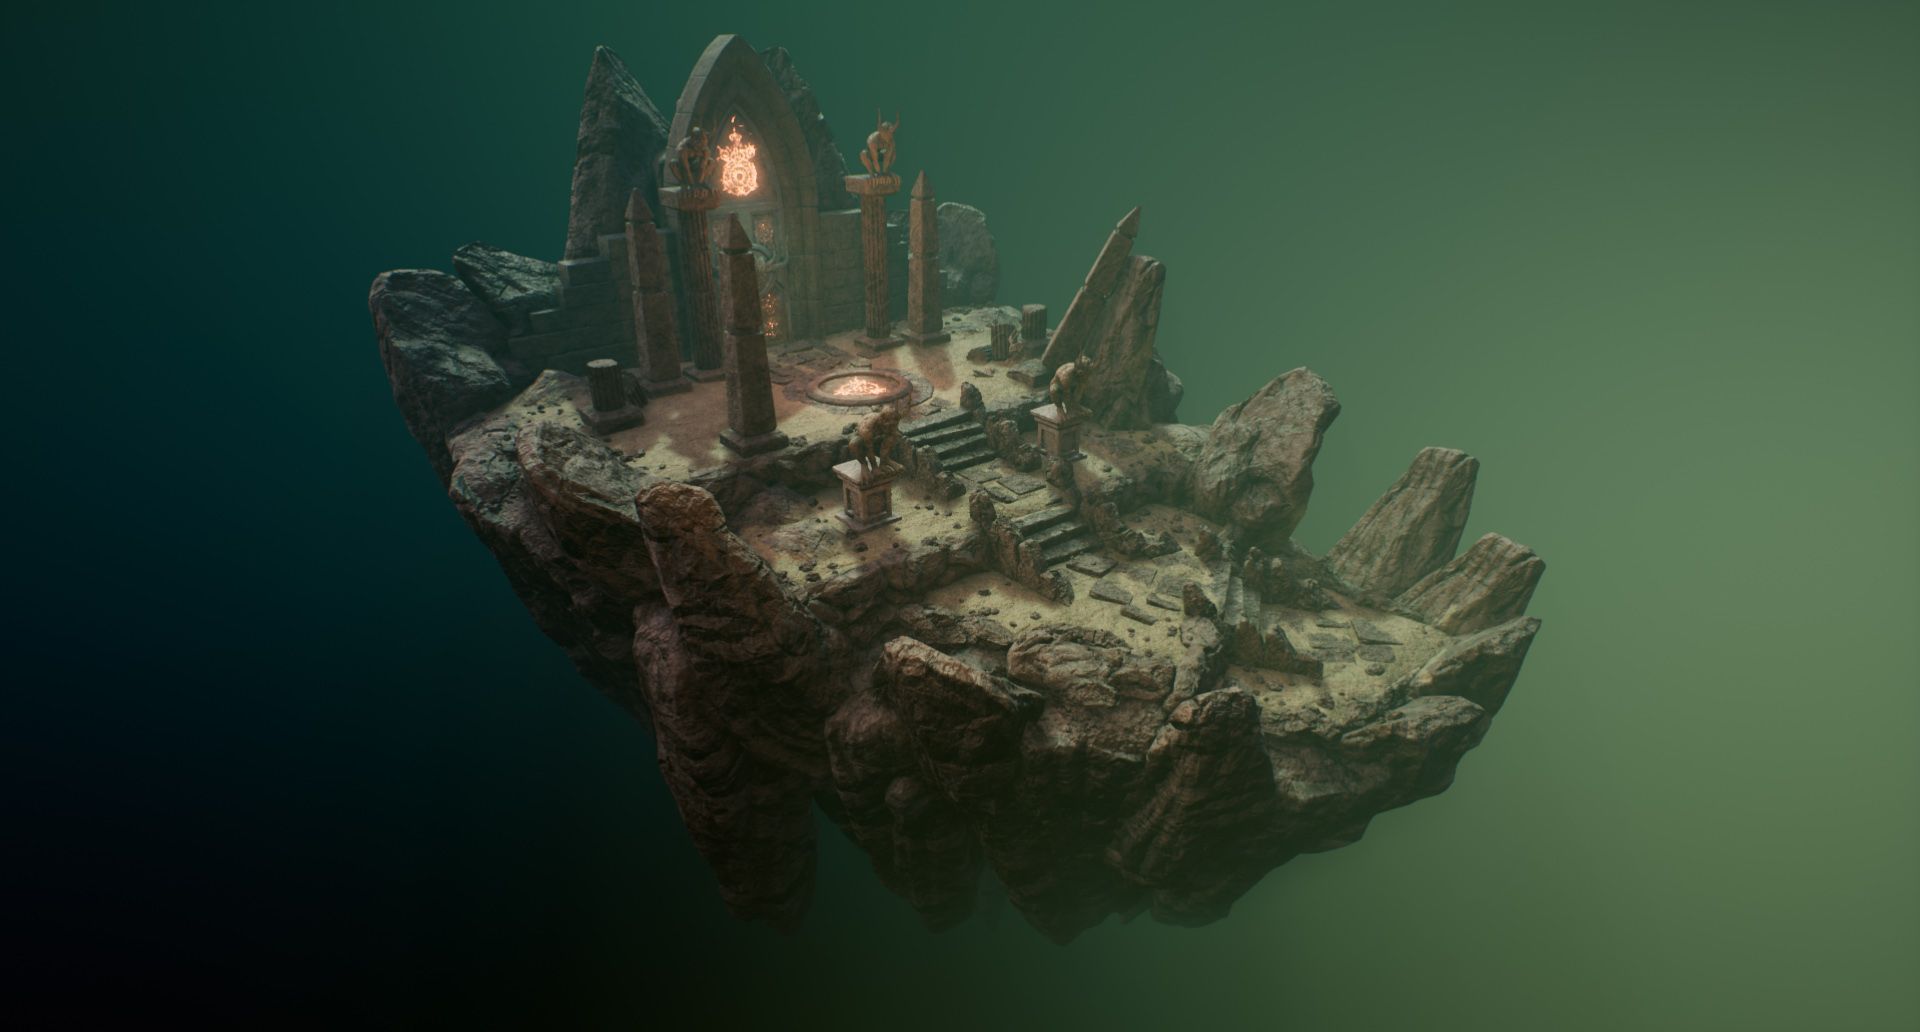
I imagined a floating Island in the middle of the void that would pose as the entrance to the world where humans inhabit in the Diablo universe. Having an environment floating in a fantasy otherworldly realm allowed me total creative freedom when it comes to the lighting, which would be super important to really nail that Diablo mood I was aiming for.
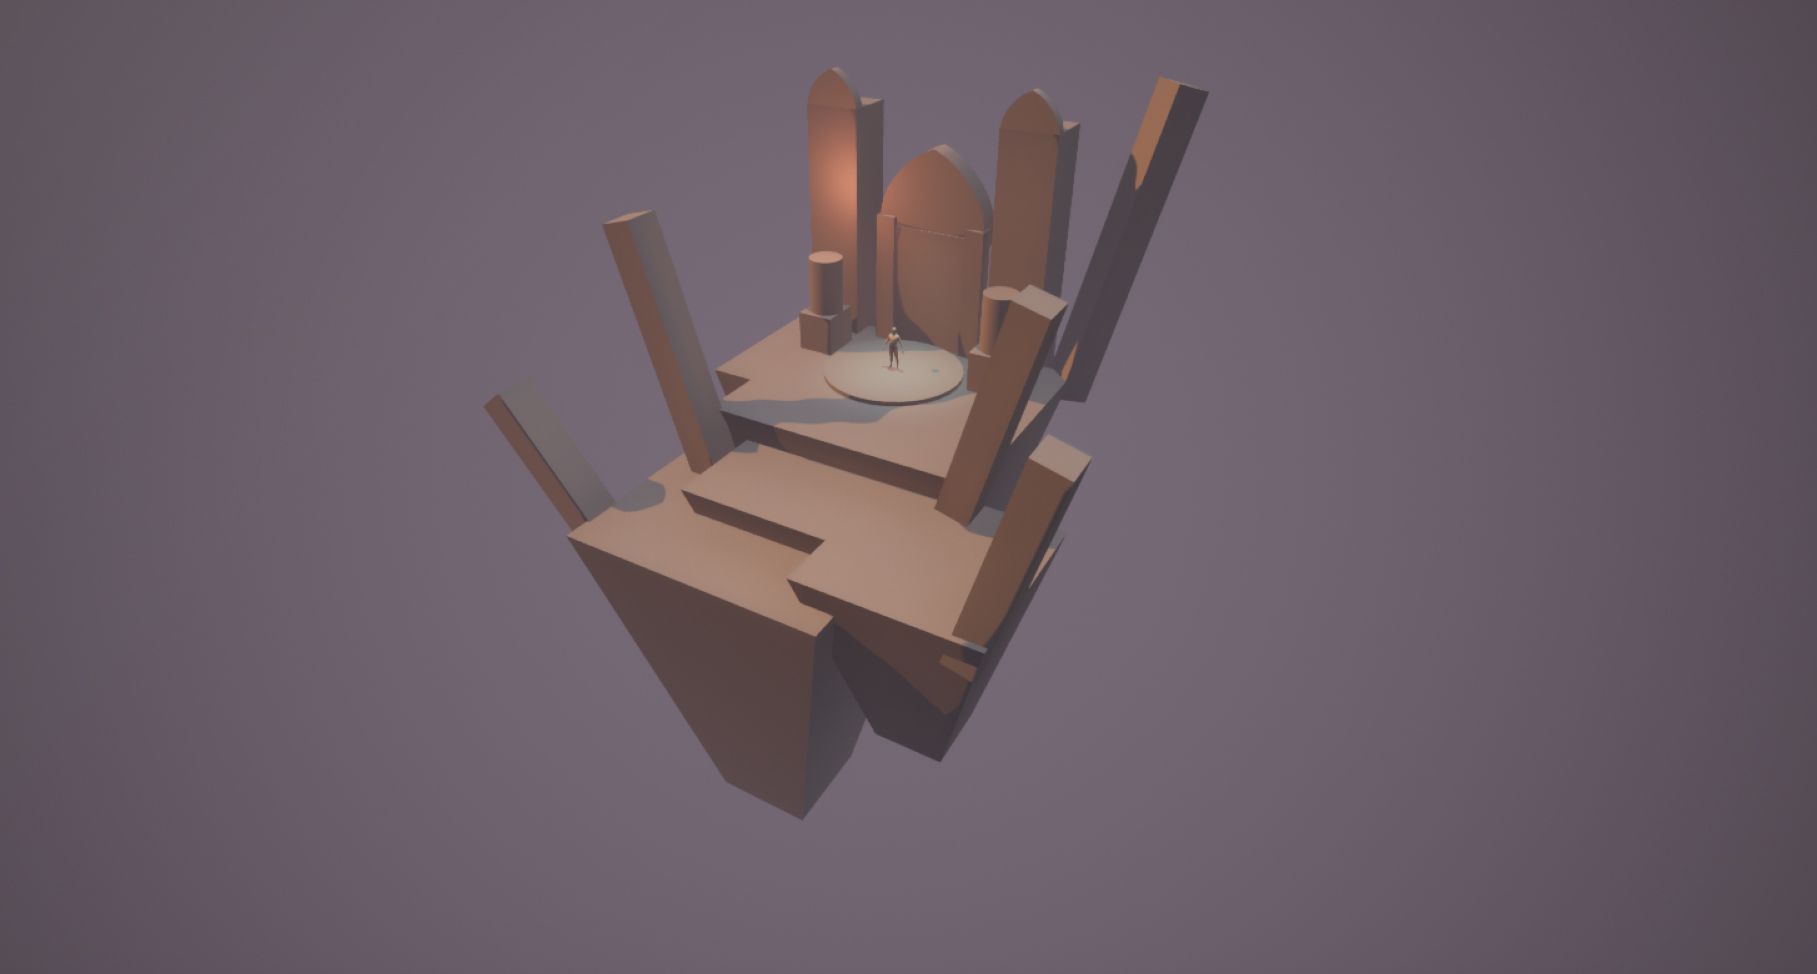
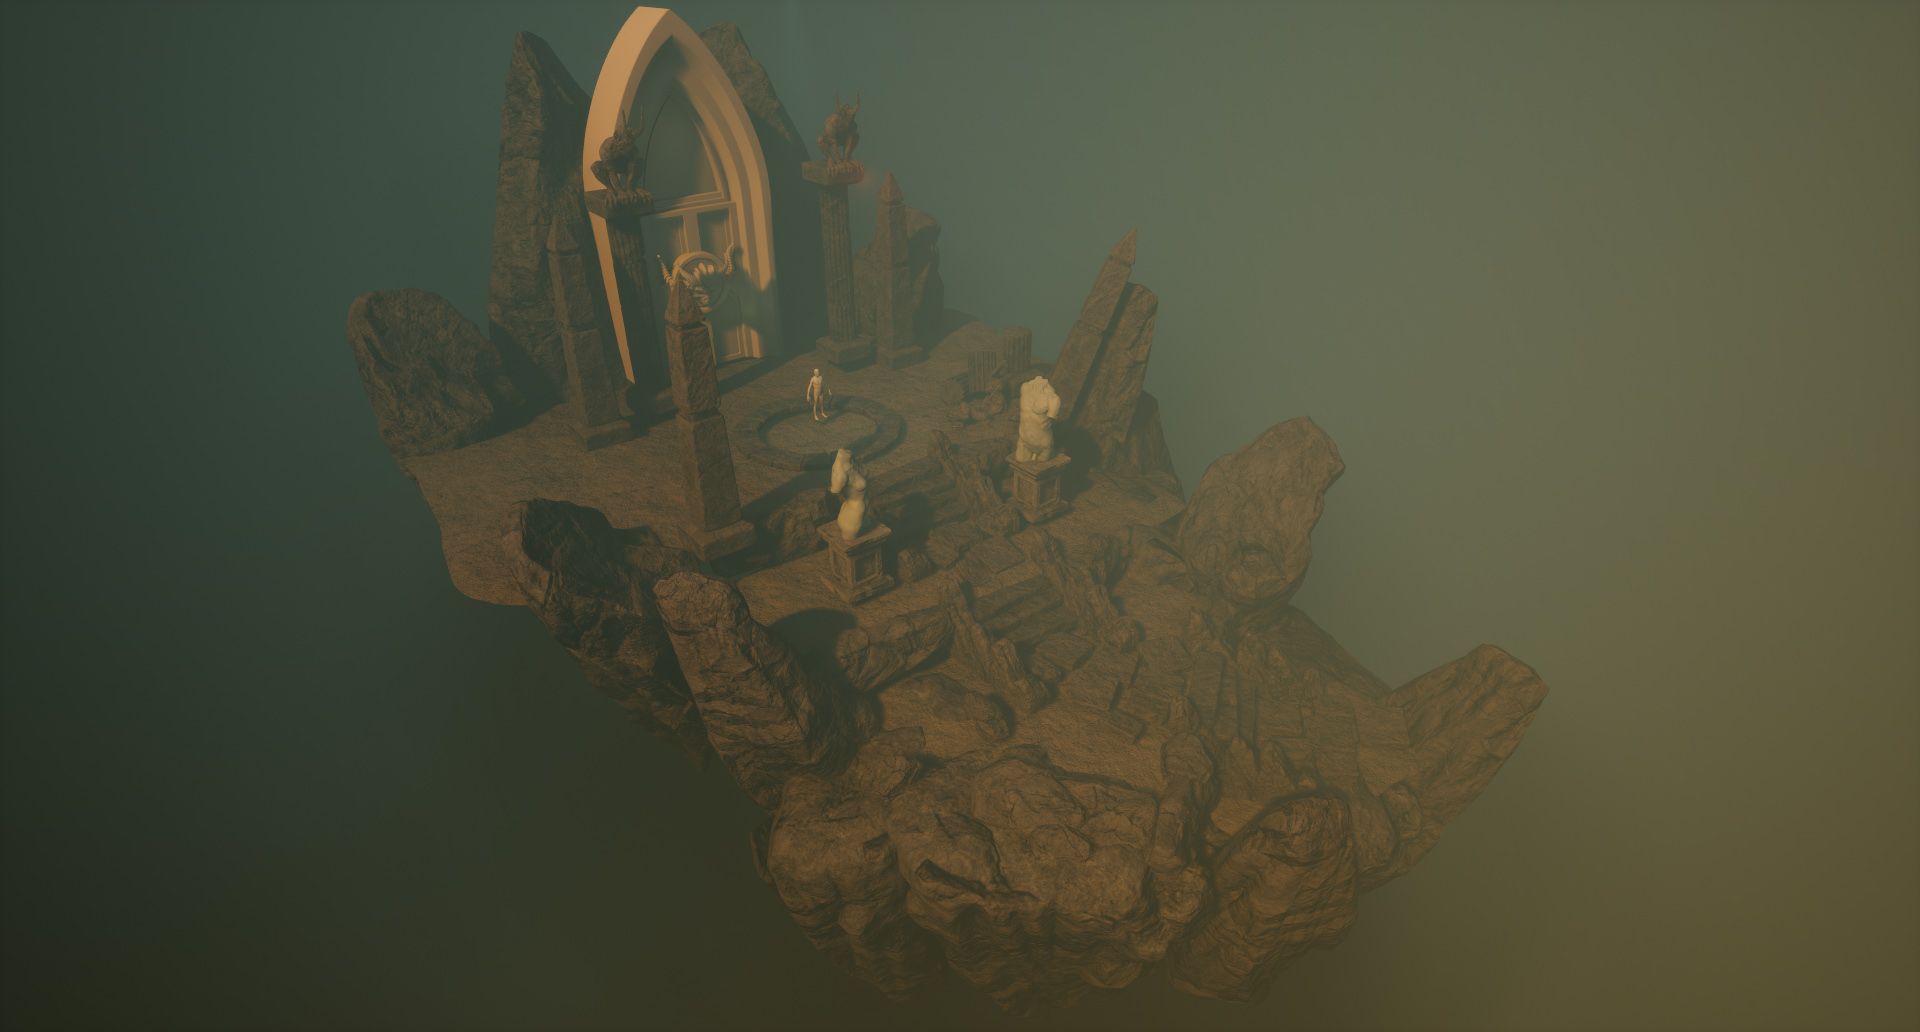
Blockout
In production I usually start by making a rough blockout in Maya and assembling it in Unreal Engine. Getting the cameras and lighting setup early on is pivotal in this stage because I wanted to use Unreal to “carve” out the environment and include the lighting as part of that sculptural approach.
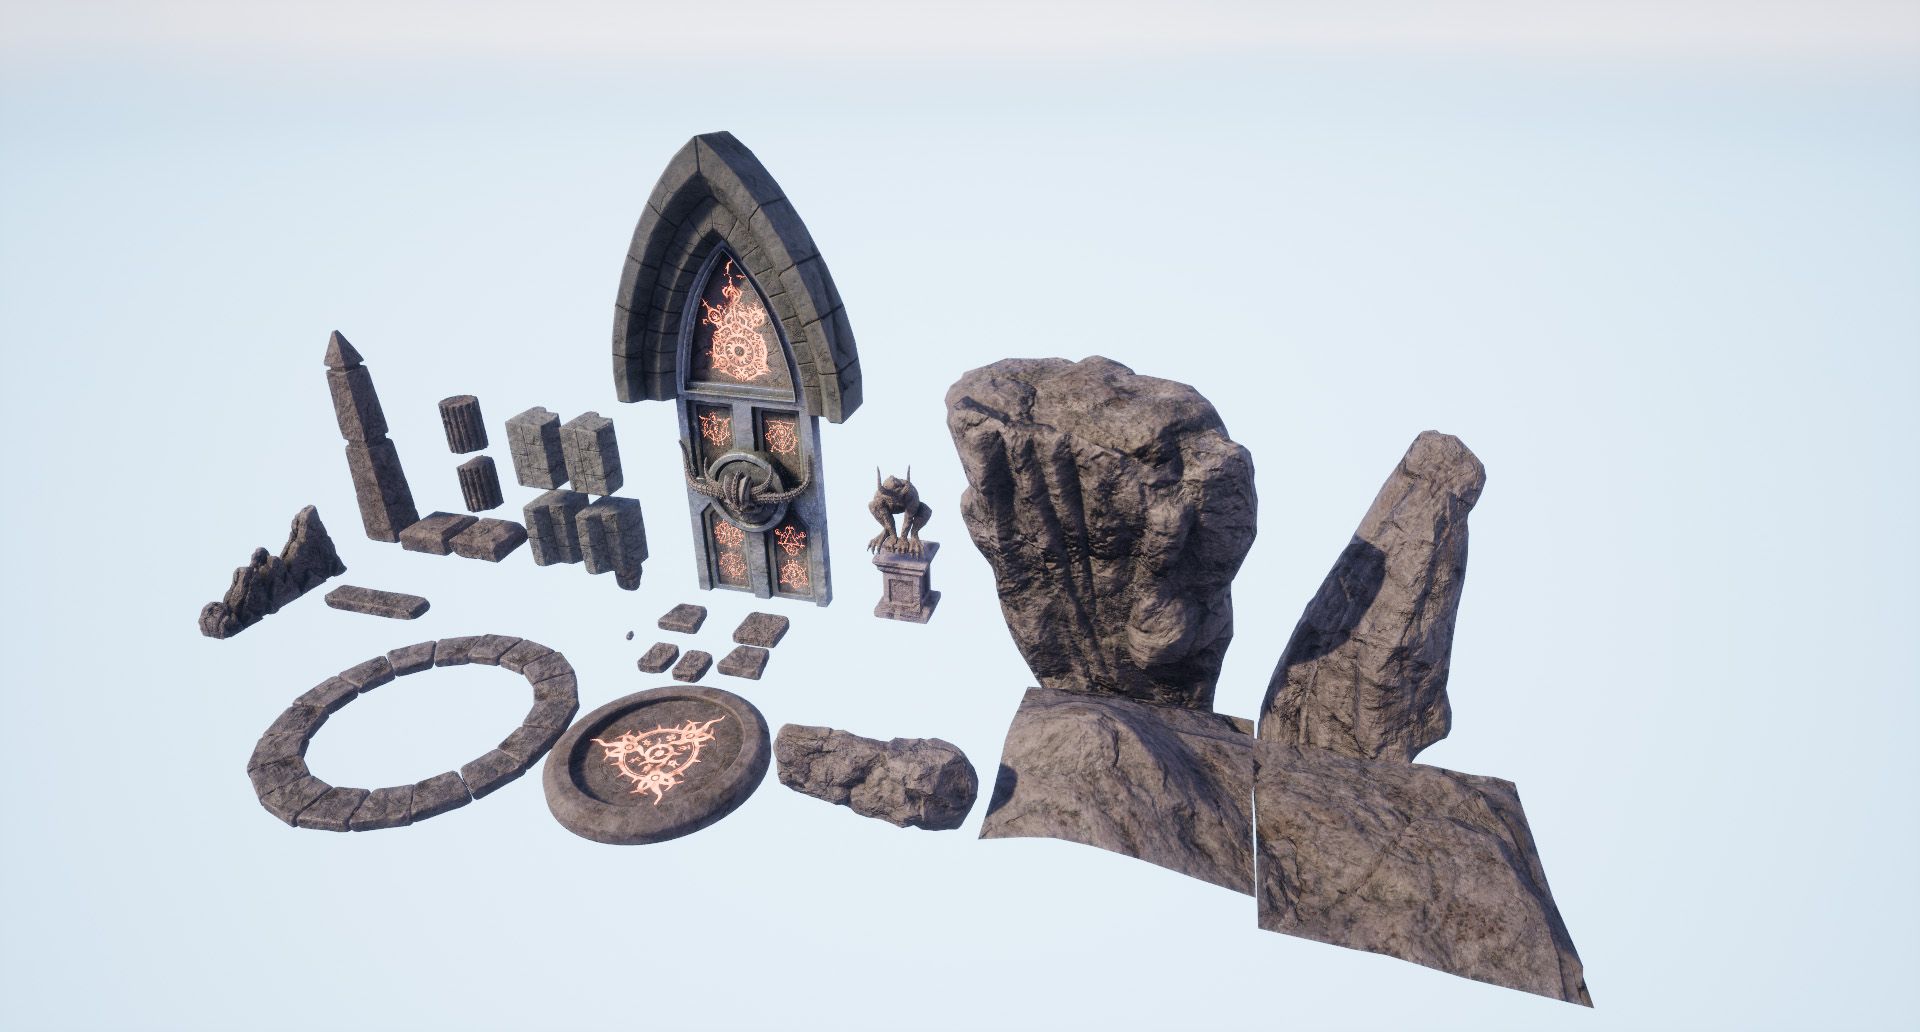
All the models created fo the scene.
As I was adding more models I would iterate on the lighting and keep the overall silhouette in check throughout the entire process.
The first couple of passes of the blockout.
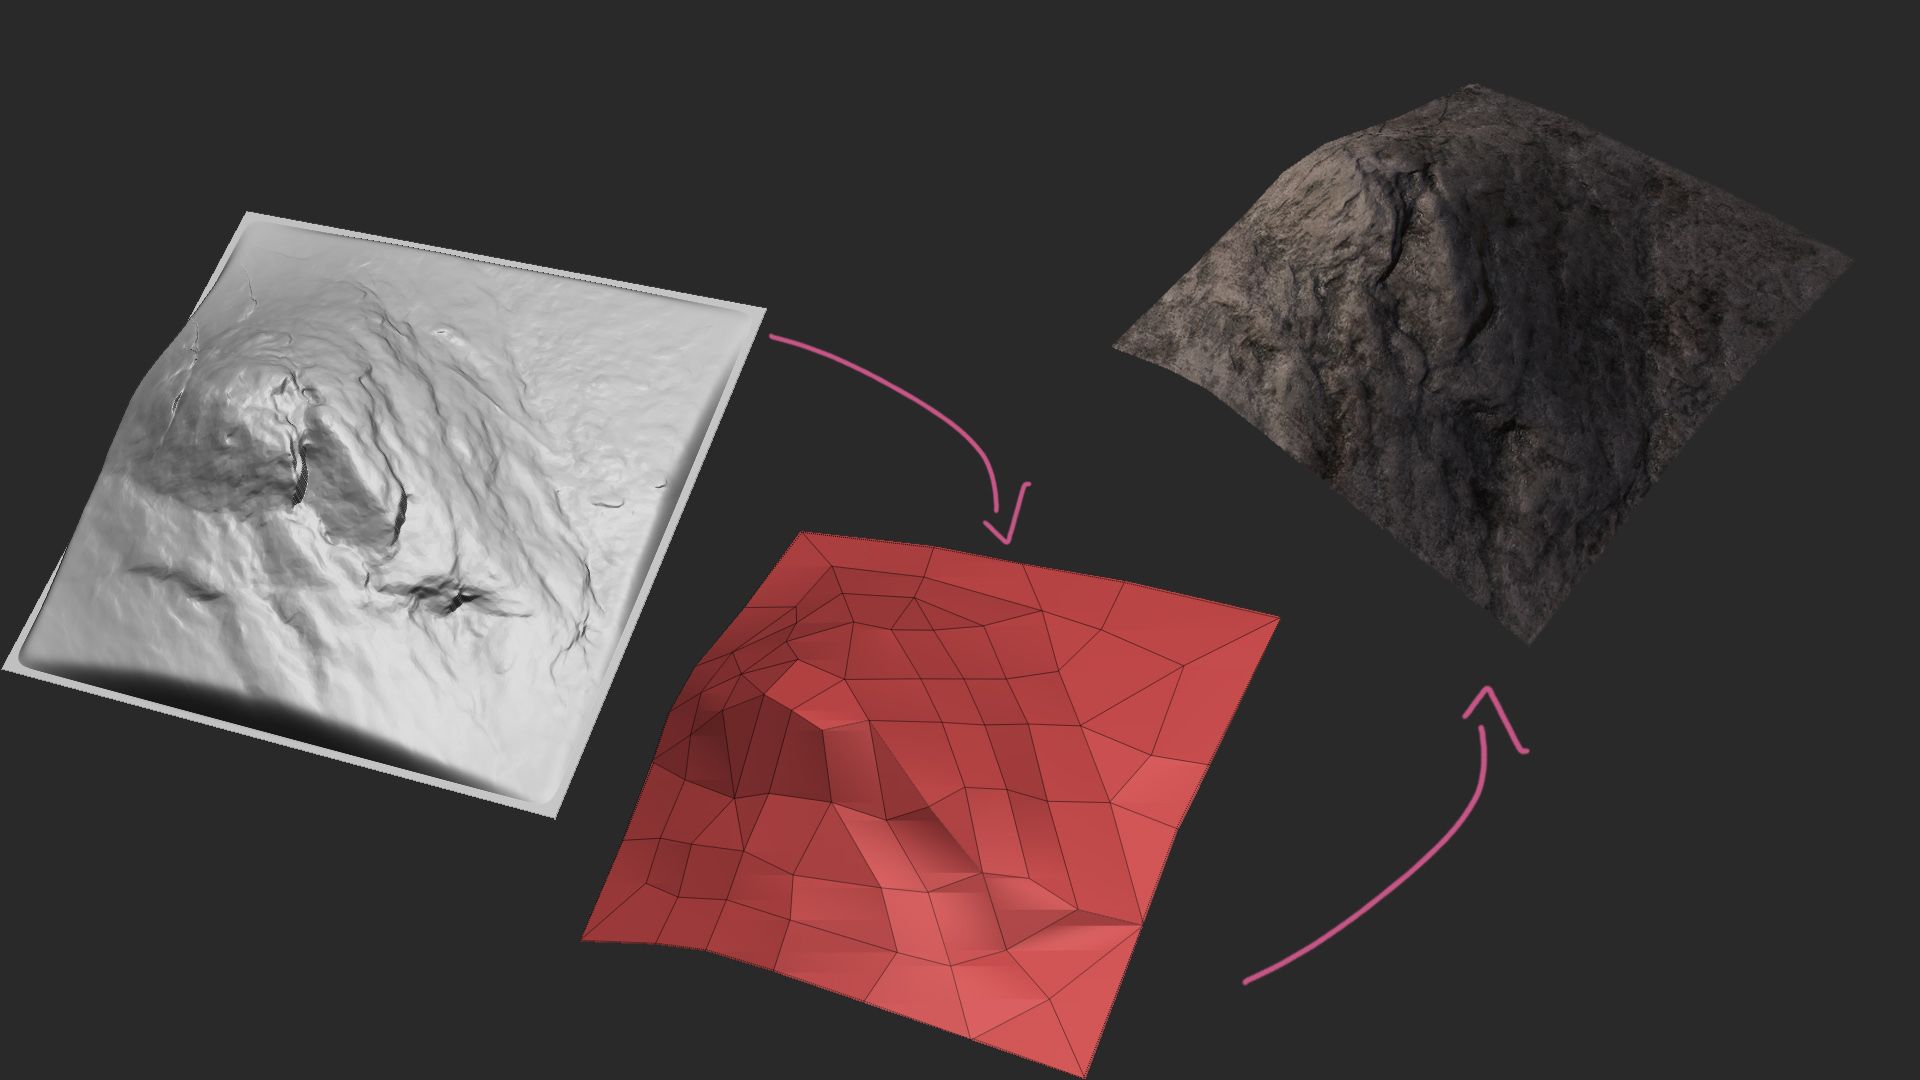
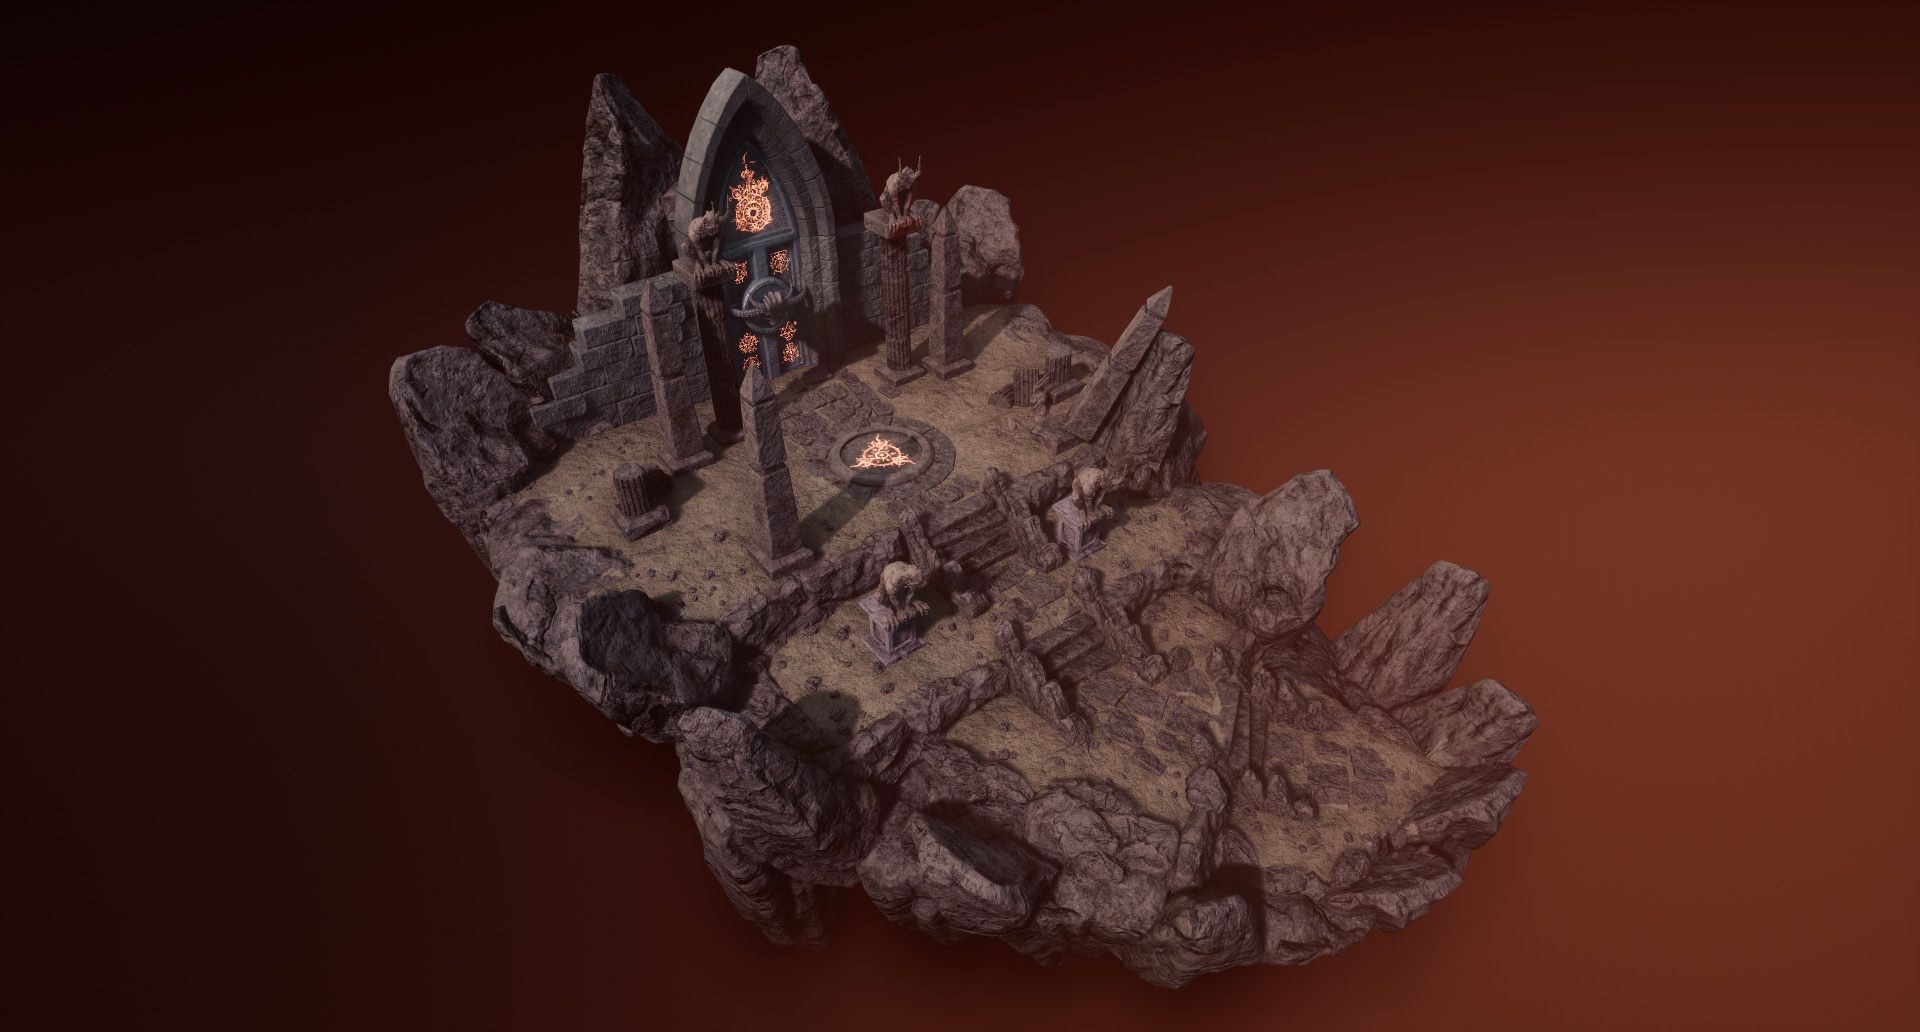
The production workflow went as follows: Sculpt> Bring a decimated version into Unreal> Set Dress> Retopo/ UVs> Texture (1st pass)> Set Dress> Texture (final pass).
Creating decimated models for blockout purposes
Due to the previously mentioned workflow, I decided that the first few models I needed to make were the rocks and cliff models. I sculpted them in ZBrush and brought a decimated version to Unreal (the same workflow was used for the other models) just to have something to work with and assemble the shape of the environment. The decimated models would be easily replaced by the “Game-ready” models later in the process.
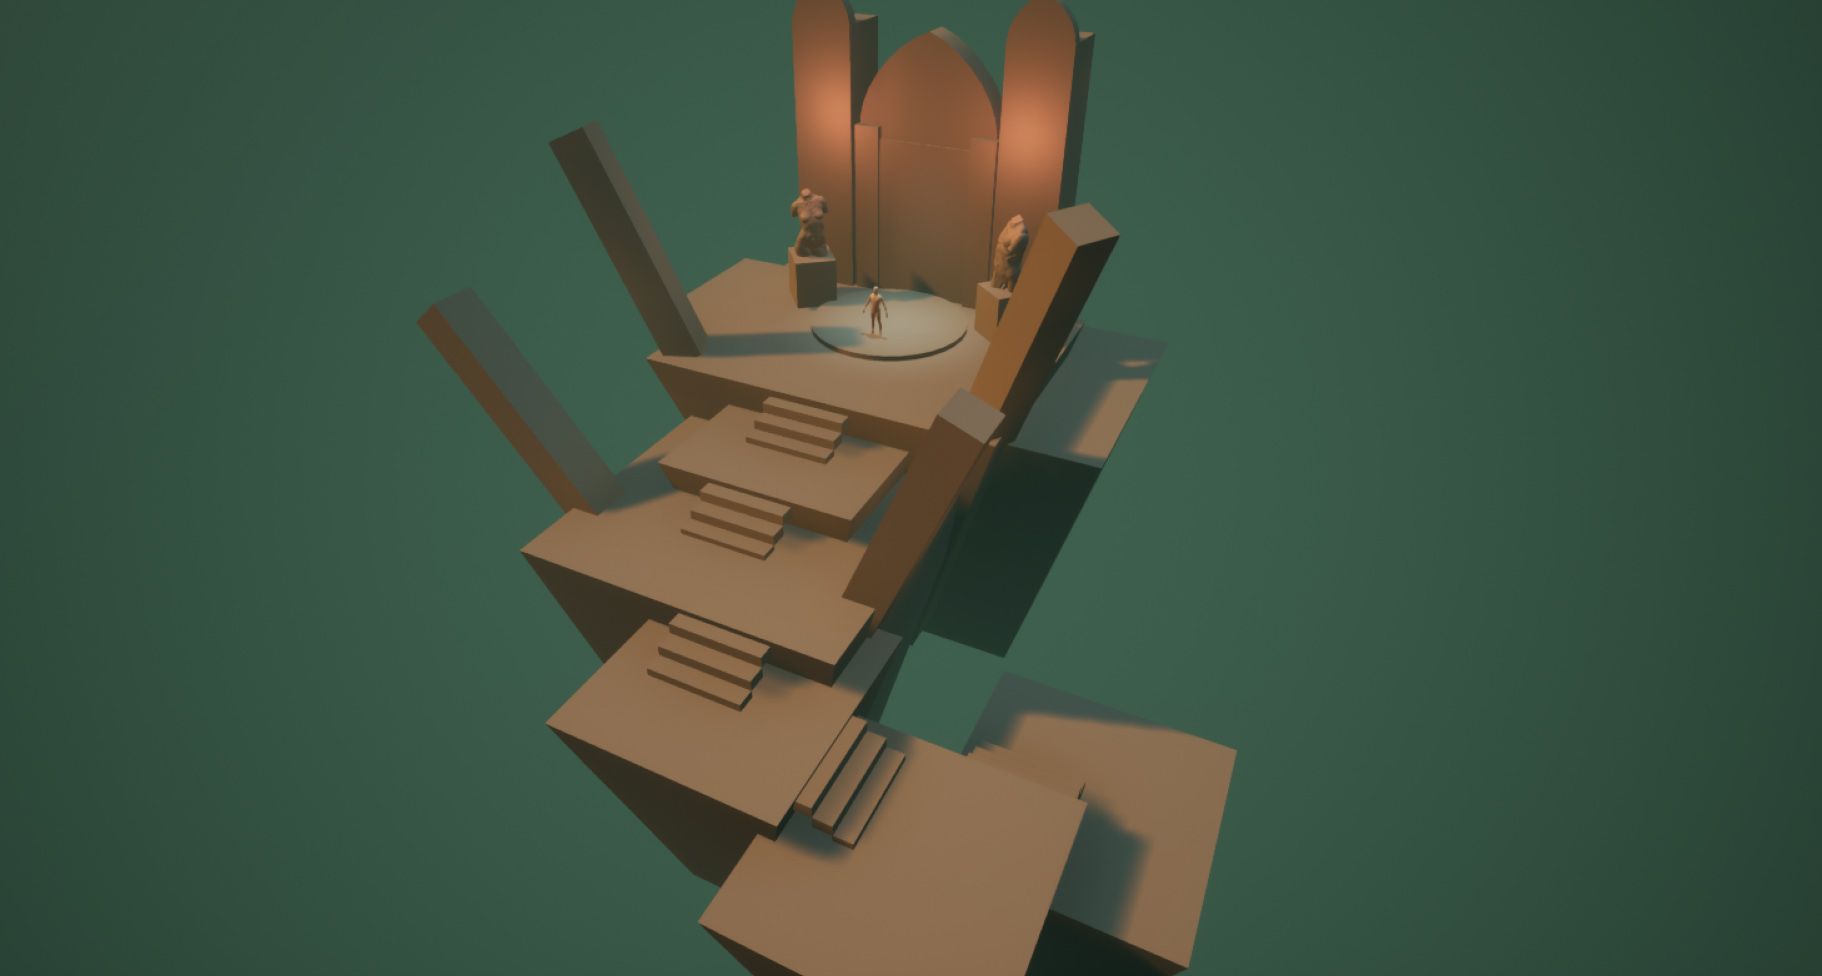
A setdressing pass using decimated meshes to replace the blockout meshes
In the actual sculpting stage, I used a basic set of brushes and then took full advantage of ZBrush’s ‘layer system’ in conjunction with ‘Surface Noise’ and ‘Morph targets’ to create the high frequency details in the sculpt. This way I was able to work non destructively and keep the ability to change each pass of details as I was working on each subsequent layer.
A progression shot of the sculpting layers in ZBrush.
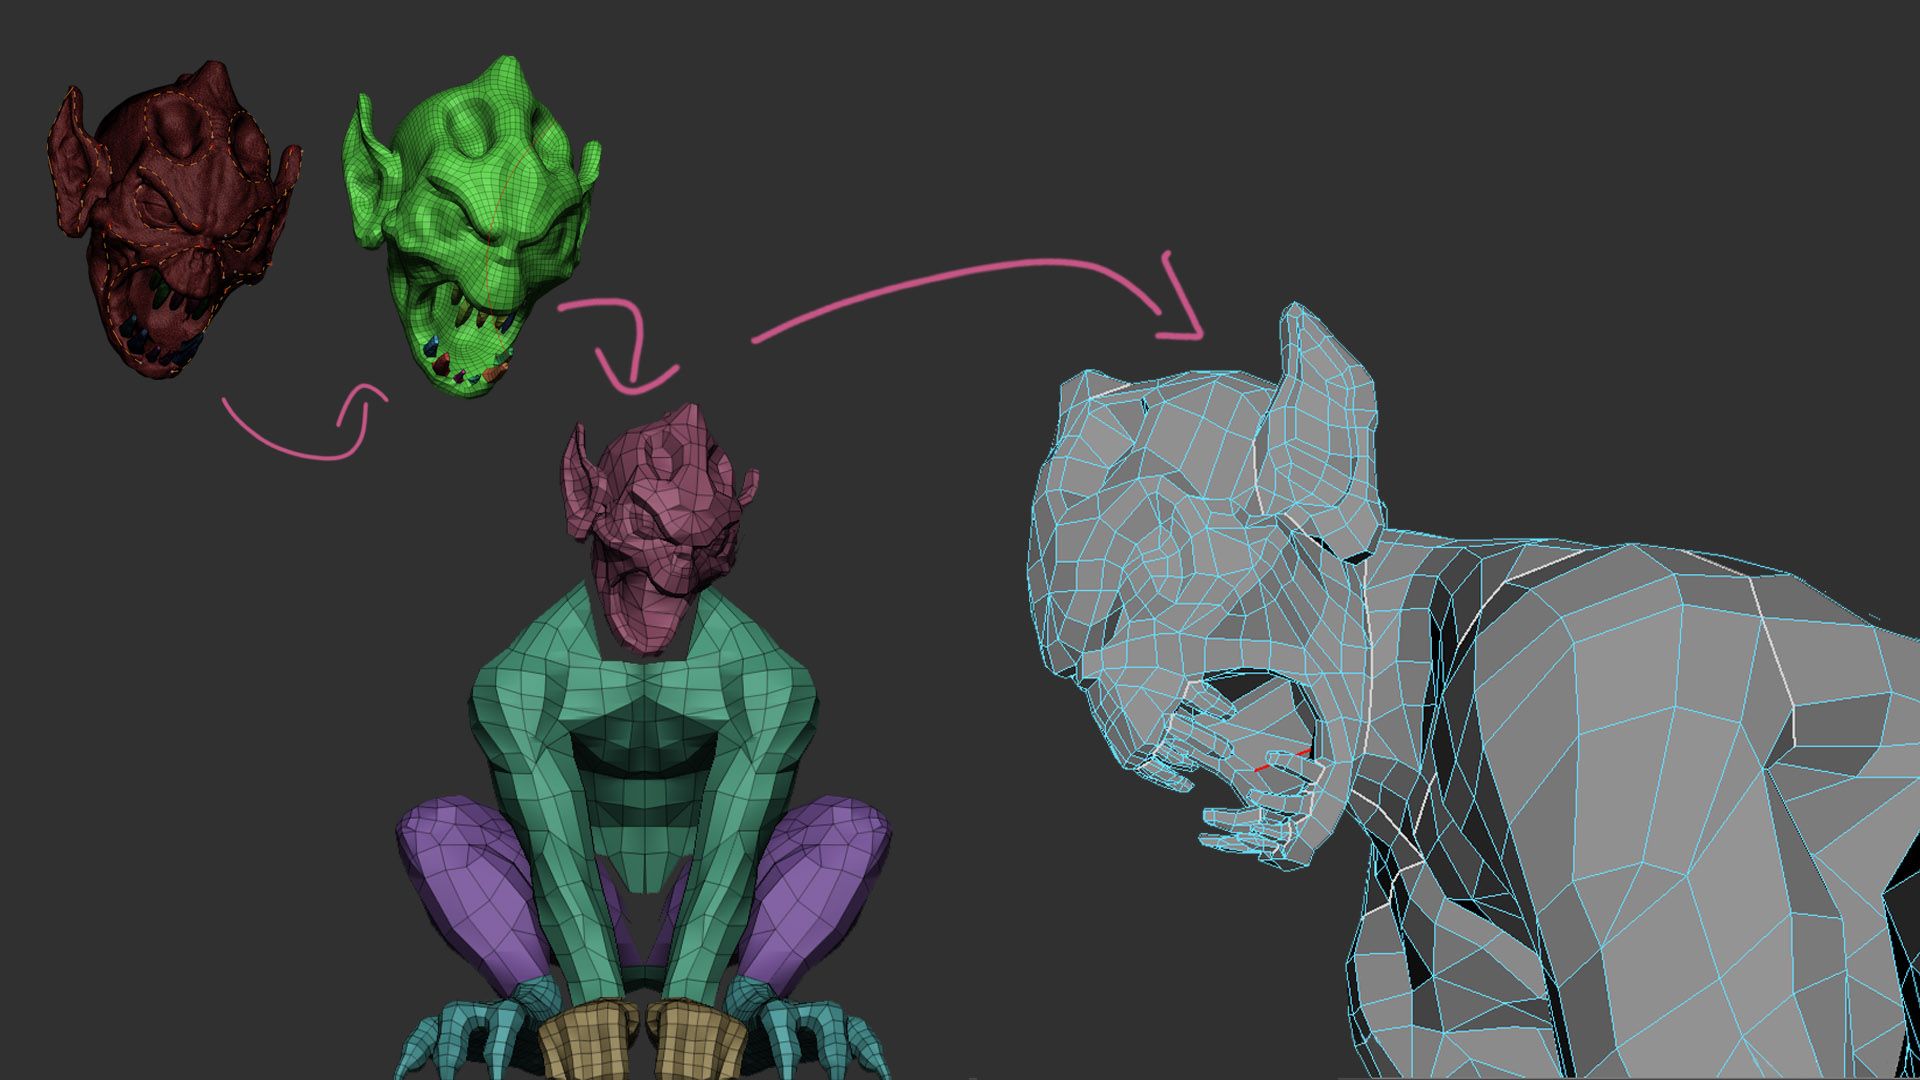
The same idea of using layers to achieve the surface rock look went into making the demon statue except this model started with Zspheres to get the pose right from the start.
Timelapse of the statue's body sculpt.
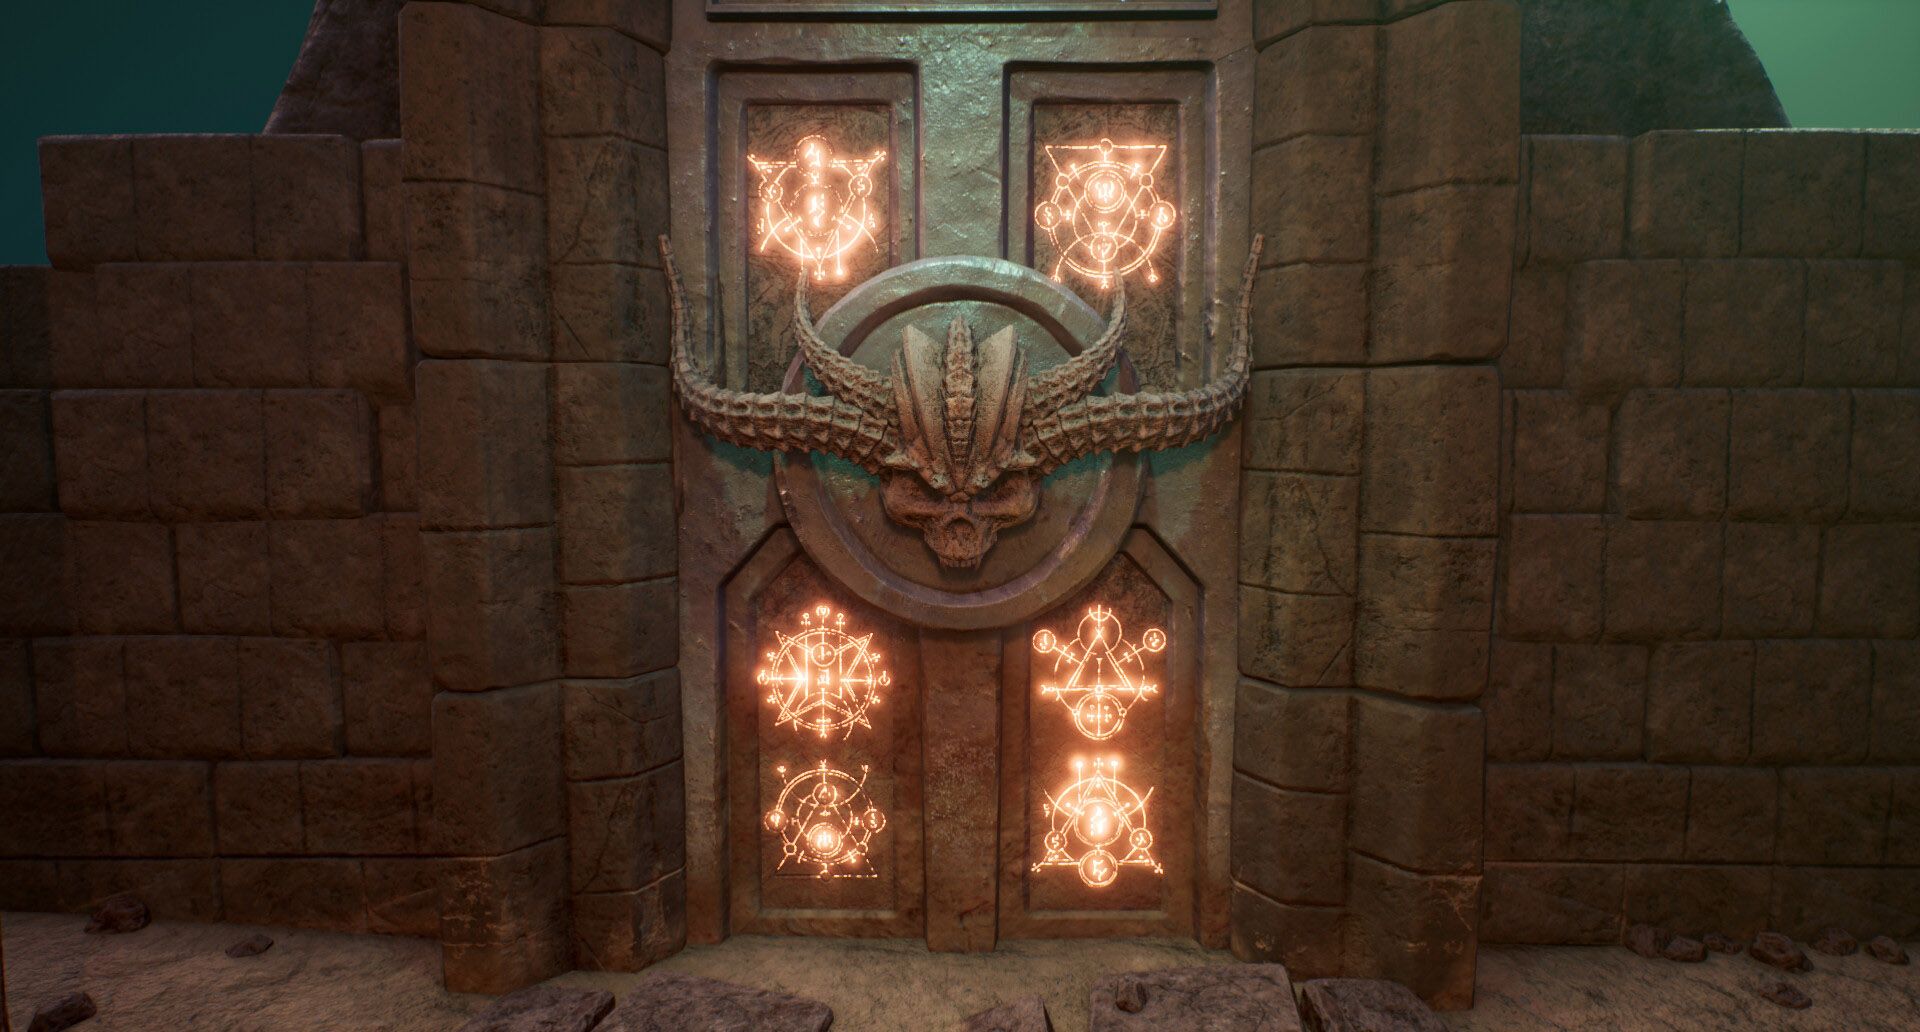
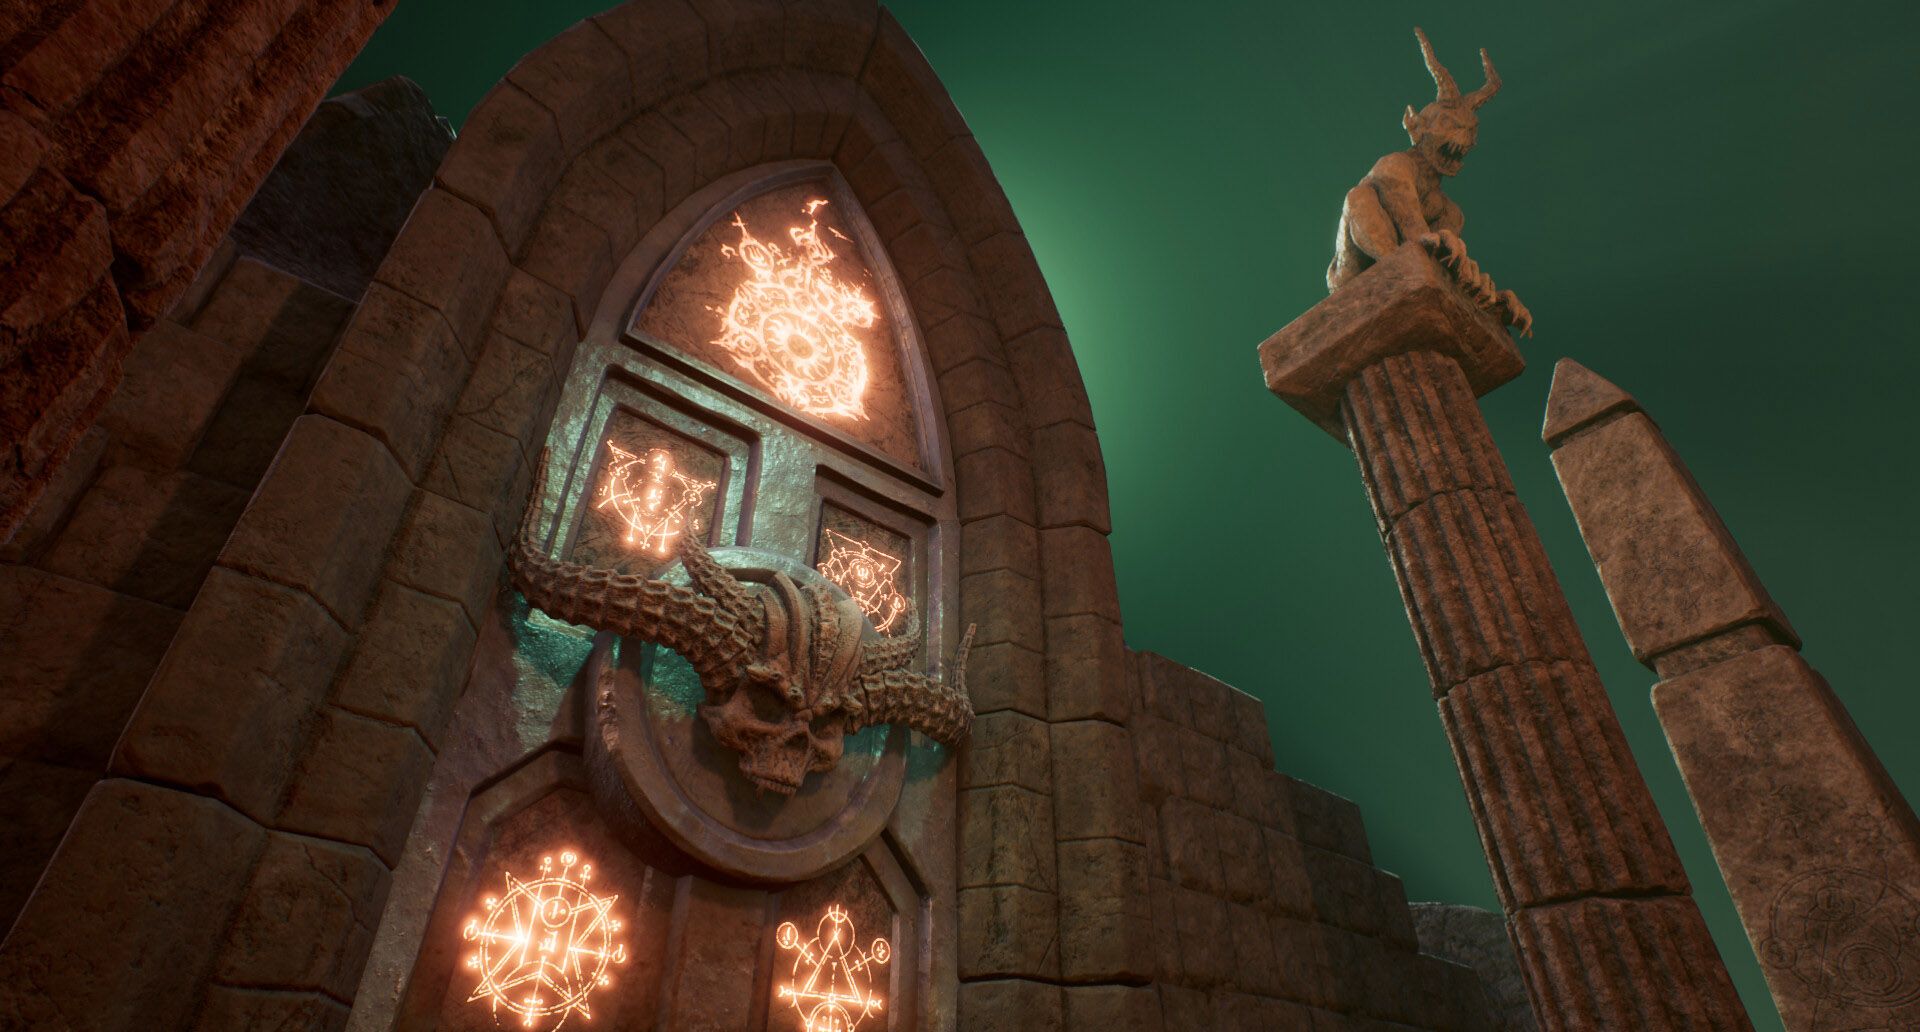
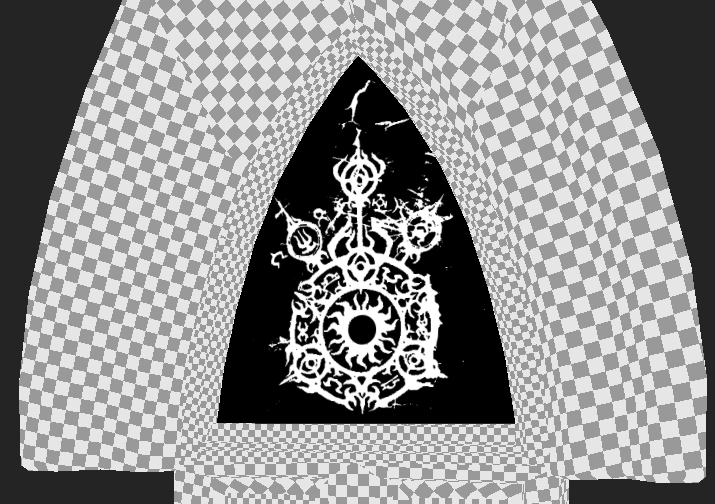
Modeling the Hero Prop (Main door)
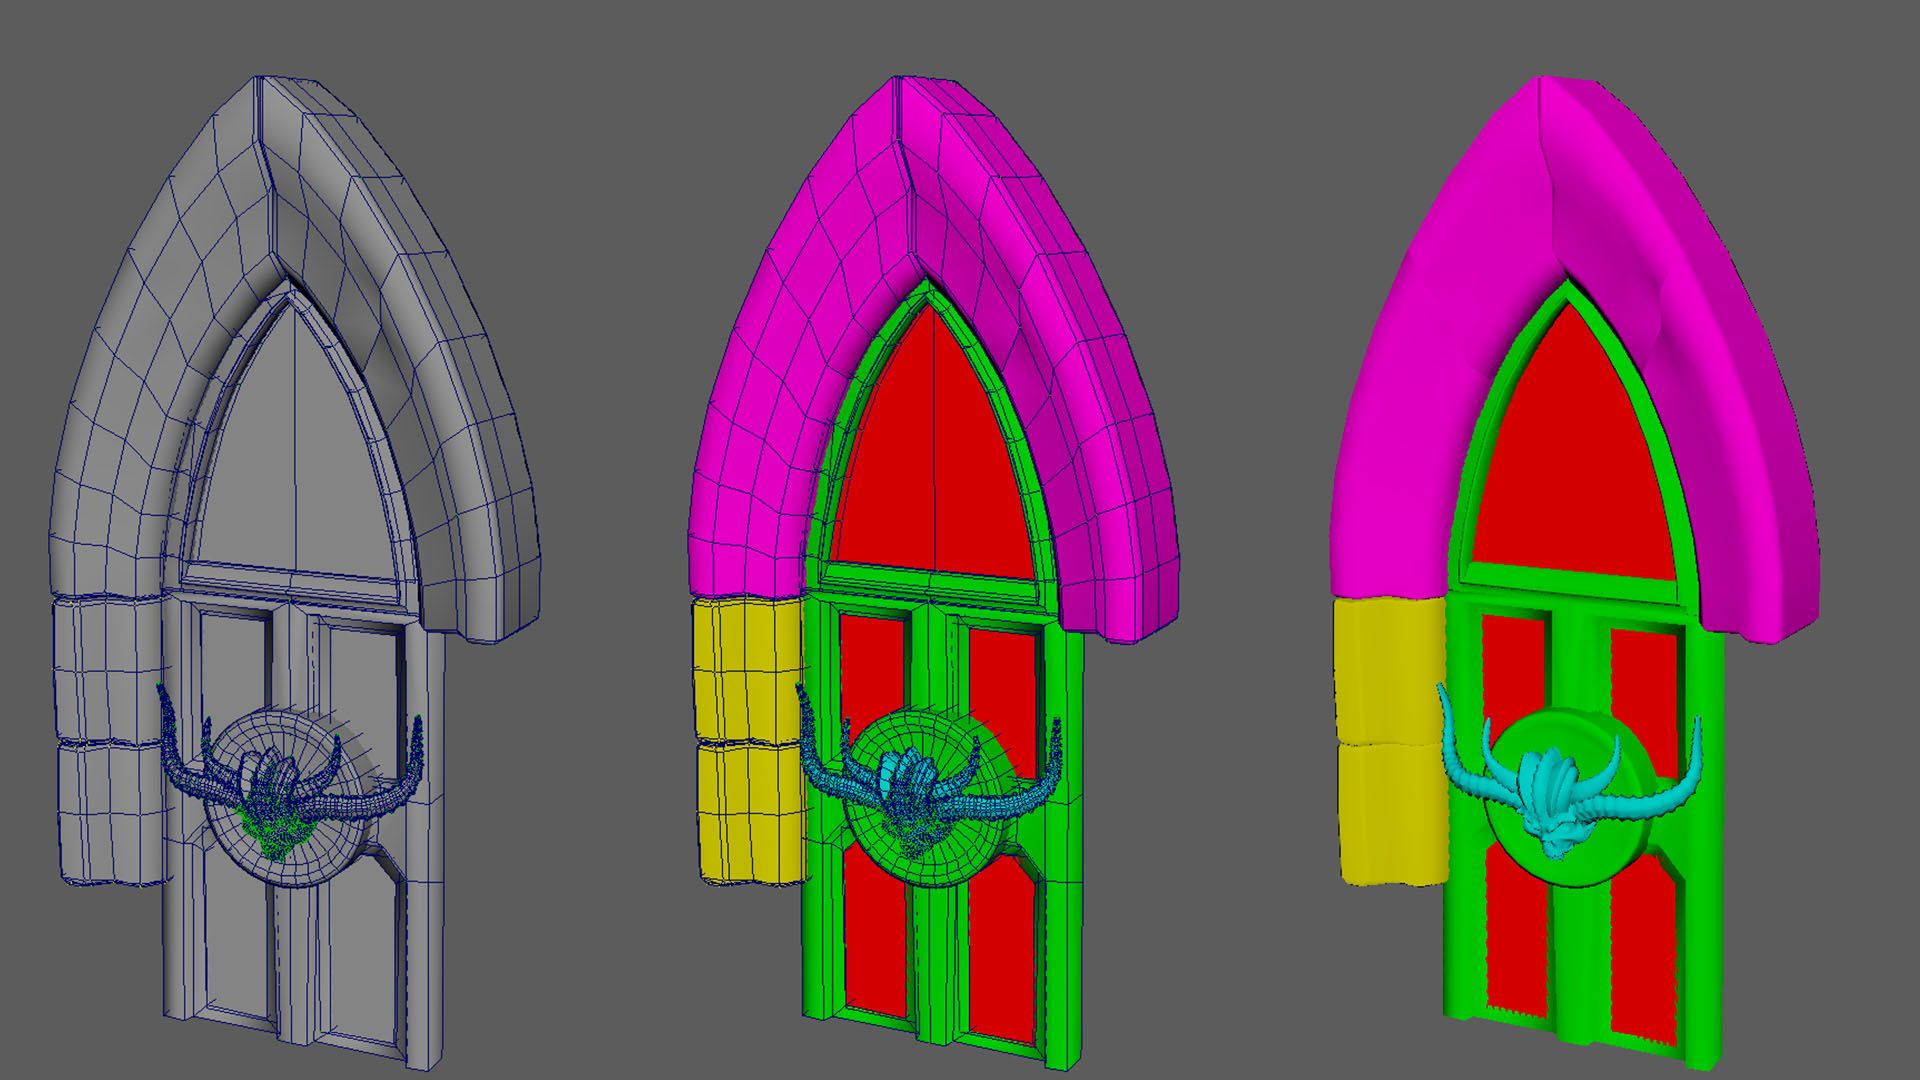
The main door is the centre-piece of this environment. Keeping that in mind, I wanted to include a couple of close up shots of this model. I decided to go crazy on detail and have the final model include more than one texture set (material ID) which was defined by the brief at being 2048px per 400 units in texel density.
The Skull would be its own texture set, the metal pieces another set, and 3 more sets for the sides, arches and the glyph carved stone areas.
The game-ready model and it's material IDs, color coded.
It is worth noting that these extra draw calls weren’t going to waste since some of the door pieces could be used as separate meshes as well. For example, the side trims of the door and the stone wall models on the sides are the same, just rotated around. I sculpted the brick pattern on the back of that particular model so they could be reused throughout the level.
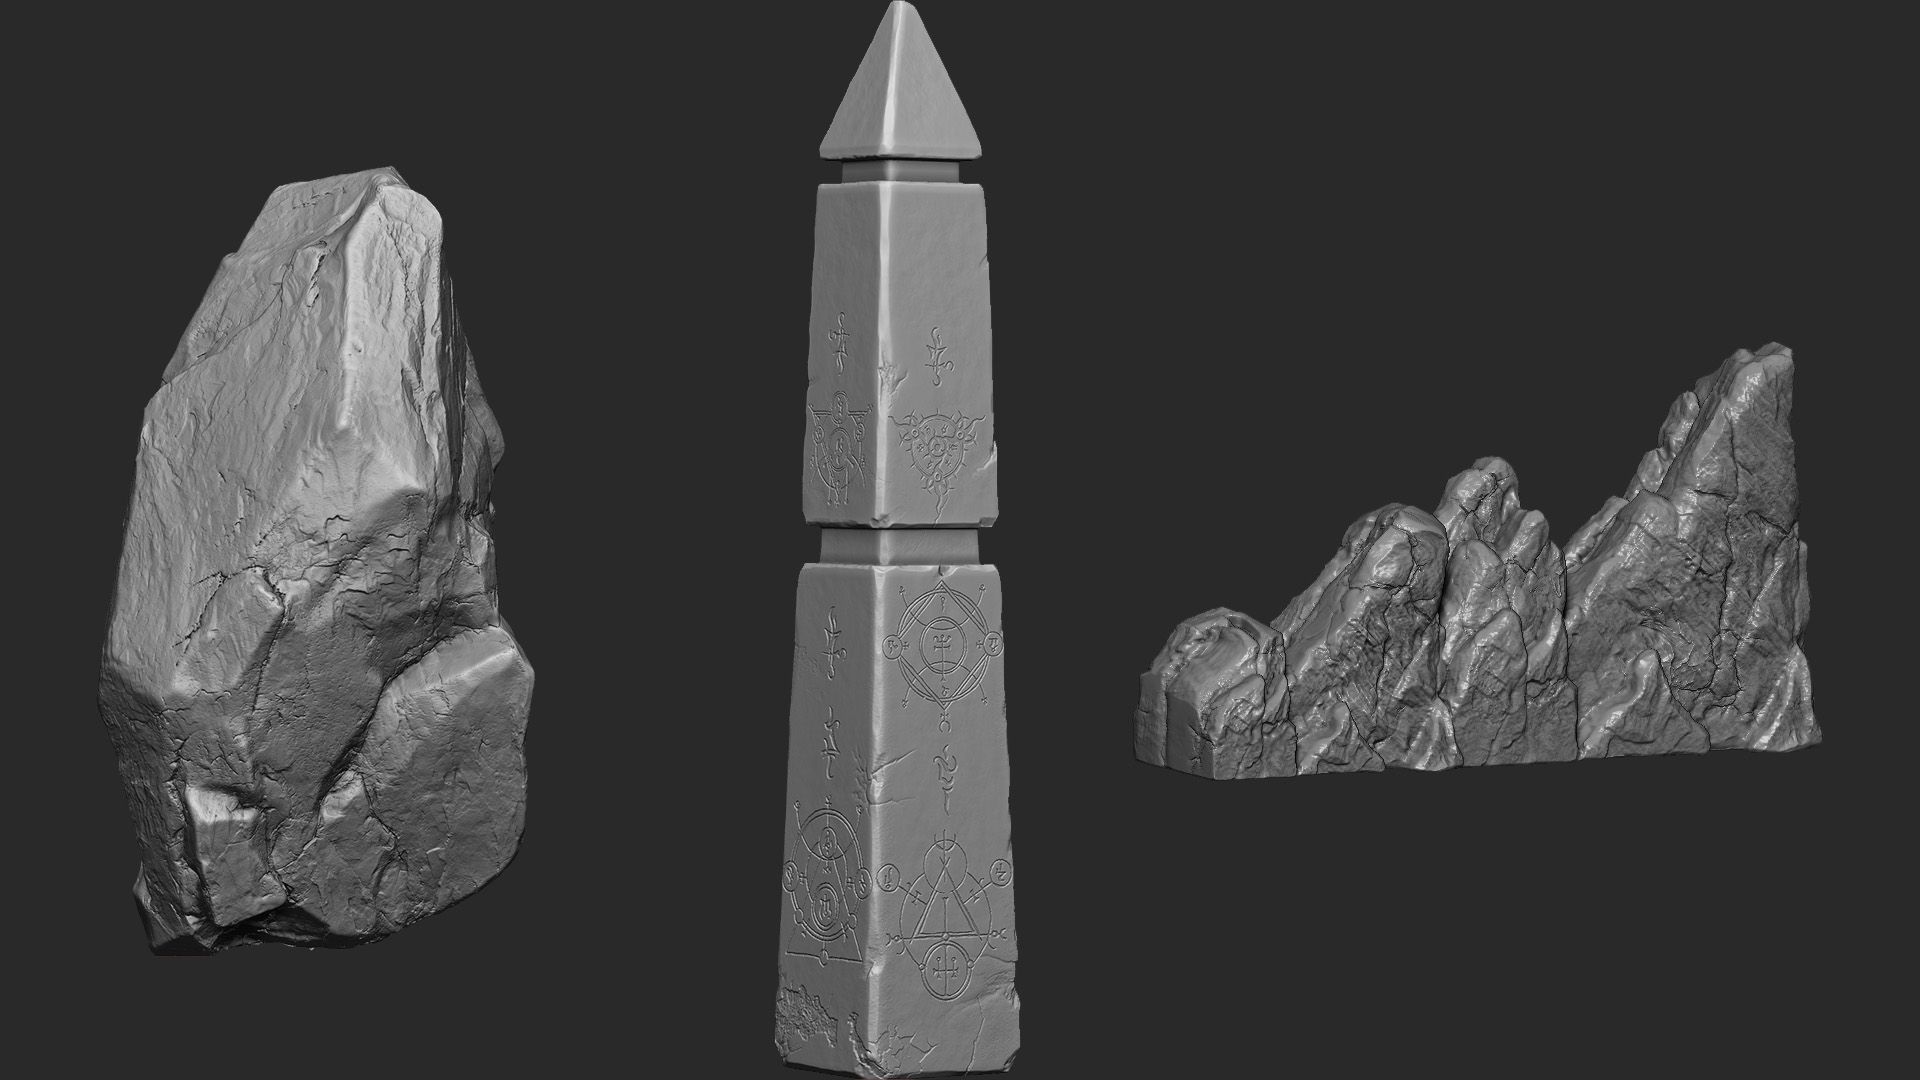
A few examples of models made entirely in ZBrush.
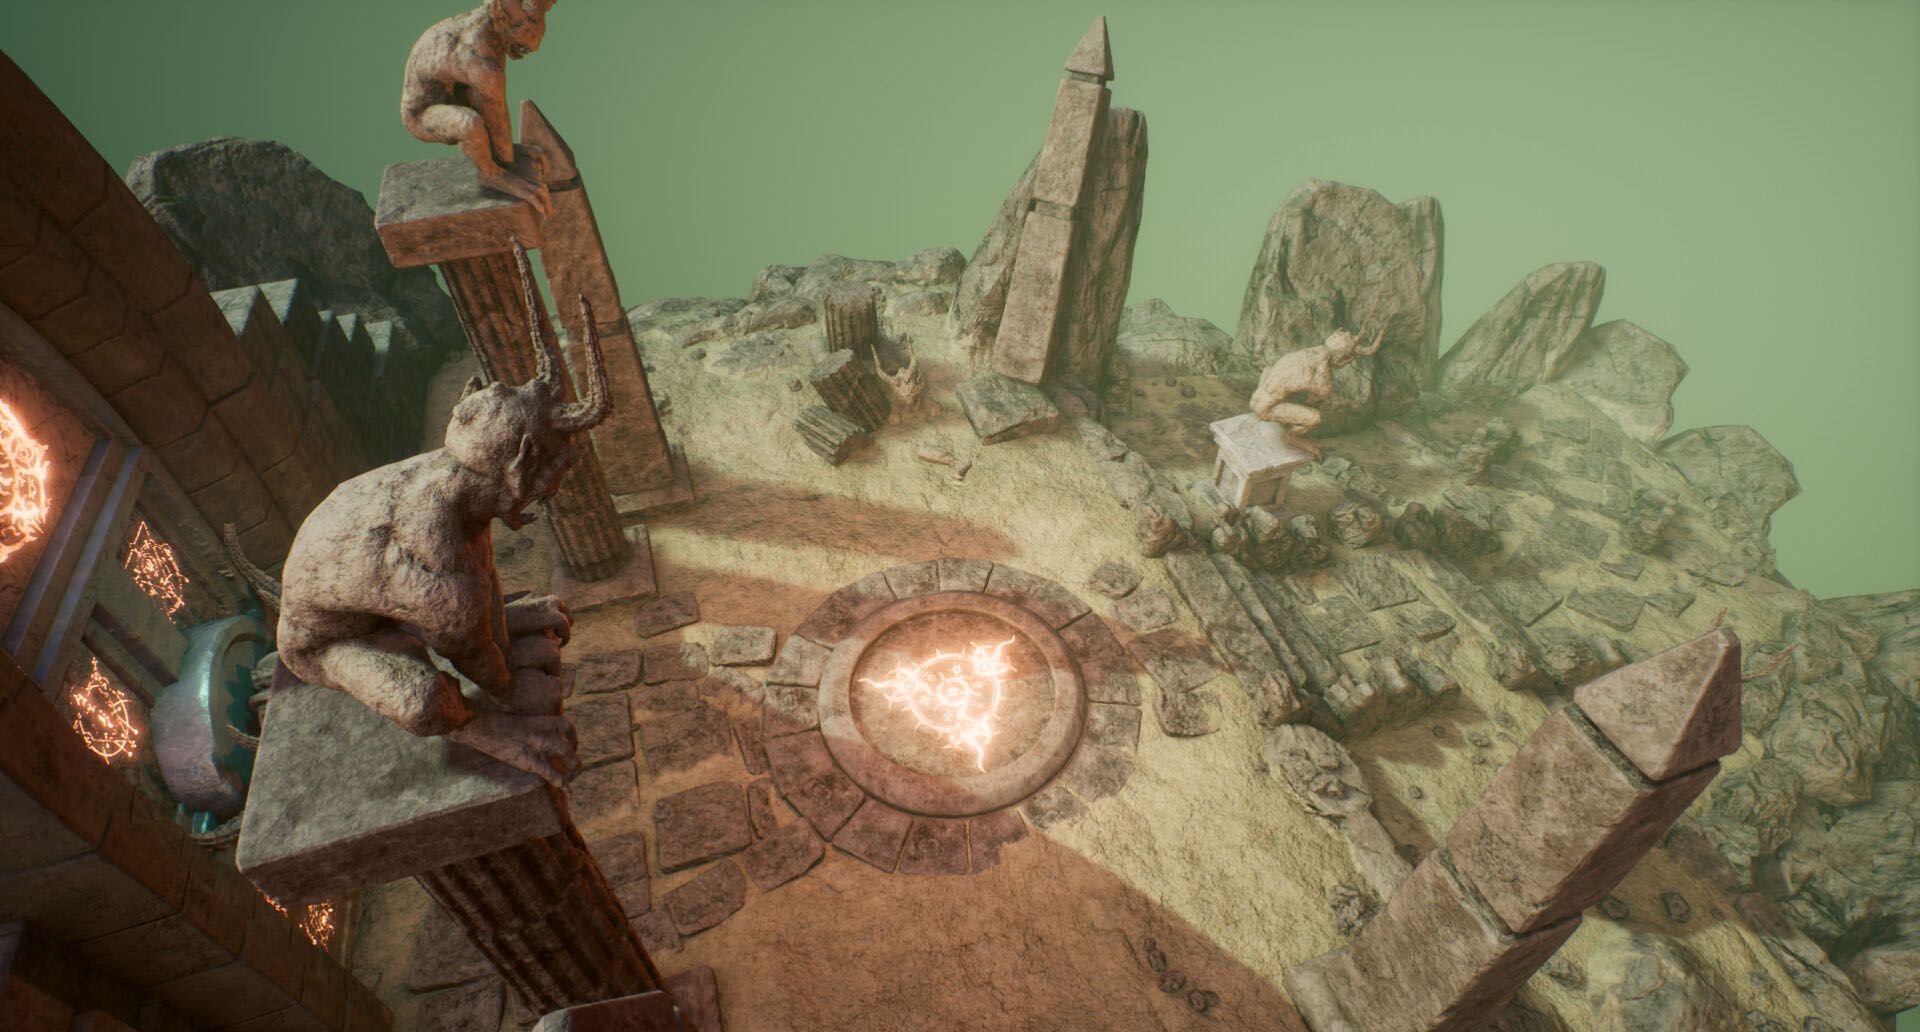
The same idea was applied to the pillar and obelisk pieces. In this case the base and the top part are separate meshes and when rotated can be used to break away from the noticeable repetition when copied multiple times in the environment. This also provided a chance to have different glyphs carved on each side and rotate them in Unreal when placing them.
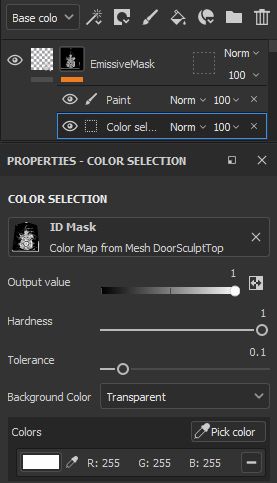
Glyphs and mask creation
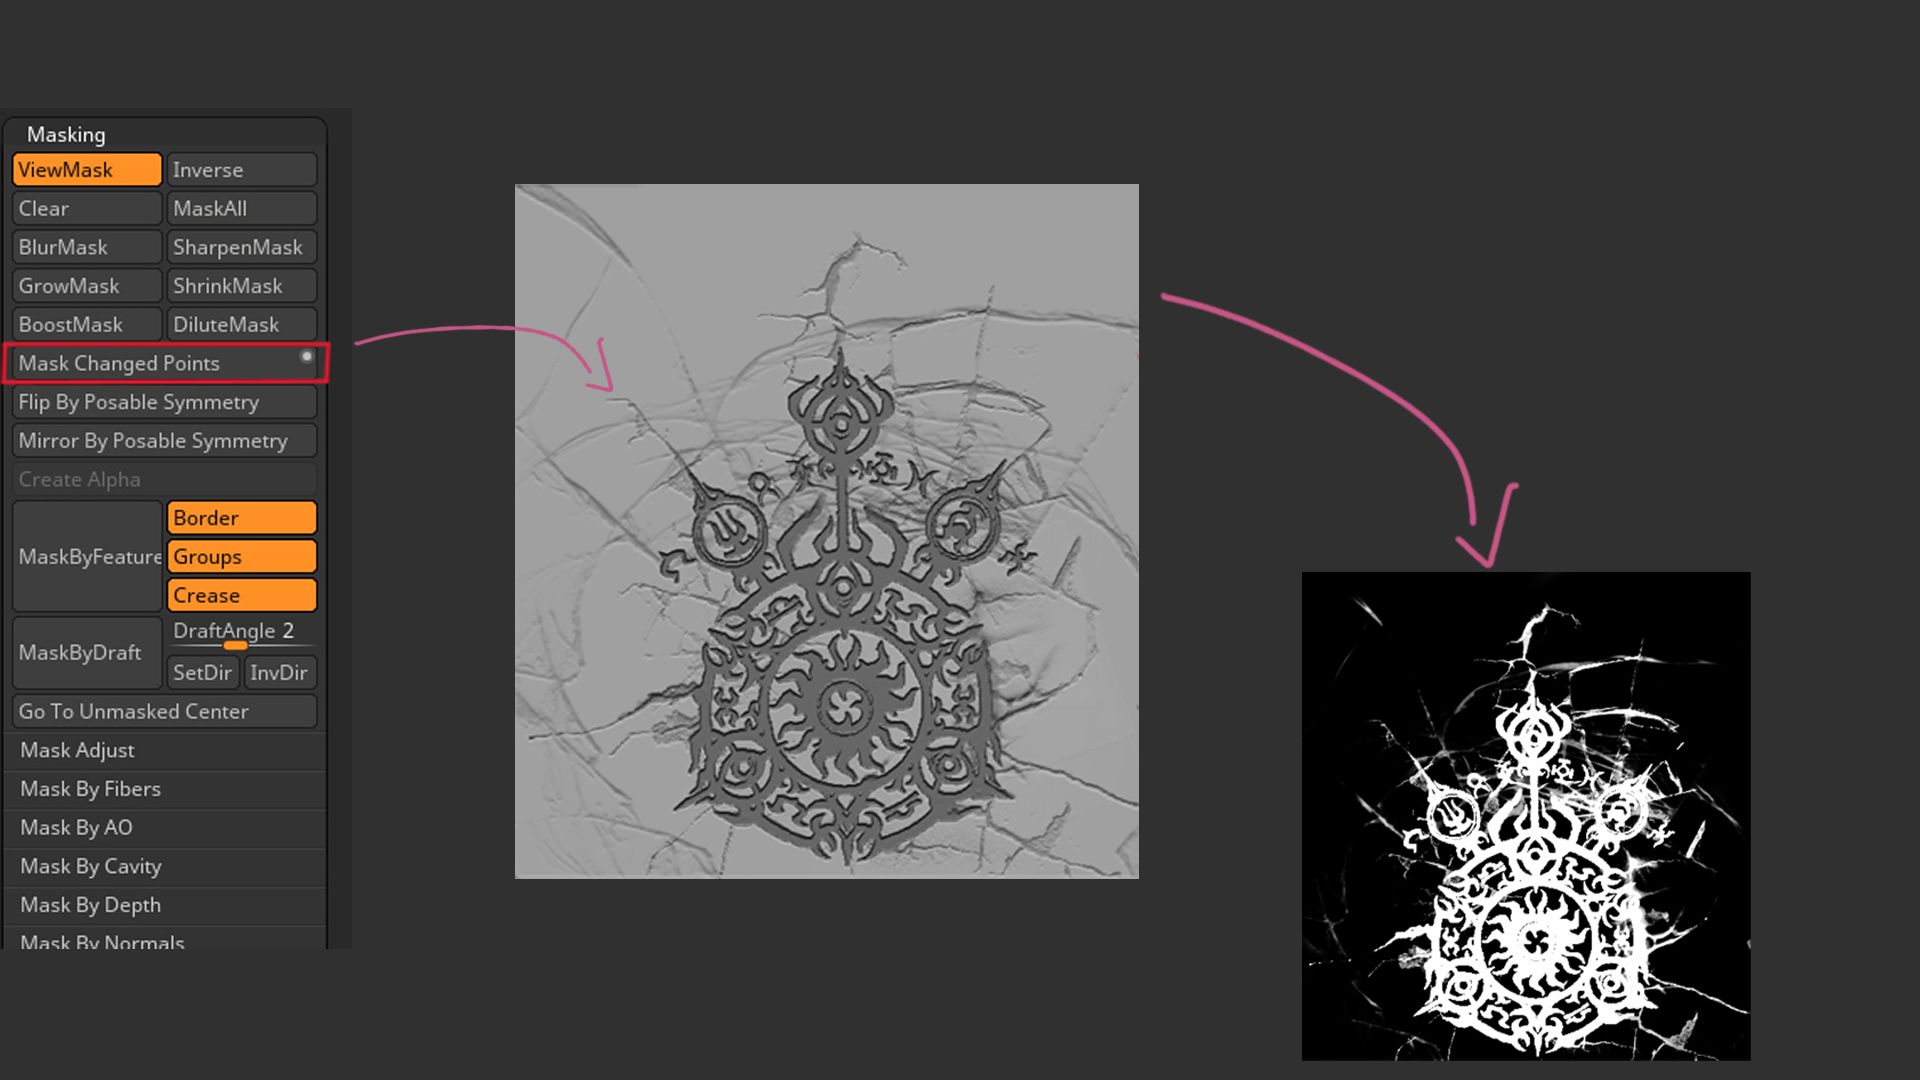
I had the idea to include demon glyphs from the actual game, carved into the various architectural models in the scene. Usually this is something that is fairly easy to do in Substance 3D Painterwith a couple of alpha textures, but I wanted some of them to glow in a way that gave the illusion that there was some sort of fiery energy behind them.
With that in mind, I decided to actually sculpt them in ZBrush and use that sculpted information to drive the emissive masks. This way, I could also include the sculpted small cracks and imperfections in the mask, making the glow more credible and having less of a “stamp” look to it.
Creating color IDs with Polypaint in ZBrush.
I achieved this by scanning the glyphs from a Diablo artbook, converting the image into an alpha using Photoshopand then sculpt in ZBrushusing them as brush alphas along with hand sculpting the cracks and imperfections.
After sculpting the glyphs I copied the base mesh and reprojected the details and used ‘mask changed points’ which would allow me to apply polypaint to all the sculpted detail and bake that as a color ID Mask in Substance.
Using Polypaint to bake Color IDs for the emissive mask.
Lilith’s skull modeling
To model Lilith’s skull at the centre of the door I sculpted a skull from a sphere and then created a custom ‘Insert Mesh’ brush containing a single horn “slice”. That way I could convert the custom brush to a ‘IMM curve’ brush and create different variations of horns by just modeling a single section of the horns.
To make a custom IMM curve brush, sculpt any number of sections you wish, as a seperate 'tool'. go to the 'Brush selection' pallete and click 'Create Insert MultiMesh' and immediately your brush will change to the one you just created. After that, you can go to 'Stroke' click the 'Curve' dropdown tab and turn on 'Curve mode'. There are a lot of features to tweak how your curve IMM brush works inside the 'Stroke' palette ('Curve functions' & 'Curve modifiers') but also in the 'Brush'>'Modifiers' tab.
The IMM curve brush workflow.
For this particular workflow, I used a 'ZSphere' to create the edgeloops and shapes that I wanted, polygrouped each polyloop as a seperate 'Polygroup' and then clicked on 'Frame mesh' with only the ' Polygroup' option selected ('Stroke'> 'Curve functions').
Using this technique allows to sculpt entirely diferent horn slice, changing the entire look of the horn with a single click on the already created curve.
A demo of the IMM workflow, in action.
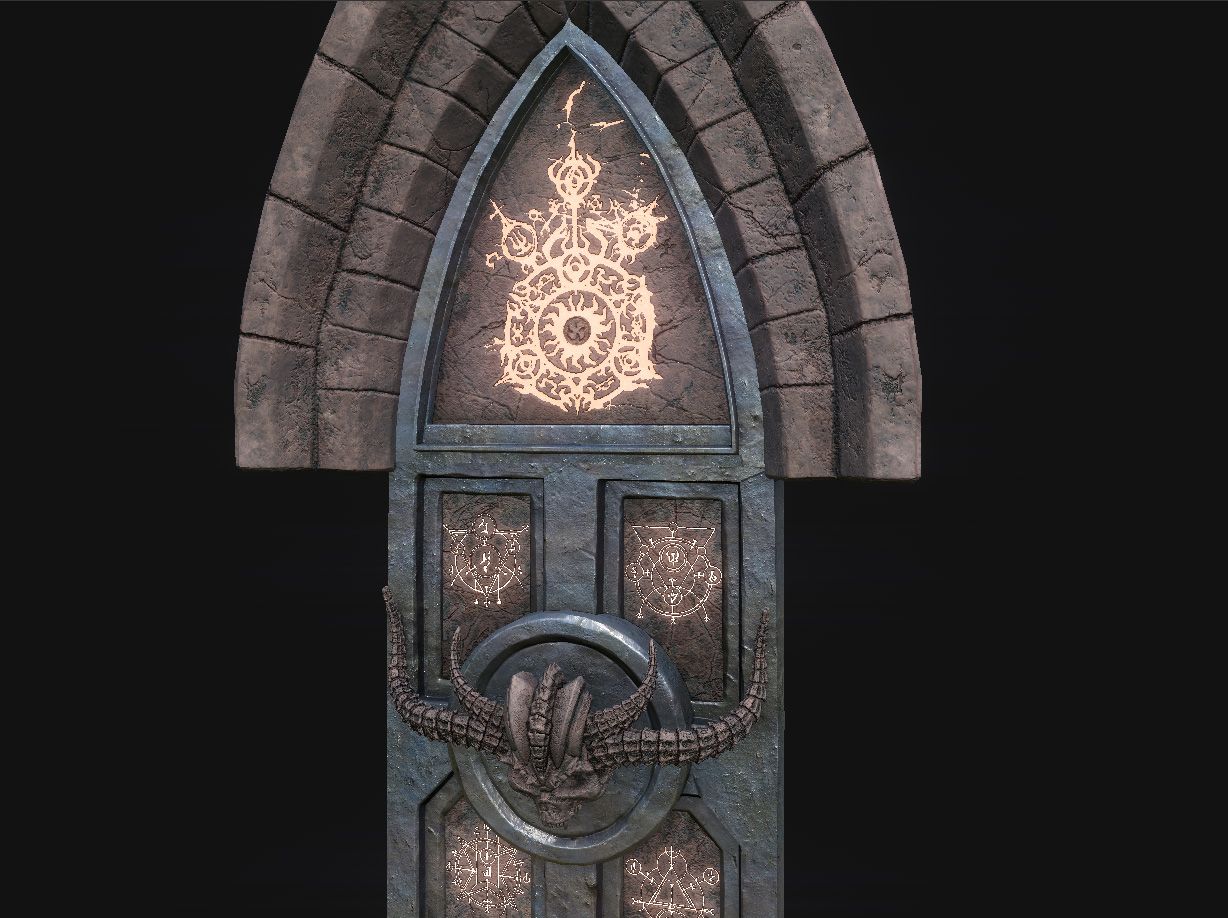
Retopology workflows in ZBrush
I wanted to have a go at all the different ZBrush retopology tools I had at my disposal, so I started the retopology and UVs process directly in ZBrush, using 'UVMaster' to quickly create the UV Shells and any further tweaks to the UVs, setting Texel density and material IDs later in Maya.
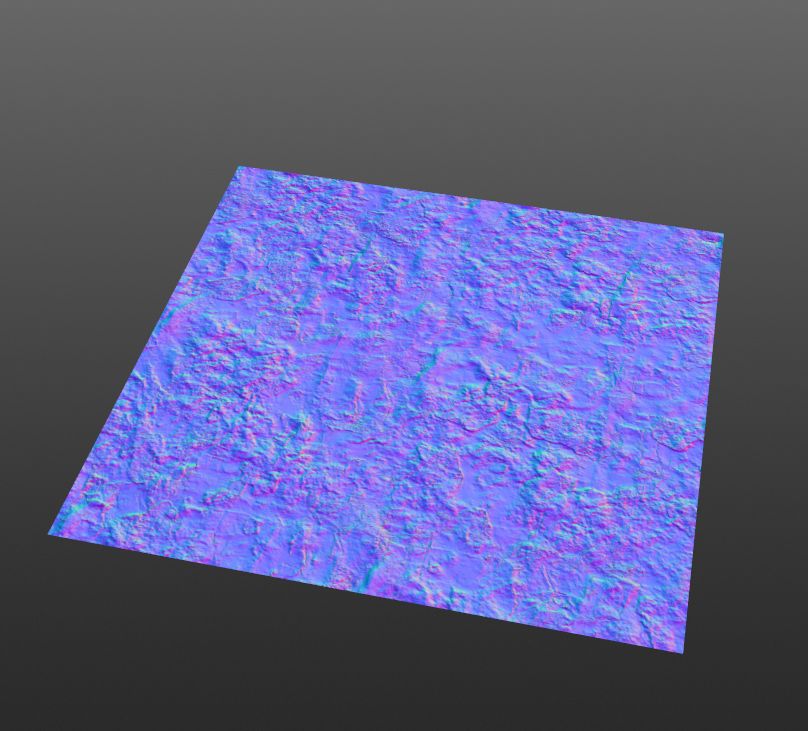
For the rocks and cliffs I used the old school method of Zsphere retopology since I wanted to have complete control over the edge flow in order to hide seams, noting that I would need to add a detail map later on as some of the rocks were simply too big to fit in the set texel density (2048px per 400 units).
Retopology process using the 'ZSphere' retopology workflow.
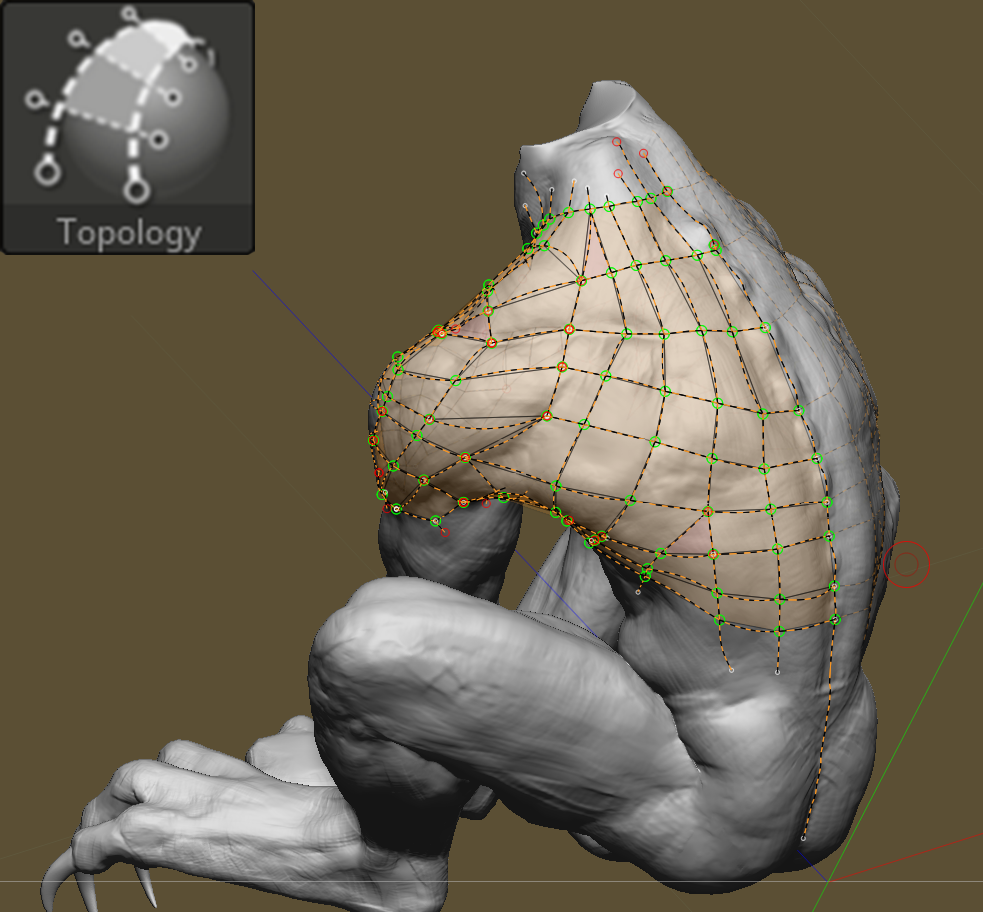
For the statue body retopology and UVs I used the ‘Topology brush’, which allowed me to have more control over edge flow. For it’s head however I used a plethora of features in combination with ‘ZRemesher’, such as ‘Control painting’ to tell ZBrush were I wanted more or less polygonal density, and ‘ZRemesh guides’ which enabled me to assume control of the resulting edge flow from ZRemesher.
After that I would bring both retopo’d meshes into Maya to weld them together, create the desired UV cuts, assign a single material and scale to the desired texel density.
Merging the ZRemeshed head and the retopo'ed body mesh in Maya and cutting UVs.
Texturing
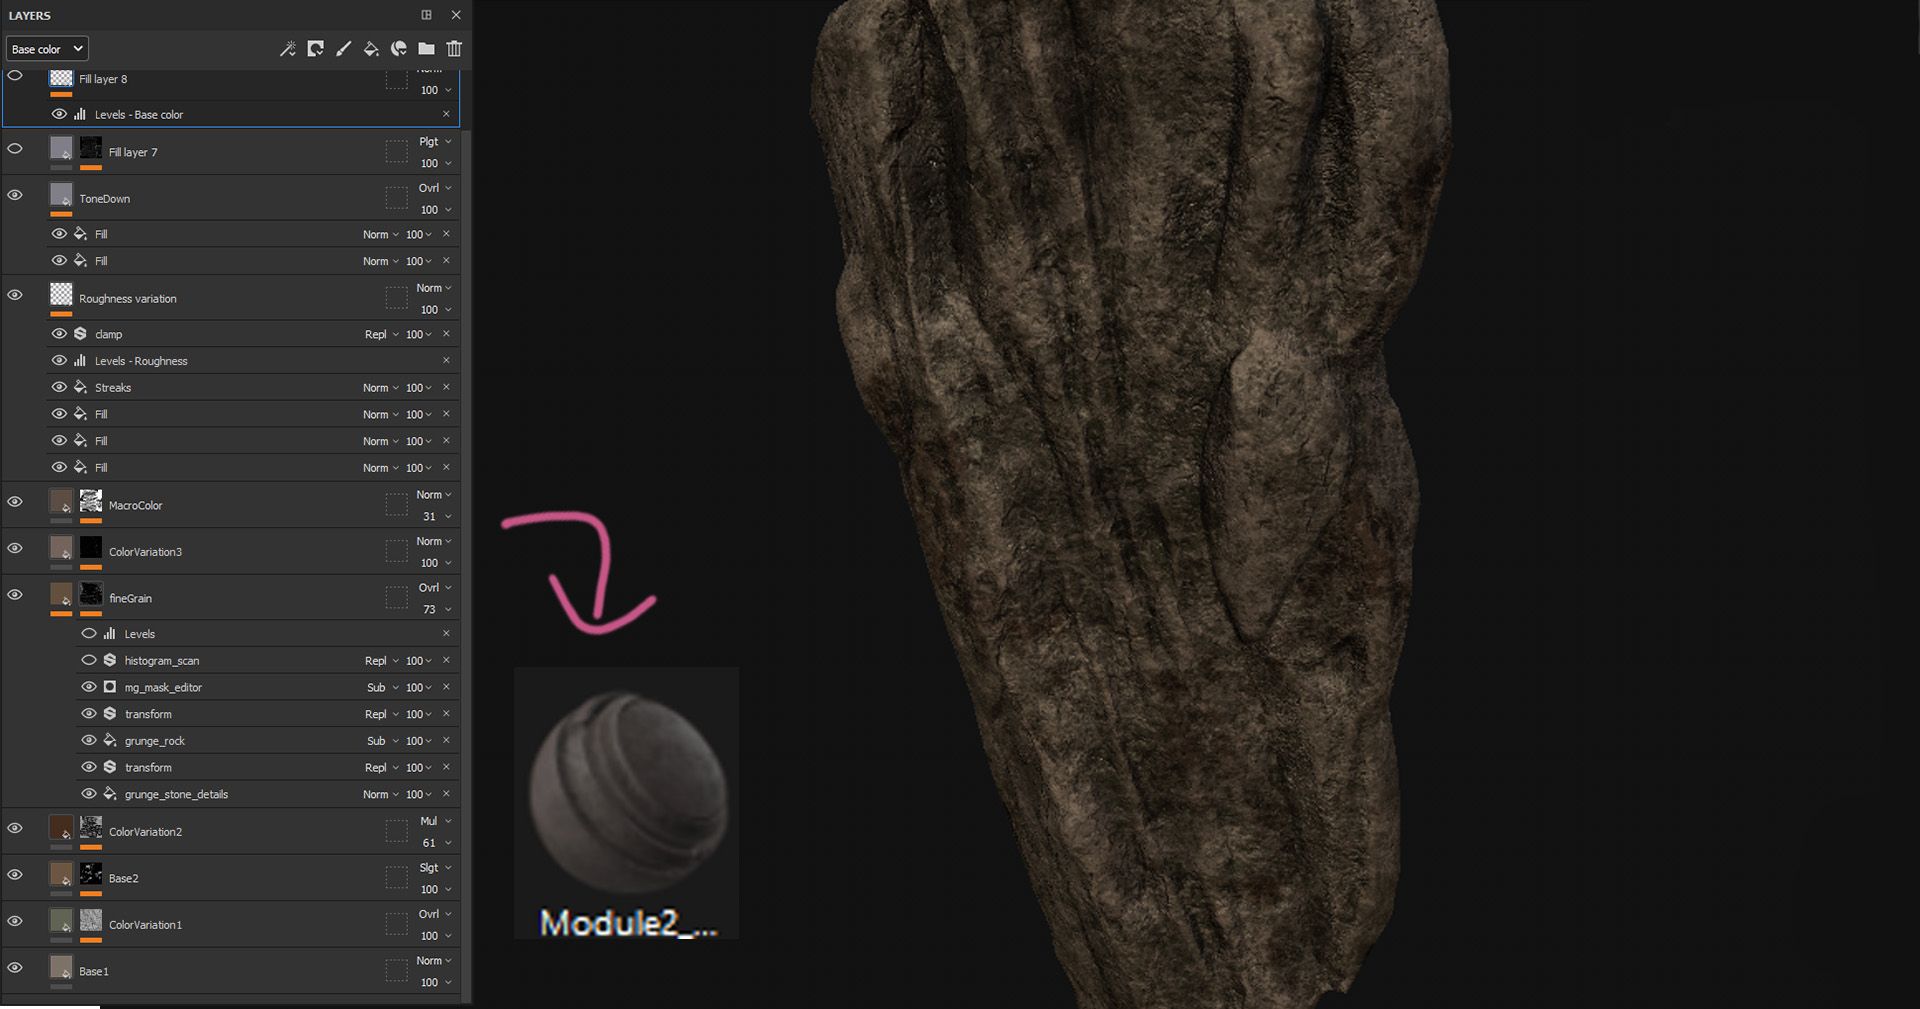
I wanted to streamline the texturing stage as much as possible (that was one of the points of the project) and in order to do that I decided to texture the big cliff rocks first, and only use mask generators created from the mesh bakes. That way, I could simply reuse that result by creating a smart material with all of my layers.
Creating my own smart materials in Painter, sped up the process by reusing and tweaking a single material in all props that share the same real-world material.
Since all the layers only used the baked maps to generate the result, applying the smart material to other models would seamlessly adapt to that other model’s baked maps, effectively speeding up the texturing process significantly.
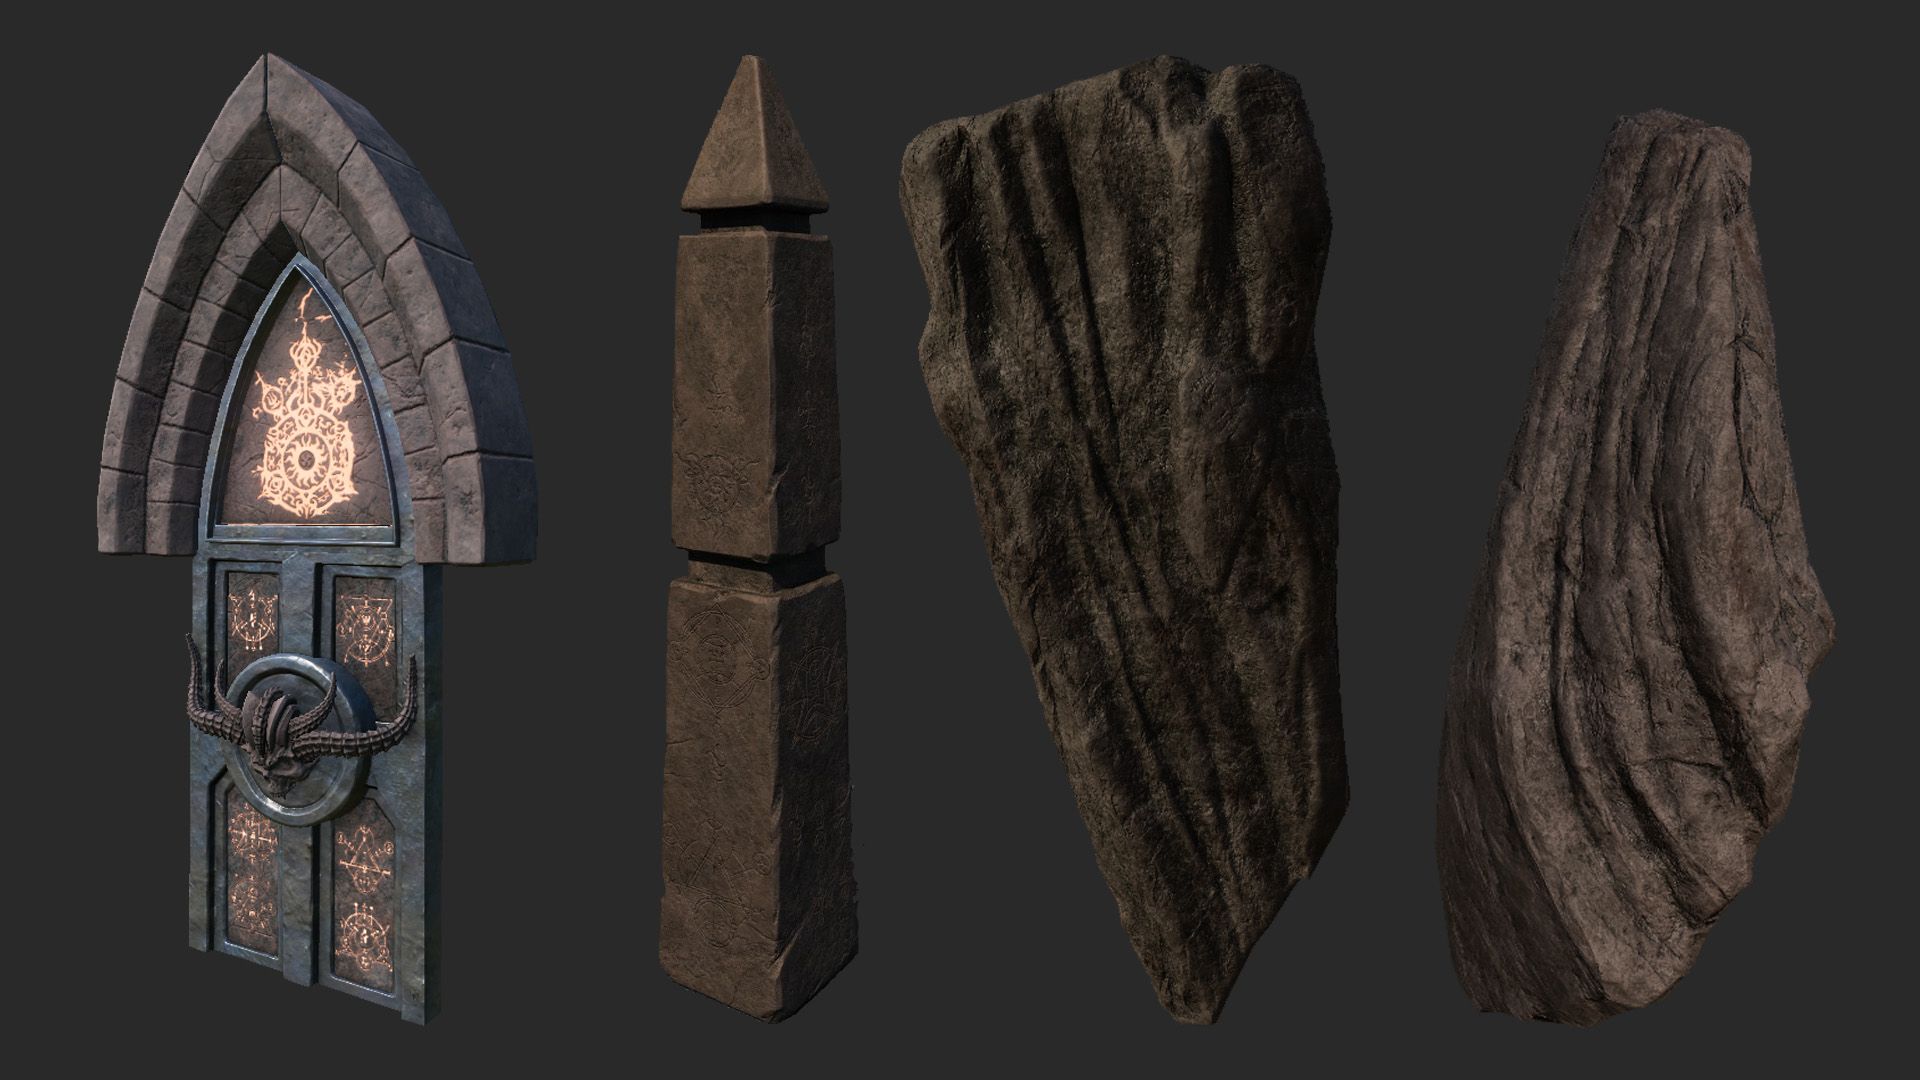
A few examples of models of models textured in Painter.
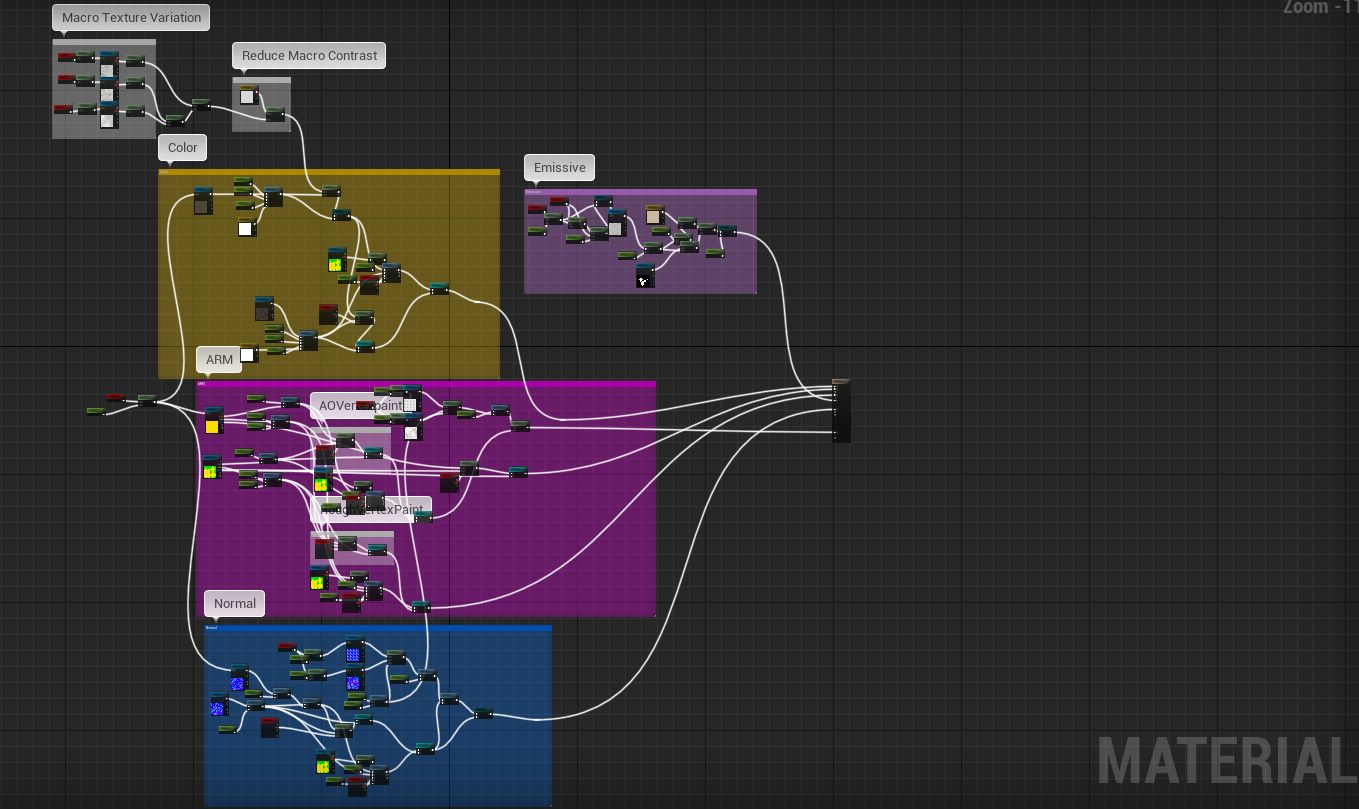
Material setup
The material setup included as much control via parameters as possible so I could edit different variations of the same material and do some tweaks to the textures directly in Unreal instead of re-texturing every time I wanted to change the look of a texture.
An onverall look at the master material (left) & a close up of the detail map system in the material editor(right).
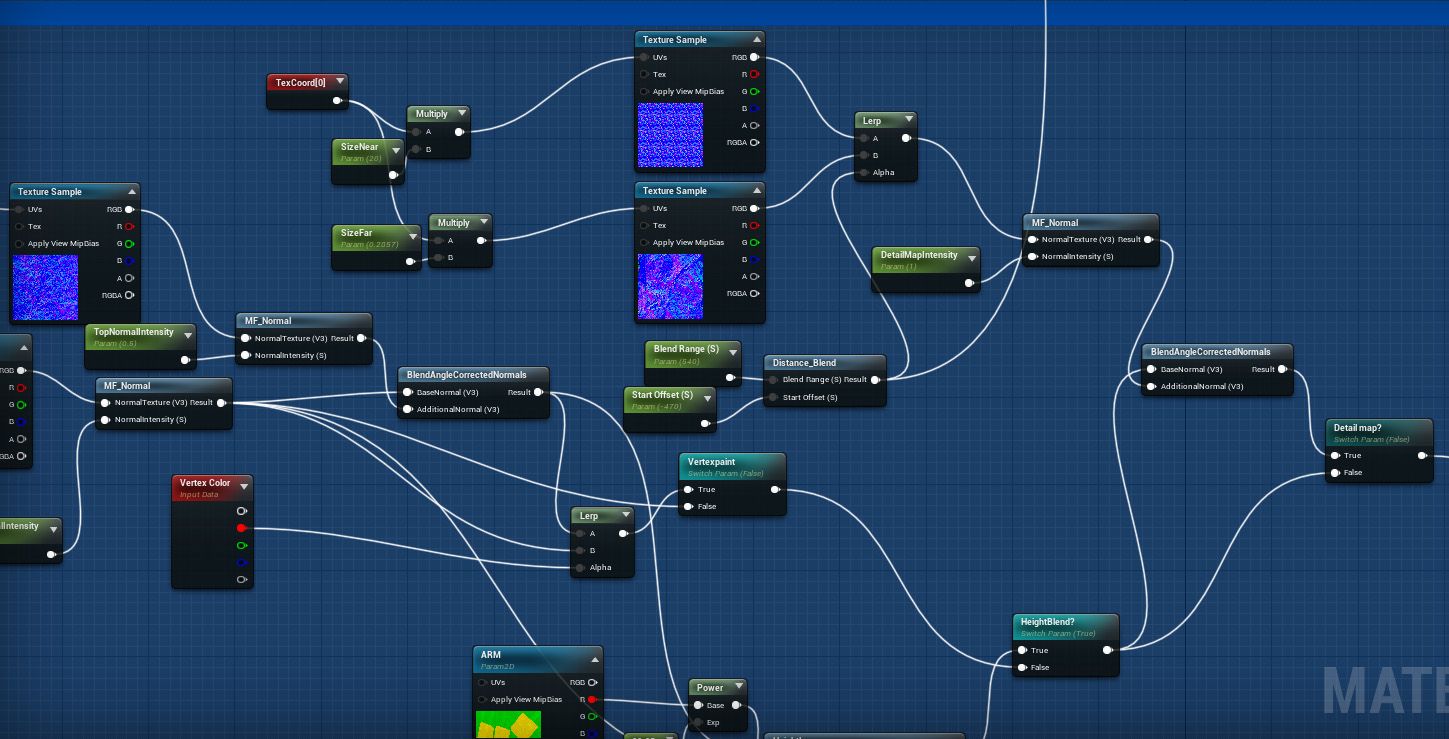
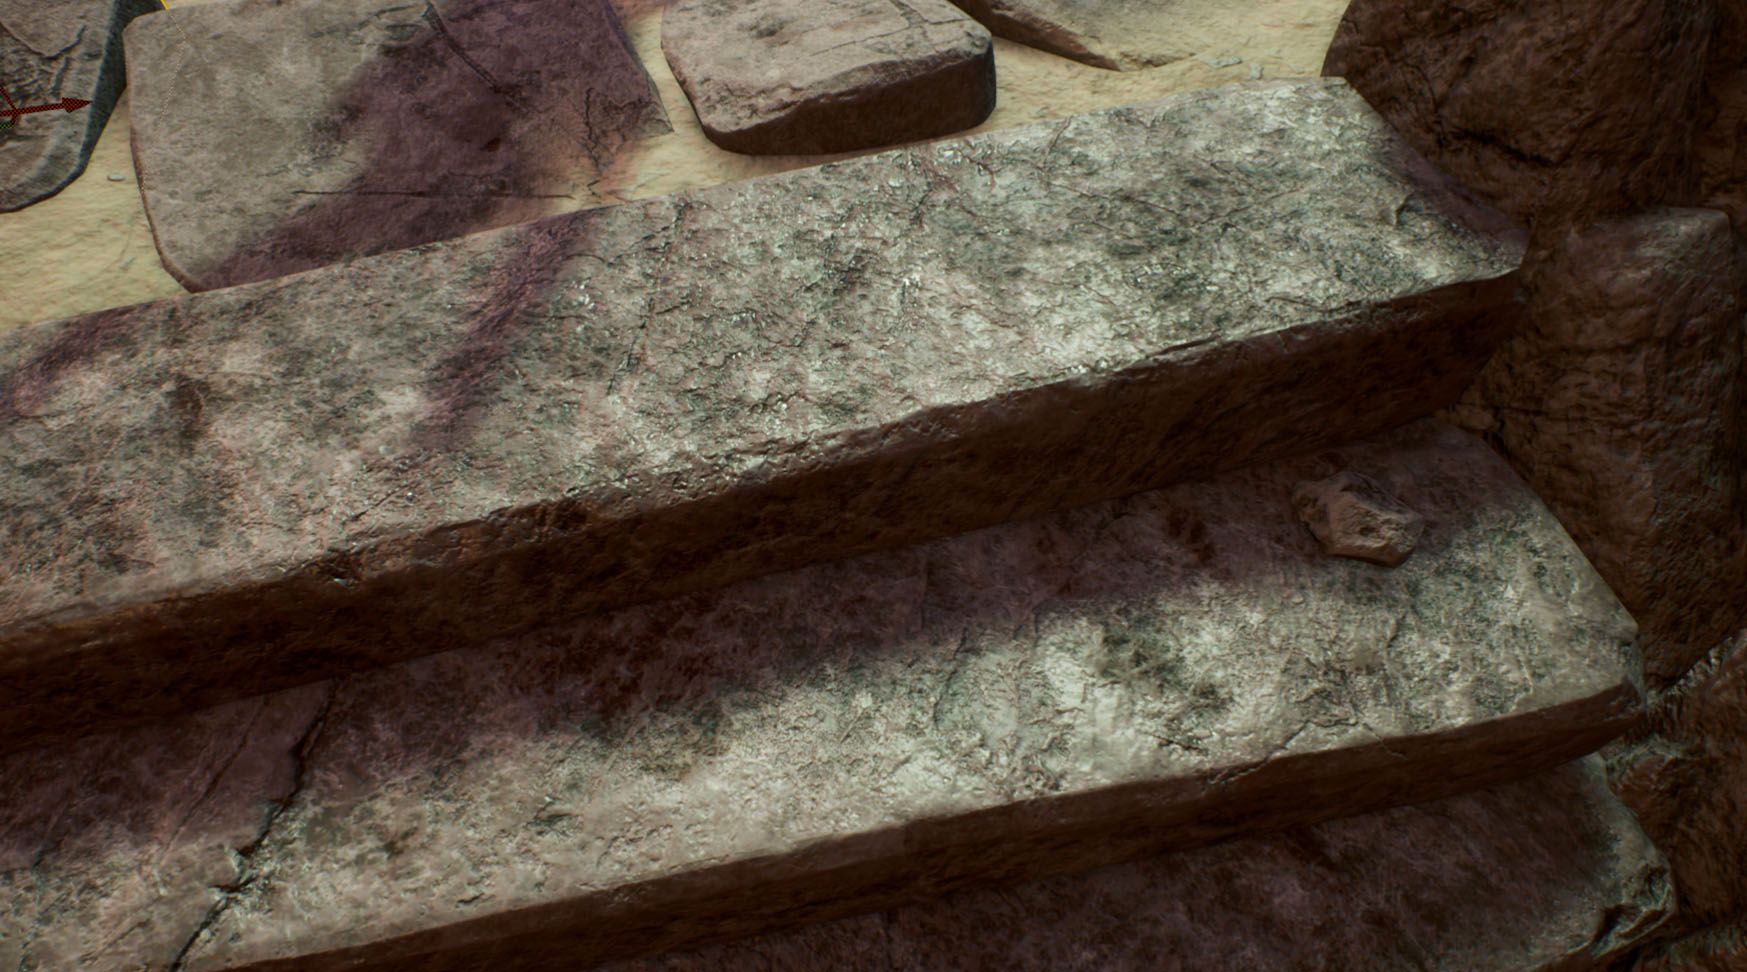
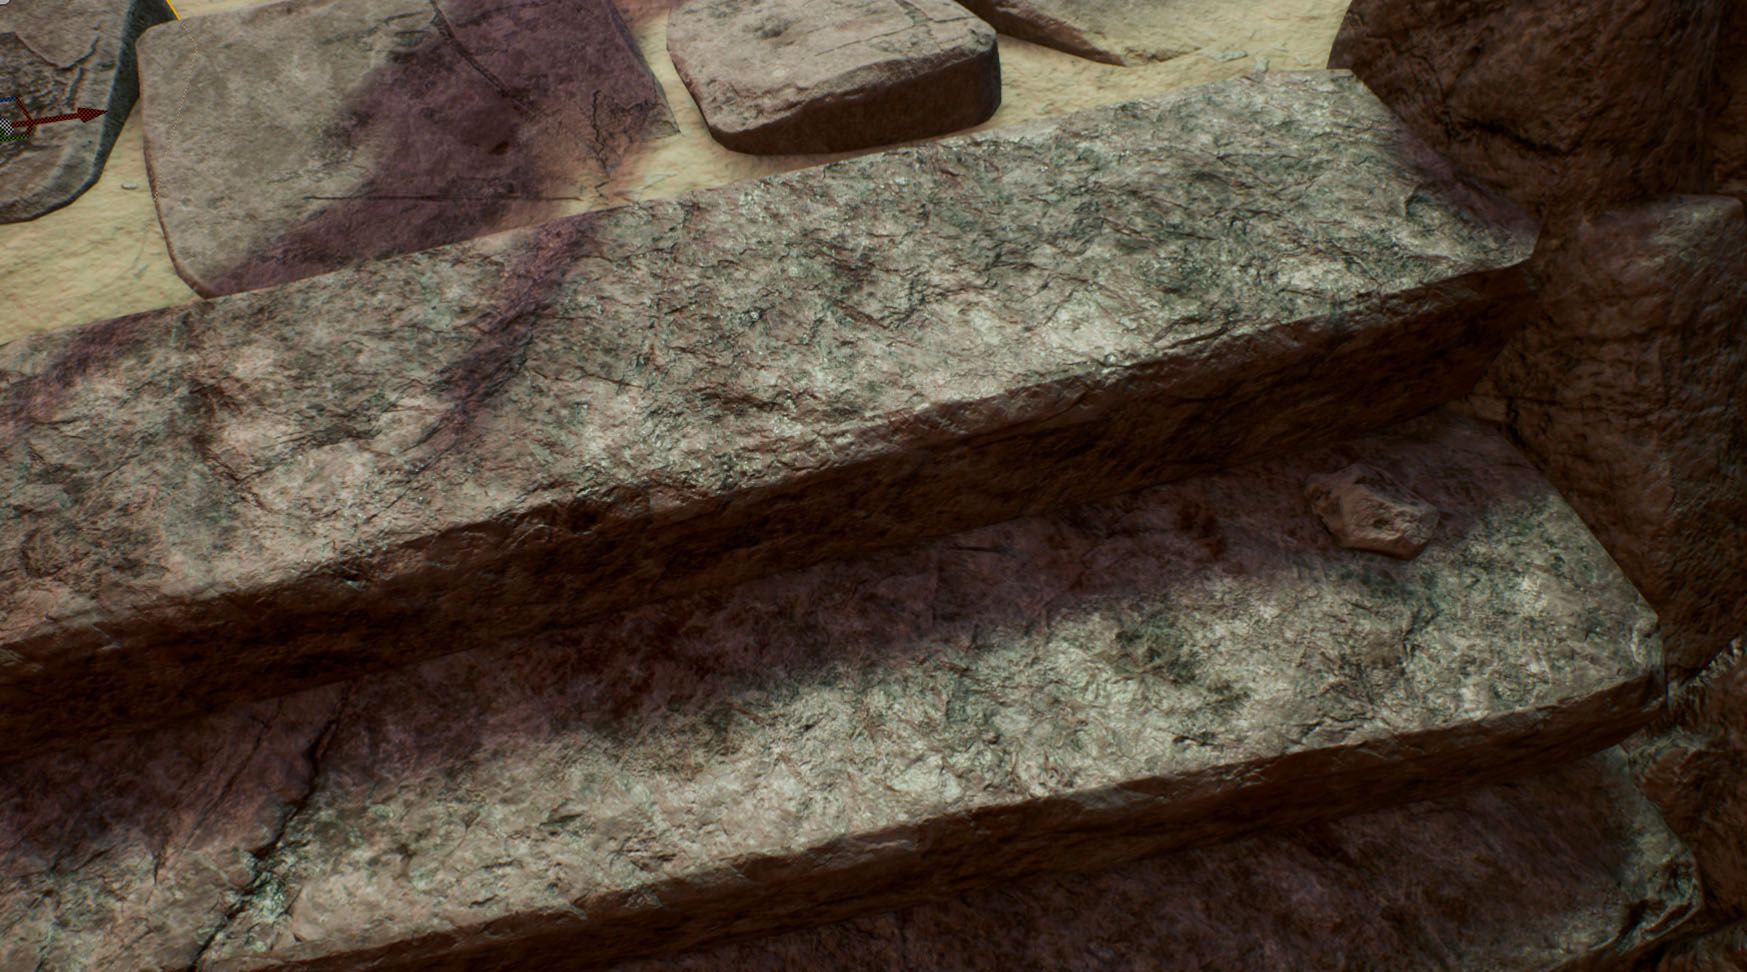
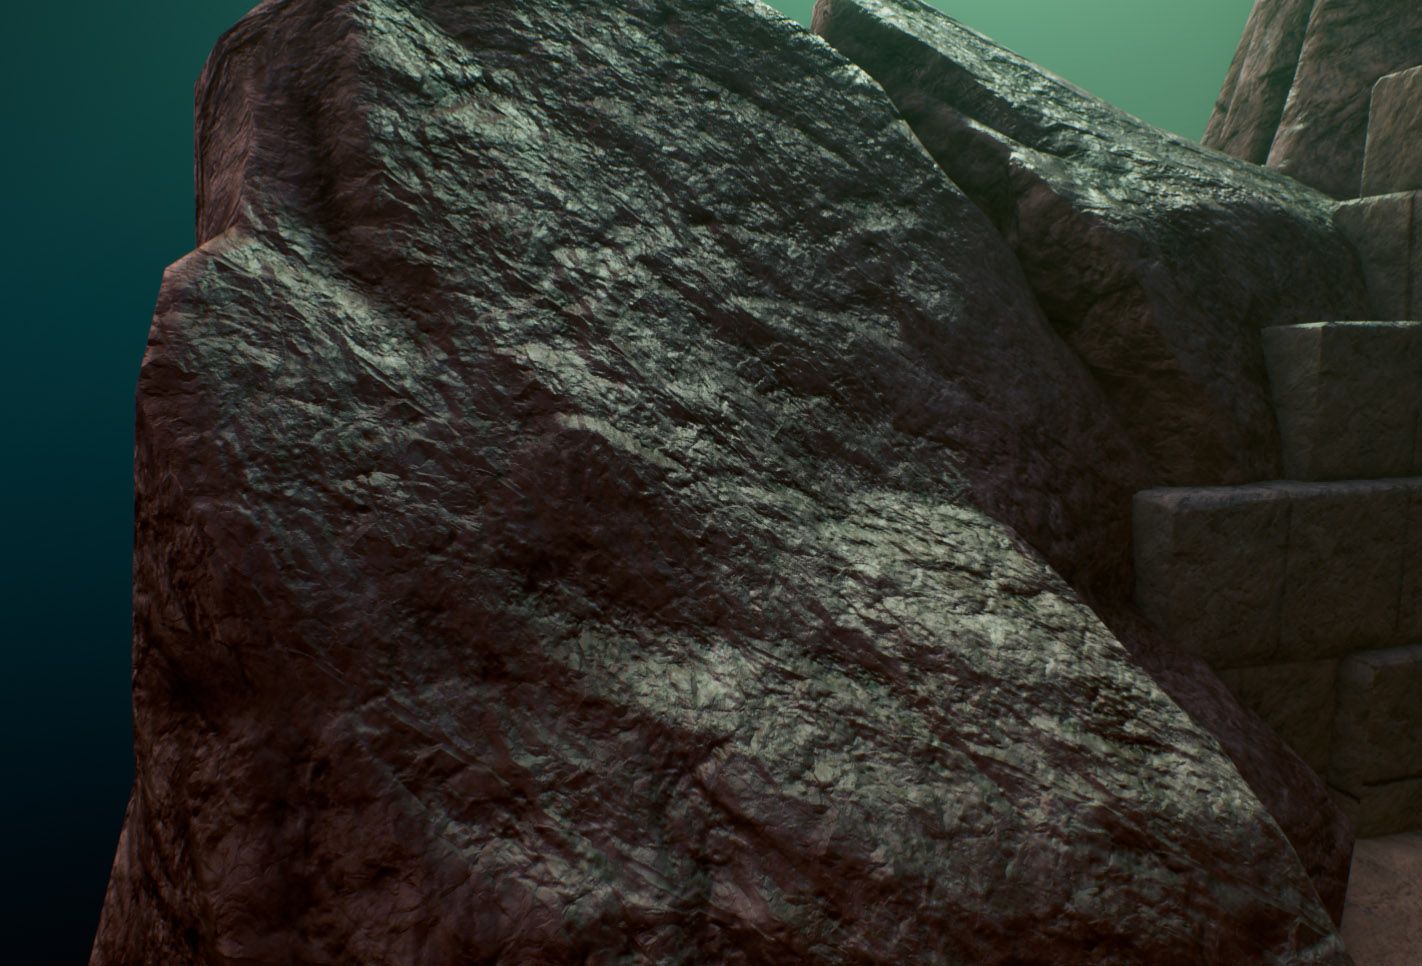
Also, as mentioned before, some of the models required detail maps. Not only would detailed maps fix the blurriness resulting from some models being larger than the texel density but it would also create the illusion of granular detail when looking at the models up close.
A few models with(right image) and without (left image) detail maps applied.
This was achieved by creating a quick rock normal map using Quixel Mixer and then blending that normal map with the model’s normal map.
The normal map created in Quixel Mixer (left) & a close up of the resulting granular detail applied on a huge mesh in Unreal (right).
I used a distance blend node to change the tiling of the detail map as the camera gets closer to the model.
The shader mask responsible for interpolating the tiling of the detail map based on the distance to the camera.
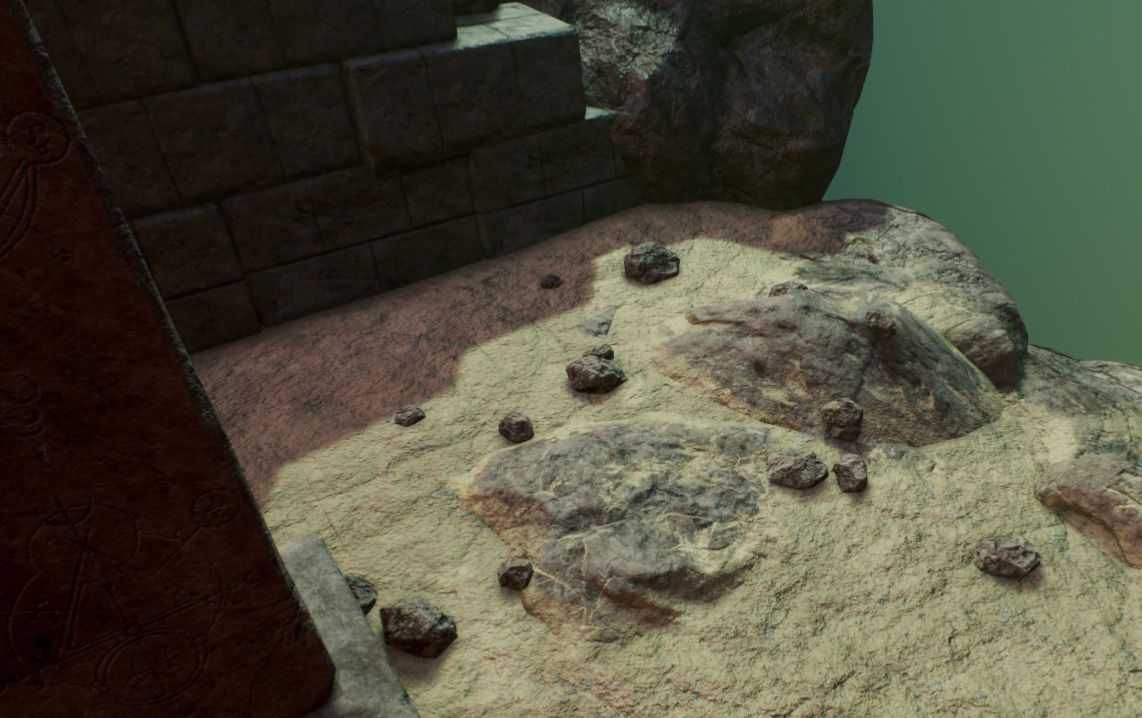
Vertex painting for terrain blending
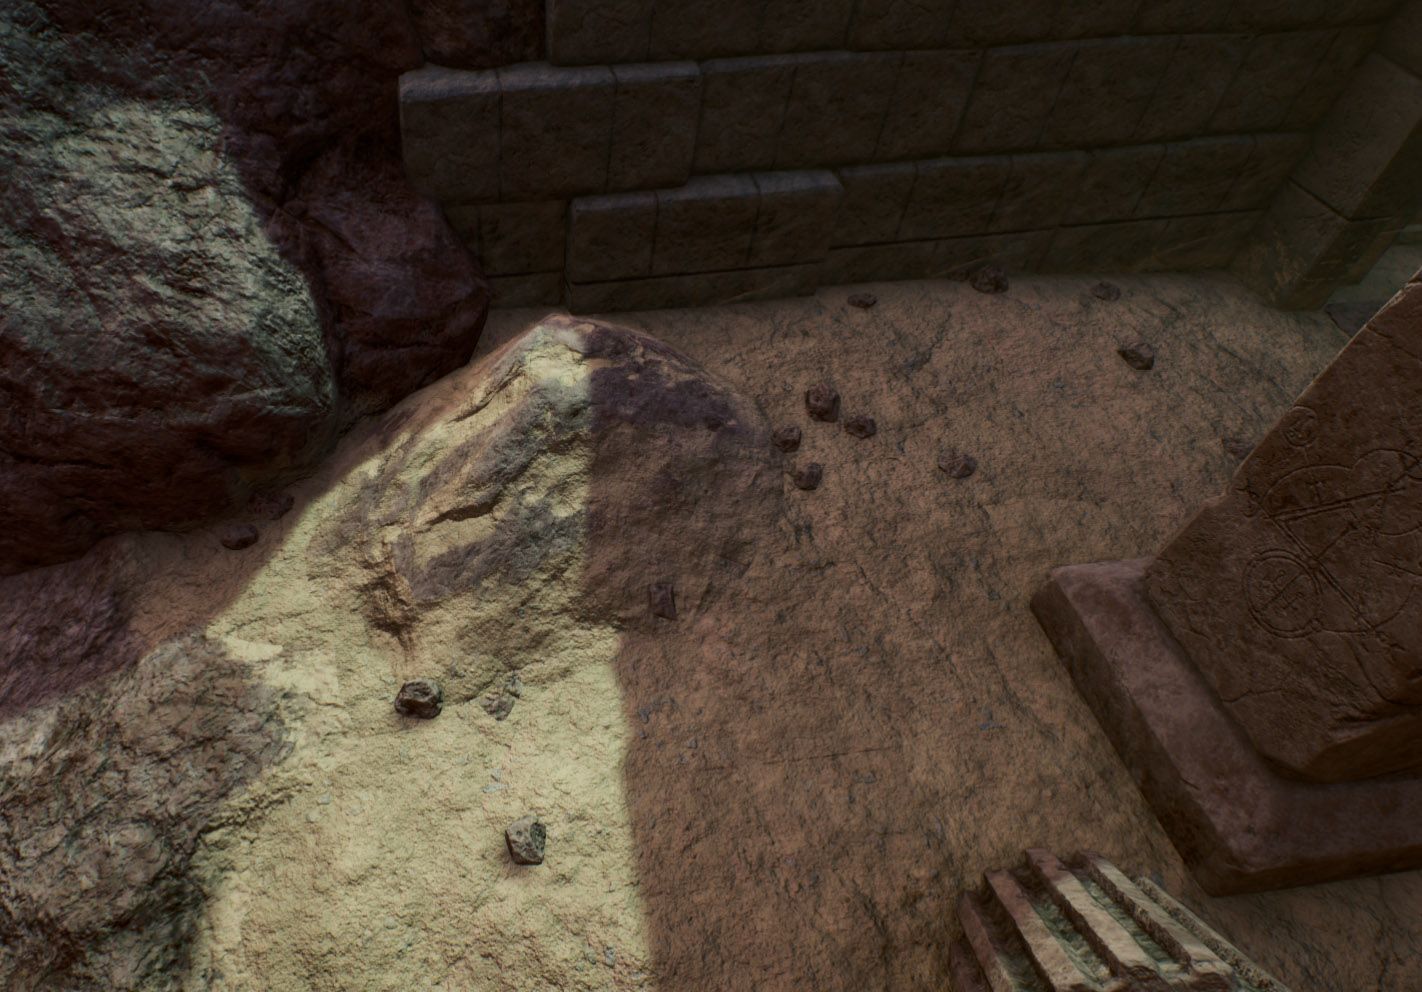
To have some more variation in the diorama’s ground I decided to create a couple of clipping meshes. These are models that are made with the particular intention of clipping through the ground and blend perfectly with the terrain textures.
The terrain clipping meshes, from Zbrush to Painter.
I made the game-ready models in ZBrush and created a system in my prop master material that would allow me to paint the ground textures on the model using vertex painting inside Unreal (procedural blending wasn’t used in this particular project).
Timelapse of the vertex painting process.
A few examples of the clipping meshes after the vertex peinting process.
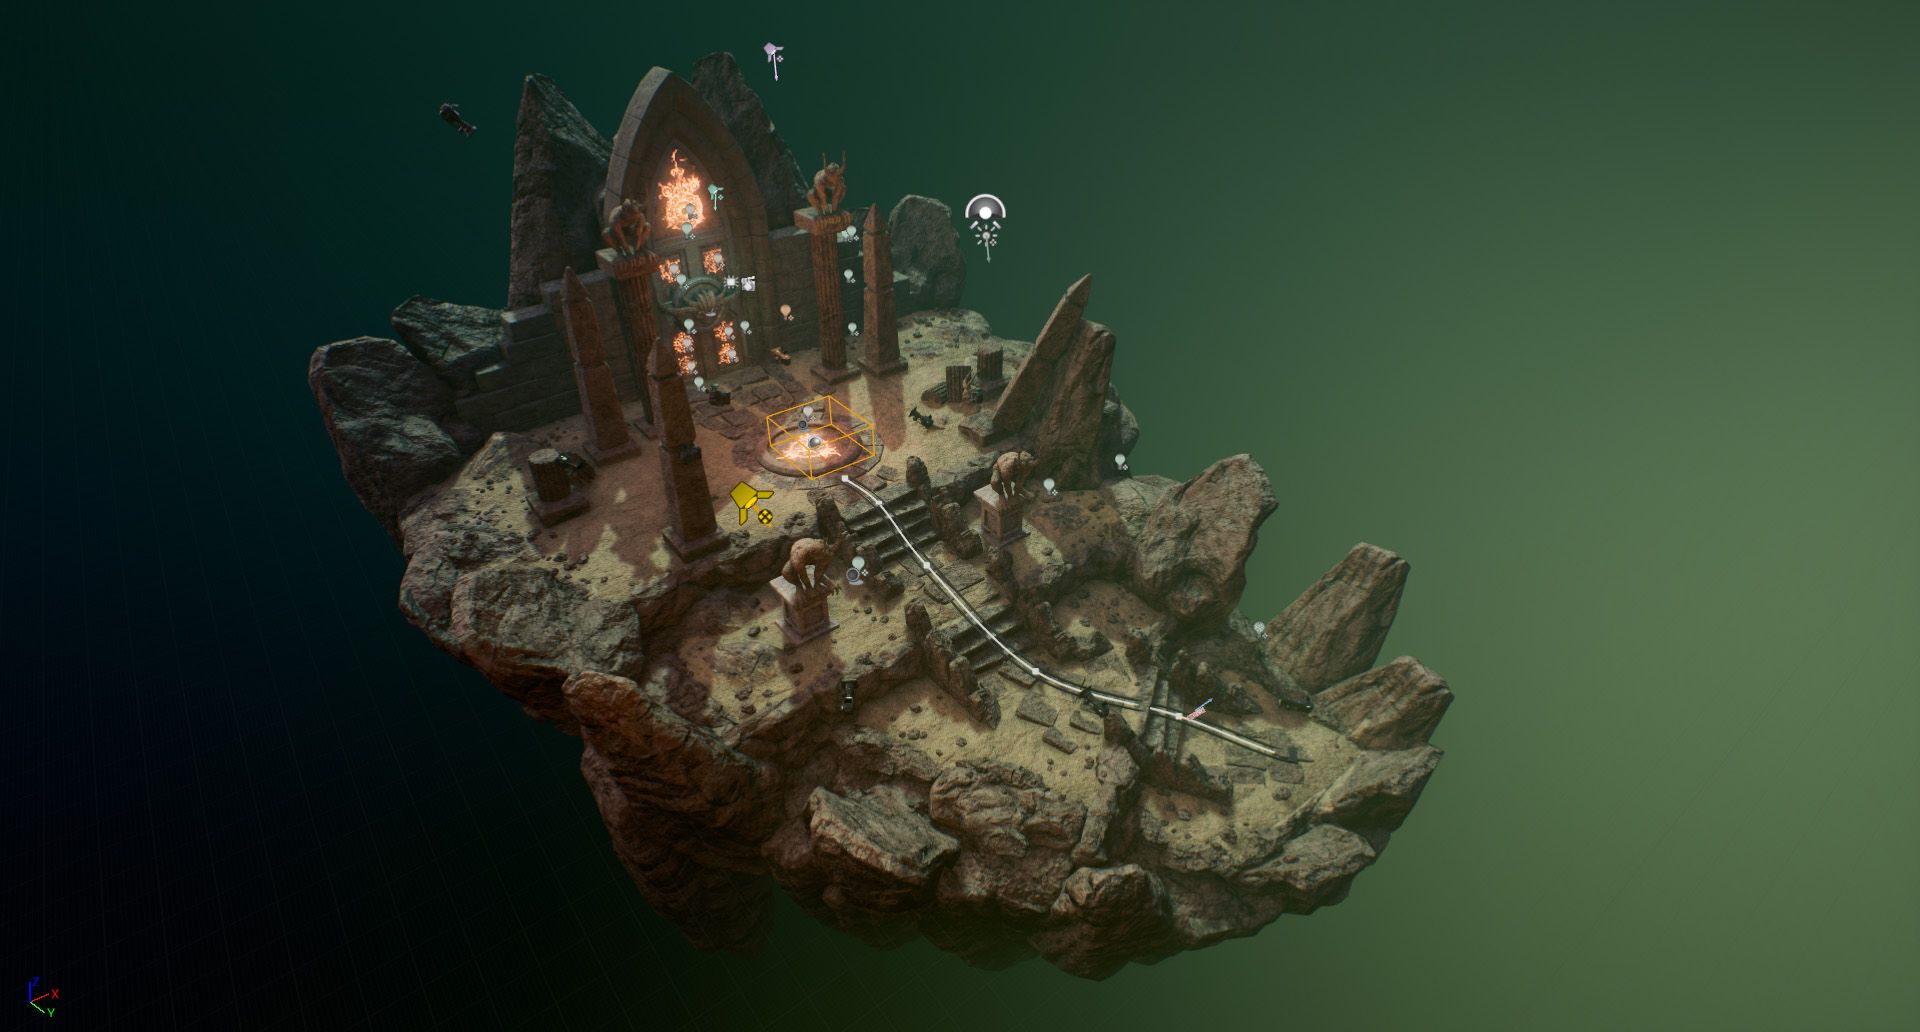
Lighting and cinematics
As previously mentioned, the Lighting was something that was thought of early on and kept evolving as the entire process was underway.
Every time I added a model in Unreal and did a set dressing pass I would include changes to the lighting in that same pass. In this way, the lighting helped emphasise certain aspects of the environment and add contrast to artistically chosen areas to guide the eye of the viewer towards it.
Three diferent stages of the lighting as the environment came together throughout the process of assembling it.
It cannot be understated the importance of the lighting on this particular piece. You can see how the lighting evolved along with the process and how drastically it changes the overall mood of the scene.
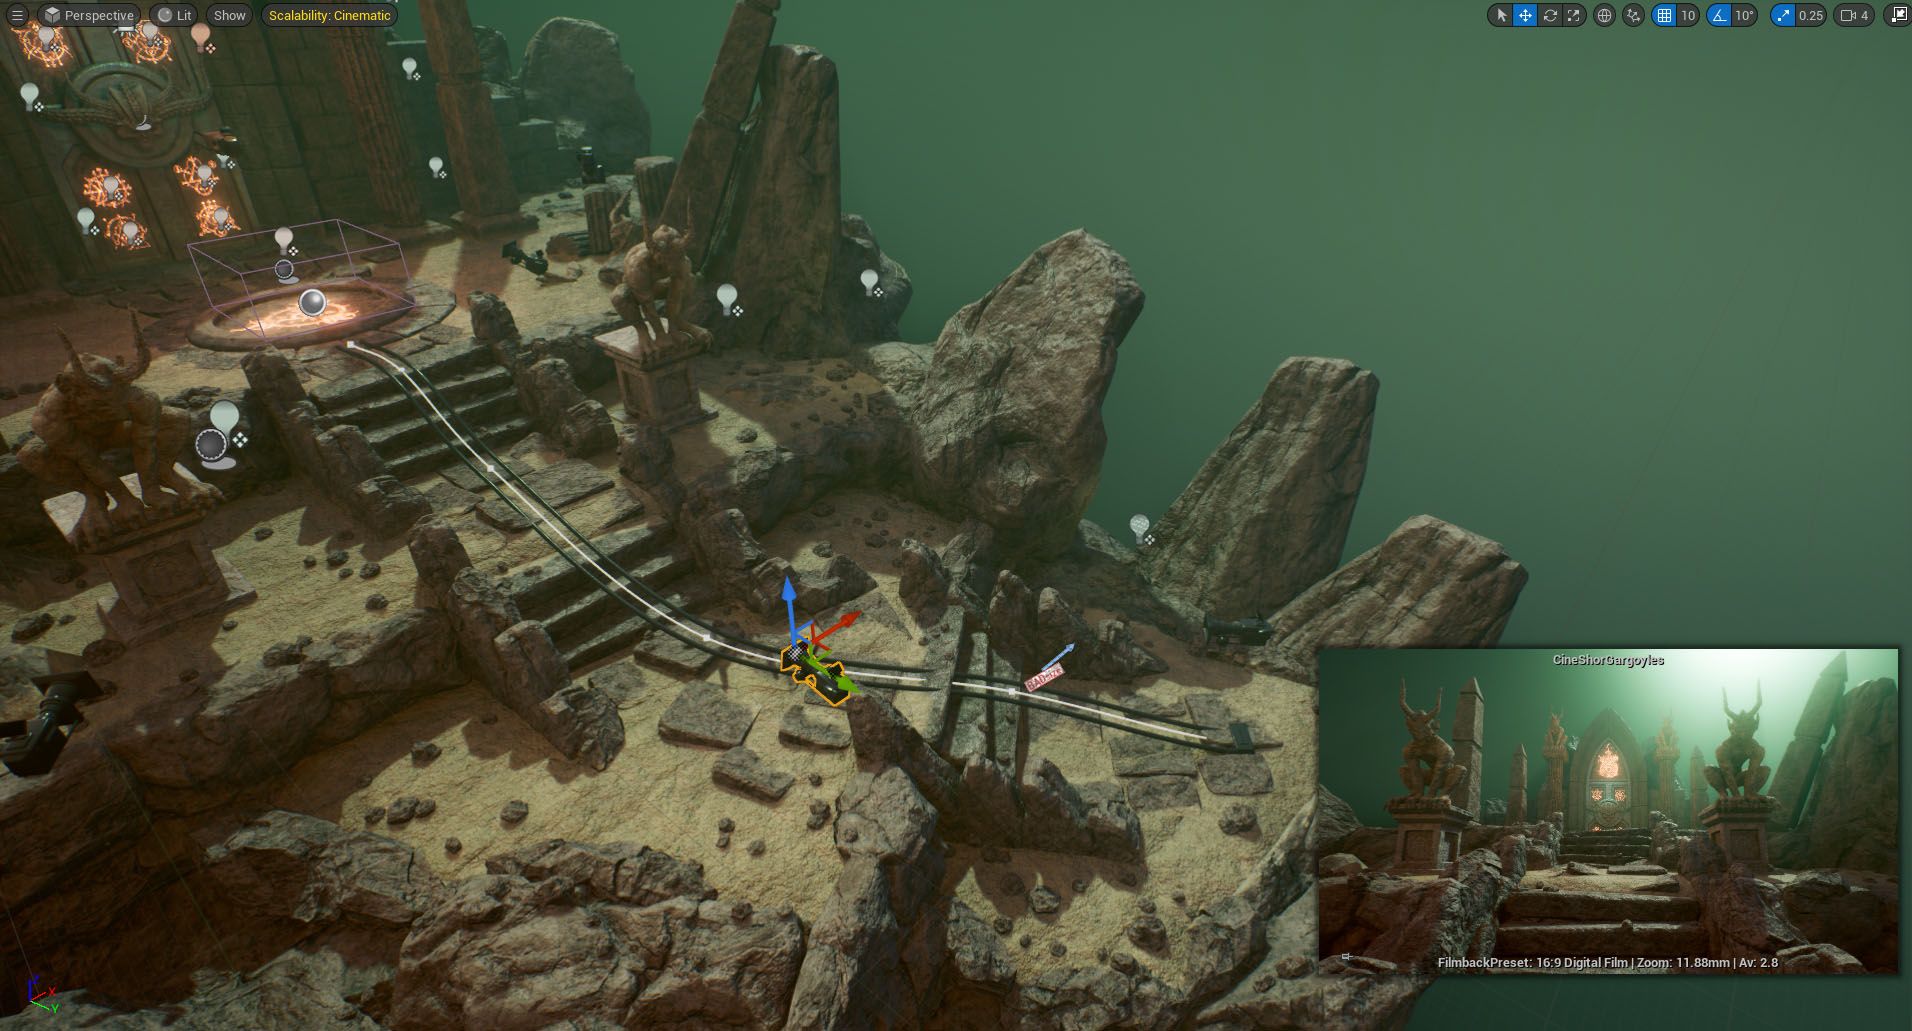
For the cinematics I used ‘Cinecamera’ actors, ‘Camera rig rail’ actors and changed a few post processing settings to make the scene pop even further.
Setting up cameras and rigs to render the cinematics.
Conclusion
This project was one of the most fun I have ever created. I really hope you found this article exciting and insightful and I can’t wait to share the process of the other pieces in my Rookie awards 2023 entry.
Check out more of Rodolfo's Rookies portfolio and entry here, and contact him via Instagram and LinkedIn.