
In order to create a good texturing & look development demo reel, it's a good idea to demonstrate you can create a photorealistic rendering from a single concept illustration, but it can be a big challenge.
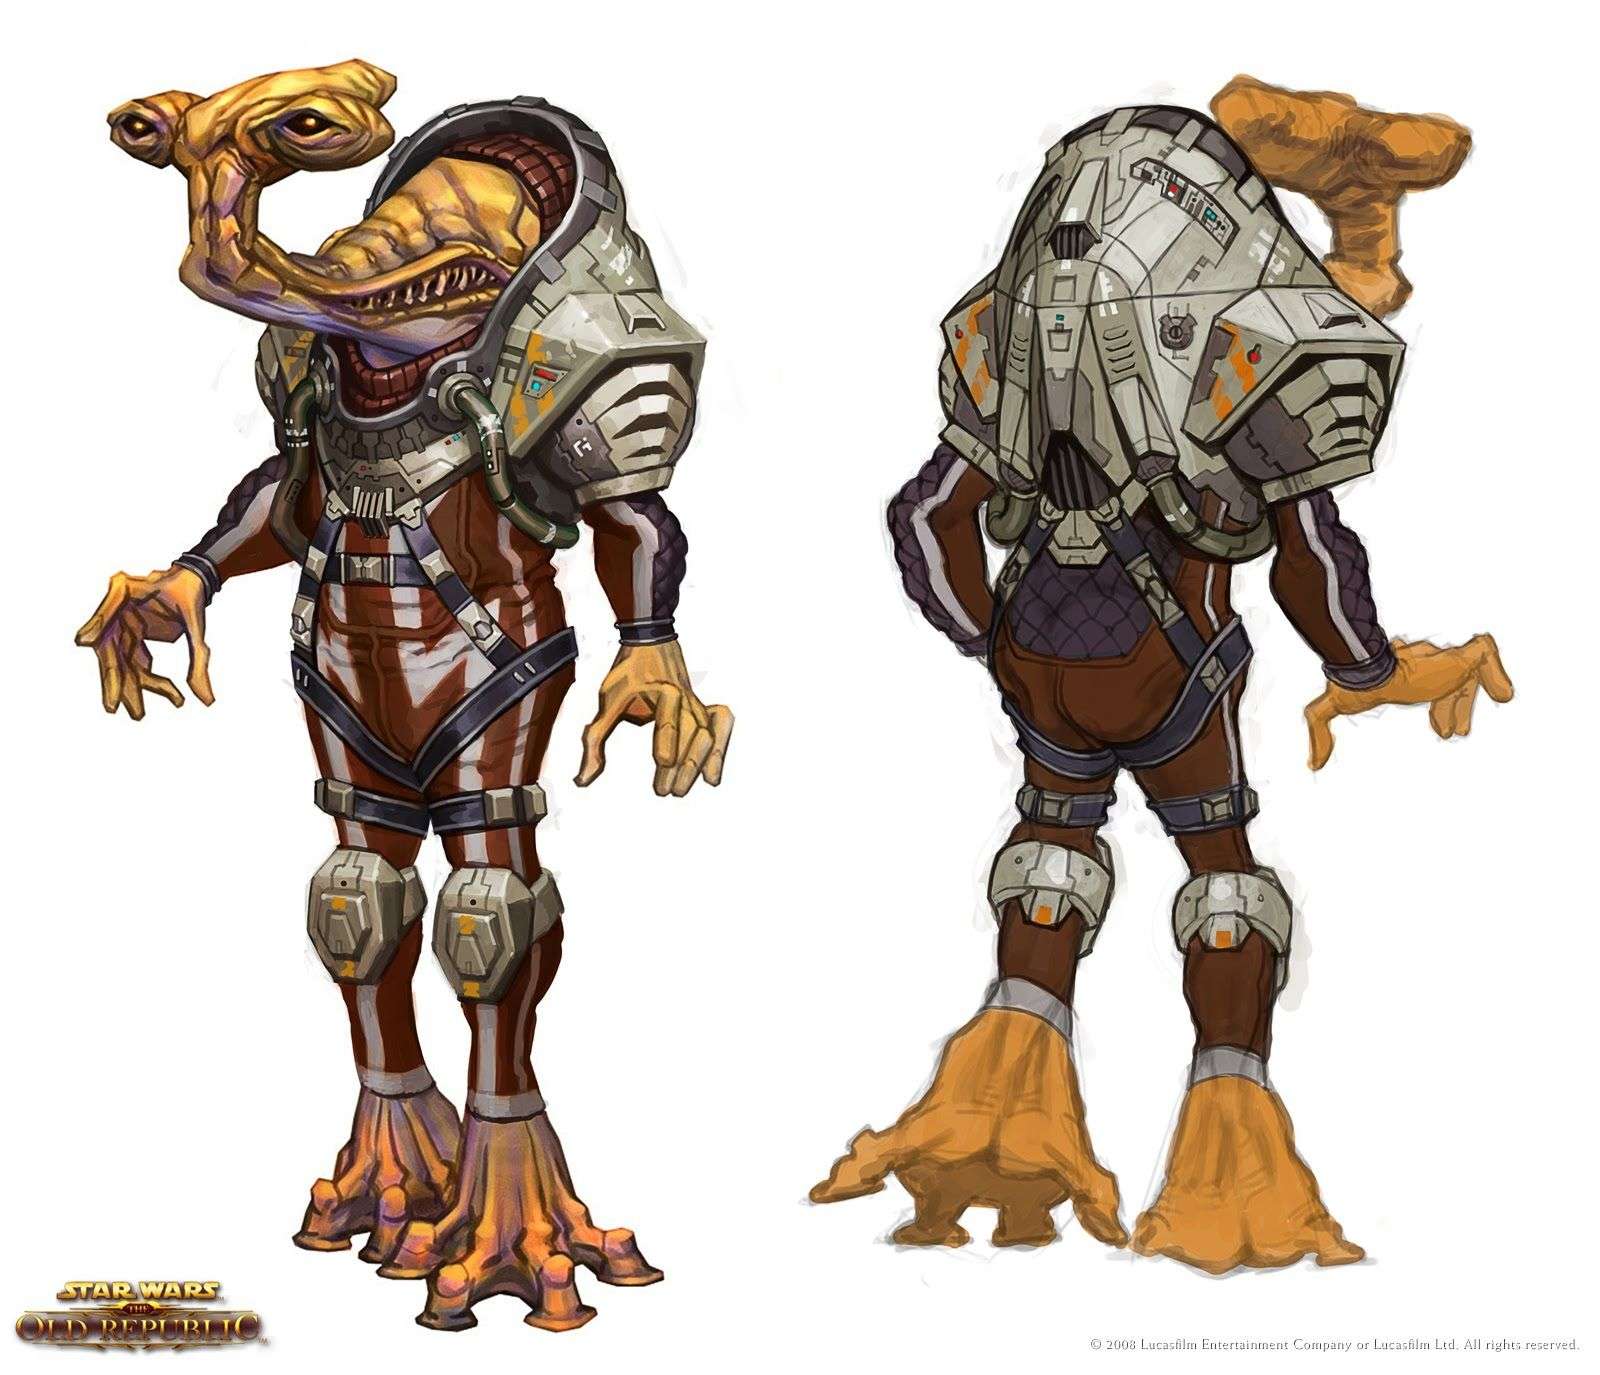
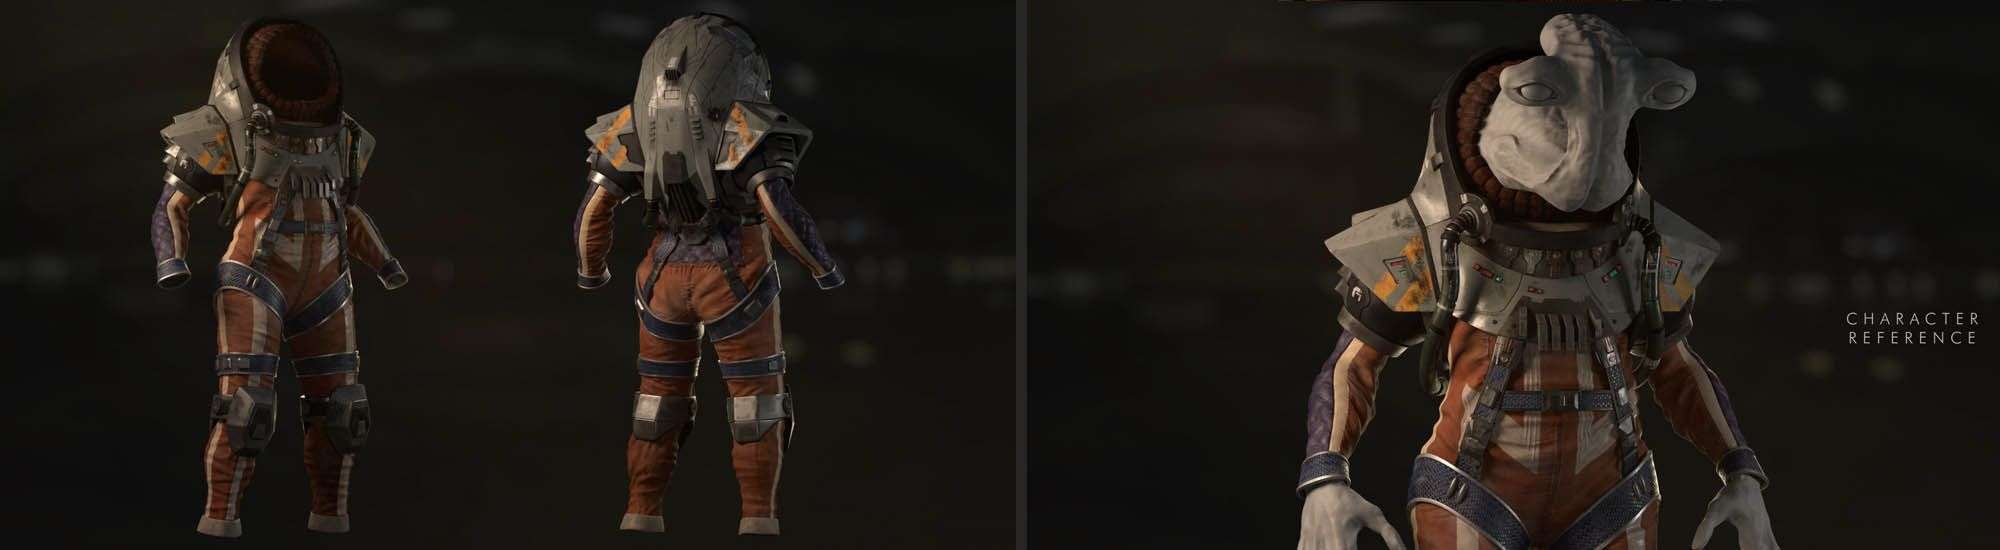
I decided to move forward with a concept of an Alien Suit that would allow me to showcase both hard surface and organic modeling skills. It would allow me a chance to really show my versatility and that I can handle different tasks.
A long journey is made with small steps
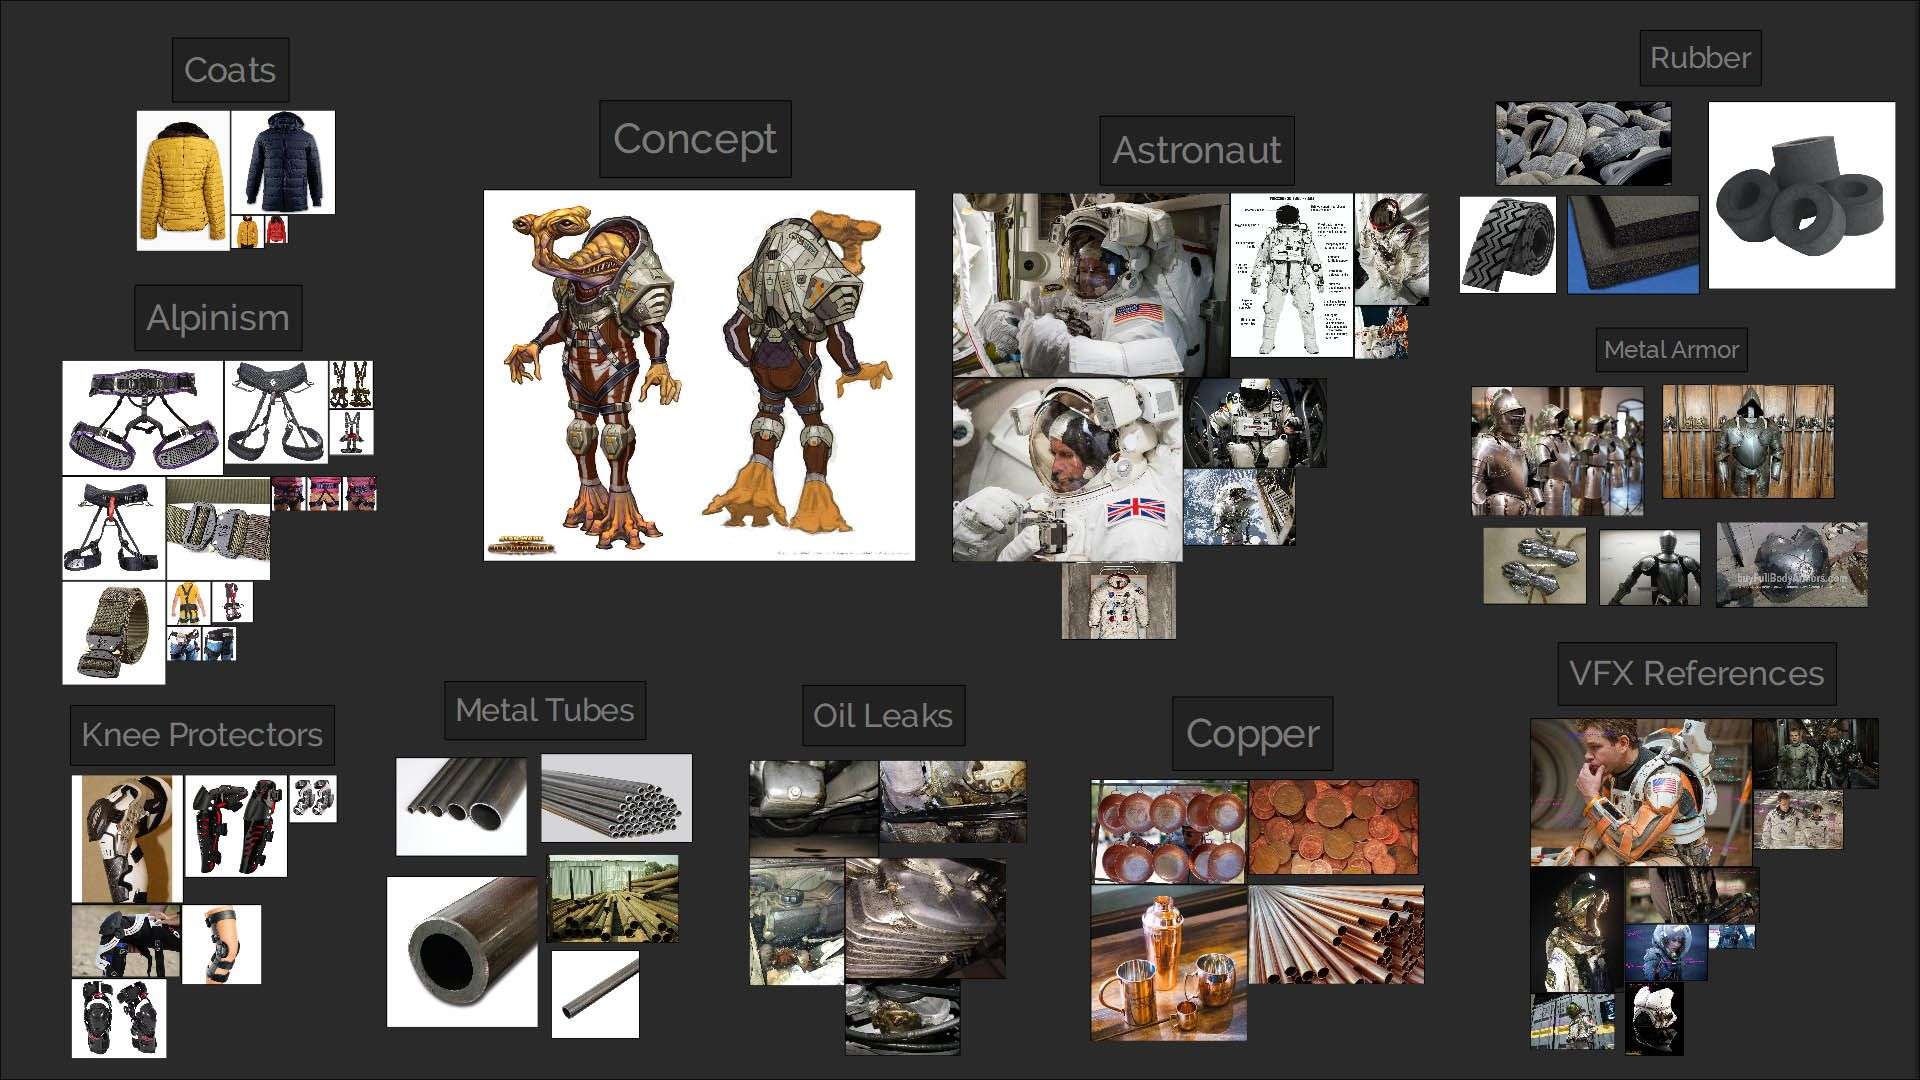
The very first step after deciding for the Alien Suit concept was having the character with an accurate anatomy and doing a deep research on real life references for all kind of materials I would paint on the asset.
I asked my friend Alex Paiva if he could sculpt the Alien as he is a Character Artist. He shared the model with me, just like it works on a studio and after that it was time to adjust anatomy and retopo the mesh.
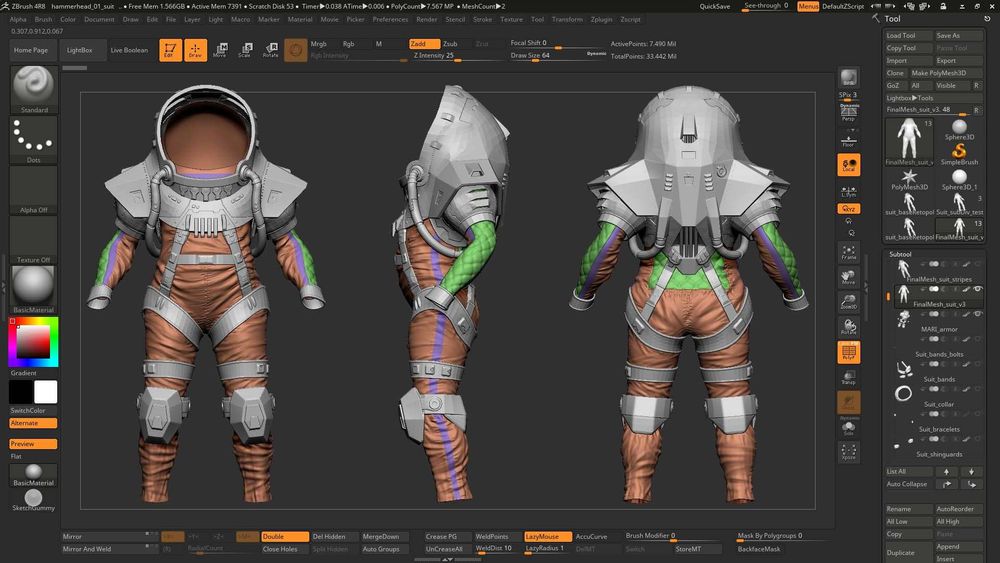
Tip: You need to be mindful while creating the topology for the model and you also need to plan where the UV cuts will be placed trying to hide it as much as possible under top parts and/or where the camera will hardly see.
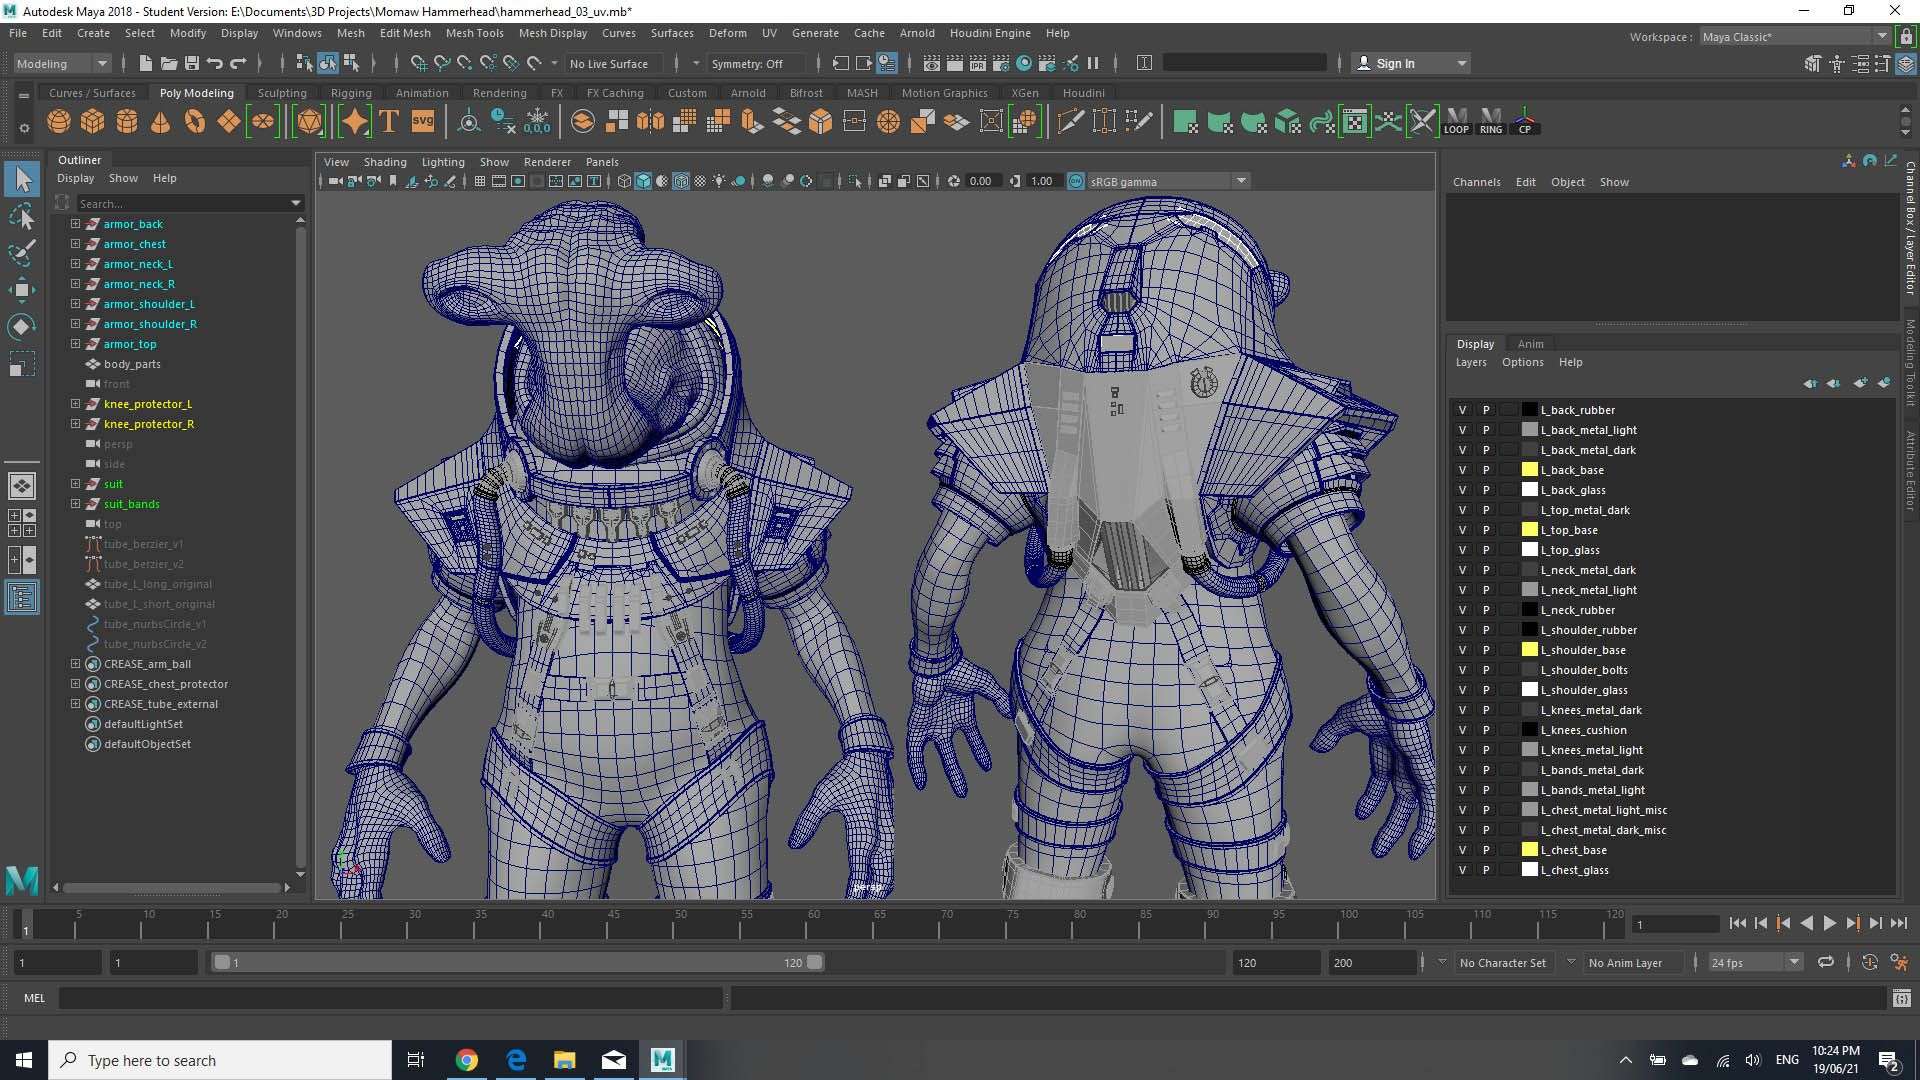
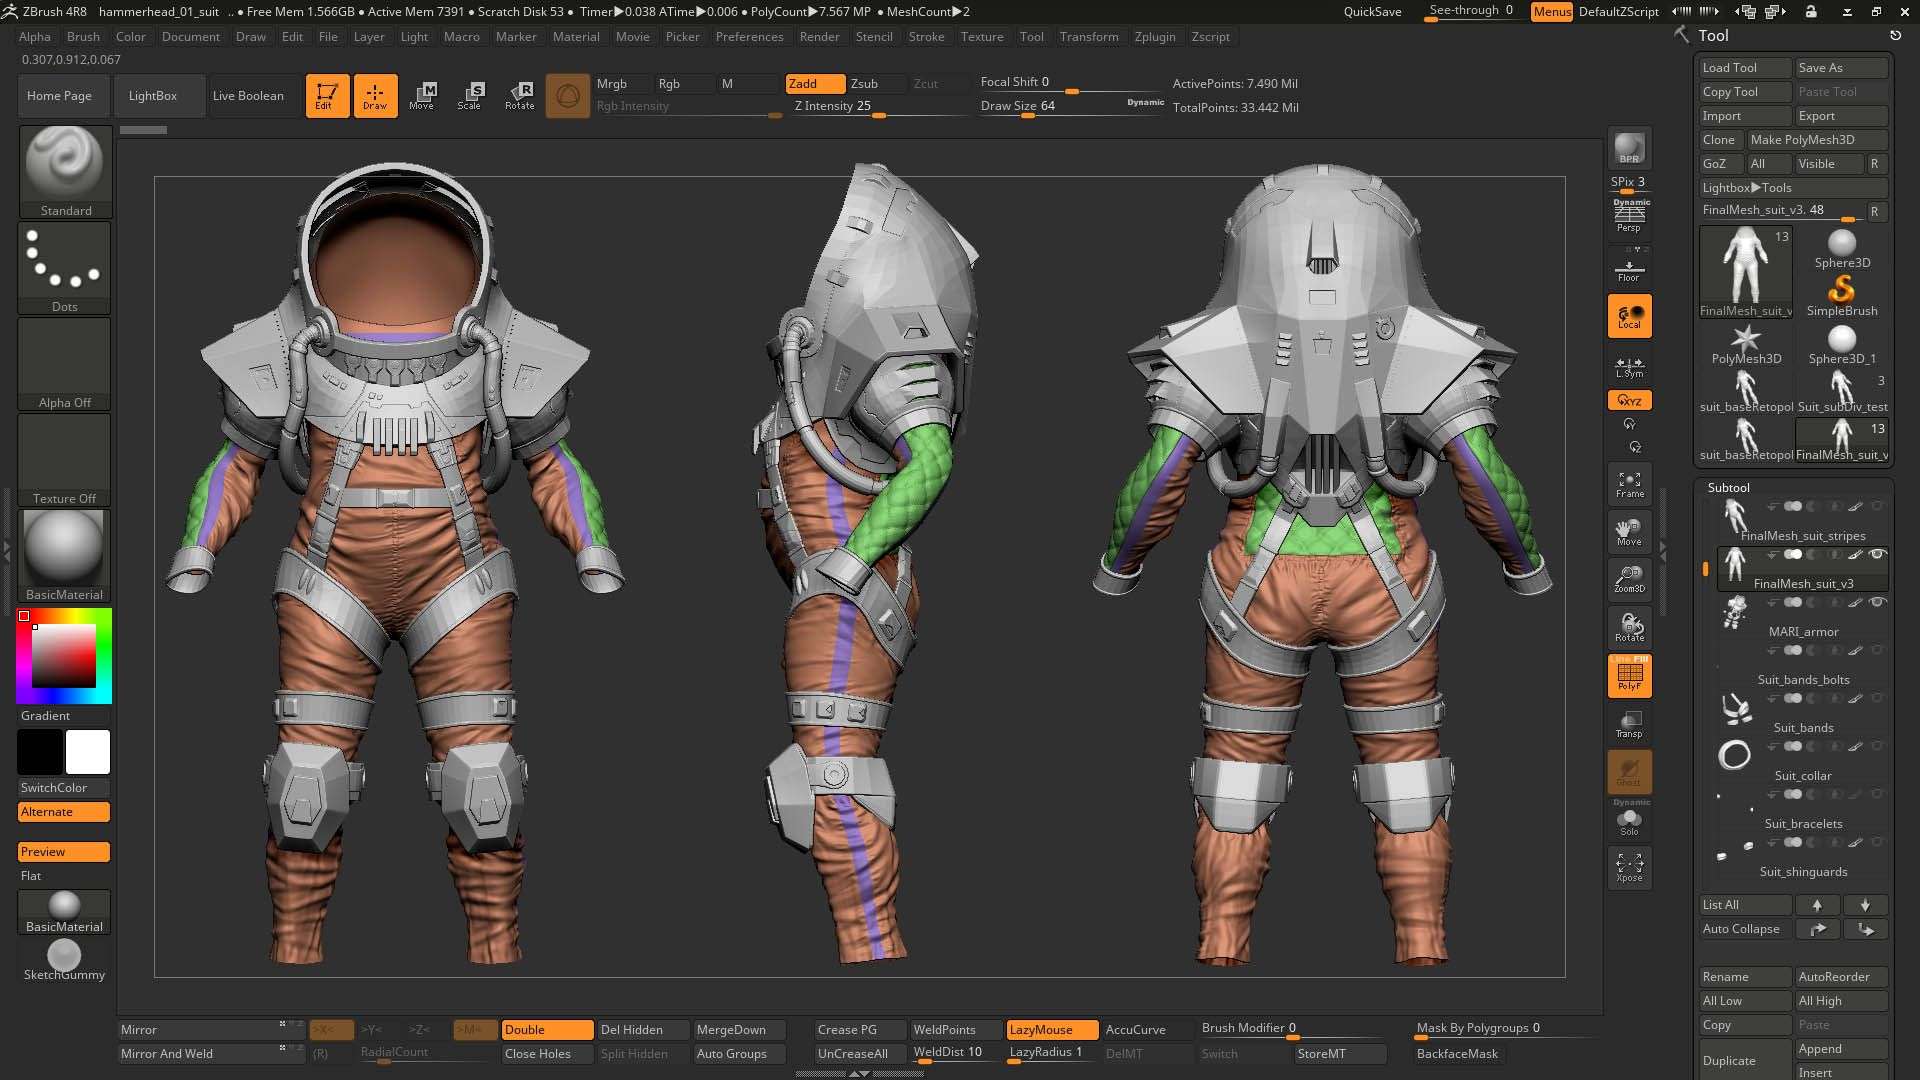
It’s highly recommended keeping your scene organized and with a clear naming convention as it’ll probably be accessed by other artists when working in a studio. I also like to create Layers for each material what helps me on finding specific meshes or isolating parts.
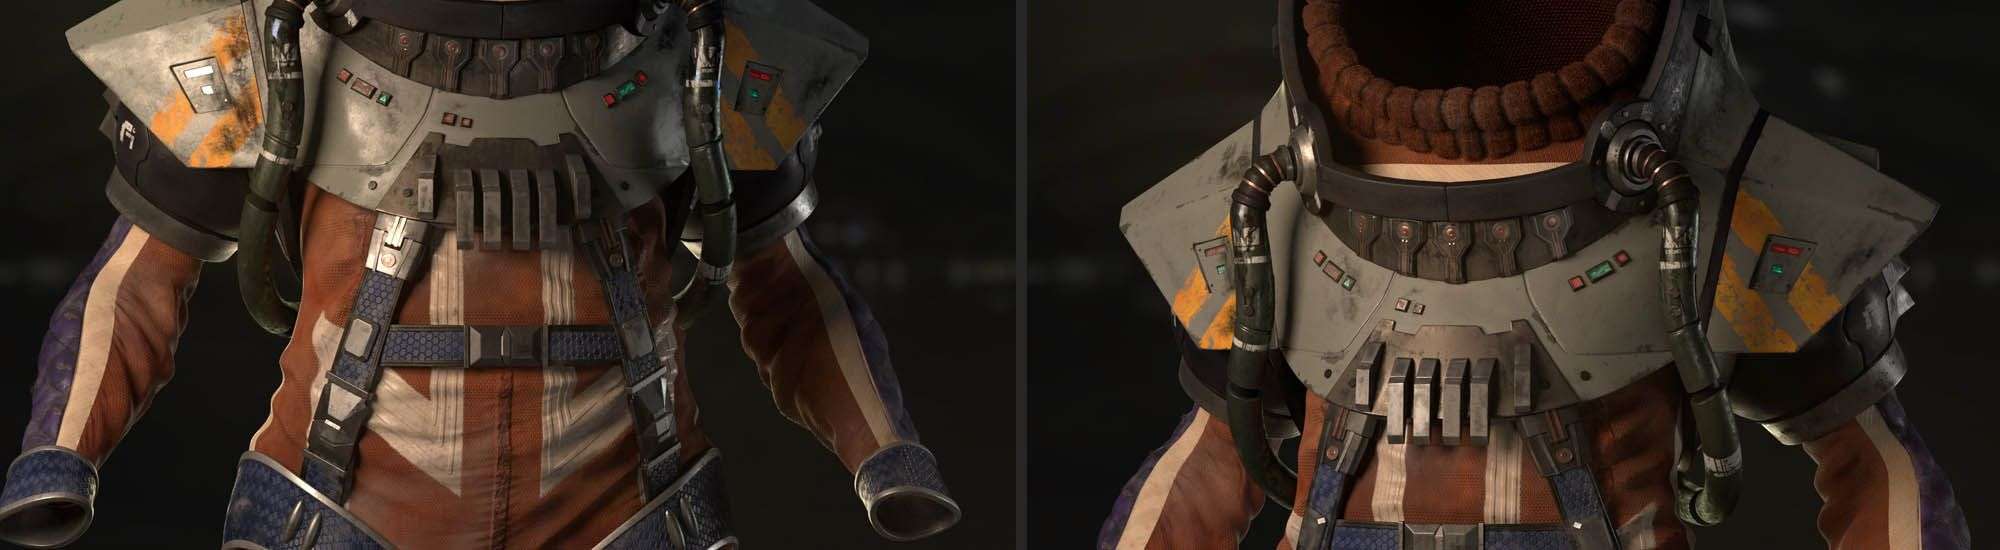
During the retopo I was extremely careful to create the edge loops following the stripes and seams of the suit. It was crucial for getting great straight UVs and for playing with it as subtools in ZBrush. I also assigned materials with different colors to make it clear where I should create the UV cuts.
For a photo-realistic asset you have always to look at real life, because getting another CG as reference is at some point a representation from another artist’s eye and not exactly the world we live.
I would highly advise you to create a board with the different type of materials and it will help you a lot during the look development stage… We’ll get there :)
Old School Modeling & Modern Sculpting
Instead of going to ZBrush and starting blocking out the space suit parts, I did the opposite of what I see the most nowadays.
I started duplicating parts of the mesh from the character and poly modeling using the same topology. Some other parts I approached with the old plane modeling technique until getting the exact shape I wanted.
I worked a lot with the Quad Draw Tool using the character as a Live Surface, so I was able to get perfect planes following the character silhouette.
The curved armor of his back was very difficult due to it’s cavities that had to be all modeled, but dealing with a low poly mesh I used the Multi-Cut Tool to guide me and help me manage the subd-edges to get a nice and smooth render with only 1 or 2 subdivision levels.
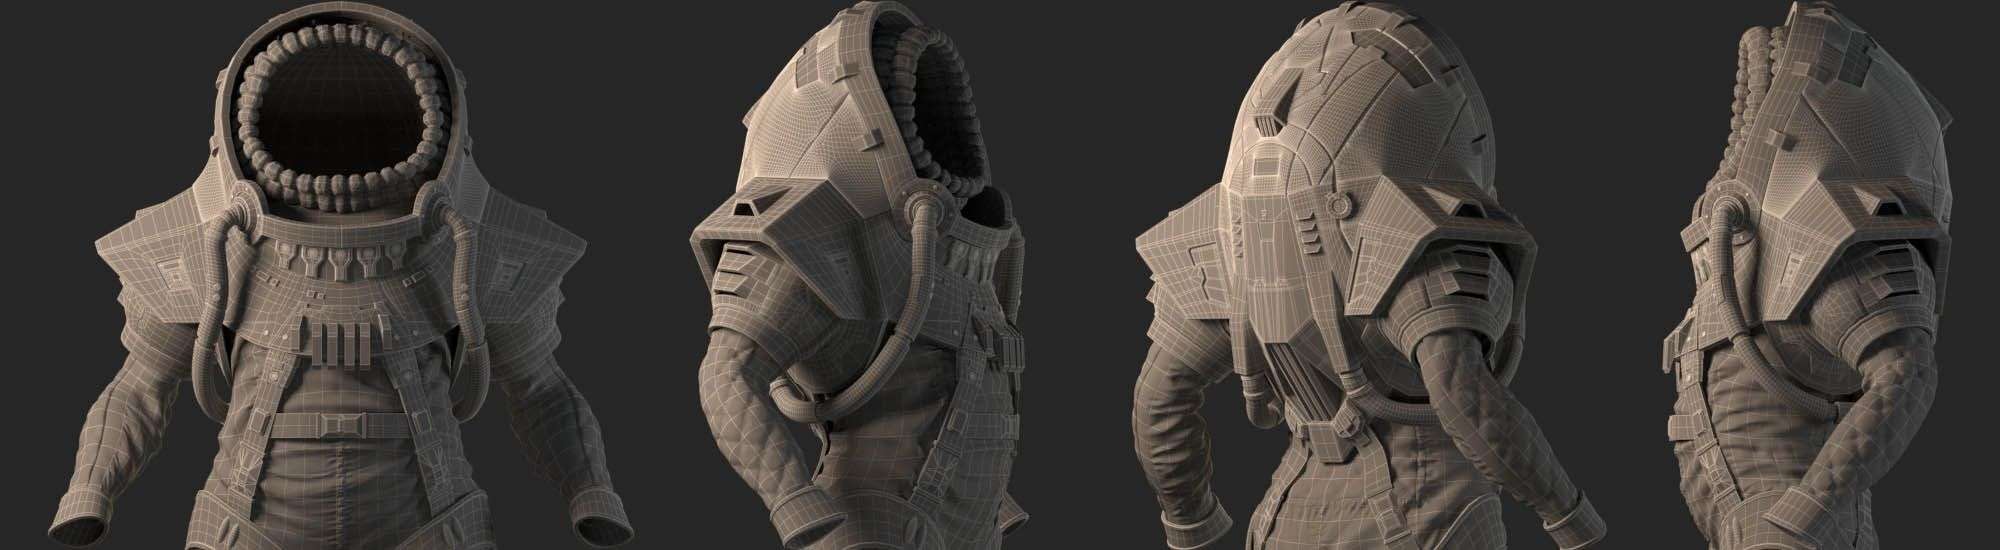
Having a nice topology and shape from the beginning helped me for a smooth sculpting task. I had only to export the meshes as OBJ files, import in ZBrush, subdivide it 1 to 3 times and I was good to start.
After finishing the sculpting I had only to be aware to properly export the displacement maps and normal maps with no need to Decimate, zRemesh, Project, Retopo... absolutely nothing and it was a huge time saver :)
UVs and Resolution is a chapter apart
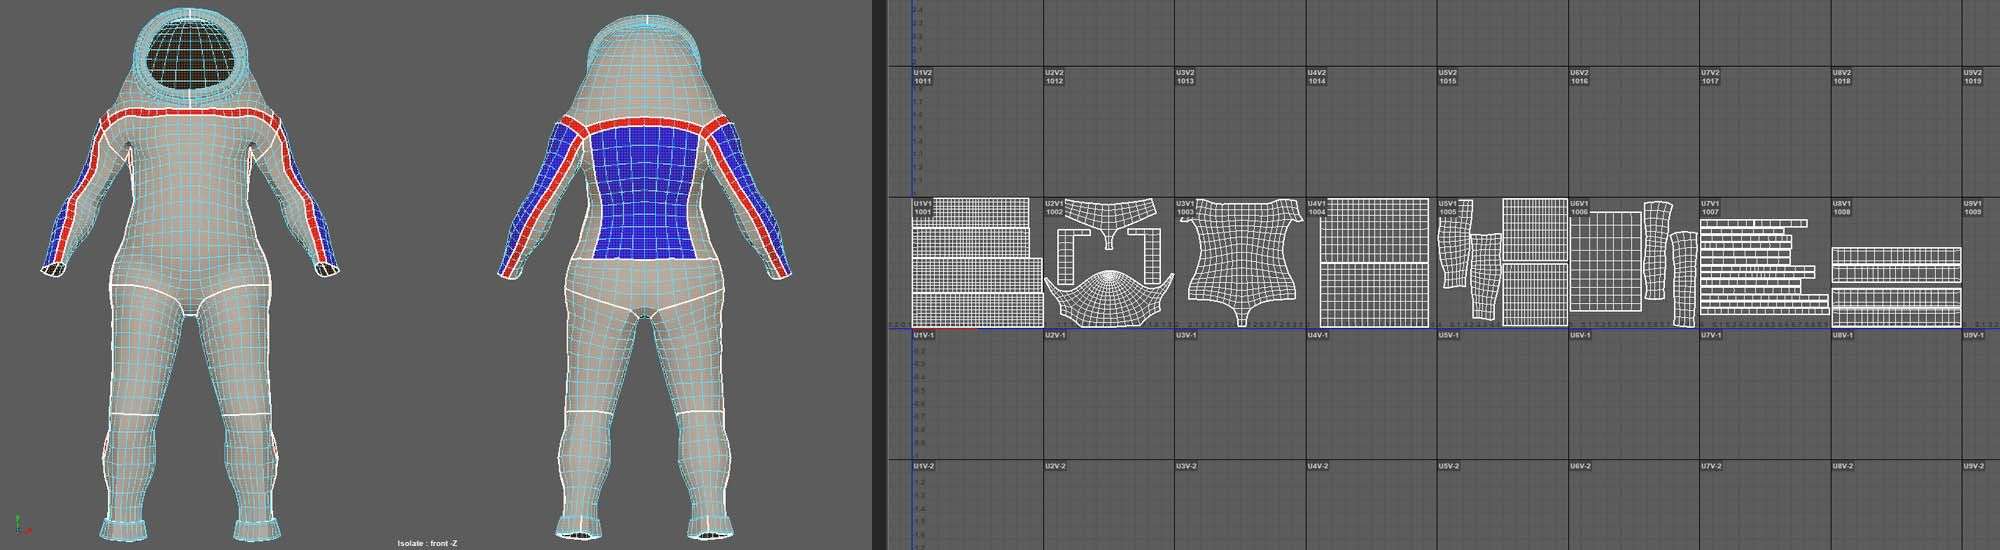
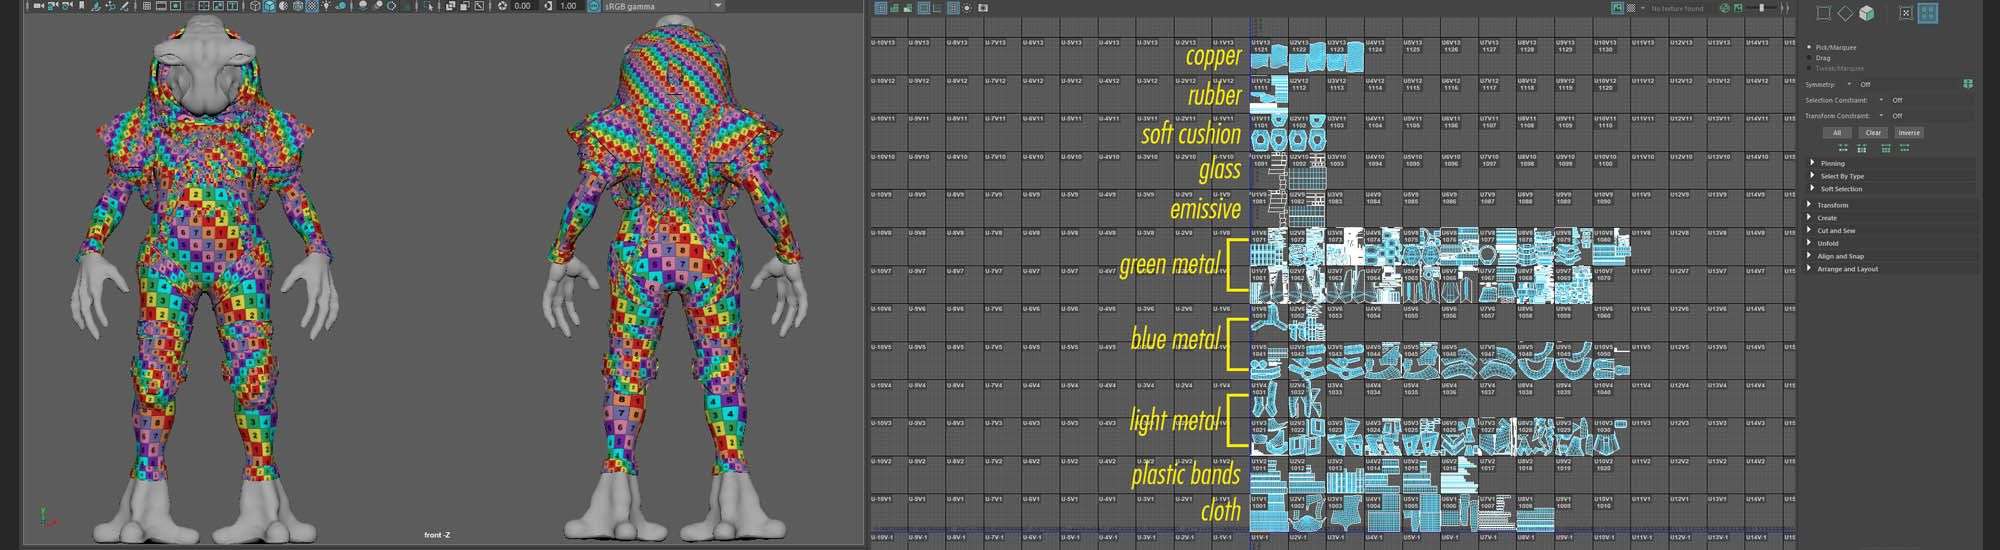
Is desirable to organize your UVs by material. You should layout all your UV islands along all positive UDIM coordinates from X1 to X10 (1001-1010) and up in Y to infinite. It’ll boost your productivity later on during your texturing in Mari or Substance and you’ll be able to create masks per material in no time.
Try also maintaining the same UV directionality in the same UDIM, it’ll help you using tileable maps and projections. A good way to achieve that is using a numbered UV checker map during your UV unfold process.
The pixel density and the number of UDIMs you’ll need for your asset is directly linked to how close the camera will render the asset.
It’s the perfect time to play with some camera animations trying to create smooth movements finding nice detailed parts and where will have great painted textures to showcase the best of your work.
After defining your camera shots it’s time to decide your final resolution and apply a simple math from a general rule for Films: Always paint the textures with the double of the render resolution.
For example: If your final render is in 2K, all textures must match a 4K resolution. After unfolding pick the biggest part and match it to the double of the render resolution, so you’ll find the proper pixel density for your UV. Finally, you can use the Pixel Density Tool and apply the same value for the other pieces.
Note: The pixel density may vary from material to material. The secret is keeping UVs from the same material with a constant pixel density.
Texturing \o/
Let’s talk about the most exciting part for me. Personally speaking, when I receive a grey shaded mesh and start painting it's like giving life to that object and indeed it's an amazing experience.
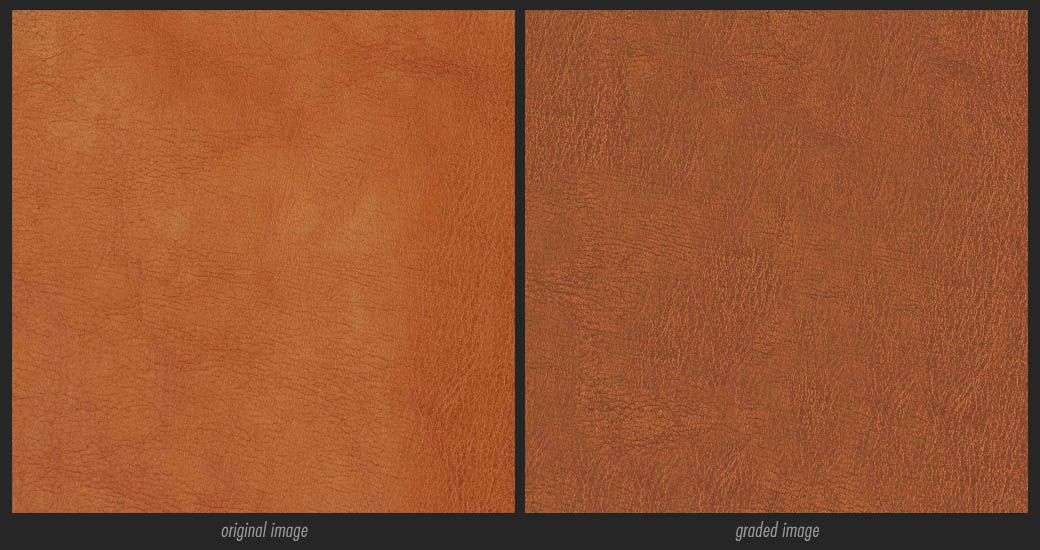
Tip: Spend a good time searching great textures, look always for high resolution images and before even start painting and projecting on your mesh, do not forget to grade them all.
Grading images consists on leveling the shadows and highlights to find the average balance and have a uniform texture. There’s an awesome recent video from Flipped Normals explaining it (How to Grade Your Maps).
With graded maps you’ll have a great advantage when applying it as a tileable map or projecting on your mesh and it’ll be much easier to hide the seams.
A Photoshop tool that helps is the Adjustments > Shadows/Highlights. Just playing with the sliders you’ll advance more than 50% of the path to achieve a good graded map, after that you can play with Clone Stamp and Healing Brush Tool to hide any evident pattern on your texture.
Your research on real life references will make it worth now. I focused on how dust and dirt collects on surfaces and how oil reacts on lighting. I also tried to find different metals to make the piece more rich and complex and studied how space suits usually get its folds and wrinkles and the type of cloth.
Project, combine and do a lot of experiments with the textures you collected. Don't be afraid of going in the wrong way. I tried different combinations of cloth patterns, I used textures of vegetation and concrete to achieve a nice Glossiness breakup, so put all your artistic skill to play on your favor.
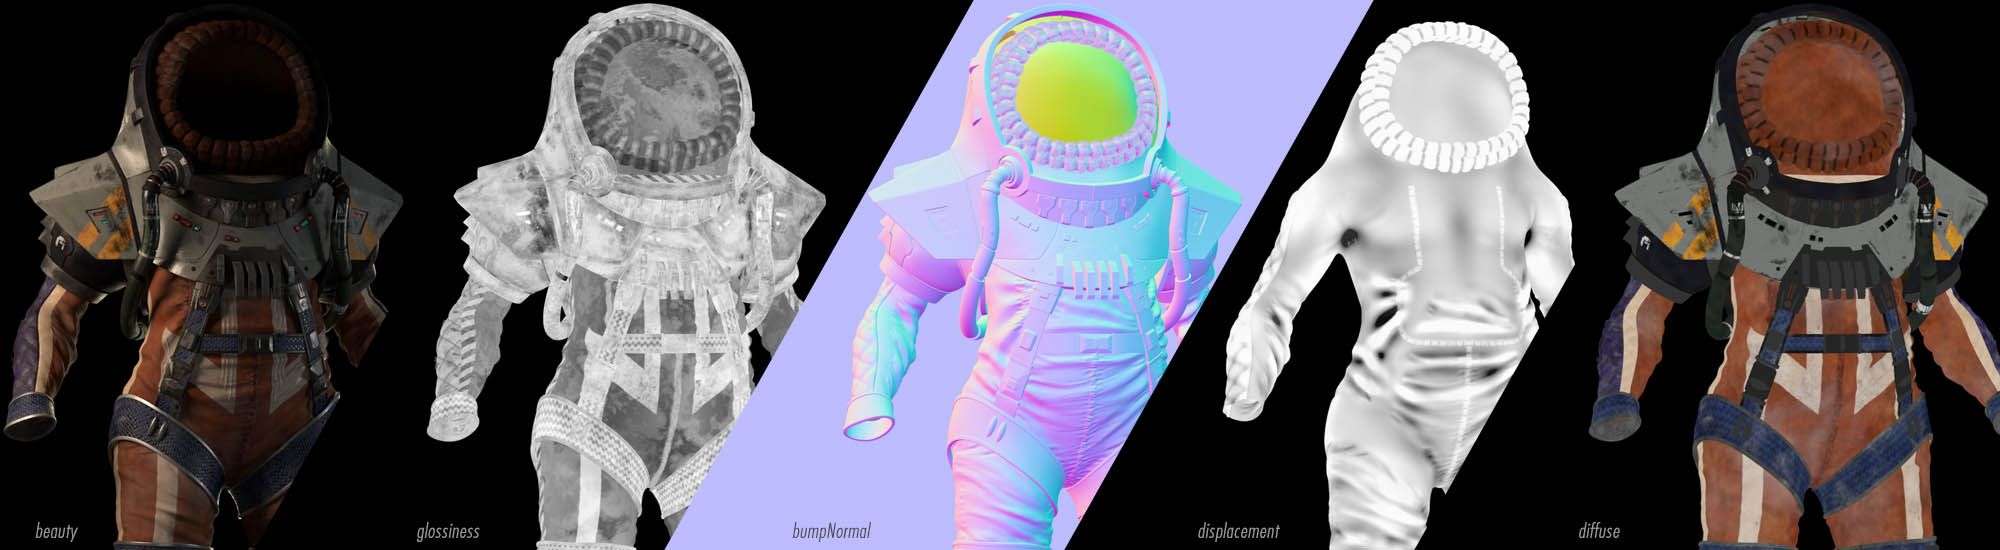
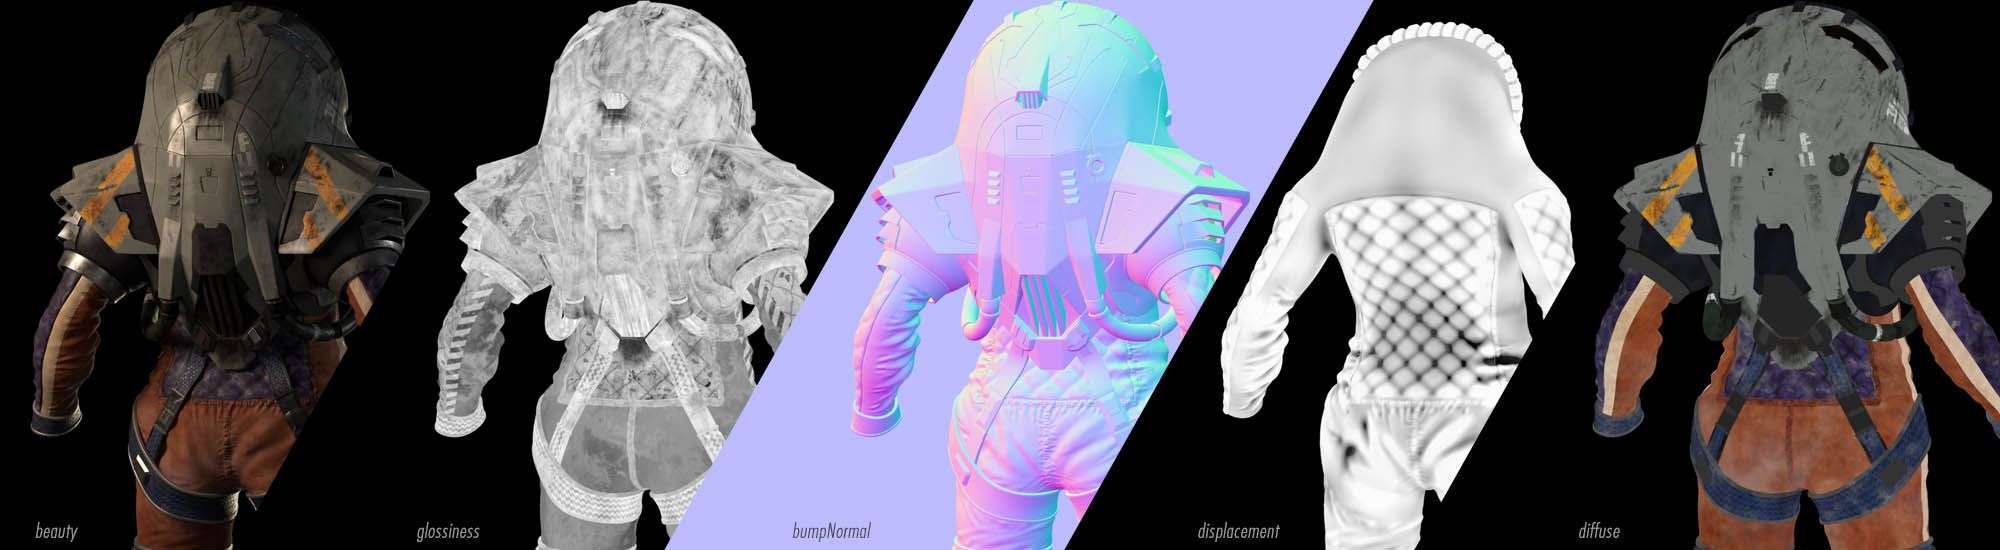
I painted 4 maps and 10 masks for Lookdev. The maps are: Glossiness, bumpNormals, Displacement and Diffuse. The masks are: Dust, Dirt, Scratches, Glass, Lights, Decals and Fur with variations for suit and armor. Specular map I used basically pure white as it's more accurate, physically speaking, and only painted a specific map for the oil leak reflections.
Look Development
For Lookdev rendering I used V-Ray as it’s the Think Tank standard and you only need to be aware on the Glossiness Map because the values are inverted in comparison with the Roughness Map on a PBR workflow.
To create the shader networks I used a lot the Blend Material and it showed to be extremely powerful. Here I used the masks I've painted in Mari, so I had total control for each dust, dirt and oil layer on top of my asset.
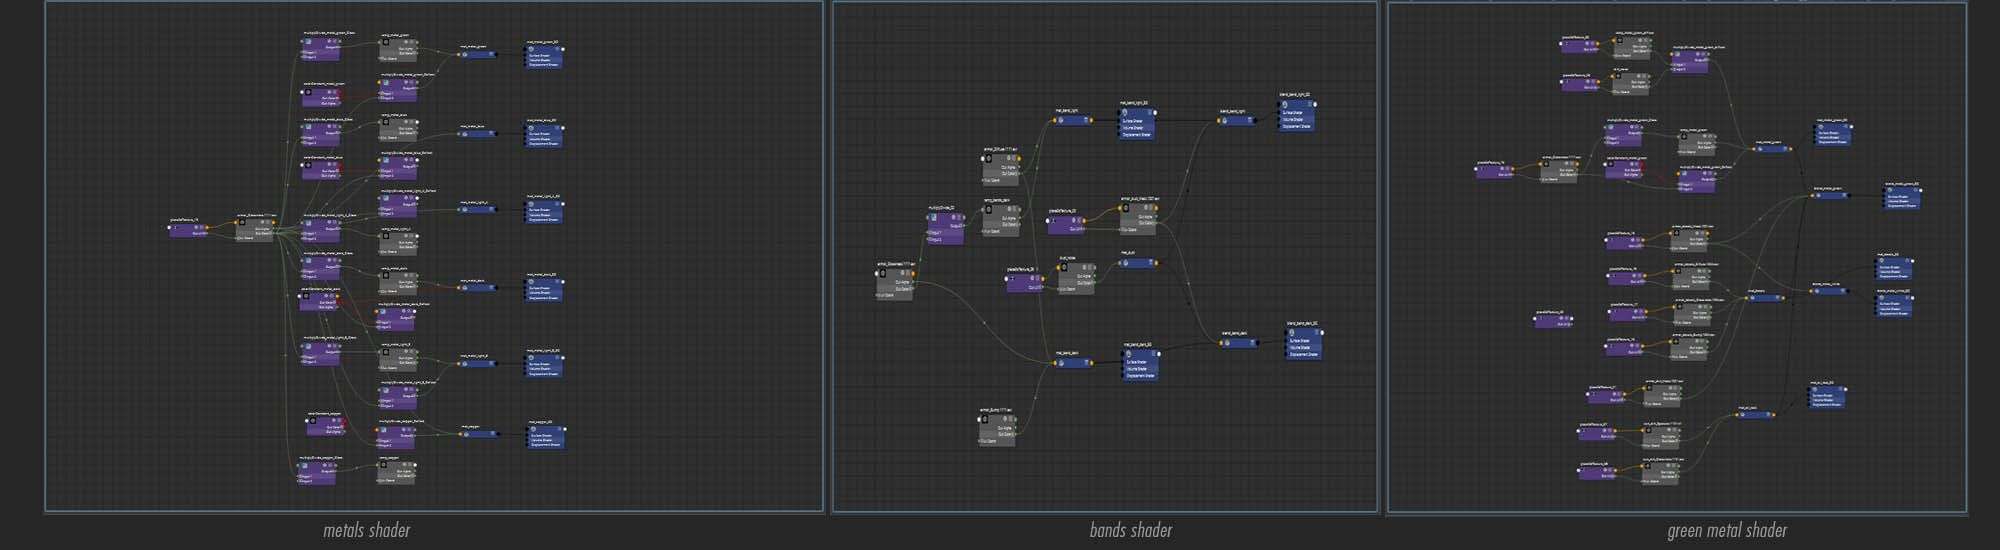
Try to create your masks from real photos and blending it with procedural ones. Using the procedural tools we have now on our hands is extremely attractive, but always remember that you’re an artist and you need to use your creativity to produce not procedural assets but unique assets.
Another valuable advice is generating some masks based on the smoothness and/or cavity of the mesh and applying it on top of your glossiness and diffuse maps blending it to achieve a complex variation that will sell a lot of the realism in the final render. There's a great article written by Paul H. Paulino, a fantastic texture artist and former student from Think Tank, where he explains how to create masks on ZBrush.
For lighting I basically used only a HDR map to light my scene as the main focus was showing how the textures and shaders will act on an Environment without the influence of controlled lights. It’s a good practice if you want to show only Texture & Lookdev and additionally you can create some beauty shots with some appealing lighting as an extra bonus for your demo reel.
This project would not be possible without the help of my mentors Justin Holt and Reilly Lohr and of course all other awesome teachers and students from Think Tank Training Centre. Thank you all :)
It was a long journey and I'm honored to share what I've learned with the Alien Space Suit. Also thank you The Rookies for the invite and opportunity to help the community to grow up. I wish to see more and more awesome projects being posted everyday and I hope that you all have enjoyed so far and that it can contribute somehow to inspire and help you in your projects.