
Texturing in the game industry has become much more advanced than years ago, and with Substance Designer’s soaring popularity, I think it’s important for people to know the in’s and out’s of this program. With more studios adding it to their pipelines, I believe you are at a disadvantage by not knowing how it works. A side effect I have found while learning designer is that doing hard surface exercises have made me better at modeling.
Coming up with an idea
When I think of a material I would like to create, I often think about what I can gain out of creating it as an exercise. Every single project will make you better, but you have to be willing to expand your horizon from the normal range of nodes you commonly see.
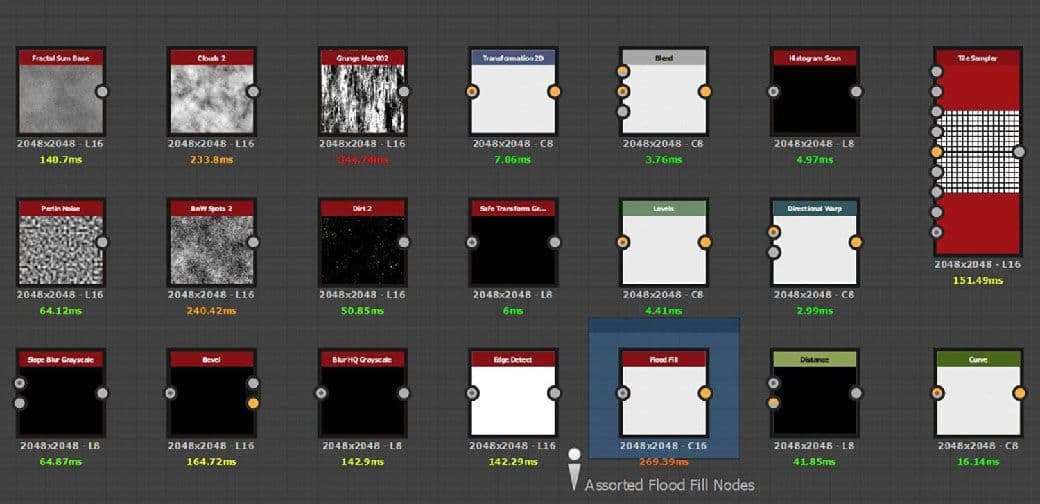
These are the nodes that I commonly find myself using in most projects. I haven’t listed all of them, but even as a base, the selection here is varied. When I first started using designer, I think I used the same four or five nodes, kitbashing grunge maps together to get weird shapes. While they looked cool, they didn’t really look like anything. I started to browse ArtStation every single day, and even today I often filter to Substance Designer work on the website. Looking at other people’s work and figuring out techniques is a big secret to improving.
For example, if you look at the same type of rock made by different artists, you can get a feel for the general shapes and realize that the first few steps of every material are generally going to be similar. A model can rely on it’s silhouette in any form of presentation, but materials can undergo entirely different transformations depending on how they are presented. Understanding other people’s work, presentation techniques, and ingame application is just as important as using real life reference.
Depending on the material, I’ll opt for usually 1-5 images. Some people go for pages and pages of reference but sometimes there’s one specific scenario I want to replicate, or a specific image that has a lot of detail.
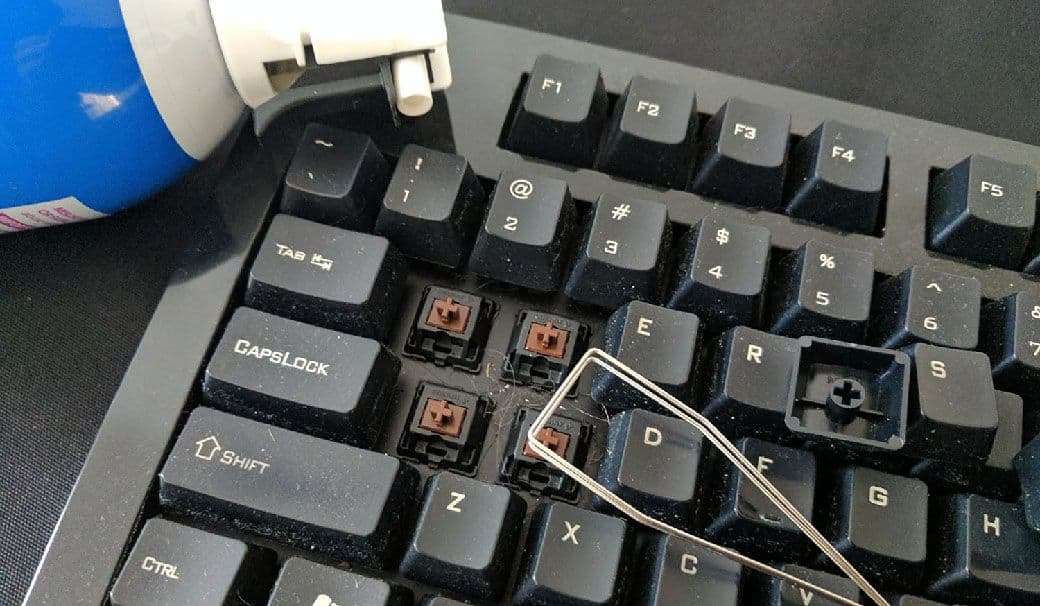
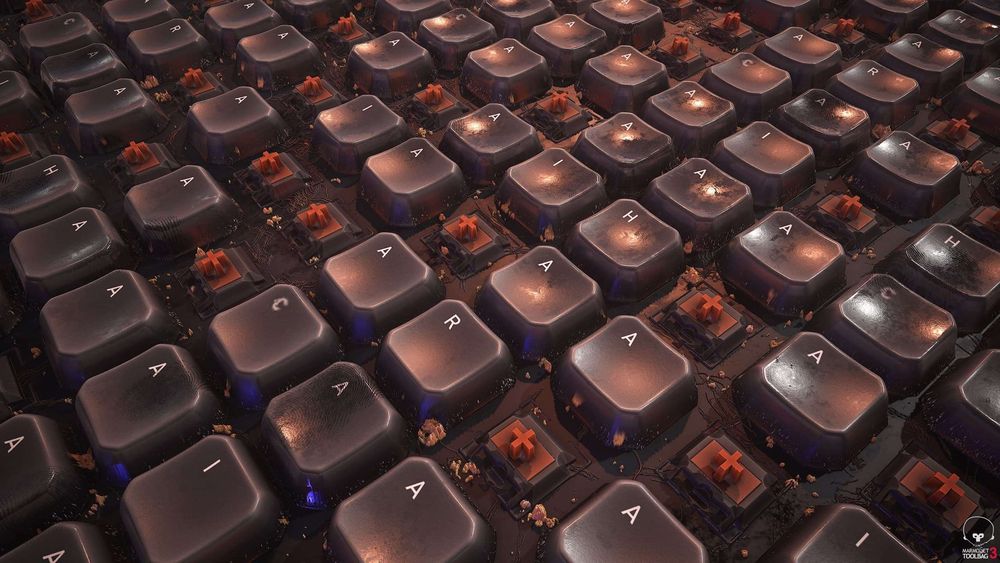
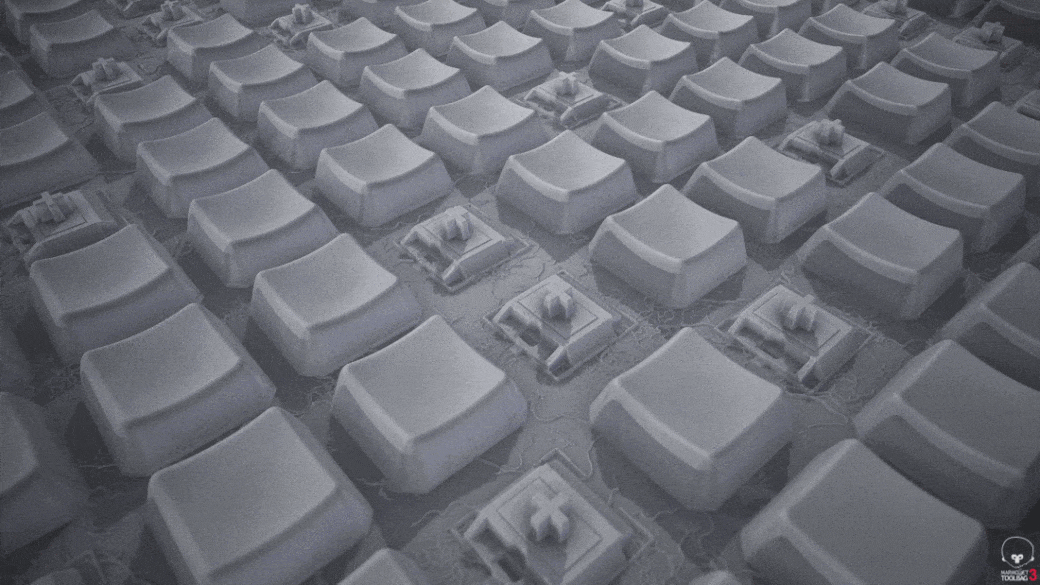
Another thing to note is that inspiration can strike at any time. I usually work at my kitchen table on personal work, but sometimes will go to the public library because it’s quiet and easy to focus. One day when sitting at my laptop I dropped a piece of granola between the keyboard, and immediately got to work looking for a reference. I liked this image because it had lots of interesting attributes to it.
When creating a material, it’s important to break it down into pieces. Here my reference has the keys, caps, hair, and dust. While that is four components, I wanted to add crumbs to go along with the real life situation that had inspired the project, as well as oils from my hands. These attributes help you to tell a story about your material. You want your materials to feel like they’ve been used by humans or nature, which will help them feel more alive.
Your Graph and You
Starting out for the first time in Designer, I opened a few materials I found on Substance Source and was very intimidated by the complex graphs. However if you break down graphs piece by piece, you start to see that they are not that complex. At its simplest form, Substance Designer is having you create a height map by adding and subtracting whites and blacks from one another.
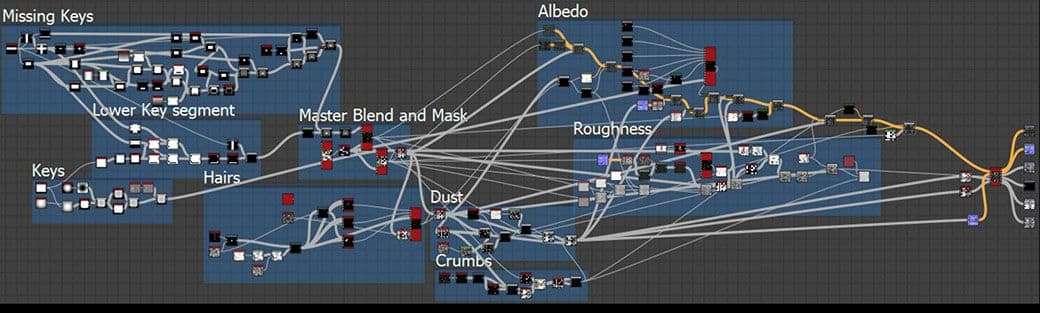
This was the graph that I ended up with when creating my keyboard. Looking back at the project when I first made it, there are some nodes that can be deleted to save some space. The fewer and less expensive nodes that you use, the more practical your material will be.
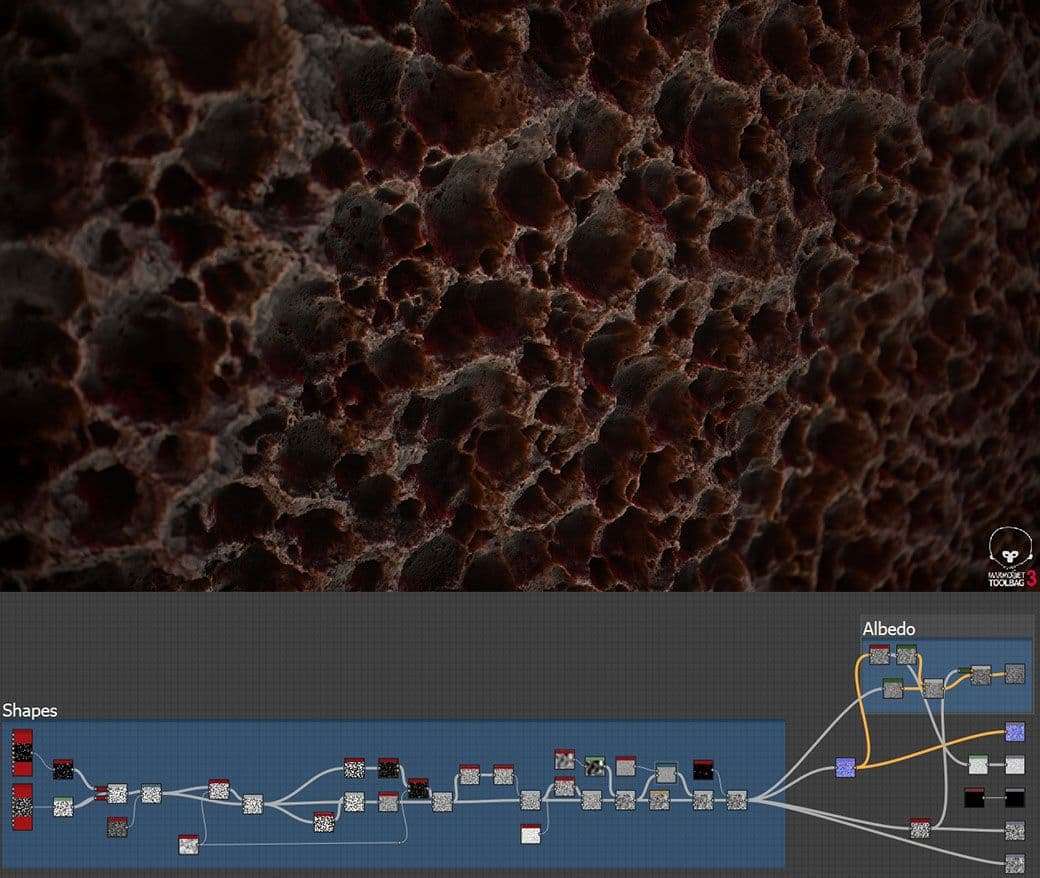
This is a material I made in an hour, and as you can see the graph is very simple. You can get some pretty awesome looking shapes with just a few nodes, while for some others it might take a bit more effort to get a more defined shape. Quantity does not always equal quality!
Something I like to do on more complex graphs is to frame the different sections for organization. This helps me work in pieces instead of all at once, which significantly decreases the time spent trailing back and forth between nodes. You want to make sure you always work smarter, not harder.
When working, like I mentioned before, you will be making a heightmap. Why specifically that map instead of an albedo or roughness? Because your heightmap is going to be what drives all of your information. You can create masks from the different shapes for your other maps as well as get an idea of your forms.
One thing I’ve tended to do less of is before I would crank the program tessellation and scale sliders all the way up to maximum. This is an awesome way for seeing how your shapes and forms are going to be carried in the height map, but when it comes to practical application, I’ve found that it is not as useful.
Tessellation in games is incredibly expensive and you will be more likely to use your material’s height map for vertex blending rather than actual deformation. The detail should be shown through your normal map.
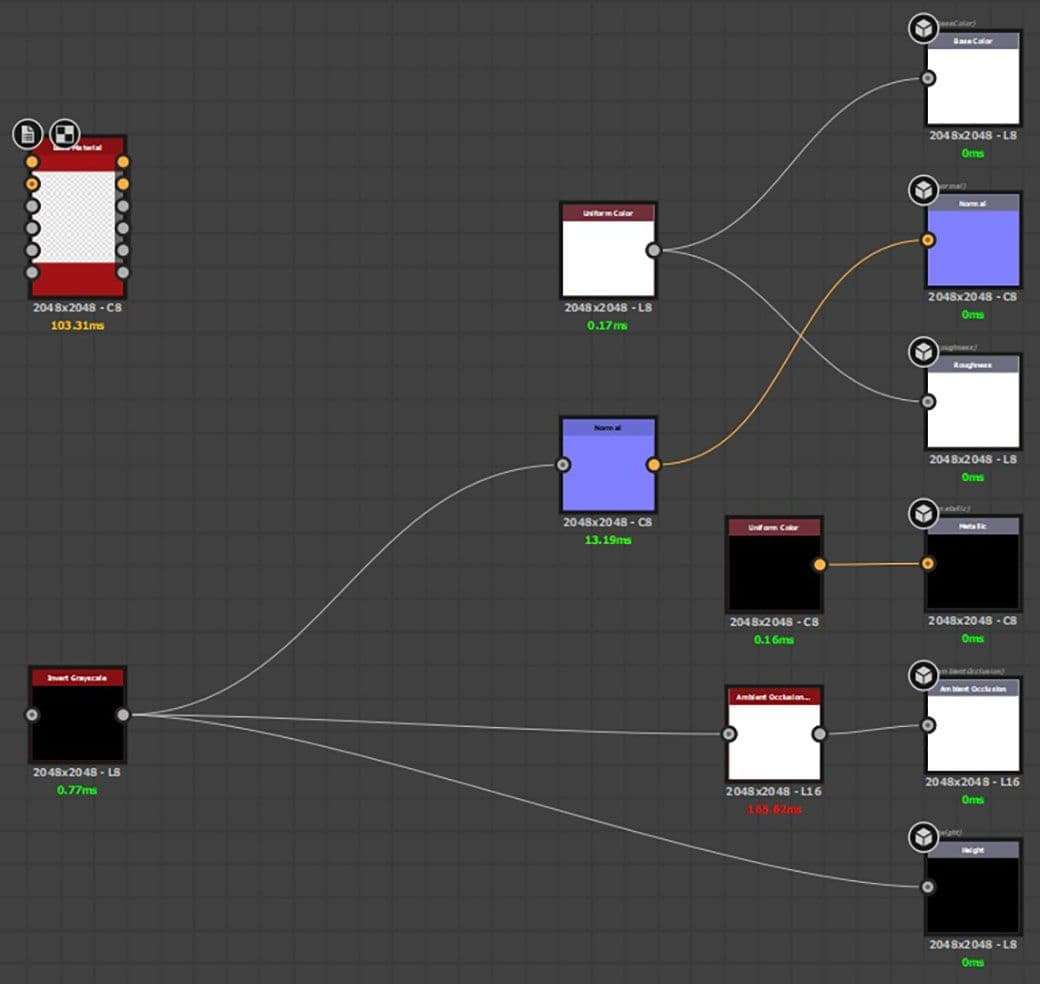
When setting up your graph, you should work with shapes in mind with no extraneous information. I keep my roughness, metallic, and albedo all at their minimum valus so I can focus solely on light and shadow information. The Invert Greyscale node (Set to false) is a great node for working like this, and I prefer it over the Base Material node. I like to keep my normal intensity around 10-15 at the start as a personal taste.
As for the Ambient Occlusion, I tend to leave it as is, and lower it if I think it’s too strong. Sometimes I’ll add a second one and mask portions off for different levels of shadowing effects, or for using for Dust and Curvature masks.
When making my materials, I like to export an early version to Marmoset Toolbag 3 to start to see how a lighting setup could affect the surface. It’s just personal preference, but I think getting started early on can help to give a better understanding of what needs to be fixed as you work.
Tips
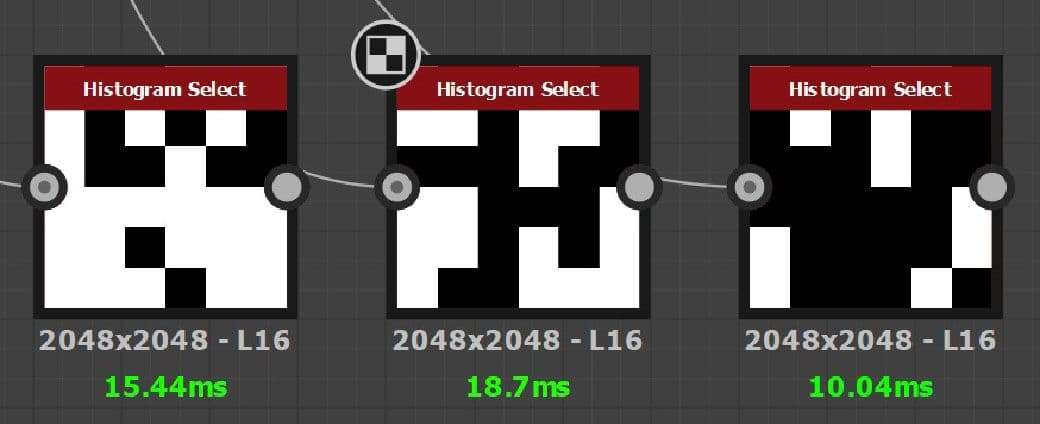
There are several nodes in Substance Designer that can help you clamp between white and black values. Depending on the situation you can find a use for many. Every node can give you thousands of different variations. There is no ‘proper’ use for one singular node because Designer can give you different ‘Happy Accidents’.
Using this Histogram Select node you can clamp a variety of different values to create different masks. I use this to get different forms of variation my keys to make each one look more unique. I always try to break up any kind of noise or grunge before laying it over my shapes because then it looks too uniform. If there’s a crack in a rock, water will seep down into it, or if there's a crevice, dust will build. Nothing can go perfectly over a surface. Even a smooth surface will have dusty imperfections to refract light.
I often rotate between the two but if your roughness is overall matte, I’ll often work on my albedo map after I finish my height. What I like to do is create a blockout of my colors, and then add different Grunges to create wear and tear.
When creating roughness/metallic/albedo, it’s important to follow PBR color schemes. Unity has a great article with some helpful graphs that can tell you proper values.


The roughness and albedo maps can provide masking for each other, which is part of the reason why they take less time to do. A technique I use to create bases is to Clamp and then further modify it with Blends and create several different variation. Always consult your reference and if you can, real world objects with the same properties as the one you are making.

When presenting in Marmoset, I always like to have a fill light, and two different colored directional lights, one hot, one cold. I want to bring out the feeling of the roughness and shadows of the shapes so I make the lights rather strong. Staring at this keyboard should make me think that a greasy slob does not take care of it.
Trying to tell a Story is the utmost priority when creating materials, as they’ll only help to elevate the model they’re used on.
Closing
Materials are the skin of the industry. Many people make some amazing models and environments with fantastic details, but materials help to bring them up to that next level that so many people want them to reach. Materials and textures bring out a sort of critical thinking that helps artists to imagine what their object was used for.
A player should ask questions when they see an object in game, like “Who laid these bricks? How old are they?” simple things such as these can help to further engage people. Artists are supposed to create incredible stories in games, and this what drives me to create the work that I do.
Good luck to all the artists in The Rookies, and let's all tell some great stories!