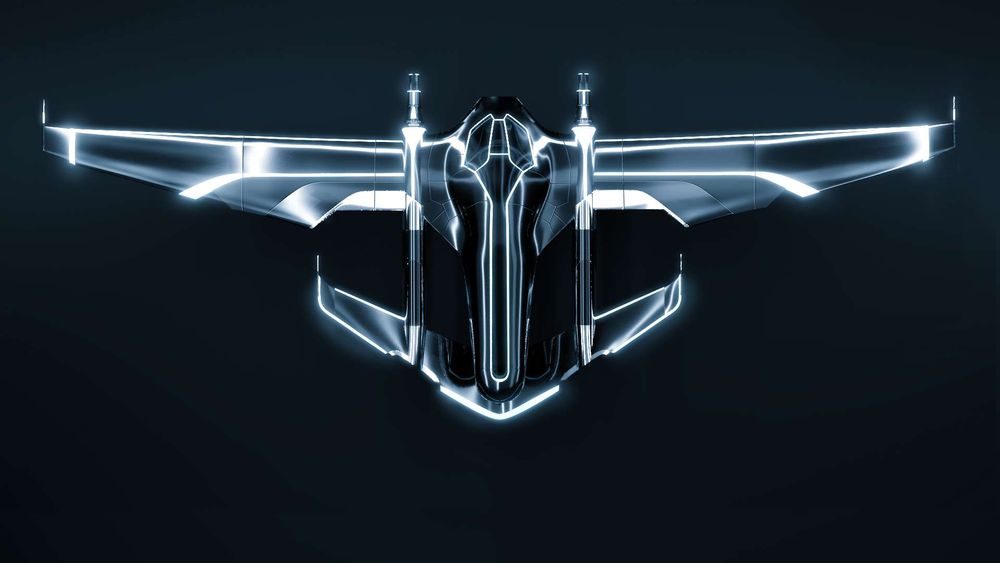

Imanuel Jason is a Hard Surface enthusiast and a 3D modeler from Indonesia. In this article, He would like to show some modeling tips in how he build Daniel Simon’s TRON Light Jet from scratch to finish.
When modeling a complex shape like this, I find it difficult sometimes to start off the model with the usual polygon modeling method. Even though I have the freedom in creating a smooth mesh in Sub-D mode, I still lose the fine control of the shape. NURBS method however, could just be the answer for this.
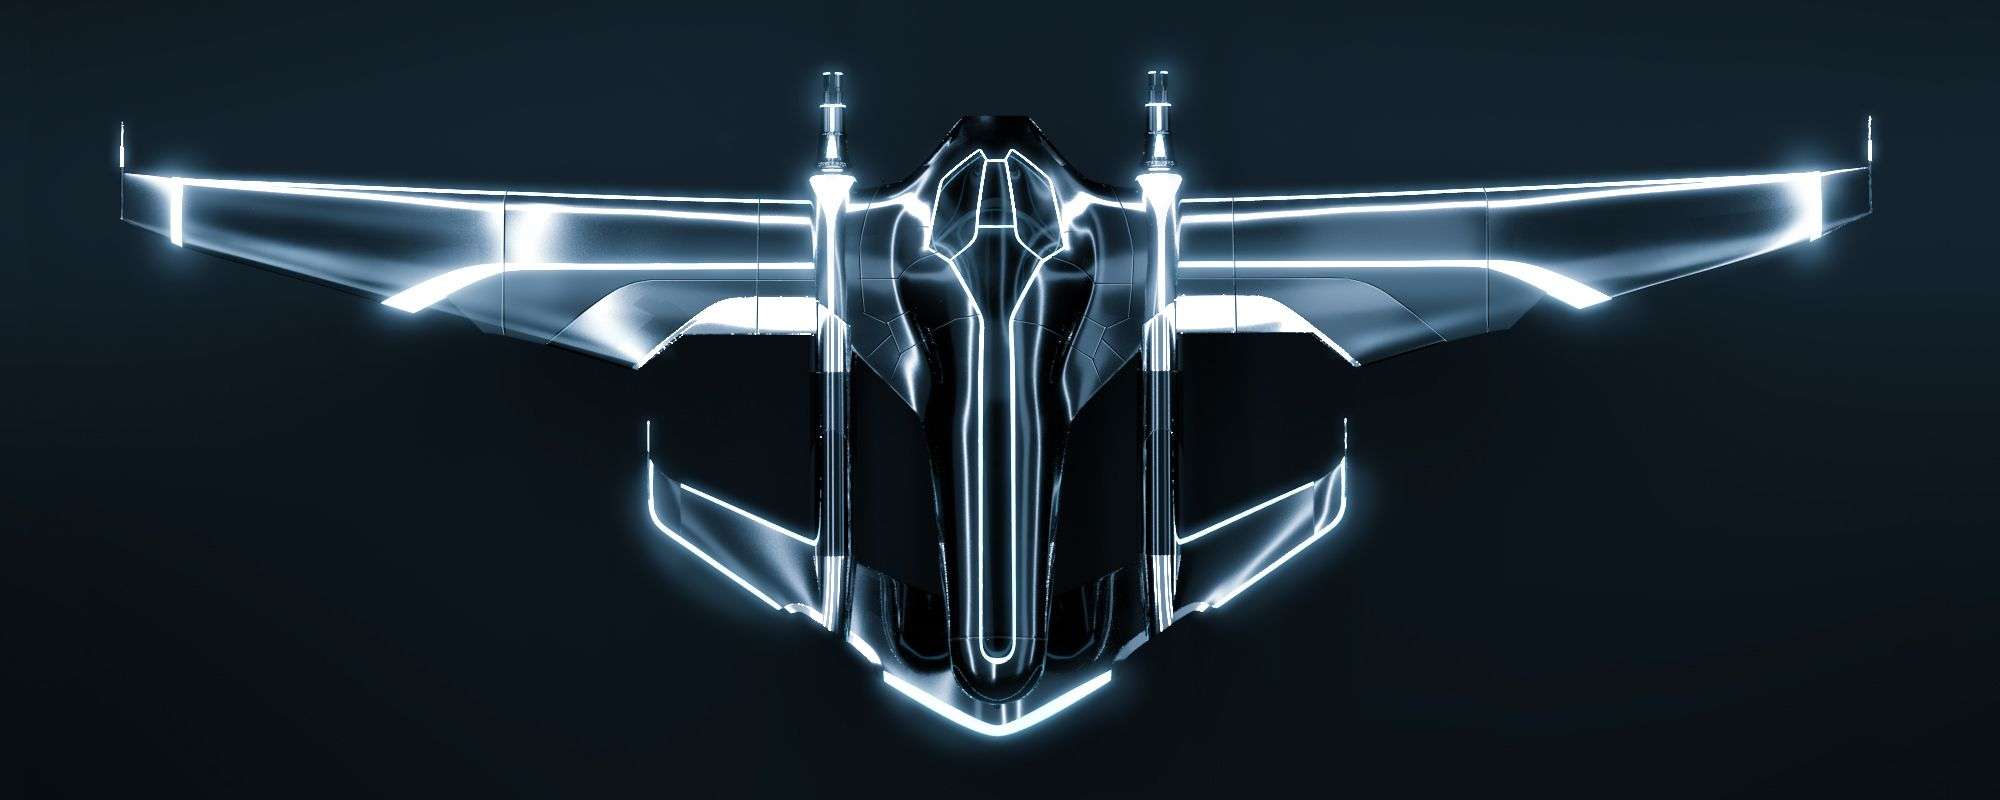
In this article, I would like to show you how I build Daniel Simon’s Tron Light Jet from the beginning until the end. Starting with building the curves for the jet.
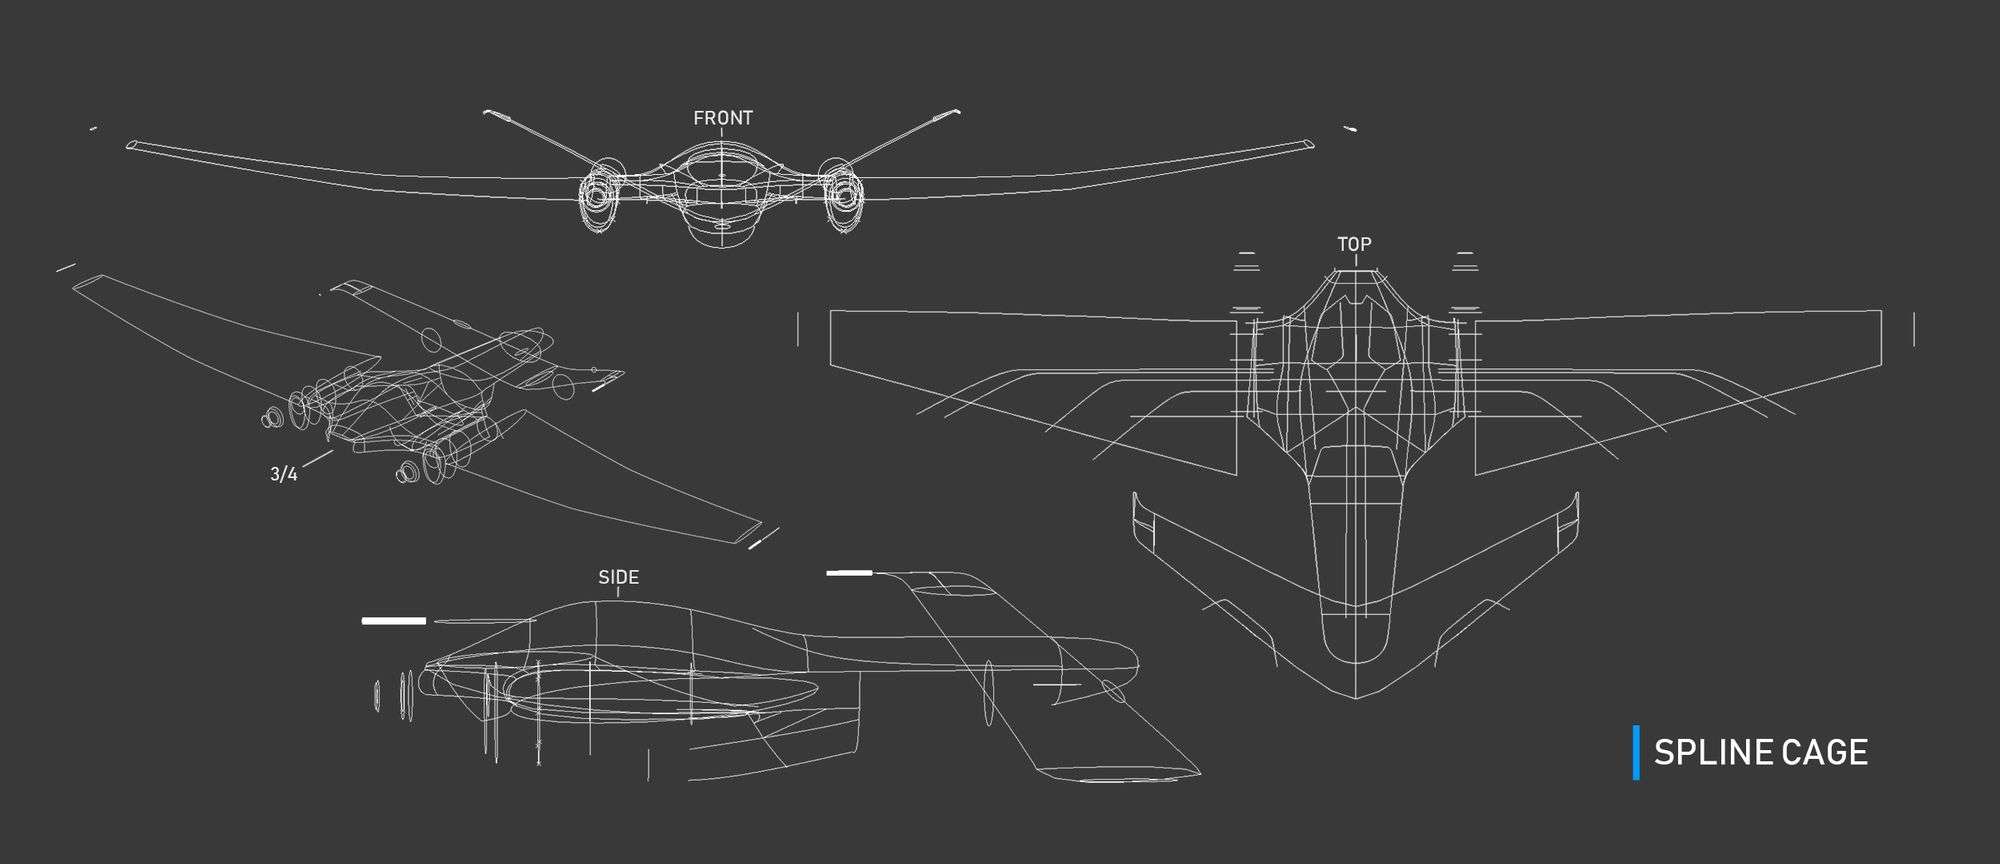
Building The Spline Cage
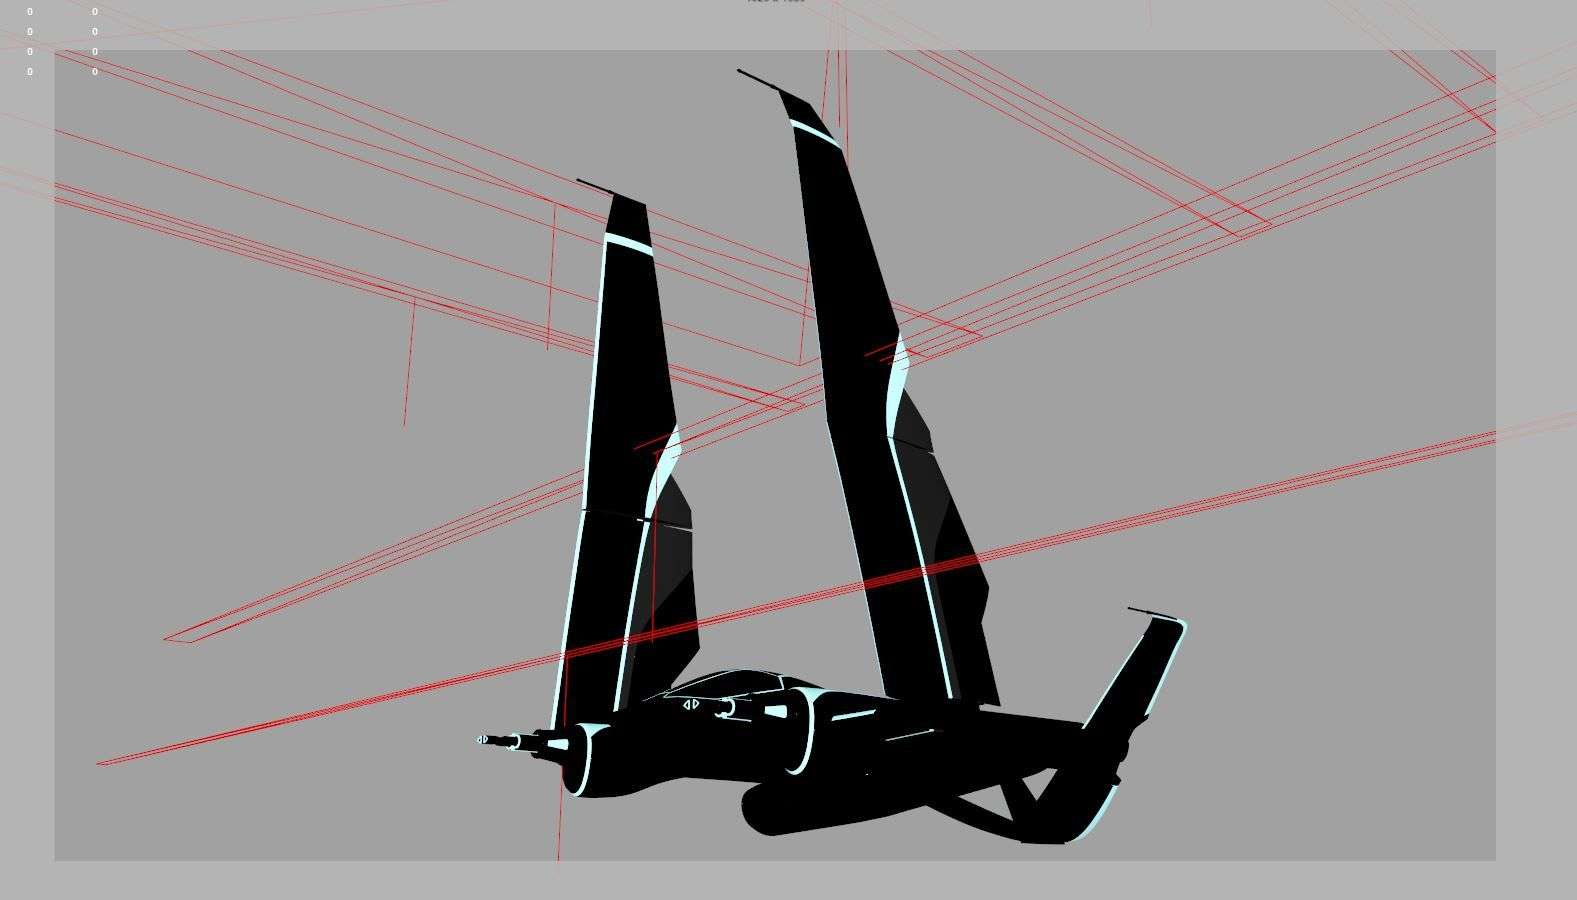
In this process, I like to think it as your 3D line drawing. All I am doing in this step is to block out or “sketch” the body of the plane first. Immediately by drawing the curves in the scene, I started to have an image on how the jet is going to look like. You can use reference images as your guide in this process. But since the reference that I got is not in orthographic views, I still need to do the proportion by eye.
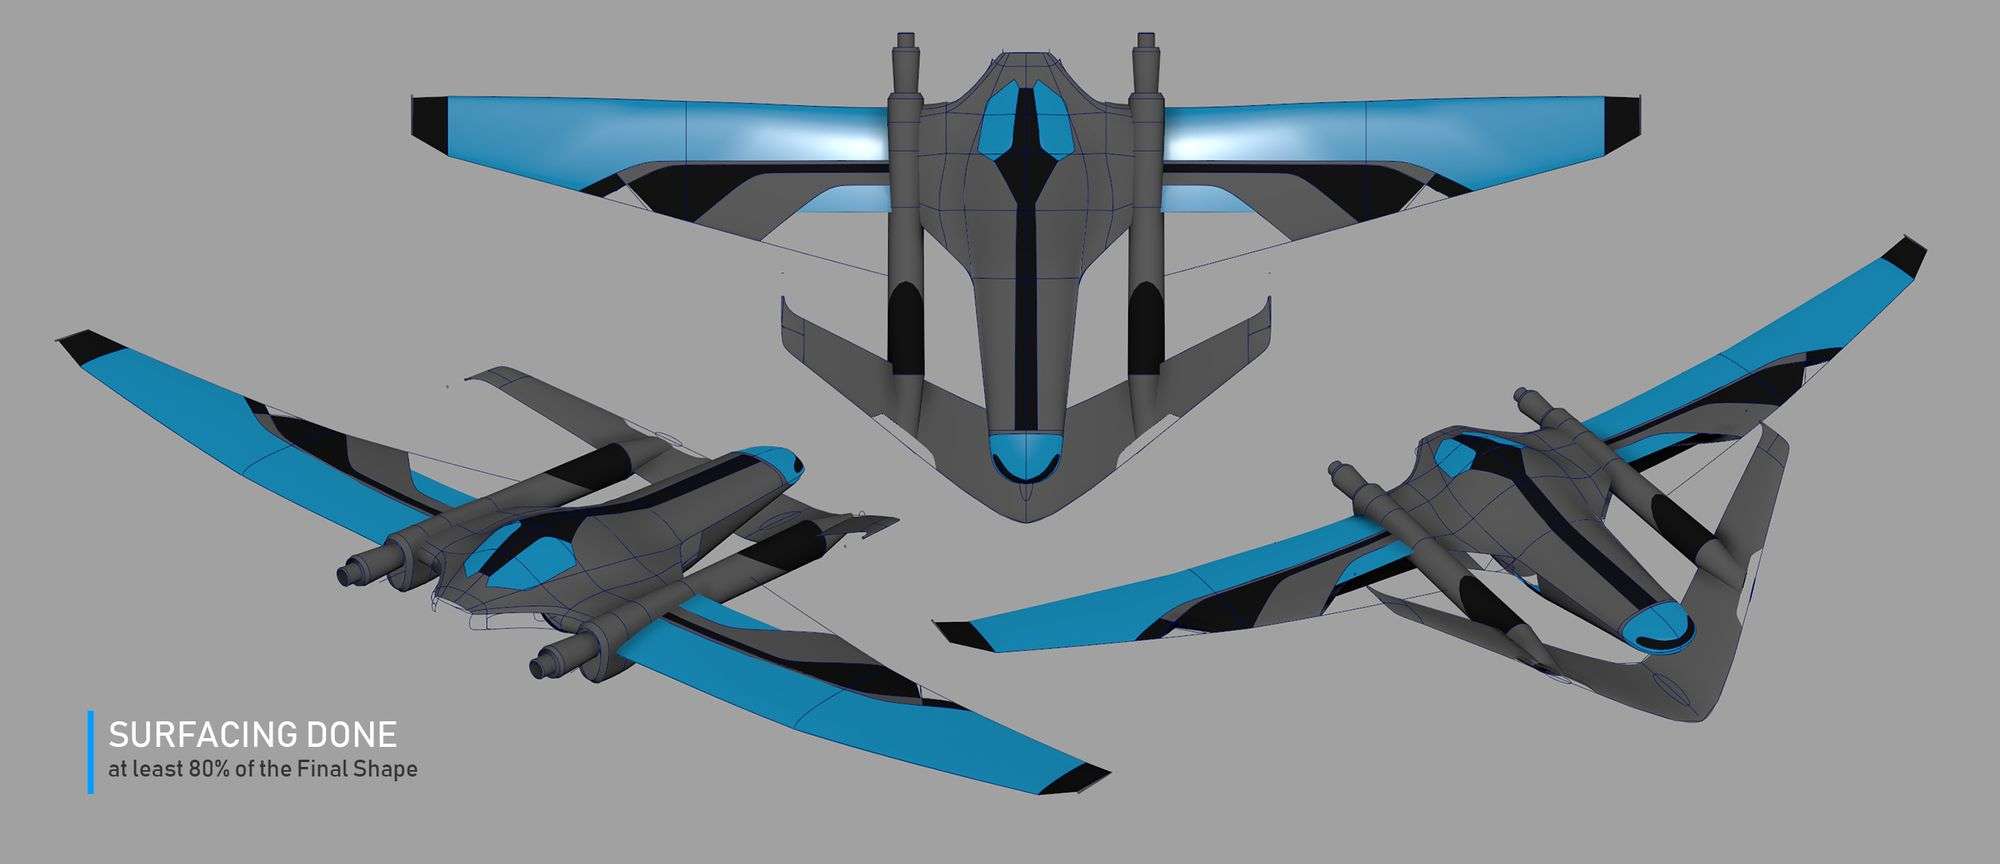
Surfacing & Trimming
This is where the fun begins. From the spline cage, now I have curves that I can use to build our surfaces. The tools that I use in this step is Boundary, Birail 3+, and Loft. Before I use the tools, I need to make sure the curves are connected in 4 sides, otherwise surfacing will be impossible. After I did the surfacing, I can start to see the final shape of the plane. Remember not to delete history at this point, because you will lose the ability to tweak the surfaces from the curves.

Another important NURBS tool in Maya is Trim tool. With this, I can simply cut the surface like cutting a paper. I don’t need to worry about topology to create this shape. Simply draw the curves, project the curves to the surface, and cut it. I use this tool for creating the wing, the window, and the jet.


The goal in this process is to get the shape of the plane for at least 80% of the final look. When we are finish with the surfaces, then we can move on to retopologizing the whole model and start working on the details
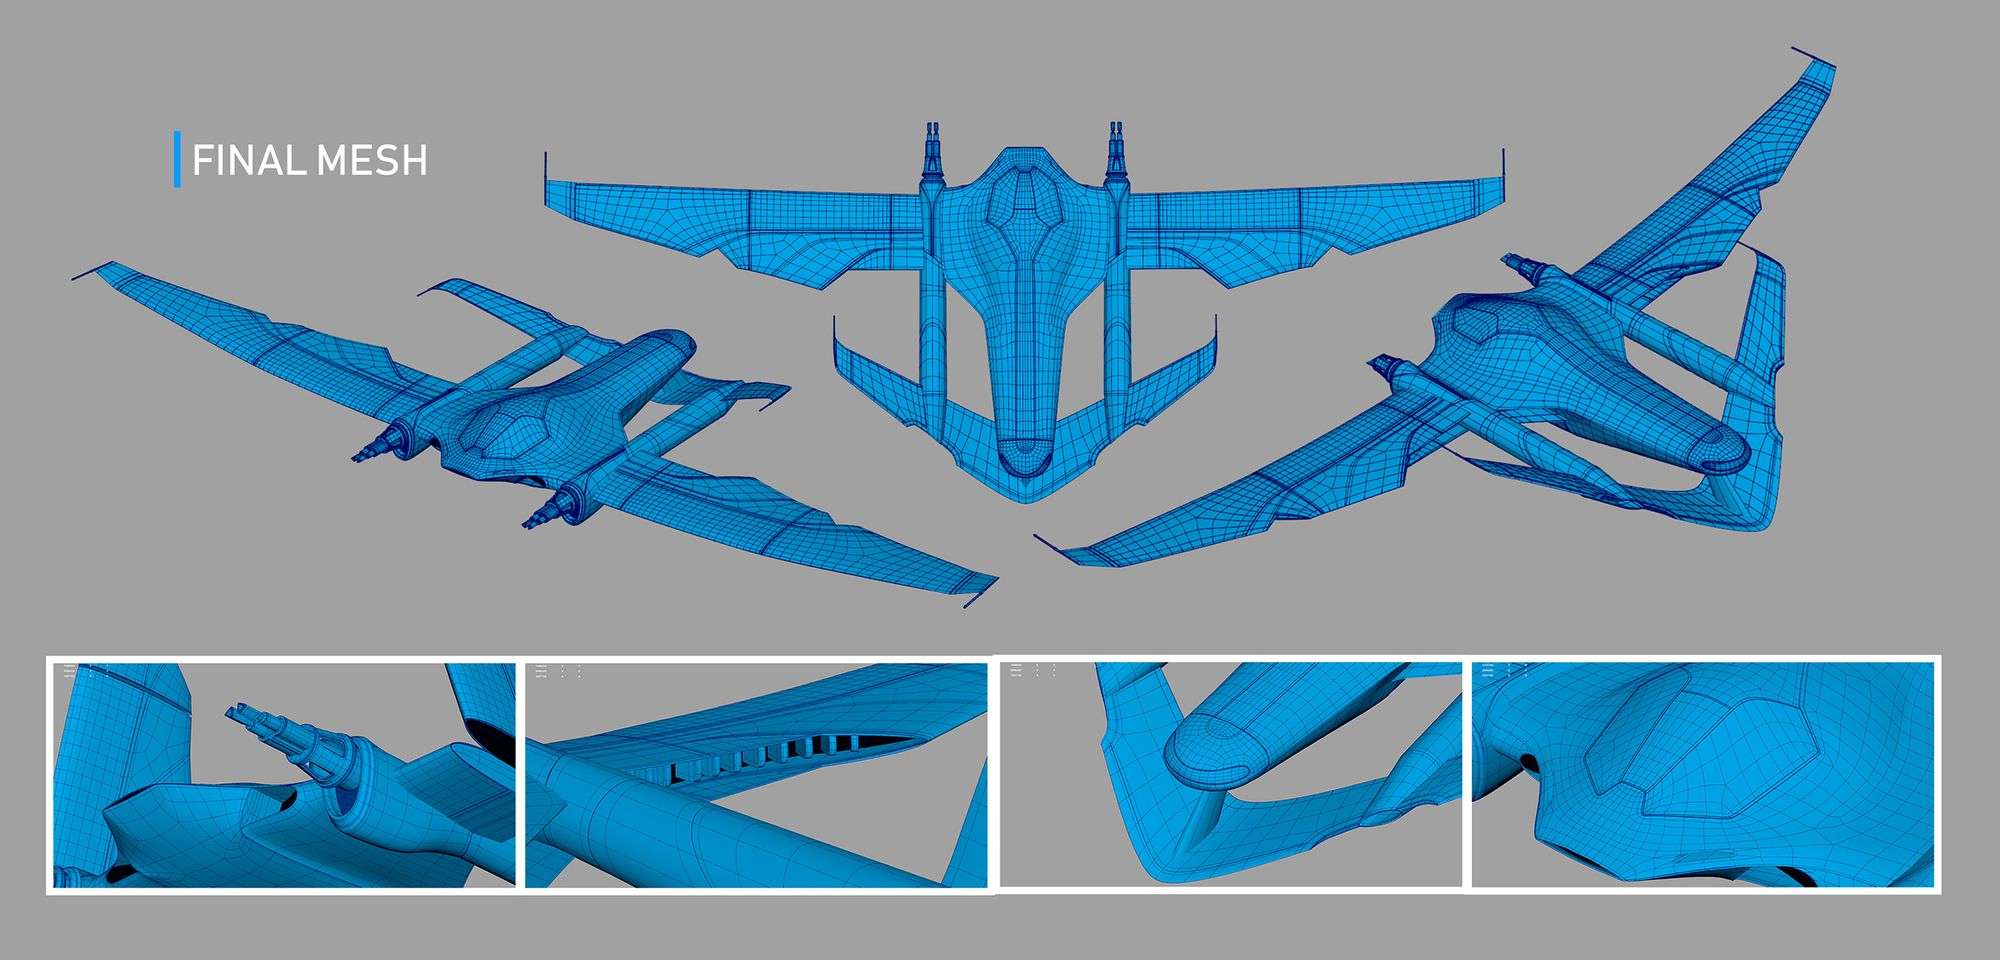
Moving to Polygon
Quad Draw tool is the MVP in this process. I used it a lot. I simply convert the NURBS surfaces to polygon, and just dial up the numbers of the resolution so it holds up all the shape.

Don’t worry about the topology, we will take care of that with Quad Draw. With all the mesh converted, simply make it a live object, and draw the topology using the Quad Draw tool. It is a fun process, but it takes time.
One thing to keep in mind in this process, is to watch out where you put the edges. You need to make sure the edges are following the directional line of the plane.

In this picture for example, I am making sure that the edges are following the directional line of the shape. This is to make sure that when I am doing the lighting for the jet, I can see the highlight flows accurately on that side. So, be very attentive where you put the edges.
Other thing that you need to consider is the pole. Try your best not to have more than 5 edges in one pole. 3 to 5 is your goal, and 4 is the best. More than 5 will results in pinching and undesirable shape later. Just keep doing this process to all the mesh. And when you are done, then you can continue working on the thickness of the mesh, bevelling, and filling the gap with details.

Lighting & Rendering
For this project, I used Arnold renderer as my render engine. This allows me to use Arnold renderview as my advantage and tweak my lighting in real time. It is really helpful for me, because I can slowly adjust where I can put the highlight in my jet to show the shape of the plane as best as possible. The light that I used is Rectangle Light, which mimics a studio light very well.
Oh, and don’t forget to add the background plane in the scene. Even though you might choose to ditch the background in compositing later, this step is still essential because it helps bouncing the light to the piece. This creates a natural secondary light for the jet.
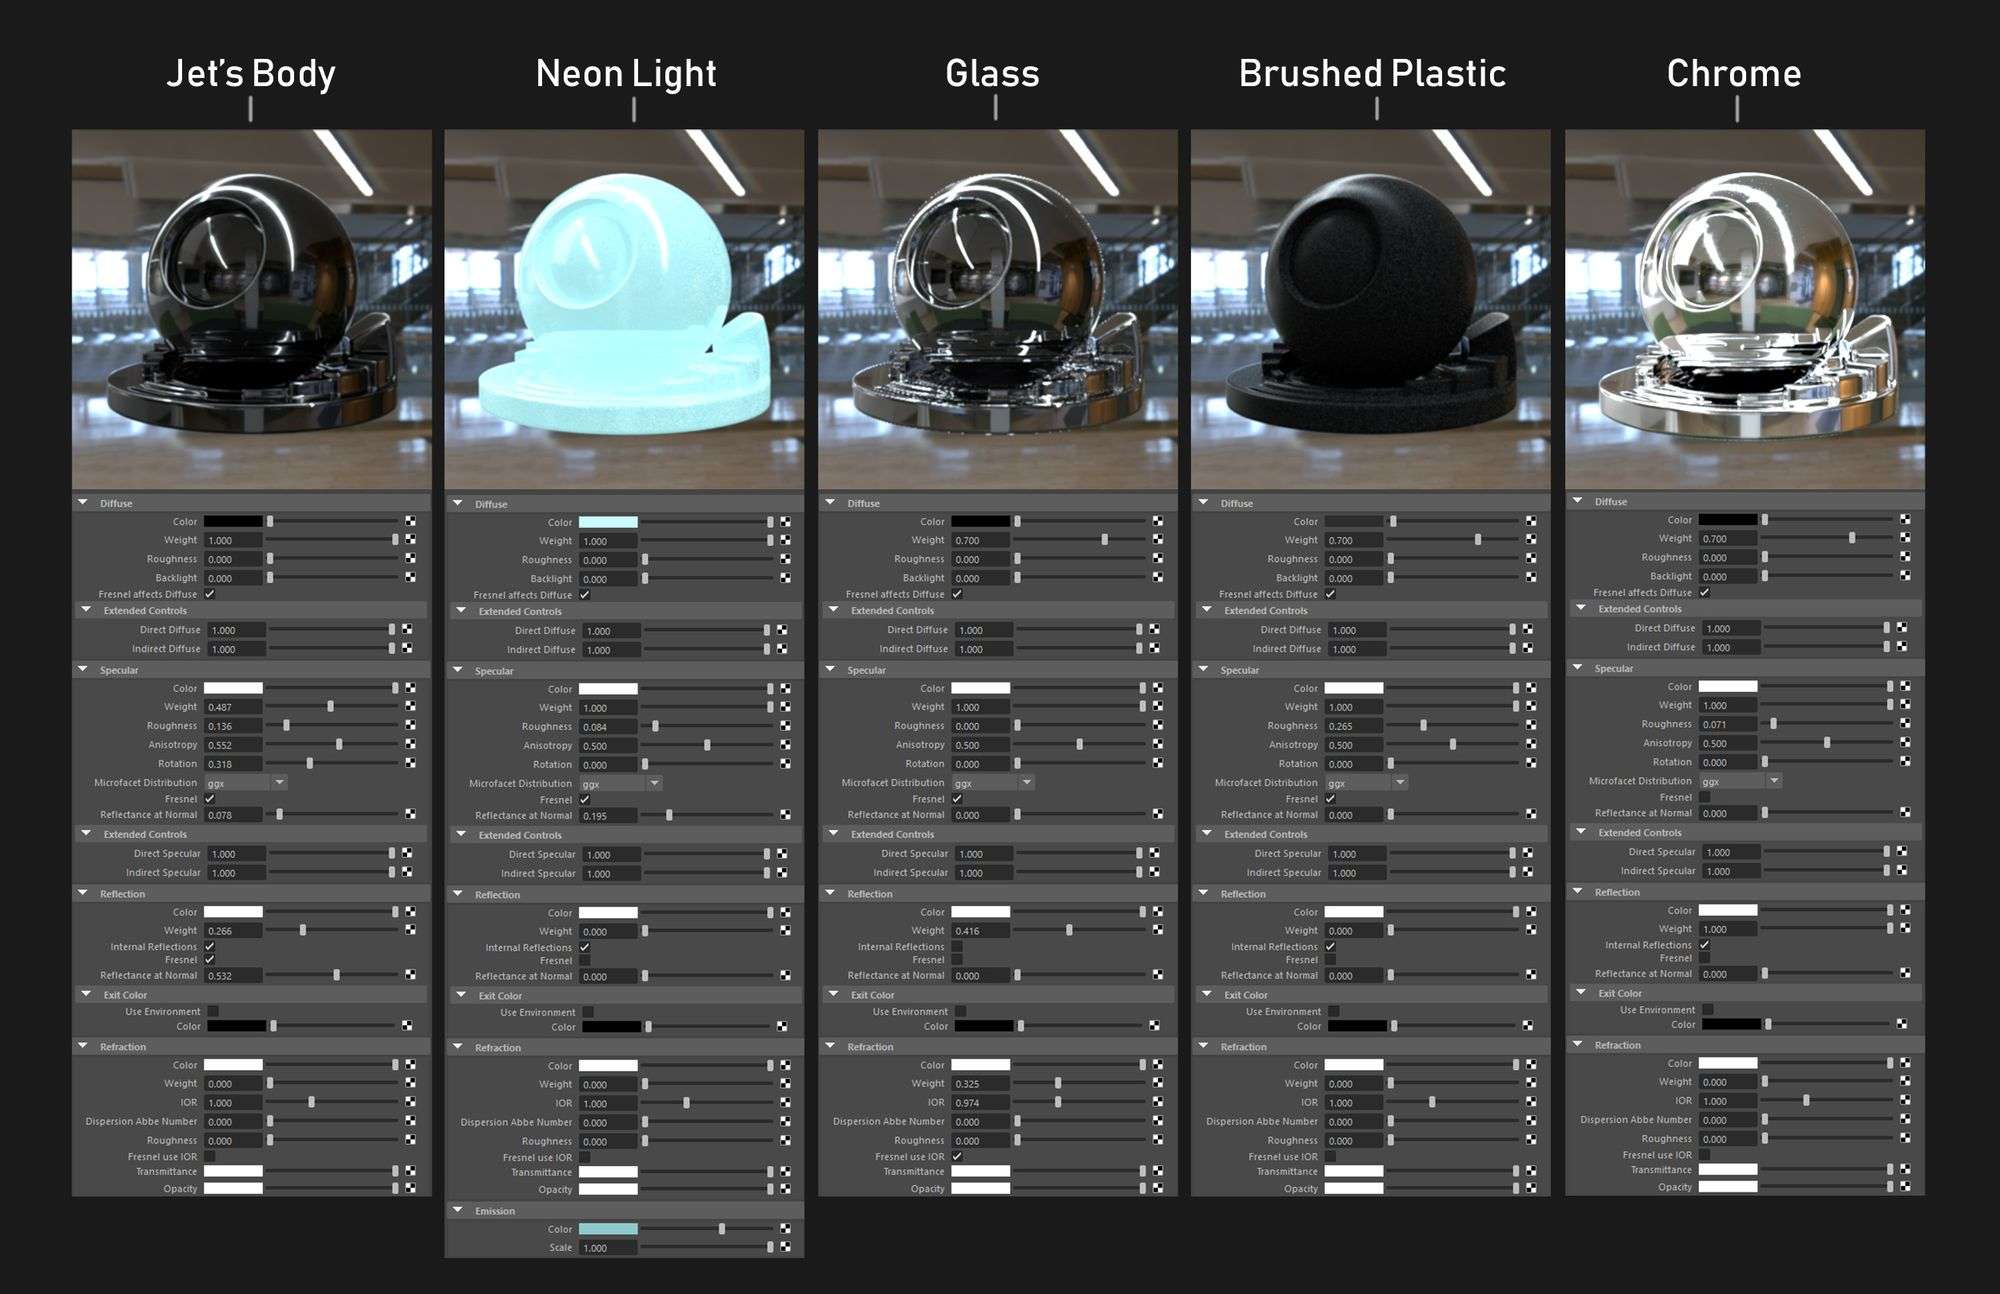
Now let’s move on to texturing and shading. In this project I am planning to make it look as clean as new, so I don’t worry too much in painting the textures. Instead, I focus on the shading of the materials more.
For the materials, I used ai standard material. And to get the different looks of the material, I simply tweak the specular glossiness, specular's weight, reflection, and refraction. I also tweak the Fresnel and the reflectance at normal's number to get the right metal looks. And for the iconic TRON Neon light, the settings that I tweak is the emission. Simply turn it up, and you will get that neon like material.
Here is the breakdown for some of the main materials that I use:
Final Adjustment and Adding Small Details
After I rendered the scene, I finalize the piece in Photoshop. Using the curves, I color corrected my piece to fit the theme. In this case, a cool blue-ish color is what I chose for the piece.


Sometimes, I did notice that the render is not always perfect. Some of the rim light tend to be noisy. Instead trying to re render the whole scene and probably increasing the render time, I prefer to just paint over the image.
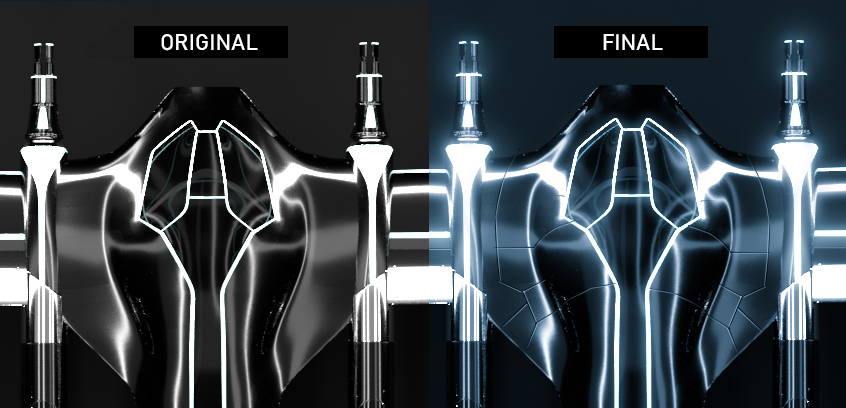
Apart from fixing the render, I also put small details that usually takes a lot of time to model. In this image for instance, I painted the parting lines in the main body of the Jet. This brings up the contrast of the plane, without spending another hours in modeling those details.
Epilogue
In the end, I would say that this is might not be the quickest way to model any mesh, but I think this is one of the most accurate way to model. Depending on the shape of the model, you can judge which modeling method that works for you. In some cases, working in polygon while also blocking the mesh with curves can work nicely.
I would like to say thank you to The Rookies for kindly presenting my works and to all of the readers. I hope this article could broaden your modeling toolkit and help you in your next portfolio.