
Hello everyone! My name is Jonathan Hemmens and I’m a 3rd year Games Development student studying at Falmouth University in the UK. I’ve been specialising in Environment Art for the past two years and I strive to keep on learning and developing my skills.
I wanted to share some theory and workflow tips I’ve picked up whilst working on my summer project, The Final Stop. I completed the project over my summer break last year while I was attending Brian Recktenwald’s course; “Designing a Modular Environment using Unreal”, which was hosted through the Artstation Masterclass.
Starting a project
As a student, personal projects are a really important part of the learning process. Sometimes it can be hard to decide on what to create, and I know a lot of people who start projects and drop them quickly. I believe that when you start a project, it’s important to decide not necessarily on what to make, but what you desire to get out of it.
For this project, I wanted to design a compelling interior scene with storytelling and game production techniques. However, you could just as easily decide to start a project with the desire to learn ZBrush, organic modelling, or interesting lighting. Whatever it is, the subject of the scene should come second to what you’ll get out if it.
Reference Gathering
I usually start my projects by doing a large amount of reference gathering. If you can go out with a camera and gather it personally, you can get a solid feel for your materials and shapes.
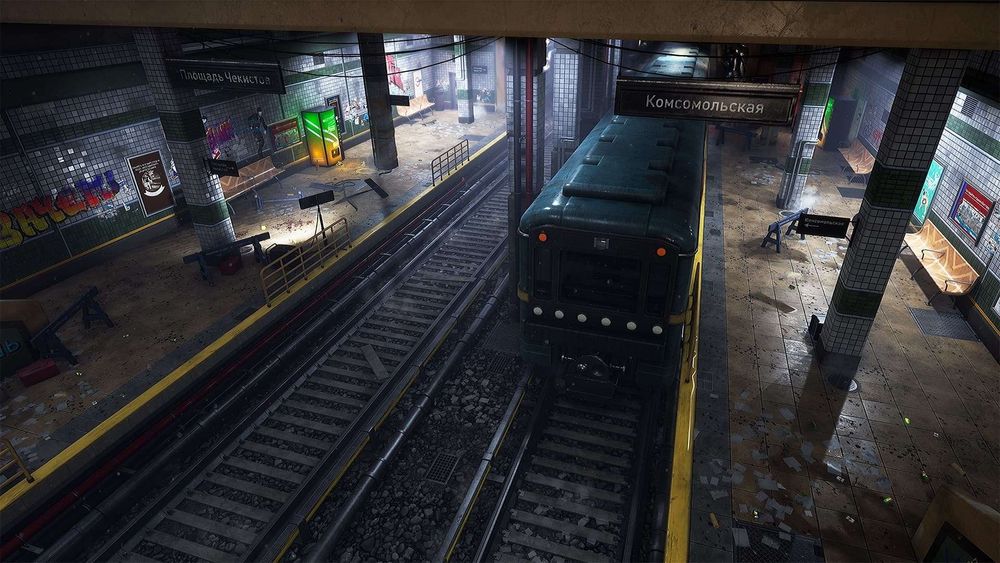
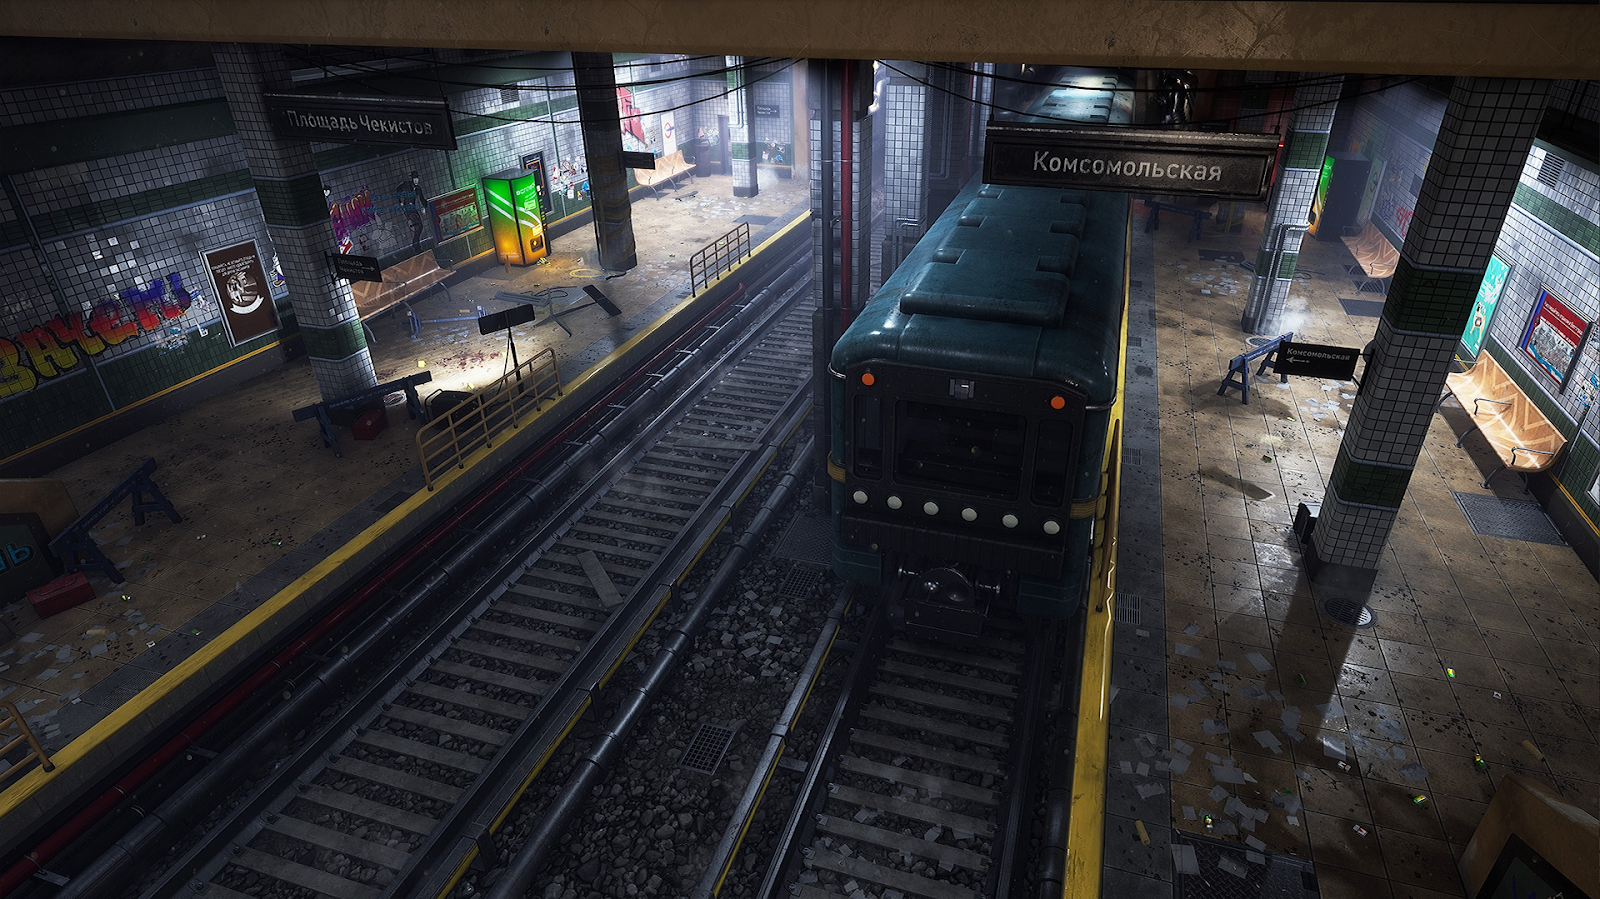
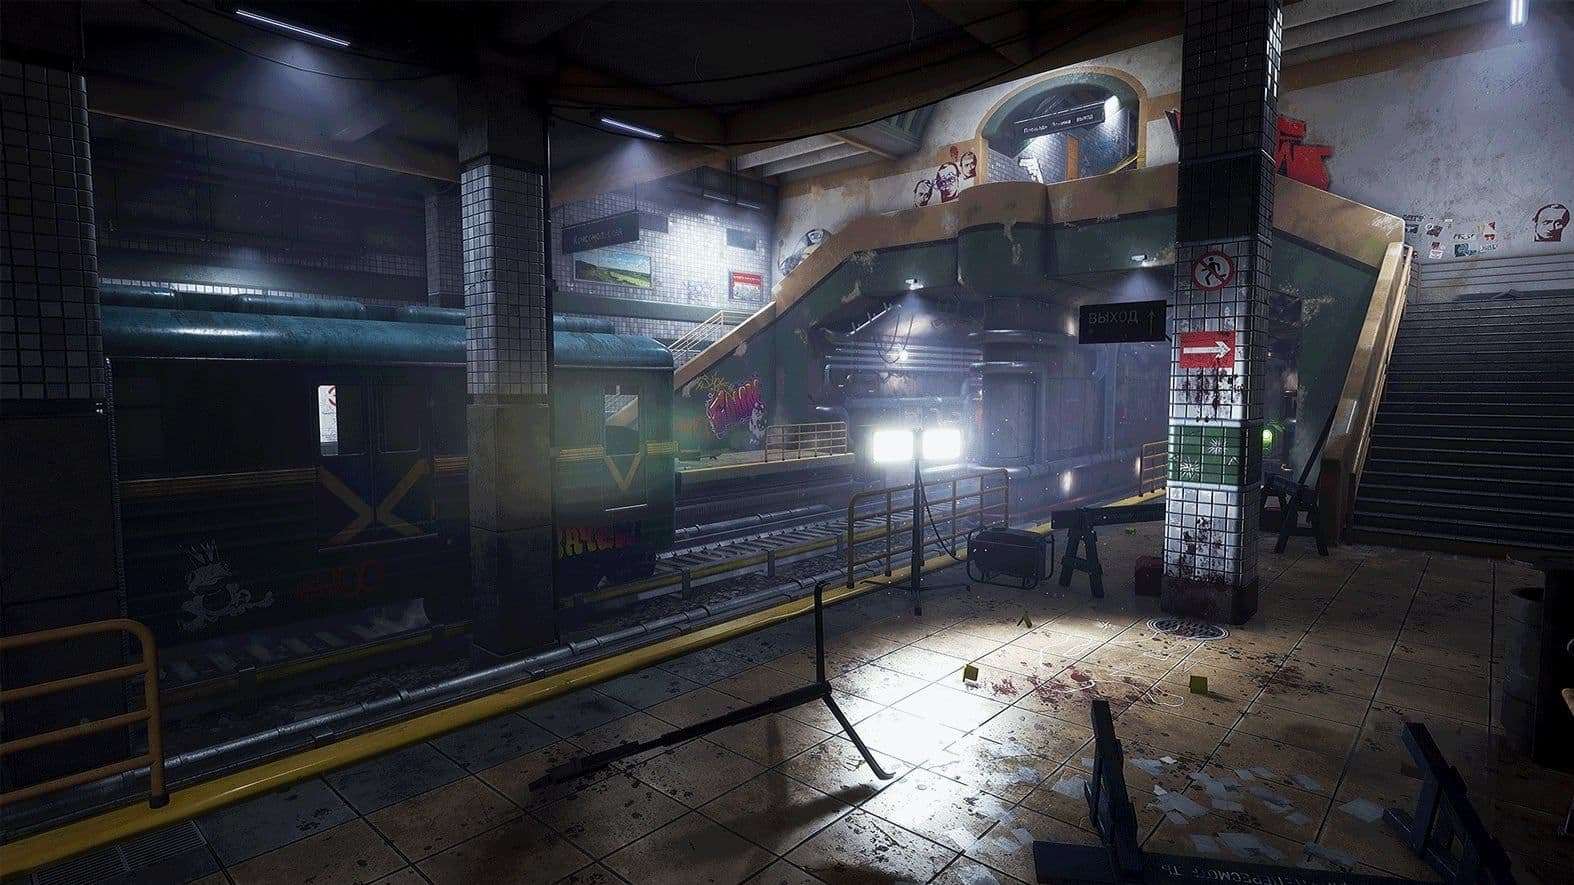
However, if you’re a poor student stuck in a rural area, google images will have to do the job! Because I was planning on building a Russian metro station, I wasn’t able to visit either of these locations easily and I had to rely on the Internet for my references.
PureRef is my tool of choice as it allows you to throw all your references into one big document all at their highest res. It’s super simple to use and doesn’t slow your PC down as much as apps like PS.
One of the best tips I learned from Brian's course was the first step in his reference gathering process. The main reference should define the scene and help you make decisions on the direction of the project later down the line.
If you’re torn between two options, go for the one which most resembles your main reference. Stay true to what you set out to create. Your scene should hopefully have similar strong shape or mood elements from your main reference by the end of the project.
Try to get a variety of different references of what you want to make, as it will help you blend all these different references into your final scene.
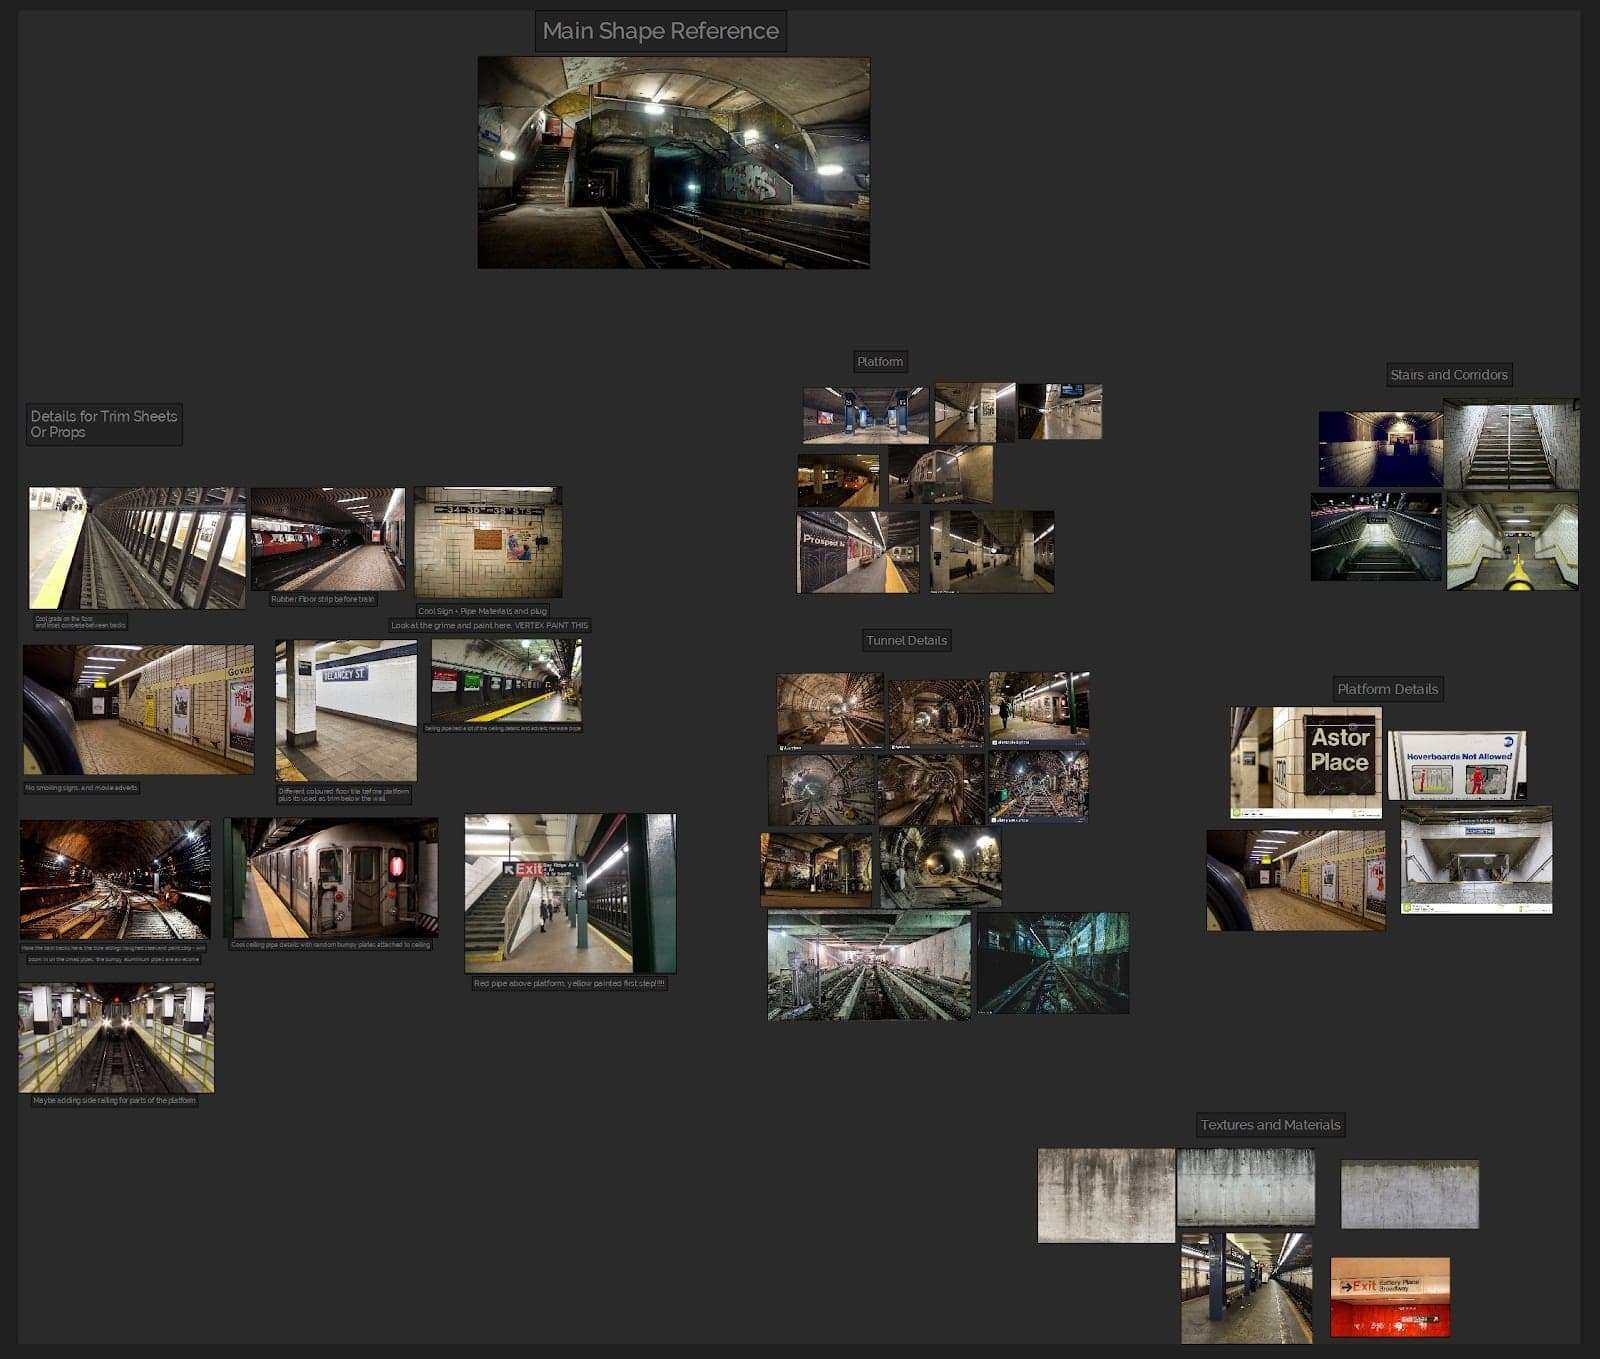
Treat your references as a visual guide for your whole project. Any questions like, what do I model here, what textures should I create for this surface, or how do I light this area should be answered through your reference board. Getting it right early on will save you a lot of questions in the long run.
The amount of references you need for a scene is fairly subjective. Some people like to grab everything they can find, but I prefer to limit myself to a smaller amount of more interesting images that really grab me. Find whichever works best for you.
Blocking Out
Blocking out is the most important part of the whole project. This phase will define the shape and composition of the scene. Set out to create an interesting layout for game-play and storytelling purposes. It’s alright to change some elements after the block out phase, but ideally these changes should be additive as to not break anything you’ve already created. This phase also helps get rid of all those bad ideas you might have early on before spending hours unwrapping and texturing.
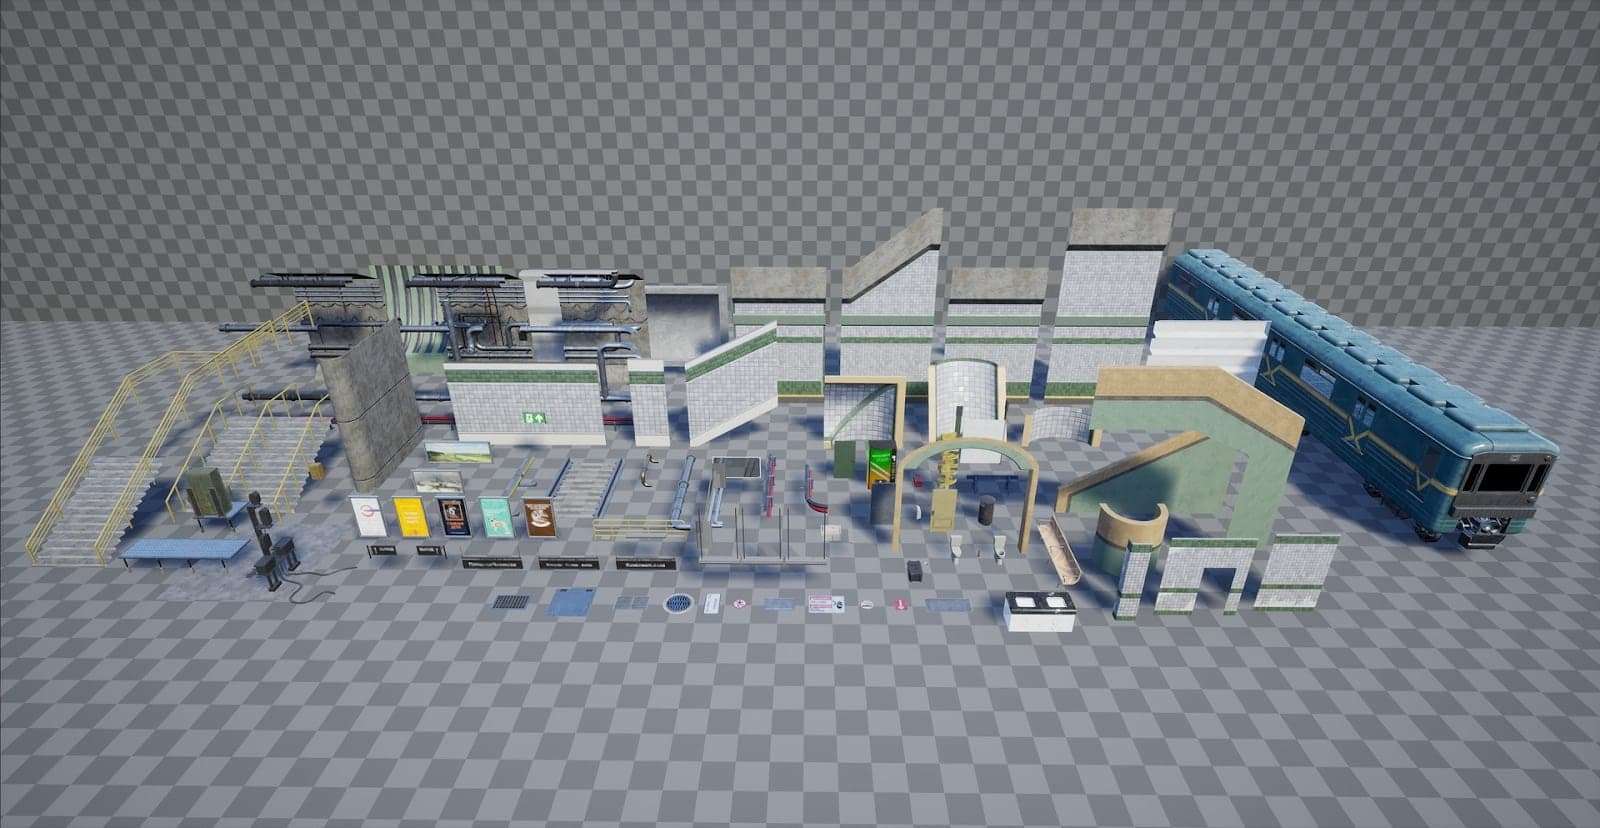
The most important tips for game production is to model your scene from a modular kit from the beginning. Think about how to break down your concept or scene into modular pieces that fit together on the grid.
Once these pieces are in engine, any iteration done in your modelling software can seamlessly transition into the engine. This will save you a ridiculous amount of time in development and will make it more accessible for other devs using your pieces if necessary, which will be an inevitability in production.
The second most important tip is to use a tool for scale. This will help everything fit together nicely. I’m sure you know roughly how large a kettle or a book is, but it can be deceptive when you’re in a 3D space without something consistent to compare against. The UE4 Mannequin is accessible through the Epic Games store animation pack and gives you a well proportioned, two metre tall figure to scale assets off. It’s been an invaluable tool to me over my recent projects.
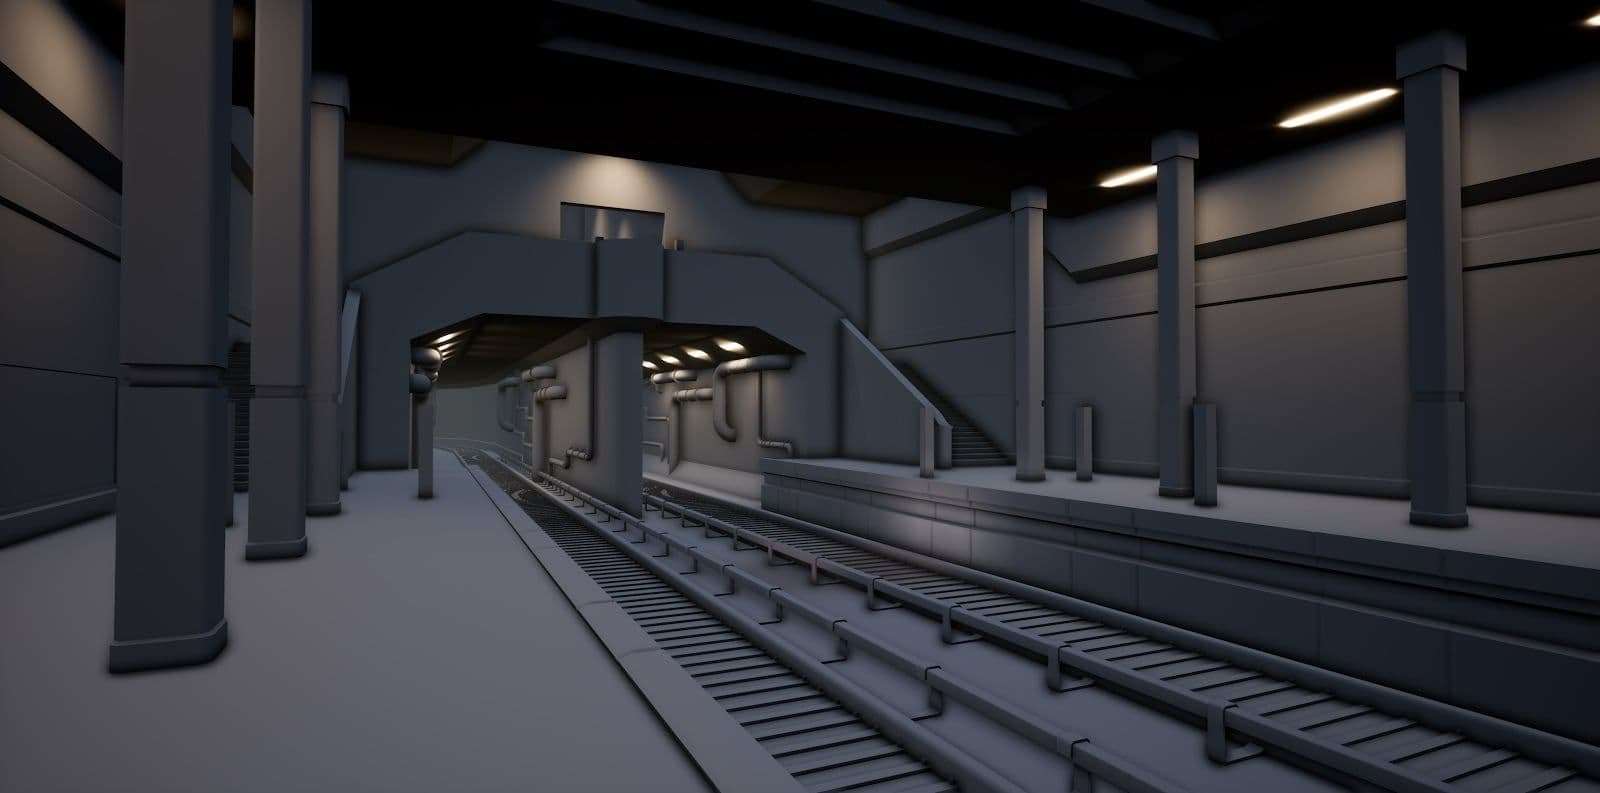
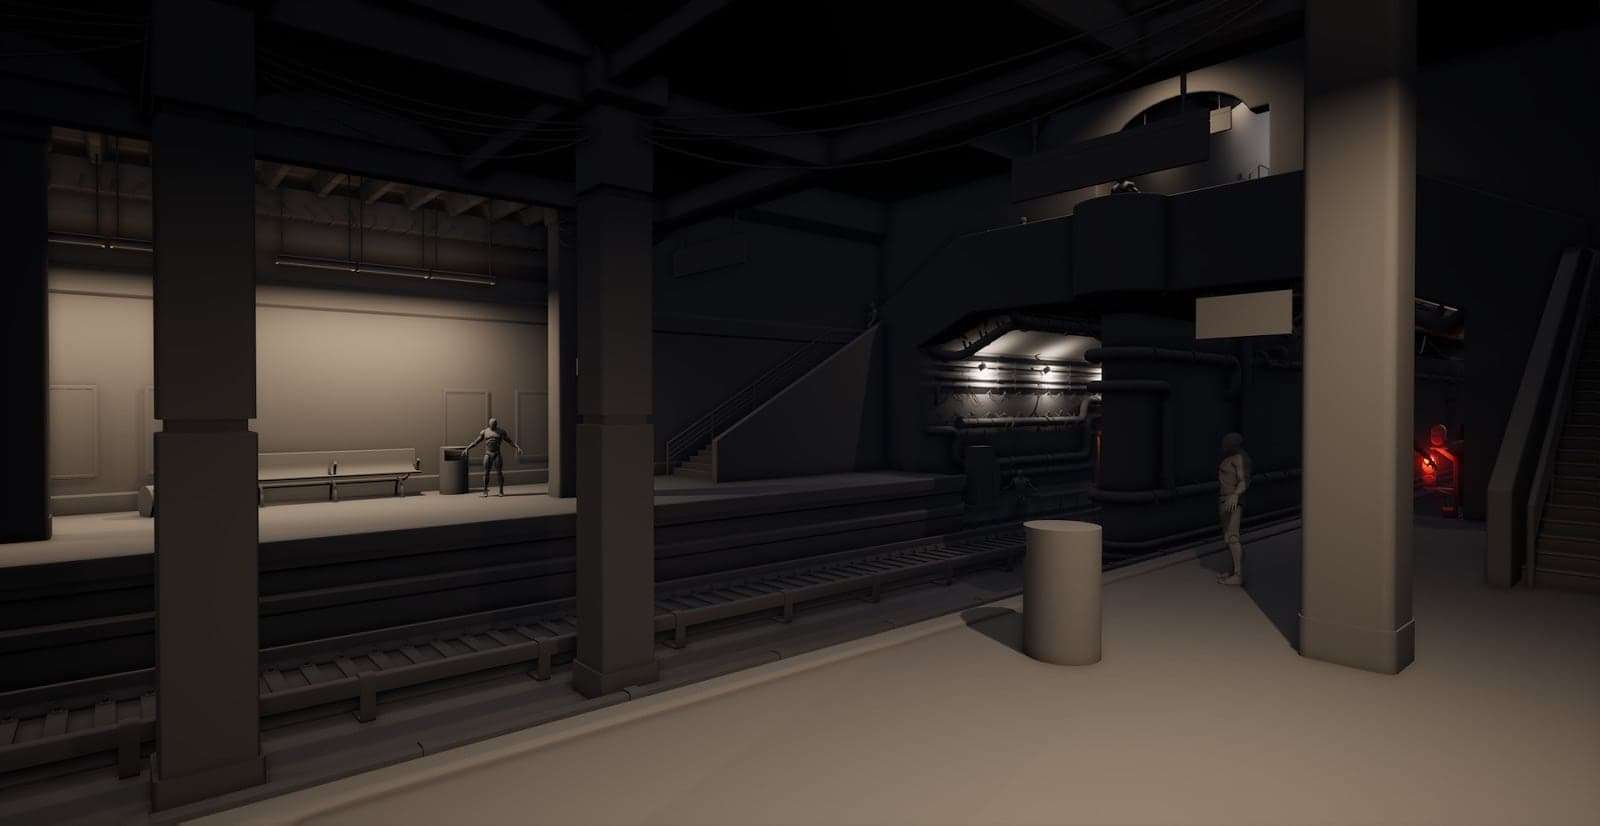
Here are some examples of my blockout after 2 days, then the blockout at a more or less finished stage. The first pass of the kit was used to start defining the platform area and work out how my modular kit would be used.
I’ve focused on making sure all the pieces fit nicely together and are on grid. In my more finalised blockout there is a lot more detail. I’ve began adding different types of ceiling pieces, adding some props and pipes within the tunnels. I’ve also began playing with lights and placing cameras for areas of interest.
By jumping the gun and adding detail before the kit works properly there is potential to waste a lot of time, so make sure it’s watertight from the earliest stages. It’s important to be thinking about camera positions in the early stages of the project.
Knowing where your cameras are looking can help inform some of your decisions on where to add detail and where to save time.
As you can see, the finished blockout doesn’t include all the assets in my final renders. This was because I had rushed out of it a little early before working out my storytelling, and I had misjudged some compositional areas.
Thankfully good feedback got me “back on track”. I ended up adding extra railings, a train, and even the bathroom as the scene was feeling a little empty, and I wanted to reiterate the purpose of the area.
If I had blocked these out from the get go, I would have had a much better idea of how long the project would have taken, and would have spent less time fiddling with the modular kit to get things looking correct.
Texturing
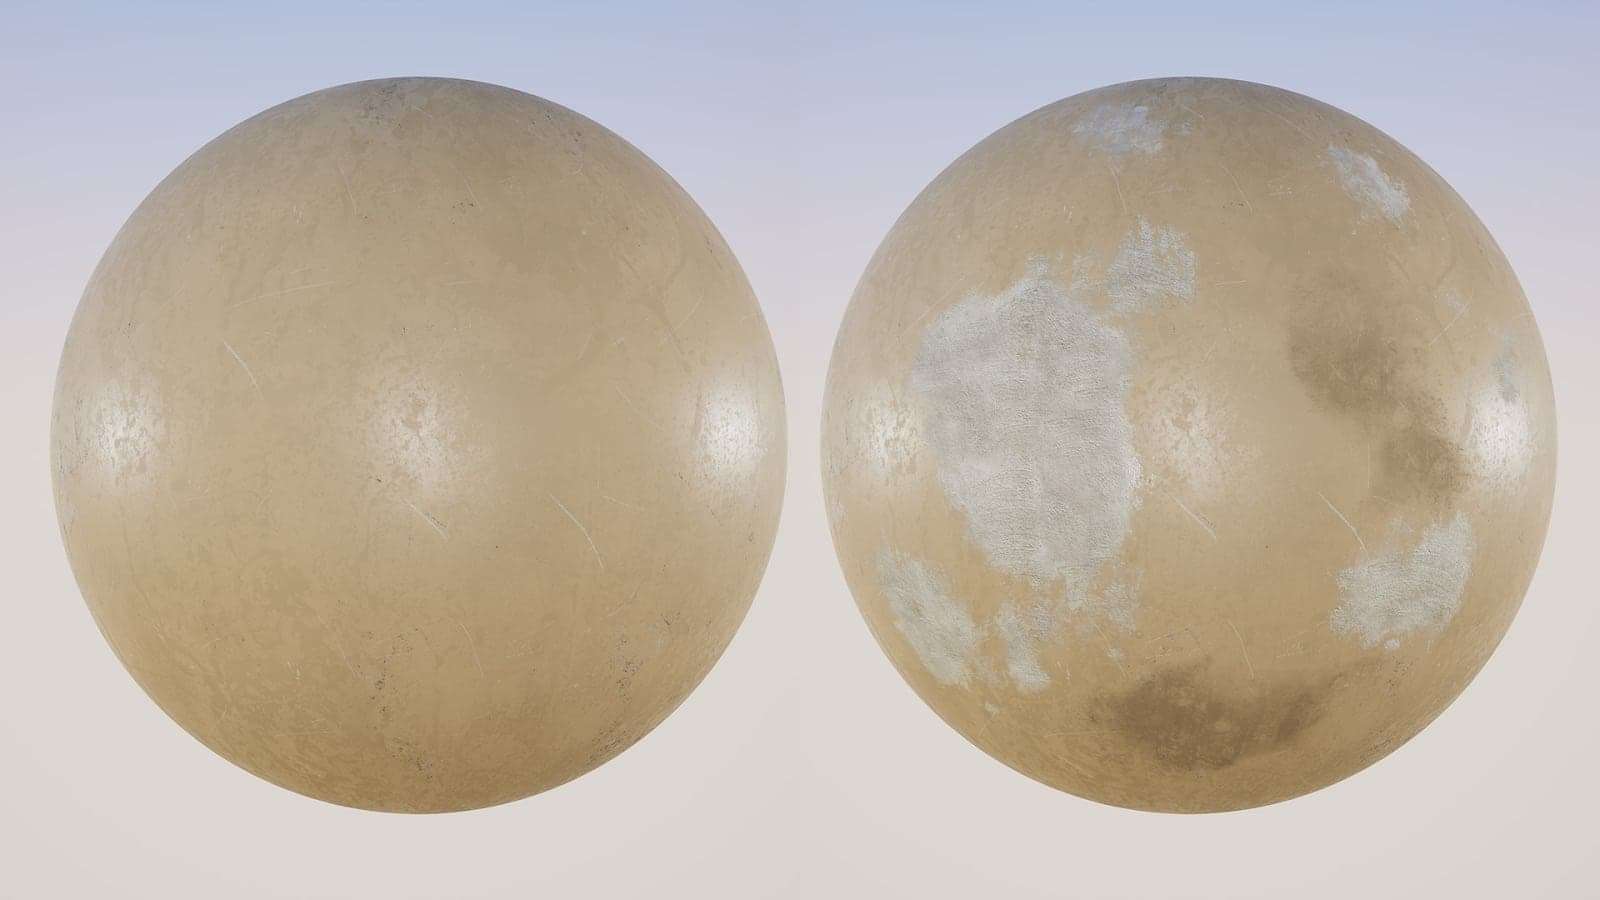
Texturing is one of the most exciting parts of the project for me as it’s when the space starts to come alive. For this project I pushed myself to use some more Substance Designer and utilise game production techniques to achieve an optimized and interesting variety of materials.

I created most of the tilables and masks in the scene using Substance Designer, then imported them into UE4 to utilize the powerful vertex painting tools.
Good examples of this would be the Floor tiles and the plaster walls. For the floor tiles, I had a low roughness value and a slight colour change which acted nicely as a water material, then fed it through the heightmap I used in Substance Designer for vertex painting. It created a really nice effect of the water filling up the cracks, divots and, slight slope variations before covering the tile.
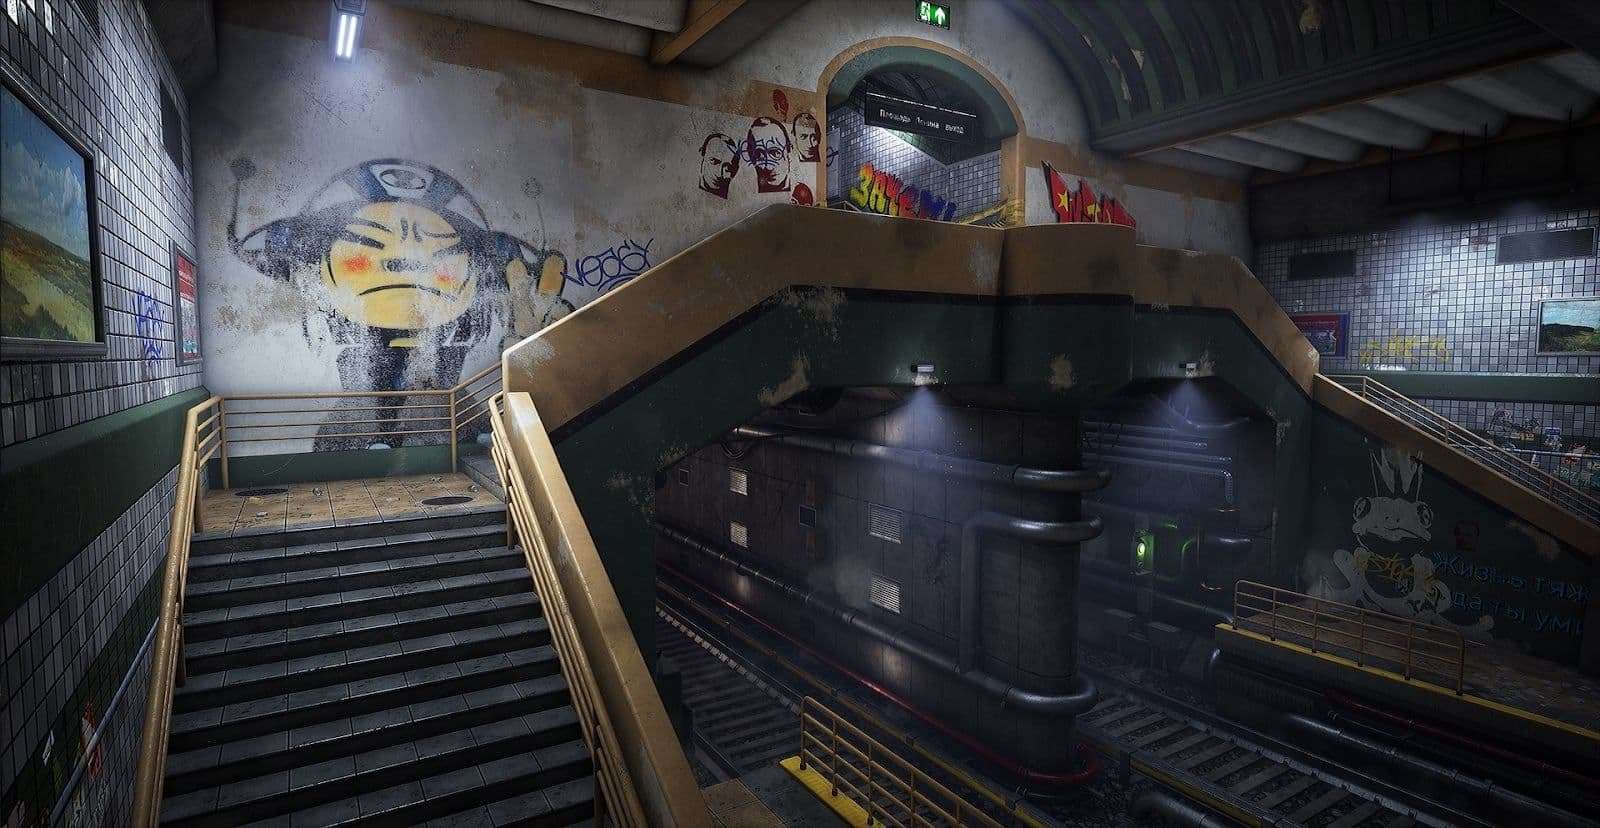
I also pushed myself to create a large variety of decals that I could use around the scene for dirt, graffiti, damage, debris, signs, and stickers. I got some good use out of these in the bathroom area of the scene. These helped to fill a lot of empty space and give the scene a feeling of decay and disrepair. By creating a master material for decals, I could throw an albedo map into an instanced material without having to set up a whole new material for each decal which saved me a lot of production time.
To create these decals, I sourced image from Google Images and Textures.com. I wouldn’t recommend this for a commercial project, but for an un-monetised personal piece, it’s completely fair use and helps flesh out your project.
I lack in strong 2D skills so I find this is the best approach for me when creating decals. Don’t be lazy and just grab everything from the internet, be trans-formative and smart about where you source images and how you use them in your project.
Lighting
Lighting is a super important part of the environment process as it has a huge knock on effect to all your assets and textures. Although I don’t intend to pursue and job in lighting in the future, it’s a tool you’ll need to show off your other environment skills. To learn lighting in UE4, I recommend starting with Tilmann Milde’s UE4 lighting academy. He covers post processing, lightmapping, dynamic and static lighting and everything in between.
His work is excellent and he goes into great depth explaining lighting theory, the UE4 tools, and post processing. I personally believe it’s a must watch for any aspiring environment artists as the knowledge will go a long way.
Feedback
Pursue feedback early and frequently. As soon as you have your project somewhat blocked out in engine, start showing it to people and ask for their feedback. I didn’t do this nearly as much as I should have for this project, but the feedback I did receive saved it from certain failure.
Ask friends, lecturers, or family about how to improve your work. Don’t let them just praise your work, push them for something for you to improve on as there is always something. I find that the best people to ask can be people who don’t specialise in 3D. They’re usually more willing to give more severe critique that might increase your production time or force you to back track. People with experience in 3D most likely won’t suggest these criticisms to you as they’ll want to save you from the pain.
If you find yourself in a rut or stuck on something, drop screenshots onto a forum thread or send some stuff to your friends and take some time for yourself. Stepping away from the project usually helps me return and see the bigger picture again.
Presentation
Presentation is the last part of the project and it’s hard to know when your project is “finished”. A good lesson my friend and lecturer, David Croft-Sharland, taught me is that when the changes you’re making are becoming less meaningful and more subjective and opinionated, it’s probably time to set the project down and wrap up.
As I mentioned earlier in the blockout phase, It’s important to be thinking about this from the early stages of the project. If you’ll never see parts of the scene in your final renders, skip them to focus on adding all the juicy details in the places people will see.
It’s very important to get lots of feedback at this stage as you will need to spend time iterating frequently on your post processing and lighting. I had a lot of issues with my lighting and colour being far too dark as my monitors weren’t properly calibrated.
I hope you’ve enjoyed reading about my workflow and tips, if you have any further questions, feel free to email me at [email protected], or message me on Artstation! You can also find more of my work on my Artstation.