
Hello, my name is Javier Blanco and I’m a Spanish modelling and texturing artist. Here’s a simple breakdown of the creation process I did to create the first piece of my demo reel at Think Tank Training Centre, with Chris Nichols as my mentor.
It was a long and tough process of learning, creation and hard work, but I had a lot of fun with it. The breakdown is going to be focused in two parts, modelling and texturing.
Modelling
During the whole process, the hardest parts for me were the creation aspects of the creature, like designing the overall shape, setting up the right flow of the scales or choosing the right references during texturing.
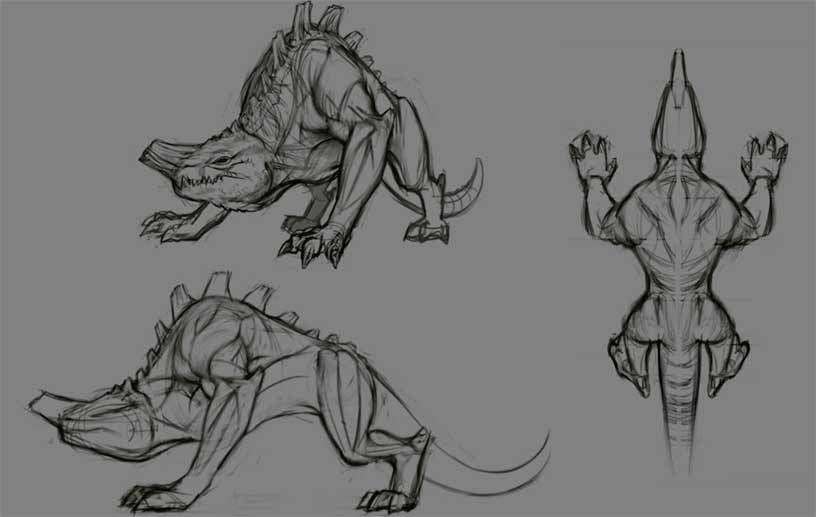
From the beginning, I wanted to create a predator, from somewhere near to the African savannah, but I didn’t know the shapes that I wanted so I started playing around in ZBrush (Dynamesh) and Photoshop.
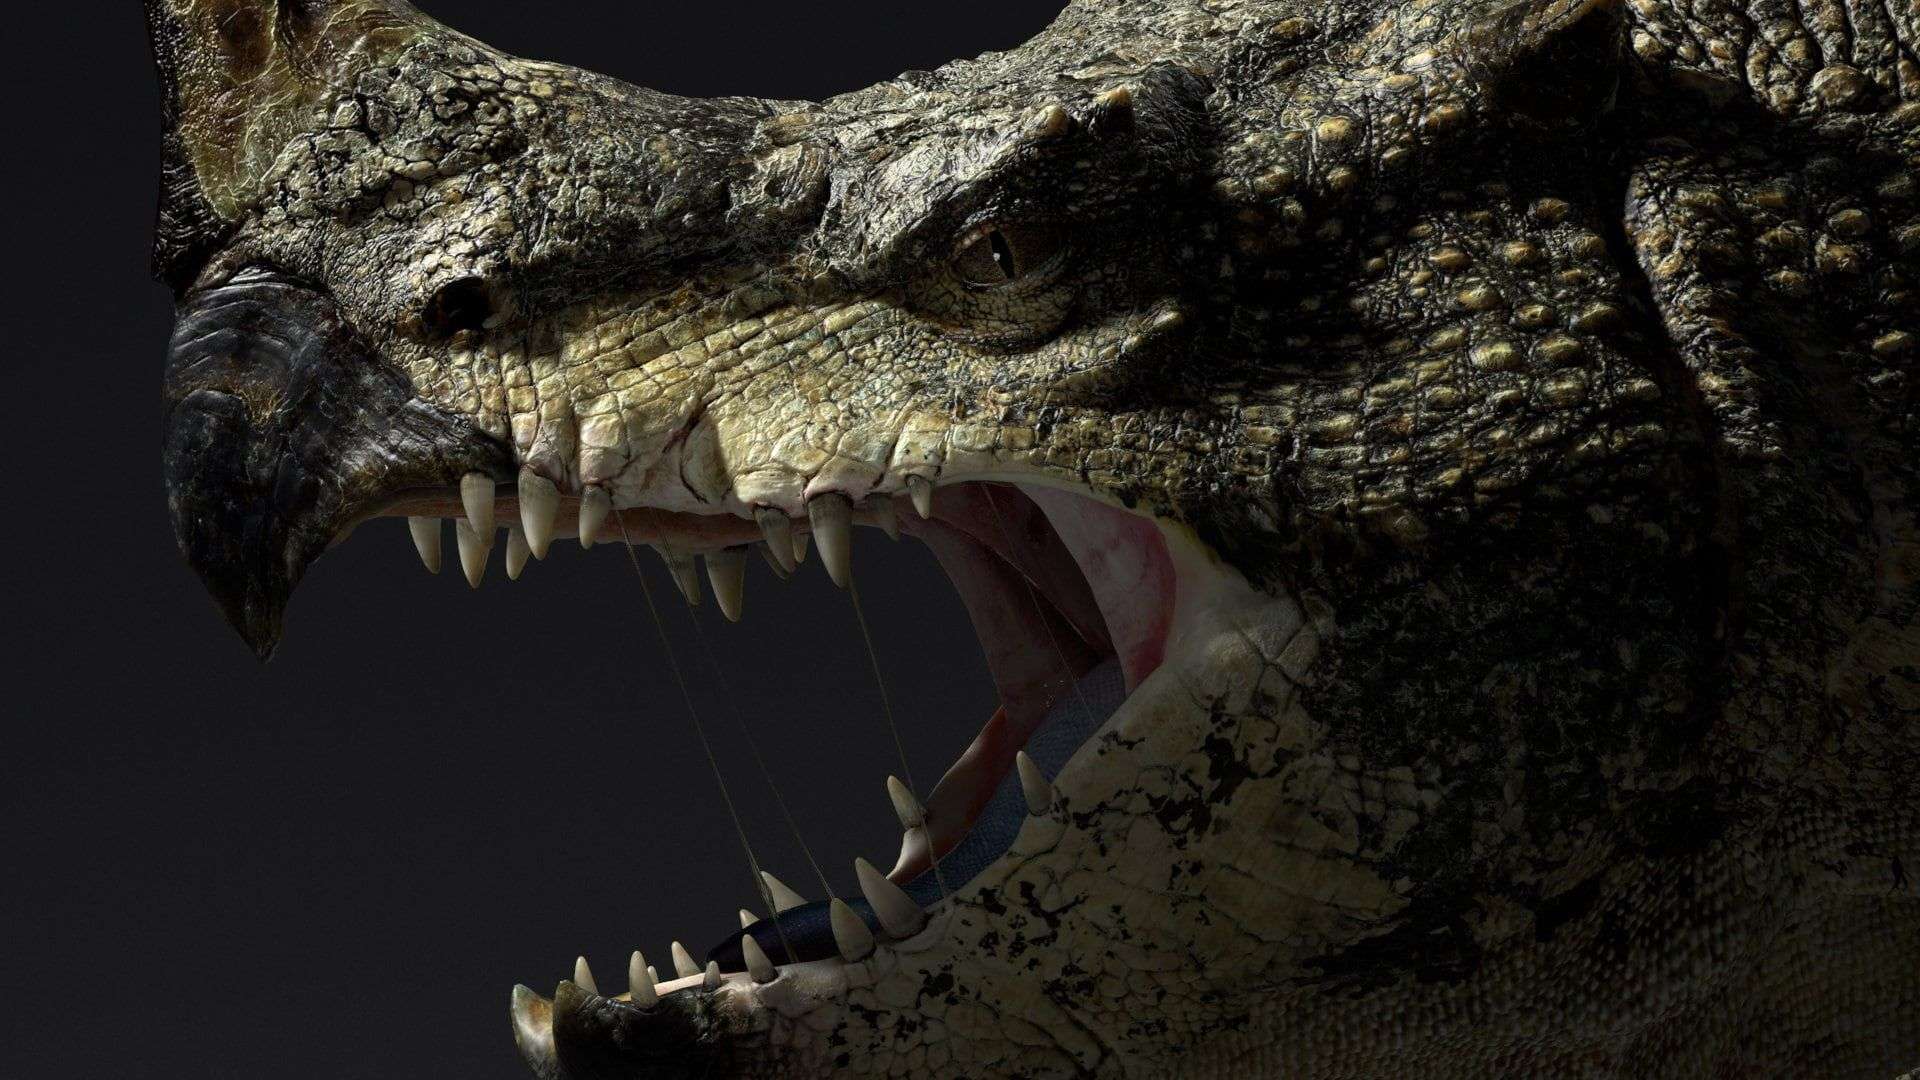
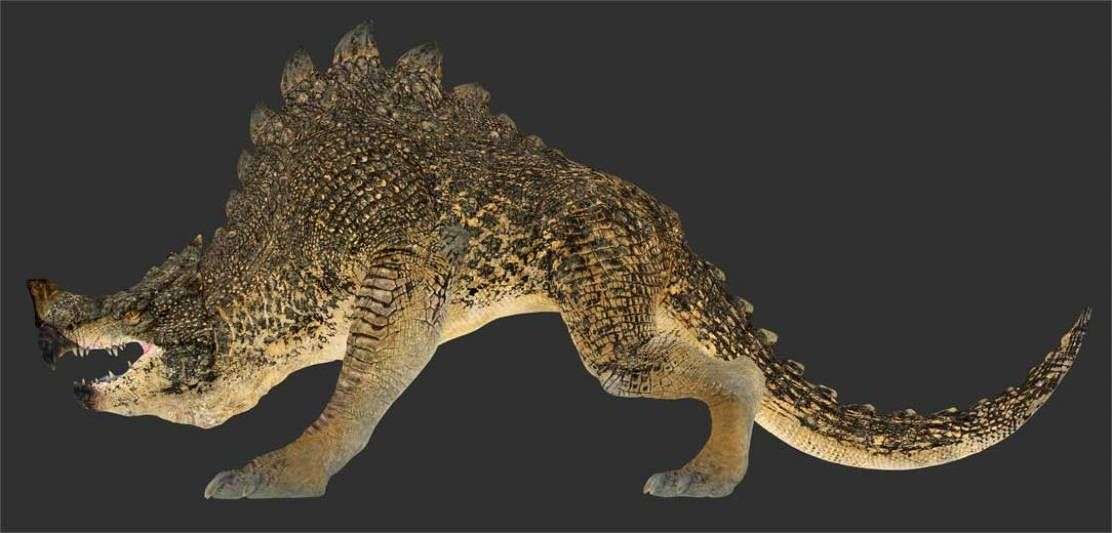
After playing with several different animal shapes, I ended up having a reptile predator, and was based on rhino/chameleon for the horn, crocodile for the head and a lion/pitbull for the body anatomy.
From the beginning I wanted to create a predator, from somewhere near to the African savannah.
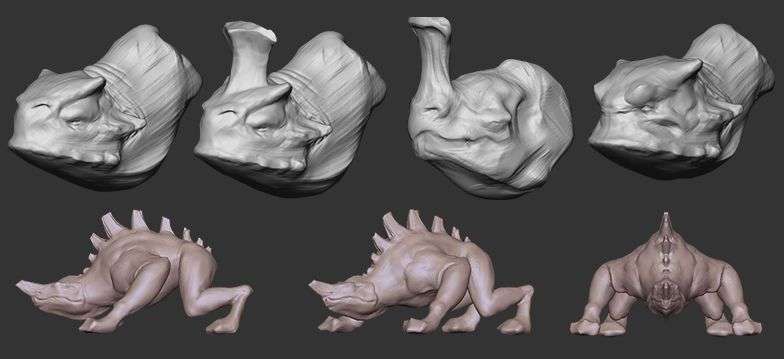
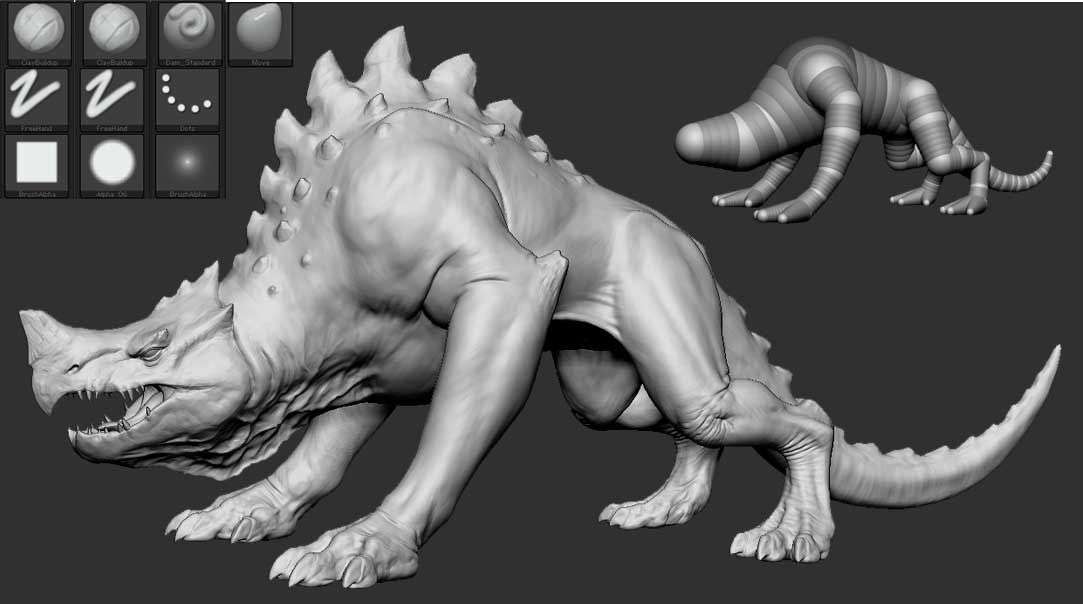
When the concept was done, I started modelling in ZBrush using really basic stuff. I always start with Zspheres to get a rough silhouette and then move on from there.
In this stage, I used the Move Brush + masks and the Move Tool to get the bigger shapes, and when I was happy with it I moved to my favourite brush, the Clay Buildup with the square alpha.
For the UVs, I had to make sure that they were big enough to show close-ups details in the whole body, so I ended up having 12 tiles.
It was going to be a creature for features, and being believable is one of the keys, so I tried to follow real-life references changing a bit the actual concept. I also started to fill the gaps of the design, like adding the skin behaviour to the whole body, trying to play with the thickness of it.
The next image shows the final result of the first pass of sculpting, only with the main details.
For the UVs, I had to make sure that they were big enough to show close-ups details in the whole body, so I ended up having 12 tiles. Also having the body parts in different tiles would allow me, later on, to be able to split those tiles as Subtools in ZBrush.
The next image shows the mesh retopologized, where each Polygroup represents each UV tile and the UVs distribution within the tiles. To set the Polygroups by UVs I used Auto Groups With UV inside Polygroups tab in ZBrush.
Mari has really powerful tools, like being able to mirror patches, so was important to have the same UV layout and symmetrical patches. Doing this I just had to work on one side.
Adding scales
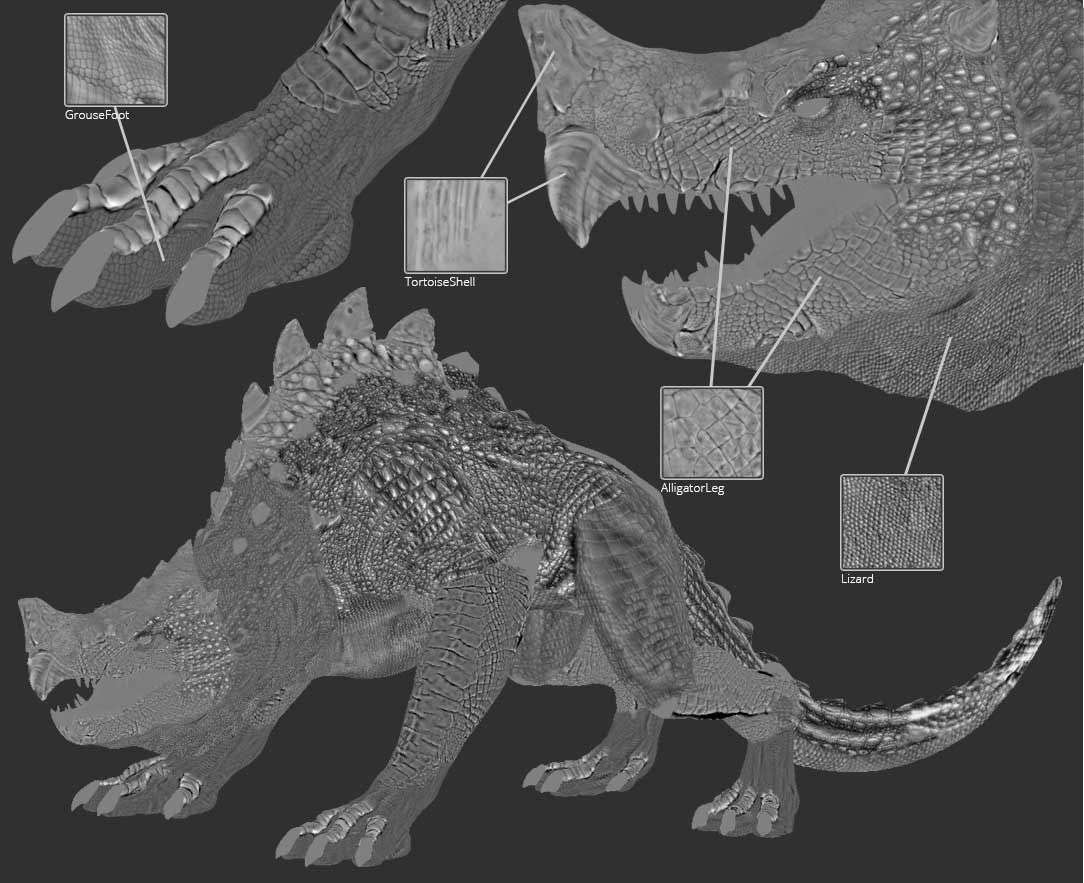
I moved then to the second pass of details, the scales. This stage was the toughest one and really time-consuming. It was divided into two parts, first creating the scales layout in Mari and then the final sculpt and polish in ZBrush.
To create the scales layout I used the Paint Through and Spline Warper tools in Mari for almost every part. All the maps I used are from Surface Mimic and from different animals, like tortoise, grouse, crocodile, lizard or frog.
Each map was different in terms of values and quality, but even having to fix a lot later on in ZBrush, this process gave me a great base.
Once this pass was done, I exported out the maps flattened as PSD files. Then I separated each UV tile into multiple subtools inside ZBrush, allowing me to subdivide a couple times more per object.
To separate each UV tile, what I did was isolate the UV tile I wanted to split, then pressed Del Lower, Del Hidden and then Reconstruct Subdiv, so I had all the UV tiles separated with all of its subdivisions. Once I had each subtool separated, I worked one by one subtool at the time, and to be safe, it's better to work in a different file per subtool due to its crazy amount of polygons.
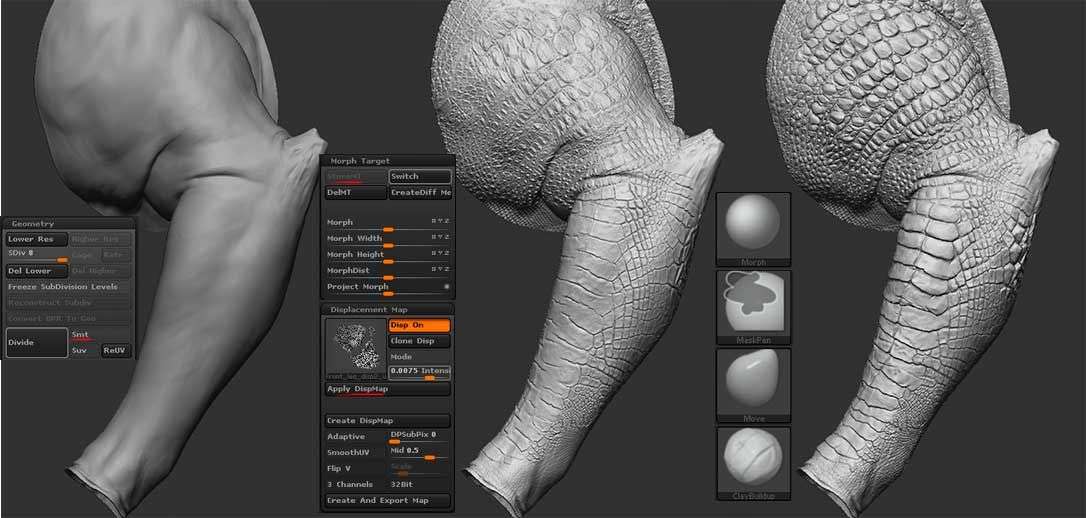
I imported the maps into the Alpha slot, subdivided the subtool a few times and then plugged the map to the Displacement Map slot. I need those 2 extra subdivisions to get all the details from the maps.
It is important to uncheck the smooth button (Smt) before subdividing the mesh once it’s divided. That way your object borders will match with the rest of parts. I determined the correct intensity value before applying the displacement. To have more control is a good idea to store a morph target (StoreMT) before applying the displacement.
It is important to uncheck the smooth button (Smt) before subdividing the mesh once it’s divided. That way your object borders will match with the rest of the parts.
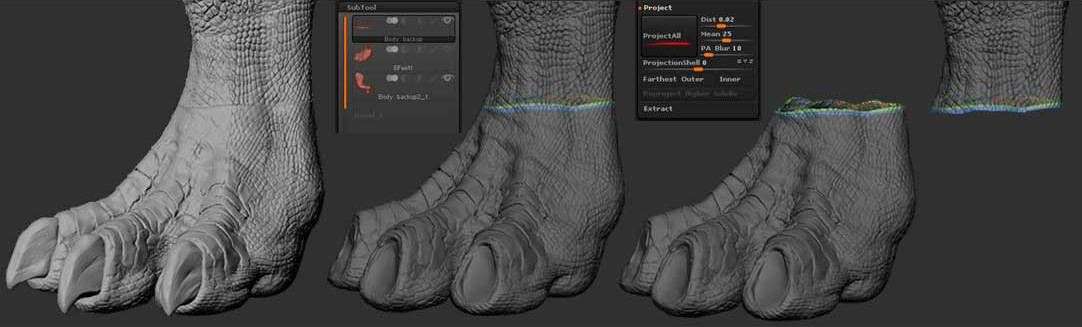
After applying the map, I sculpted on top to refine and polish the result. The image below shows the leg without map, with map and with map+sculpt.
I used this Mari technique to cover almost all the body, but there were parts where I had to sculpt from scratch, especially the zone around the spine.
This took me a lot of time, and after figuring out what kind of skin I wanted and understanding the right scale flow, it became a bit tedious.
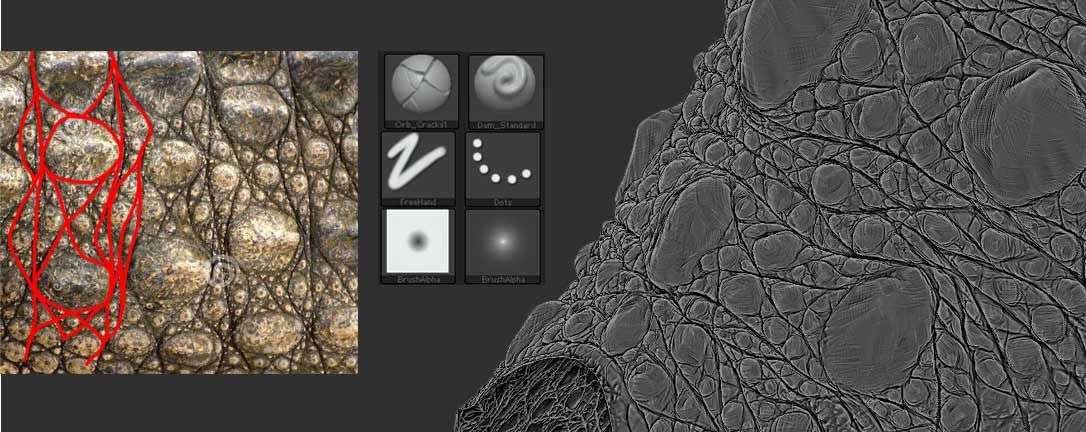
The next image shows the guides I painted on top of the picture to understand how the scales behave. For this part, I used a lot the Orb Cracks1 and the Dam Standard brushes.
Having the mesh divided into multiple subtools, caused seams issues across the mesh where the different objects merge.
To solve this, I had to create a bridge between each subtool, project the details from both subtools on the bridge, fix the seams (doing some sculpting) and then reproject this bridge on both subtools. Then the seam issue should be solved.
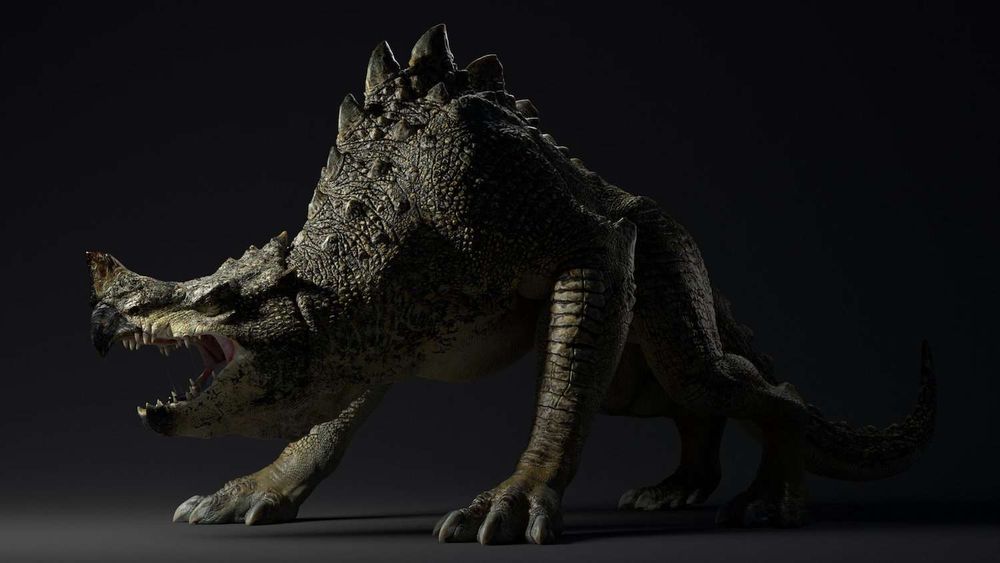
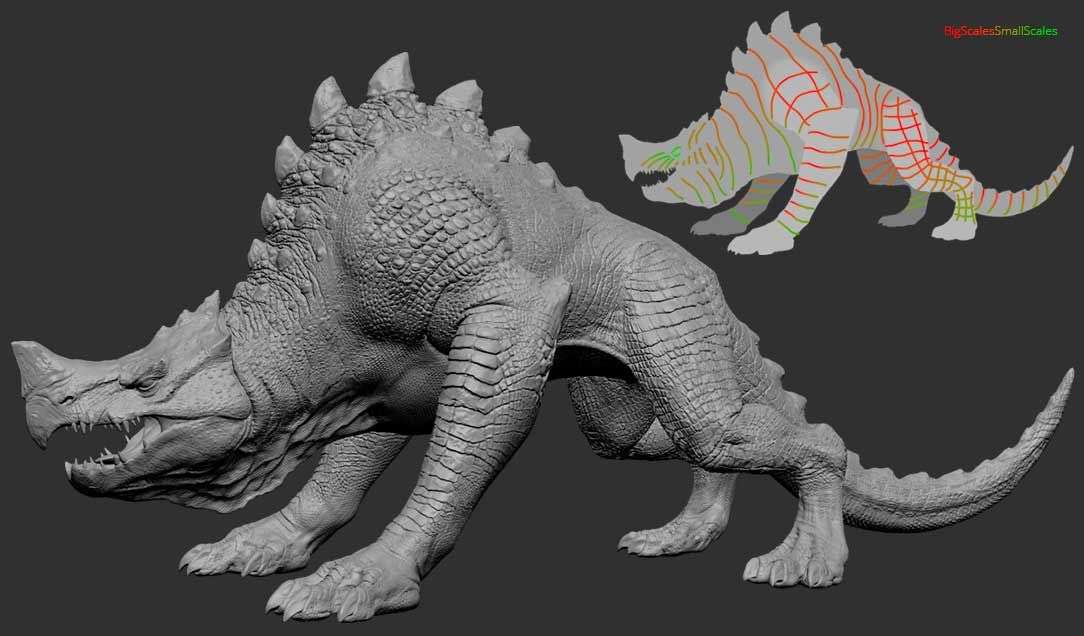
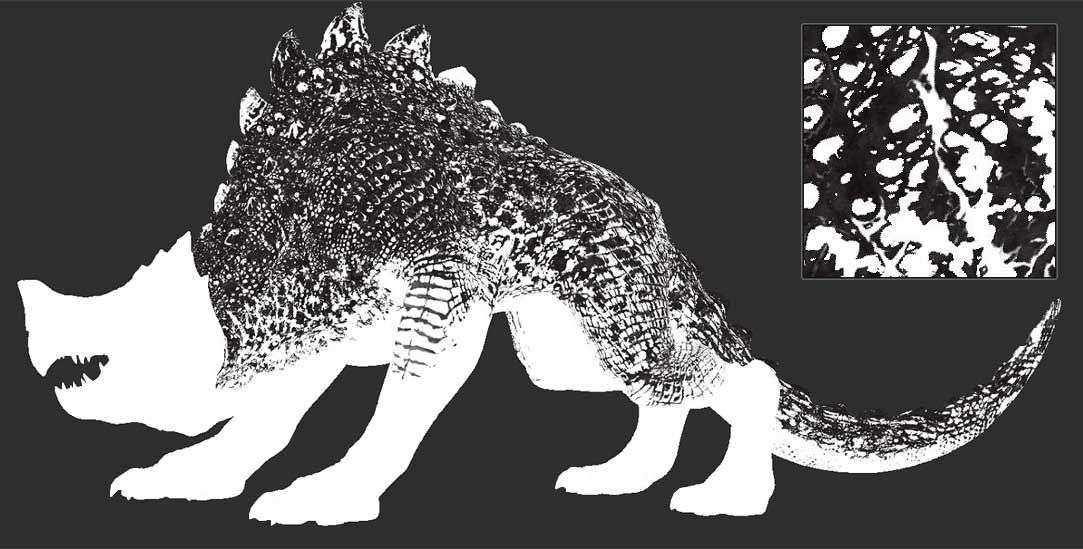
The next image shows the final result with the second pass of details applied. It also shows a rough representation of the scales layout in terms of direction and size.
After this, I sent each subtool to Mudbox as an OBJ and extracted the displacement map there. I used 4K 32bit EXR files for the displacement maps. I used Mudbox because is much faster handling big files.
Texturing
Texturing the creature was possibly what I enjoyed the most. The design I did was for modelling purposes, and it was totally useless in terms of texturing. So I started gathering a lot of references for inspiration because I had no idea how the textures were going to be.
For some specific parts like the horn, beak or feet, I had an idea of what I wanted. But first I needed to know the overall look of the creatures like colours, patterns, etc, to merge everything together and keep being consistent, adapting each specific reference part to the main colour scheme.
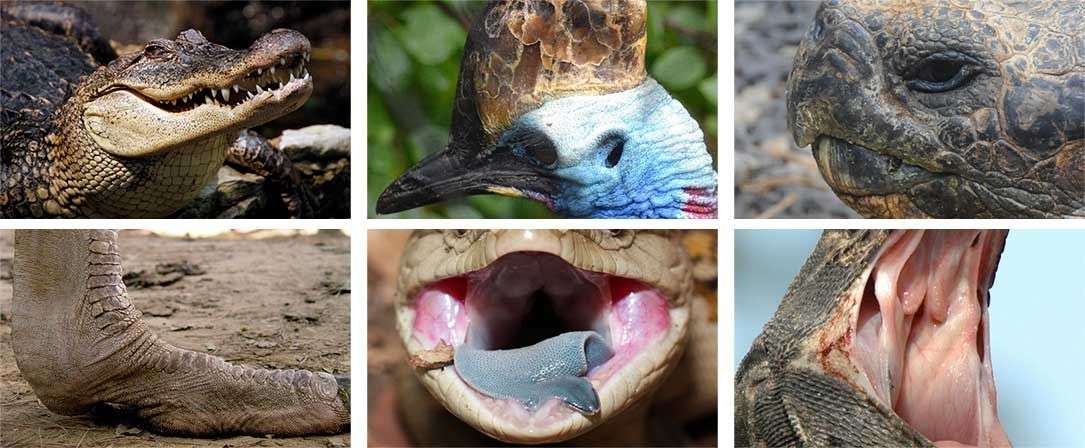
I chose the crocodile as the main reference for the scales and pattern behaviour, cassowary bird for the horn, tortoise for the beak, ostrich for the legs and feet, blue-tongued lizard for the tongue and lizards in general for the mouth interior.
Texturing the creature was what I enjoyed the most. The design was done for modelling purposes, so it was totally useless in terms of texturing.
Once I had the references, I moved to Mari. Before texturing the whole creature, I focused only on the head. This allowed me to solve a lot of hard creative decisions in a small part, like overall colour, pattern drawing or skin details. I spent around a month and a half to do all the maps of the head, but then the whole body took me 2 weeks.
I divided the textures into 3 big groups, skin base with colour variations, pattern and dry skin. In the next part, I’m going to explain the steps I followed to texture each group.
Skin base
First, from close up pictures of crocodile skin, I broke down the different colour variation of the skin. Those different colours would represent the basic set of layers of the skin base group.
To create those layers, I made a tiled layer using a tileable texture with a good amount of values variety, and colour correcting it to match the reference. Then I painted the visible seams with the same texture. This was the main base.
Once that first base layer was done, I duplicated it, changed the colour value to match the reference, and masked it to get the granular shape of the skin. So basically all the layers are duplicated from the first but with different masks on top.
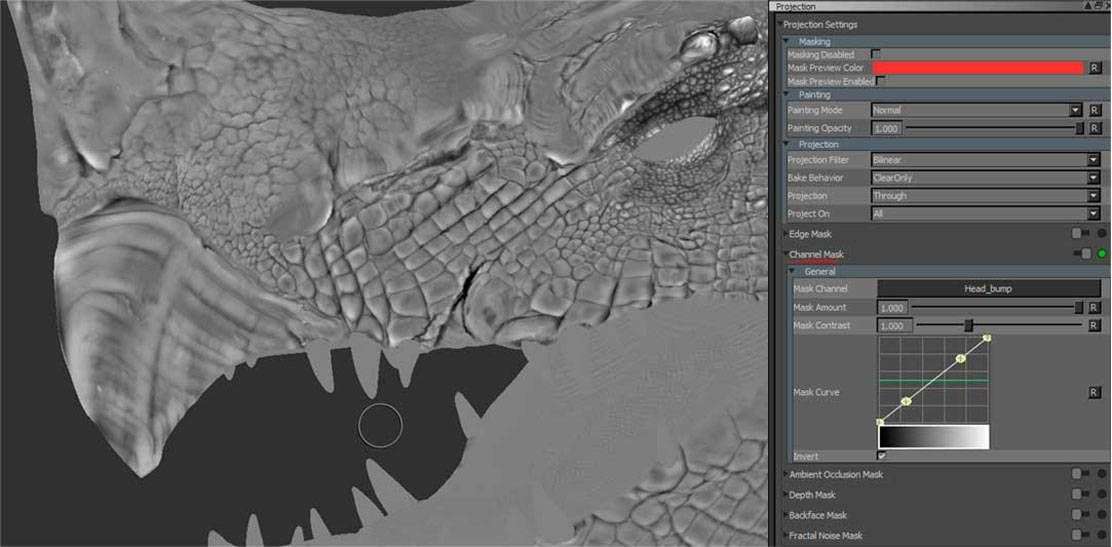
The next step once I had all the colours, was to start driving the layers through the sculpted details. So at that point, I started using the first pass of bump and the displacement maps as the main global masks.
To do that, instead of copying inside each individual layer the bump and displacement map as a mask, I like to use this maps through the Channel Mask inside of the Projection tab.
This allows me to play in real time with the values (you need to have a specific channel with the maps inside).

After this, I started adding more details but always following this same methodology to build every layer.
You can see in the next GIF, an example of the building process.
In my opinion, the black and white images (masks) are the key, because when doing textures by hand, you need a lot of shapes to match the references.
For example, to match the colour variation of the skin, I used an image with granular shapes, or to make skin looked dried, I used a black and white version of some peeled plaster texture.
Pattern
This part was tricky. After spending some time looking for the right crocodile species, I chose the Cuban crocodile as pattern reference. When you look to the pattern closely, it seems random, but from the distance, you can see clear shapes, so reaching the right balance between close up randomness and from far pattern coherence, was the hardest part.
My goal was to get a black and white layer to use as a mask. I tried to use procedurals in Mari to get the overall shape but was impossible to match the reference, so I used a mix between real pictures (black & white) and procedural. Both of them guided by the global masks that I had already done, the first pass bump and displacement maps.
This part was tricky. After spending some time looking for the right crocodile species, I chose the Cuban crocodile as the pattern reference
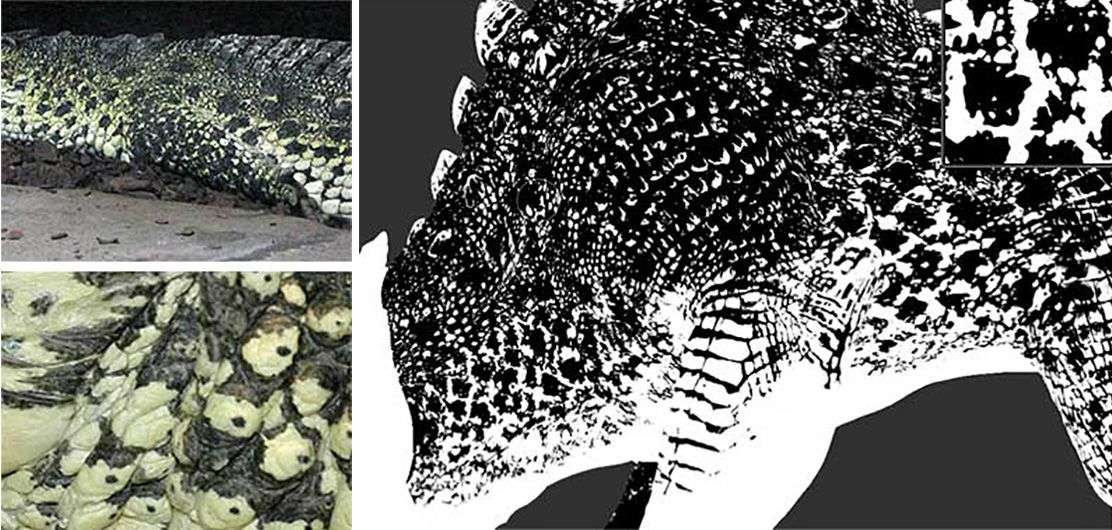
As you can see in the close-up image, the pattern is not a flat colour, so the next step was breaking the pattern a little bit. It wasn’t to be too crazy because a lot of the surface details would come later with the last big group of layers, the dry skin.
The next image shows the body pattern and a close up image of it.
Dry skin
This was the last step texturing the colour, and one of the most important. It was quite easy to do compared to previous steps, but it really pushed the texture to the next level. As you can see in the crocodile pictures, the top layer of skin is made of dry/death skin, and usually found where the skin is exposed to the sun.
I decomposed that skin layer in two parts, the colour base and the bright peeled border surrounding the colour base. In the next section, I’m going to show briefly the process to create both layers.
The next GIF shows the skin near to the mouth without dry skin and with it
The first layer I did was the colour base of the dry skin. To do that, I filled the whole body with a greenish marble texture and changed the blend mode to Screen.
Then I used global masks to drive the scales and added more mask layers inside the same mask stack. You can see an example in the next GIF

The red colour is not important, but it needs to be a colour to make the border previsualization easier.
When I had the colour base done, I used it to get its borders. I exported out that layer flattened as a black and white image, and then I started to play with it in Photoshop. The next GIF shows an example of the process, but with a screenshot instead of the map itself, it’s the same.
First, with Curves, I got rid of grey values to get a good black and white image. Then I removed the whites to keep only where the dry skin is going to be and created a red background layer. The red colour is not important, but it needs to be a colour to make the border previsualization easier.
After that, I applied a filter to the black layer, the Outer Glow, changing the values to get the right border. And then I made the background colour black and I merged both layers together. That’s it, then I just imported this new map into the layer stack and changed the blend mode to Add.
This was the last step to finish the Color map.
The next GIF shows the dry skin layers that I used for the neck.

After this, the rest of the maps were done really quickly, more based in the feedback received from the Look Dev in Vray.
I could explain a lot more, but I tried my best to compile the most important aspects of modelling and texturing the colour in this breakdown. I hope you find it useful!
Again, special thanks to my mentor Chris Nichols, an awesome artist and a good friend. Without him, I couldn’t have done half of this!