
In this second part of surviving your first year in a gaming company, I will cover some Unreal Engine shader work and some techniques for scene optimisation.
Create a Layered Material in Unreal Engine 4
Here I’ll go into a few ways to create a layered material in Unreal Engine 4 that has similar aspects to the ones used at Monolith. An important feature that helps add extra variations to layered materials is height based blending.
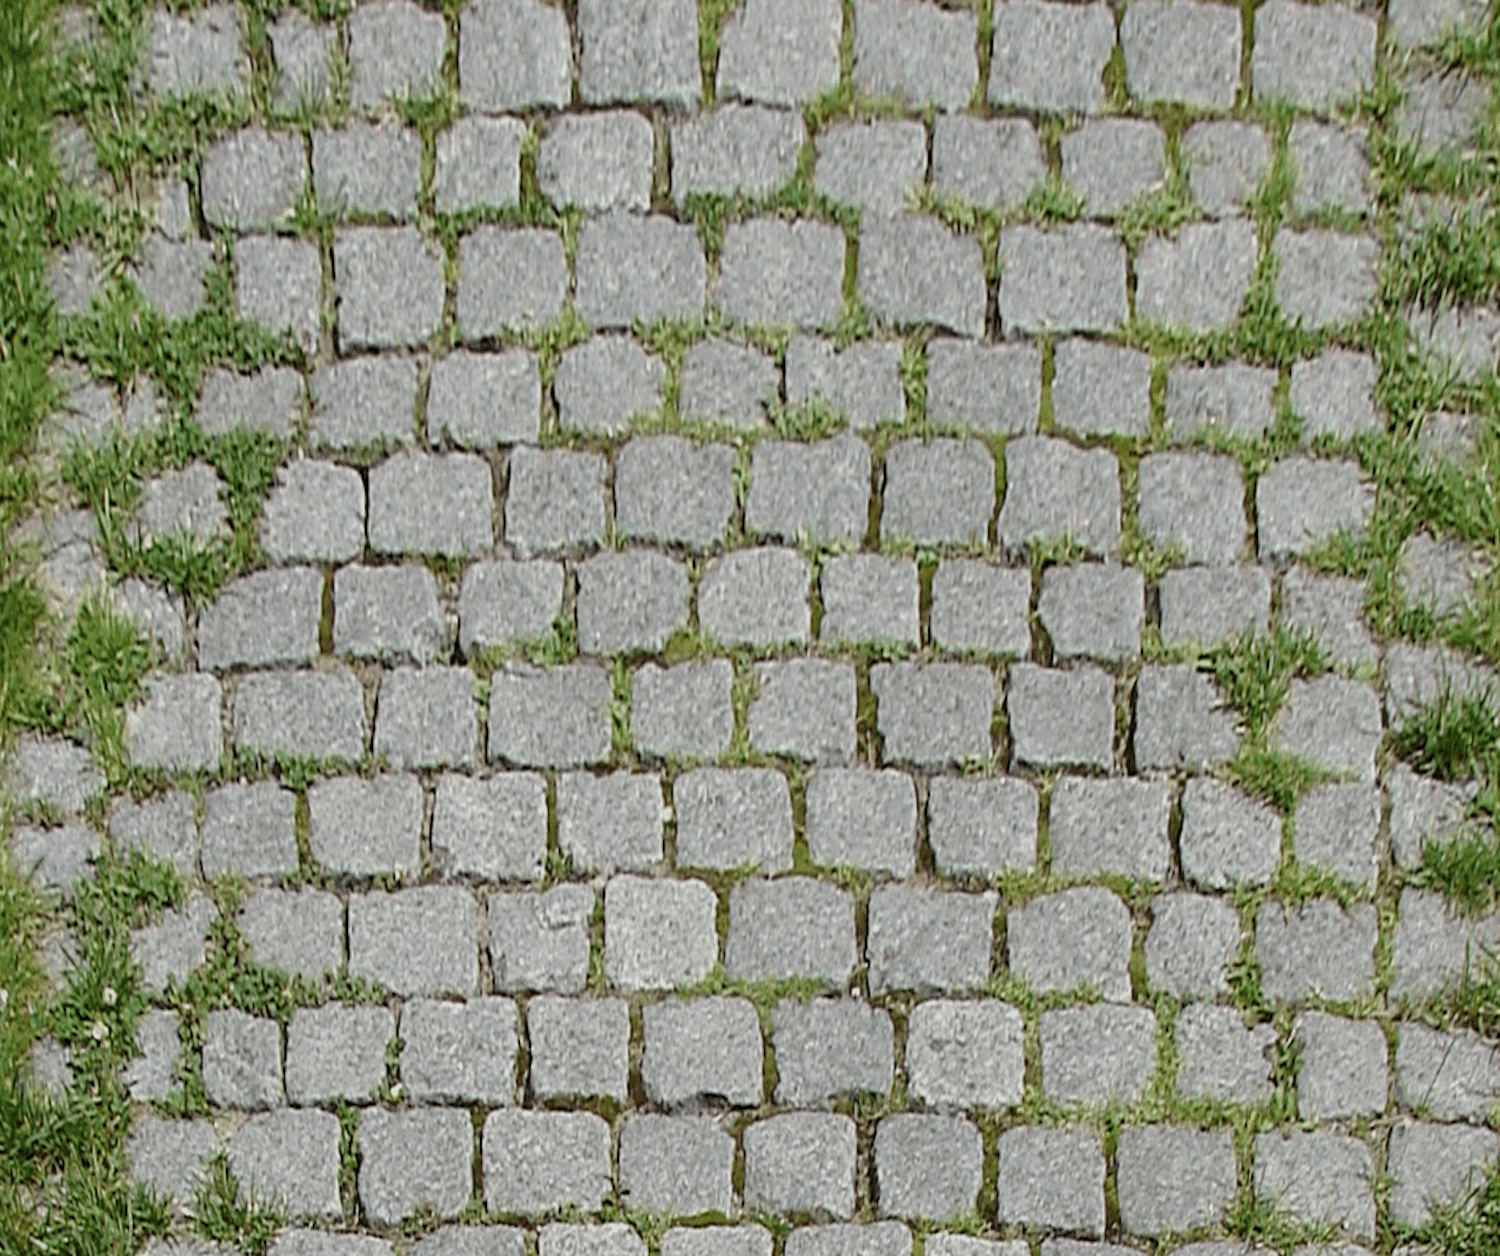
In this photograph, the grass tends to grow in the cracks between the bricks. This is essentially the kind of effect that you can get through height blending, where one material will start building up in the lowest parts of the other, gradually covering higher parts as the mask is painted stronger.
2-Way Height Blend
To start with something simple, here’s how you can set up a tile material with puddles that build up based on its height.

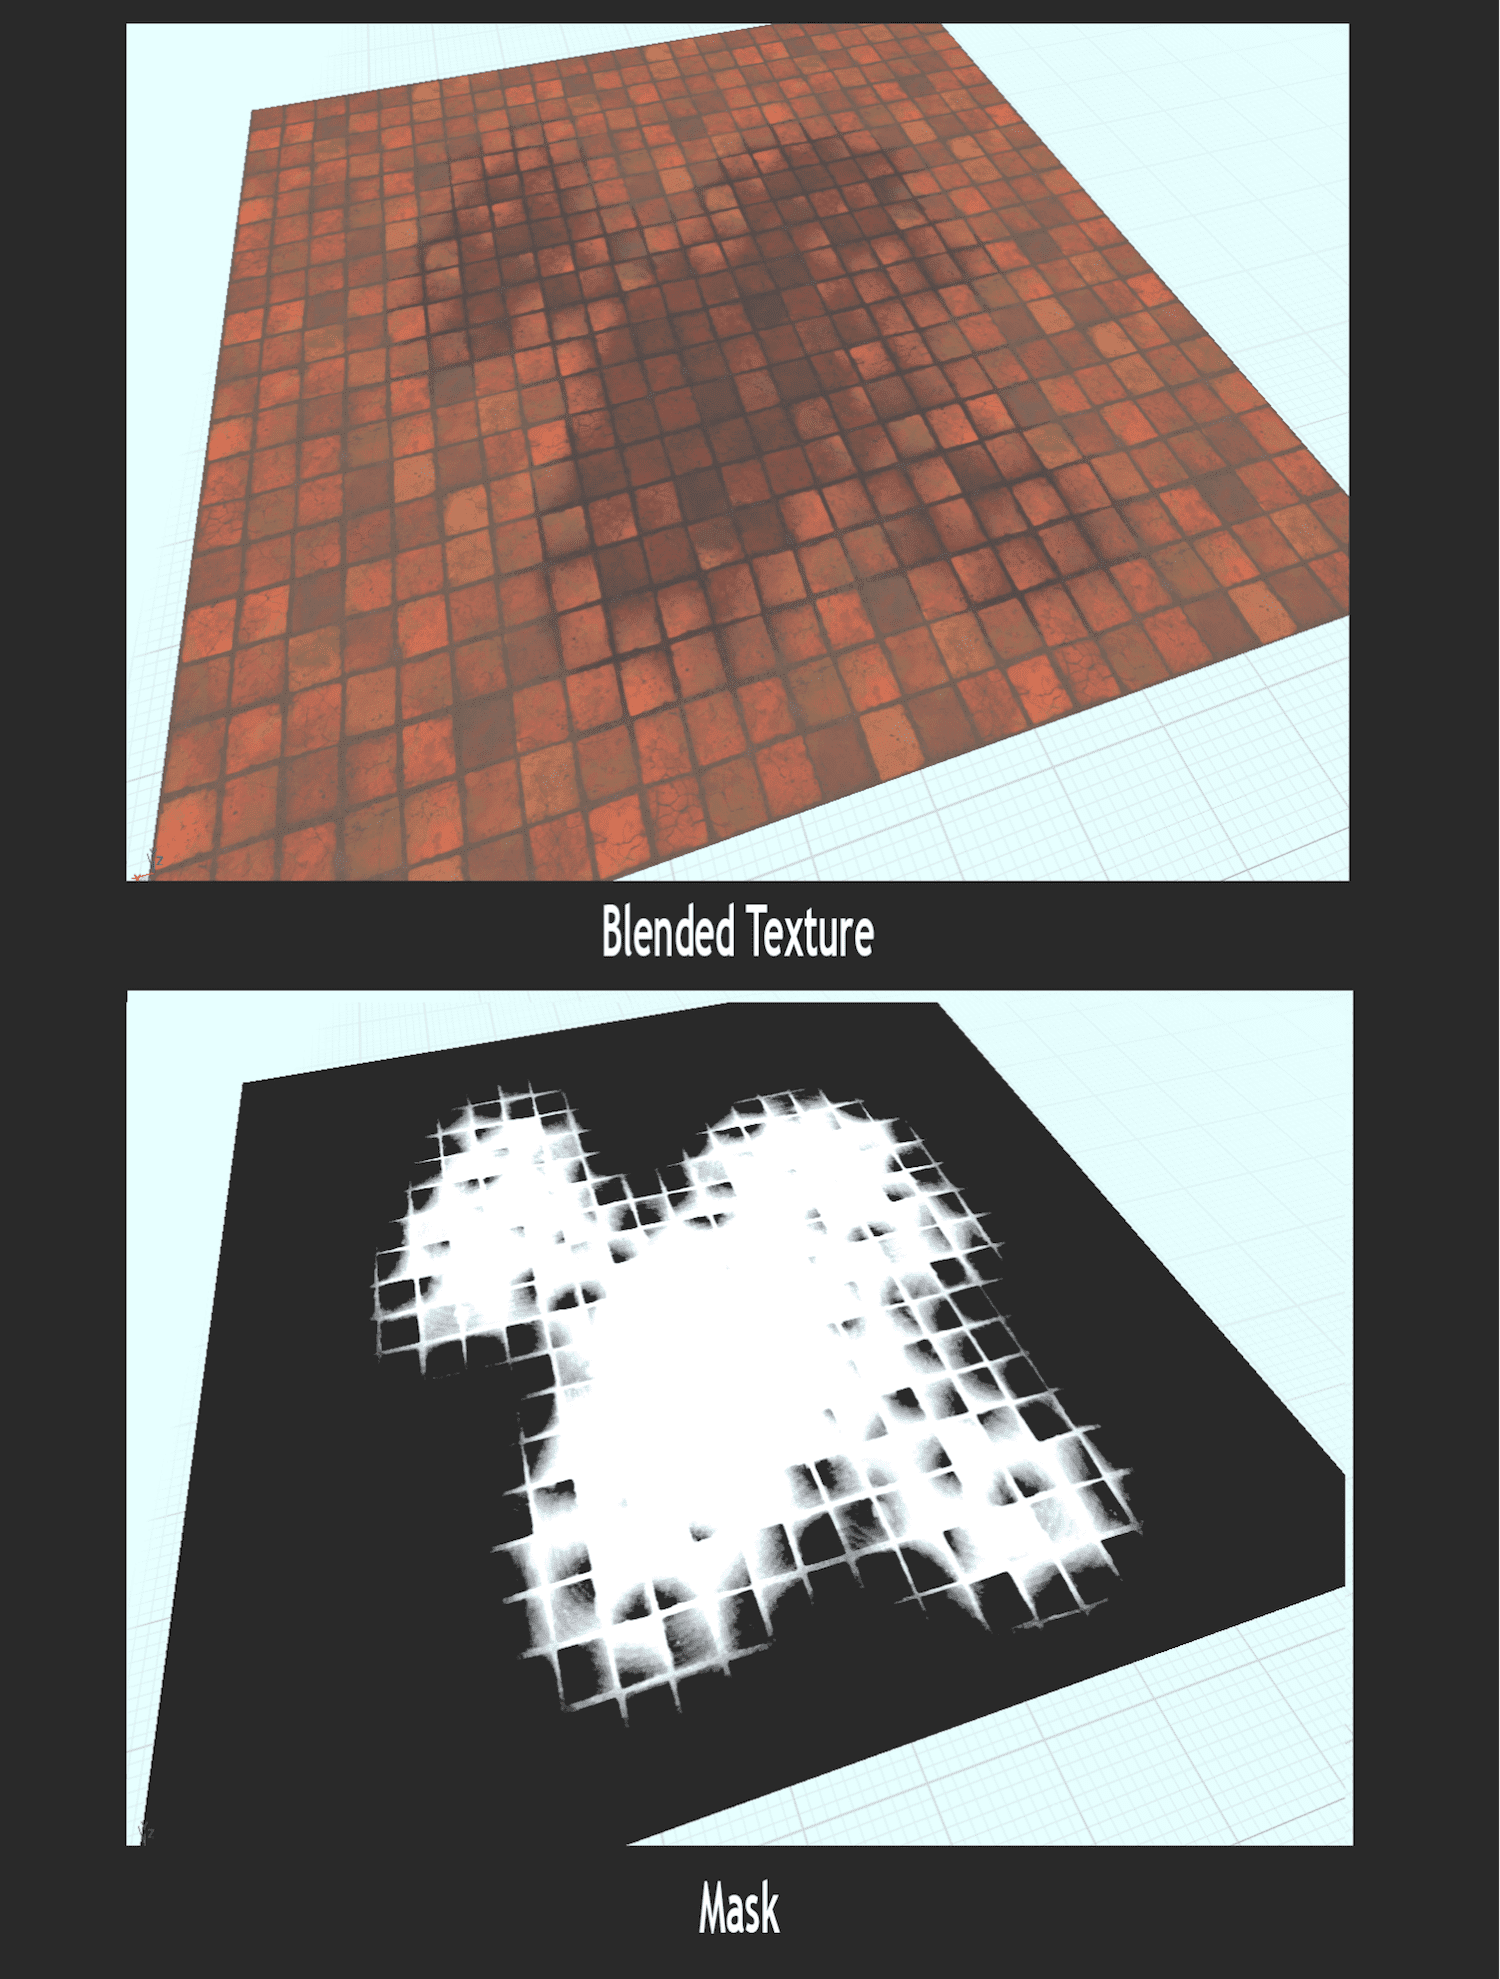
First, you can set up a lerp between the tile texture and a tinted version of it for the puddle. The transition between the tiles and puddle can be controlled by a texture mask. In this case, the mask is applied to 0-1 coordinates of the mesh on UV channel 1 while the overall tiling of the texture is controlled in UV channel 0.
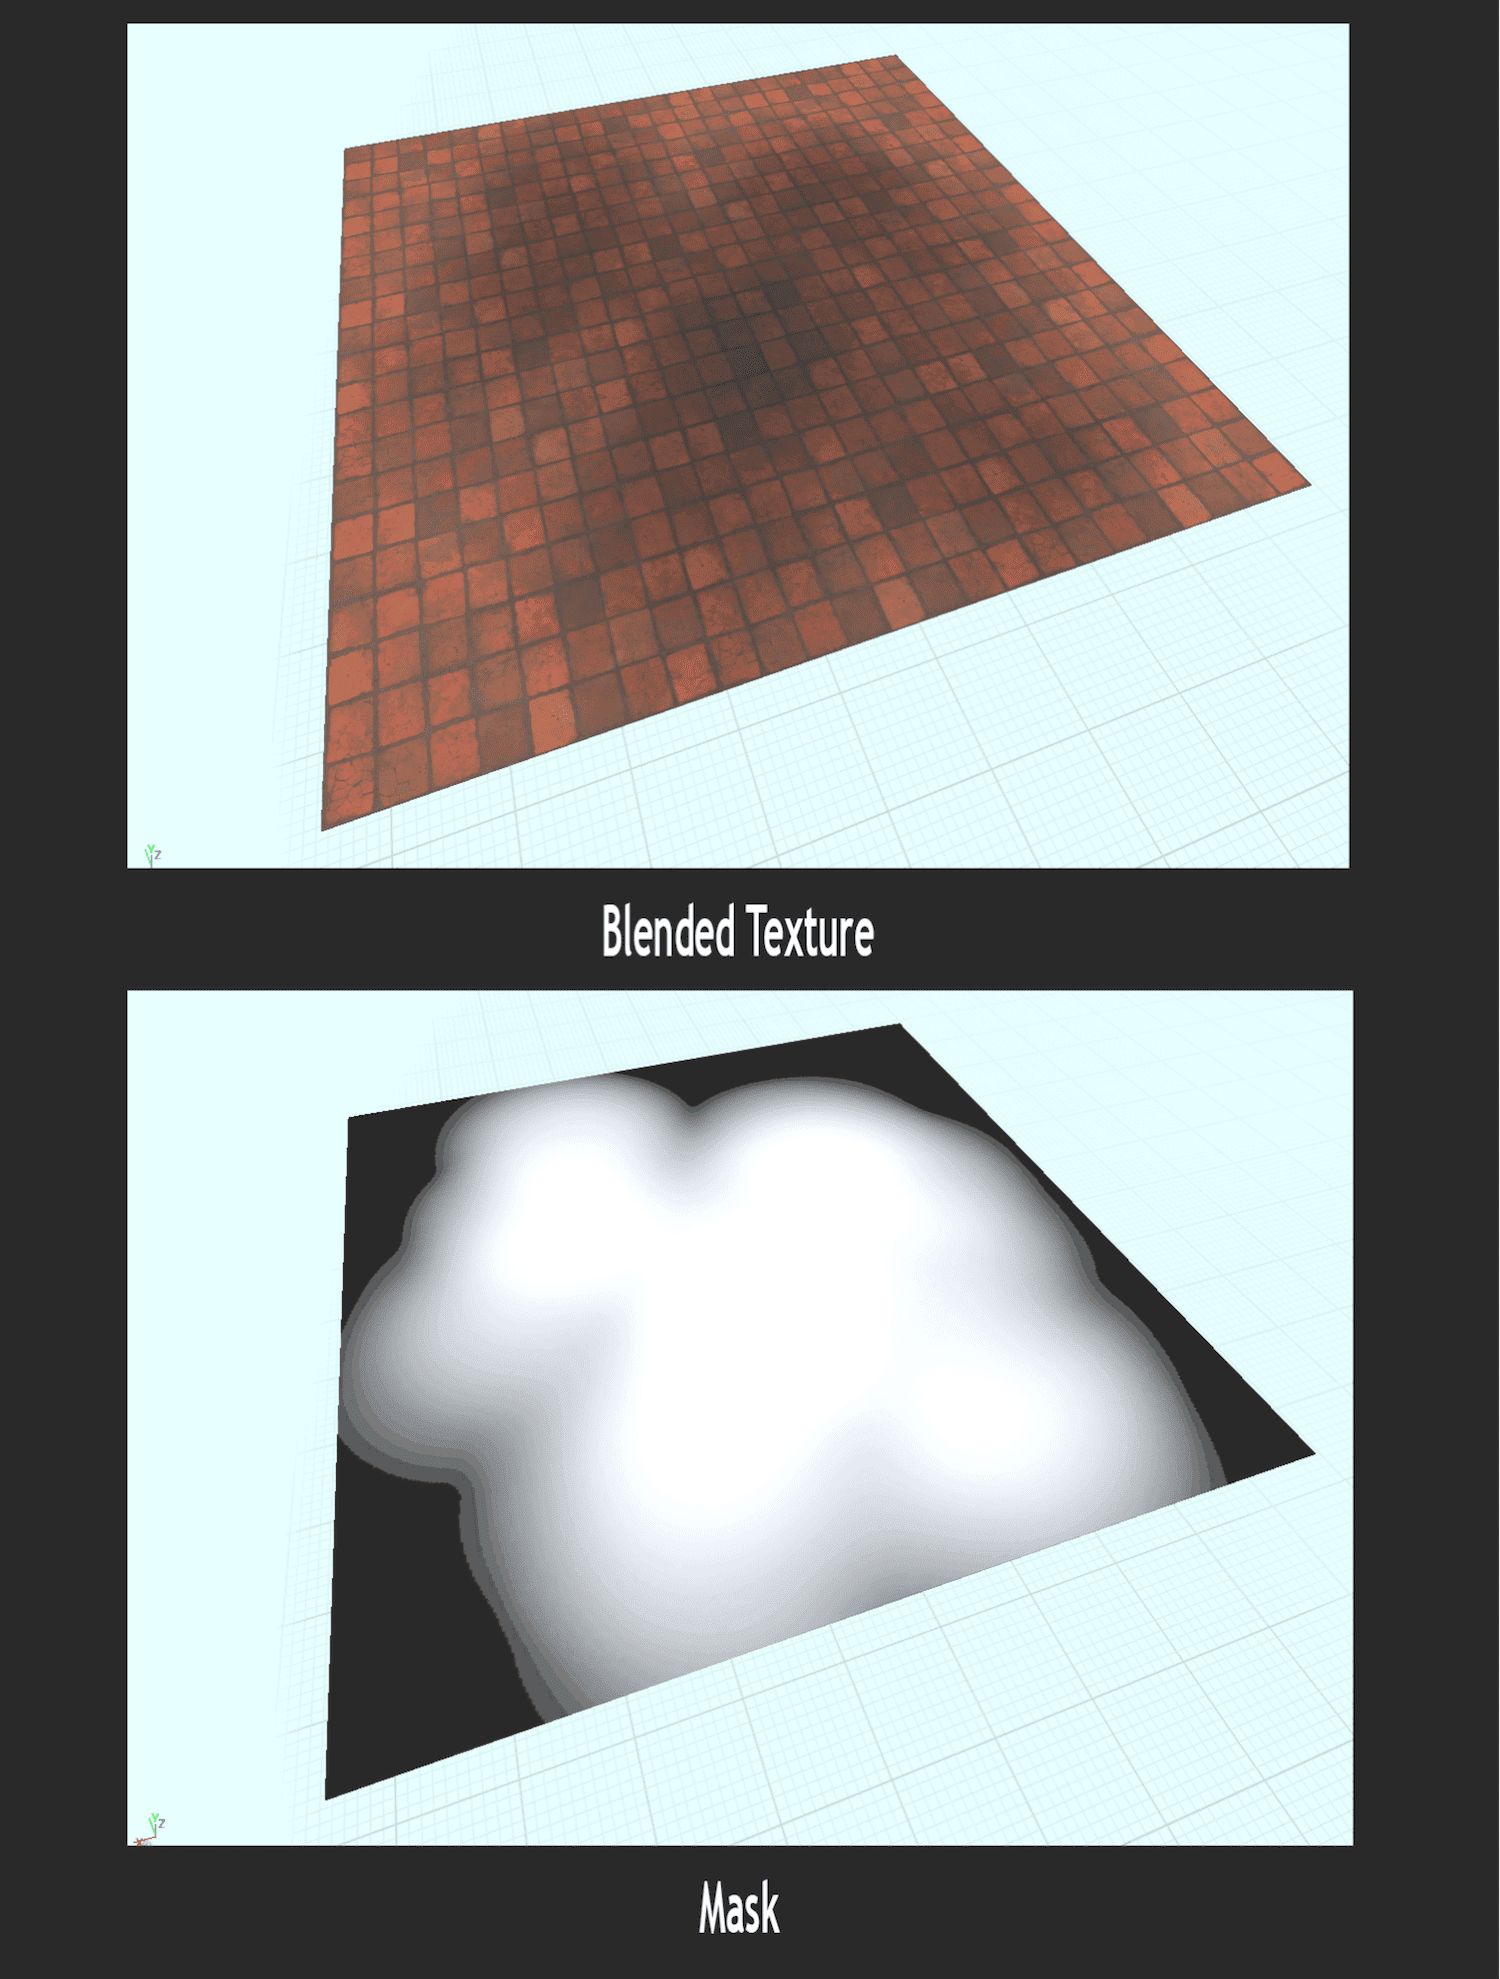
Here’s how this standard blend looks and the mask that’s used to blend it. The next step is to get this blend broken up based on the height of the tiles.
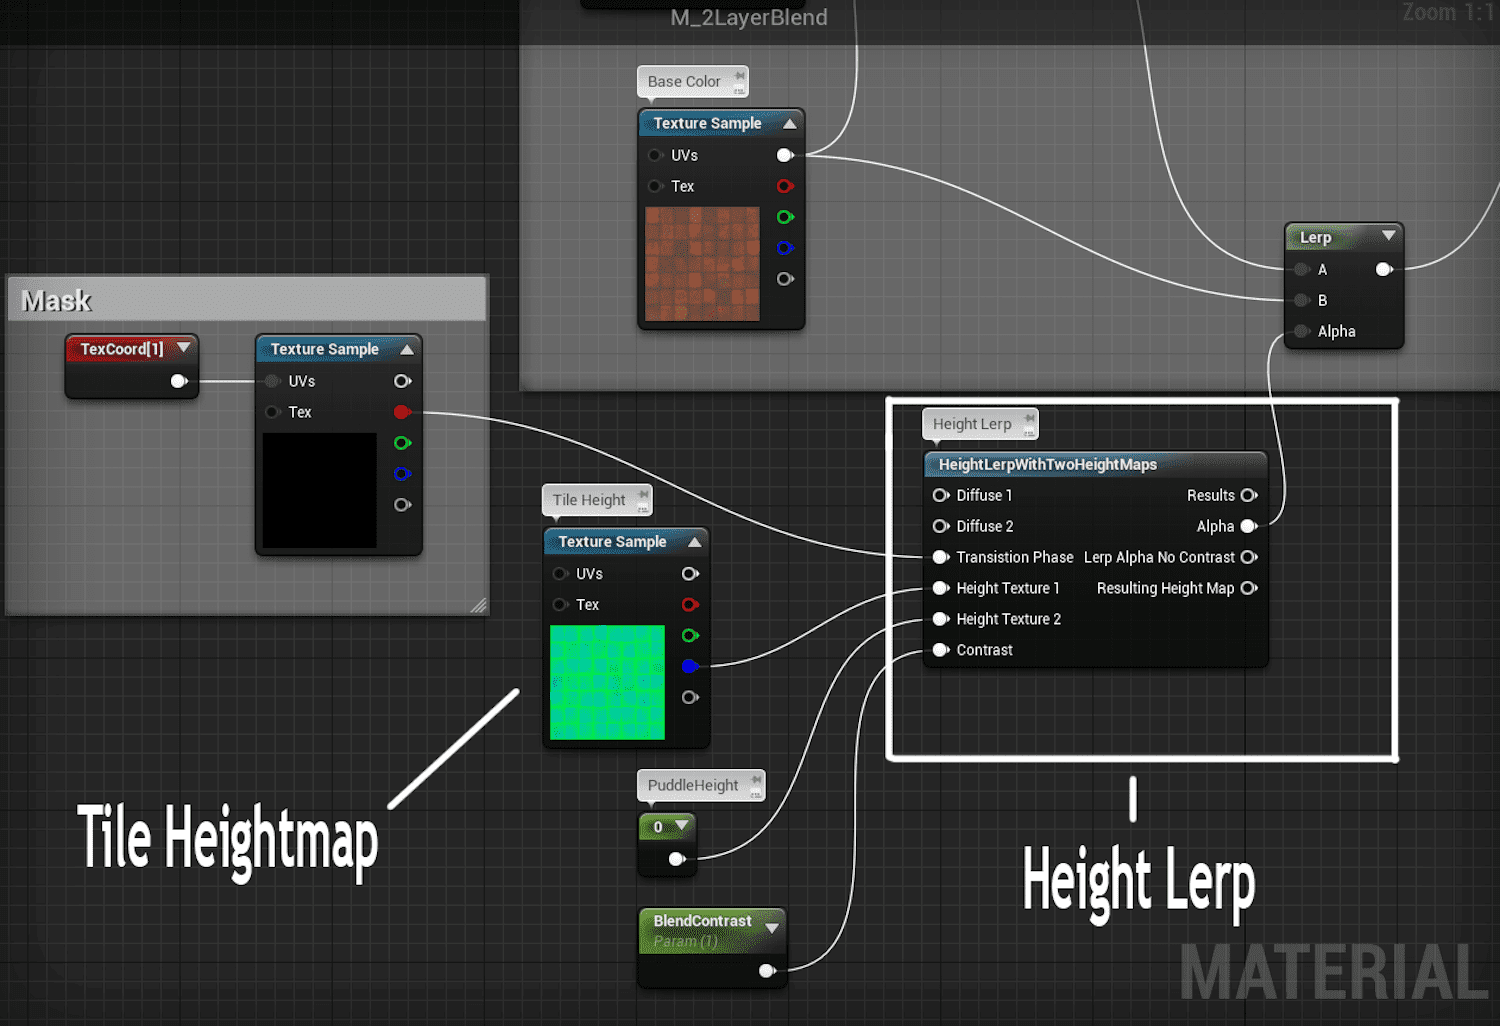
To do this, you can use one of the height lerp nodes that are included in the material editor.
Related link: – Surviving Your First Year in a Games Company – Part 1
The transition phase is the mask that controls the blend. Darker values will blend more of the puddle with the tiles. A parameter called blend contrast controls how much smoothing occurs between the blends.
Looking at the new mask, the blend is now getting more broken up. Depending on the intensity of the input mask, the water is blended with tiles starting in the lowest sections of the heightmap, gradually covering raised sections in areas painted with more strength. With this new mask, you can now set up blends for the normals and roughness.
For this material, I gave the puddle a roughness of .01 and a couple of panning normal maps to give it a slight waviness.
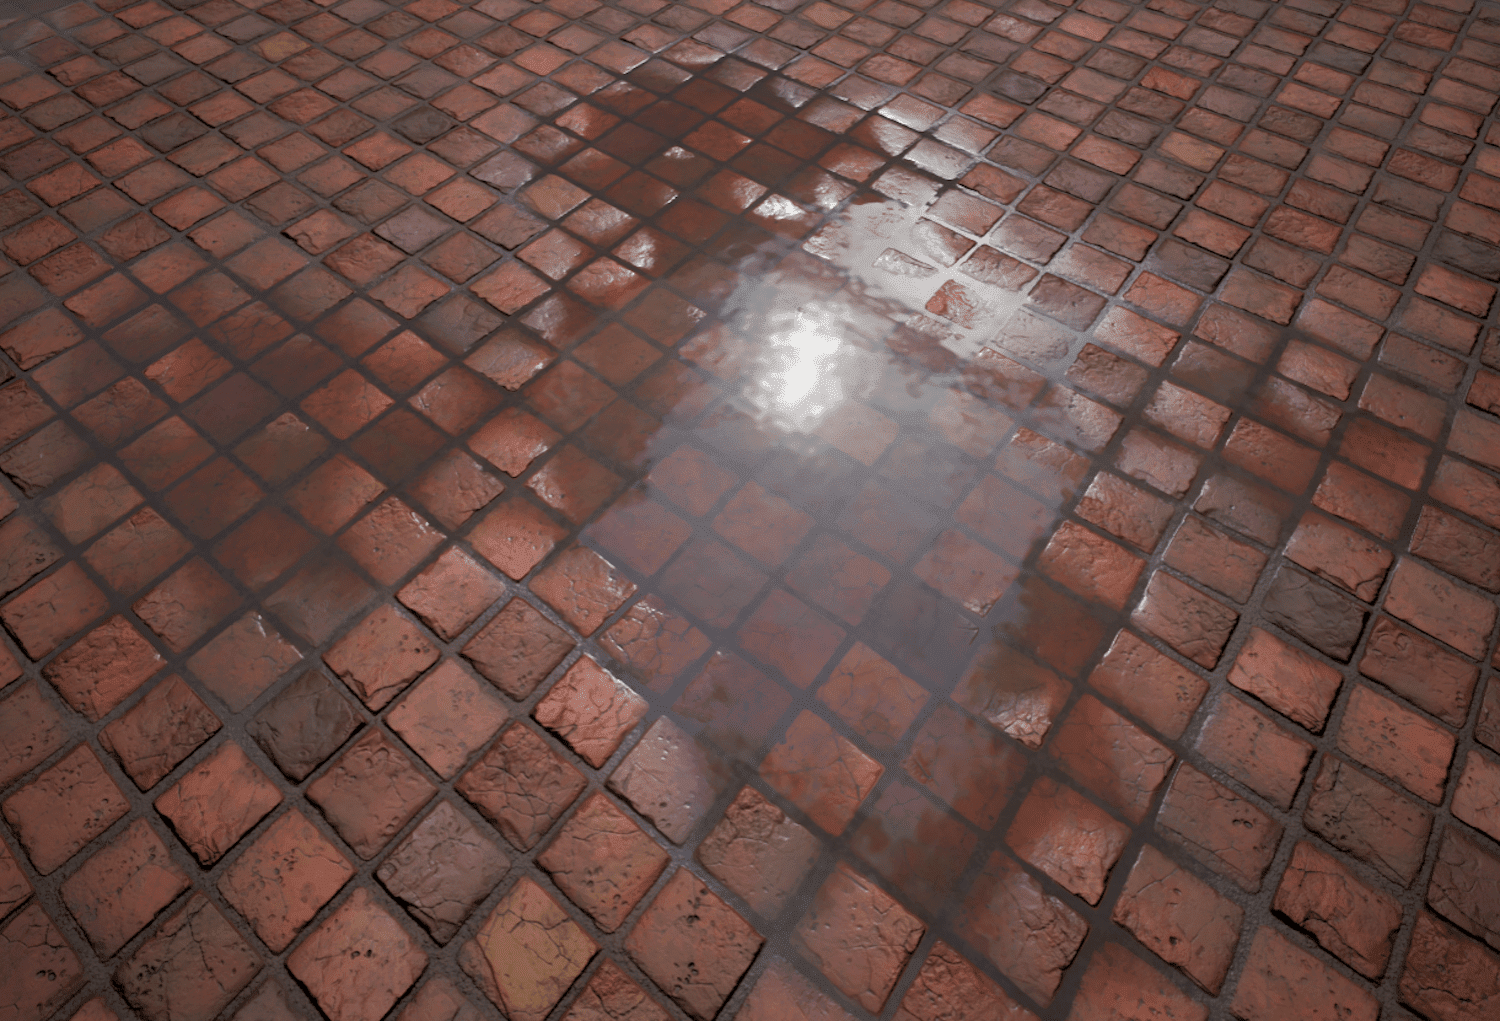
Now you have a basic puddle blend with water buildup in the low points of the tile. You can get more flexibility out of this method by adding more layers to the material.
4-Way Height Blend
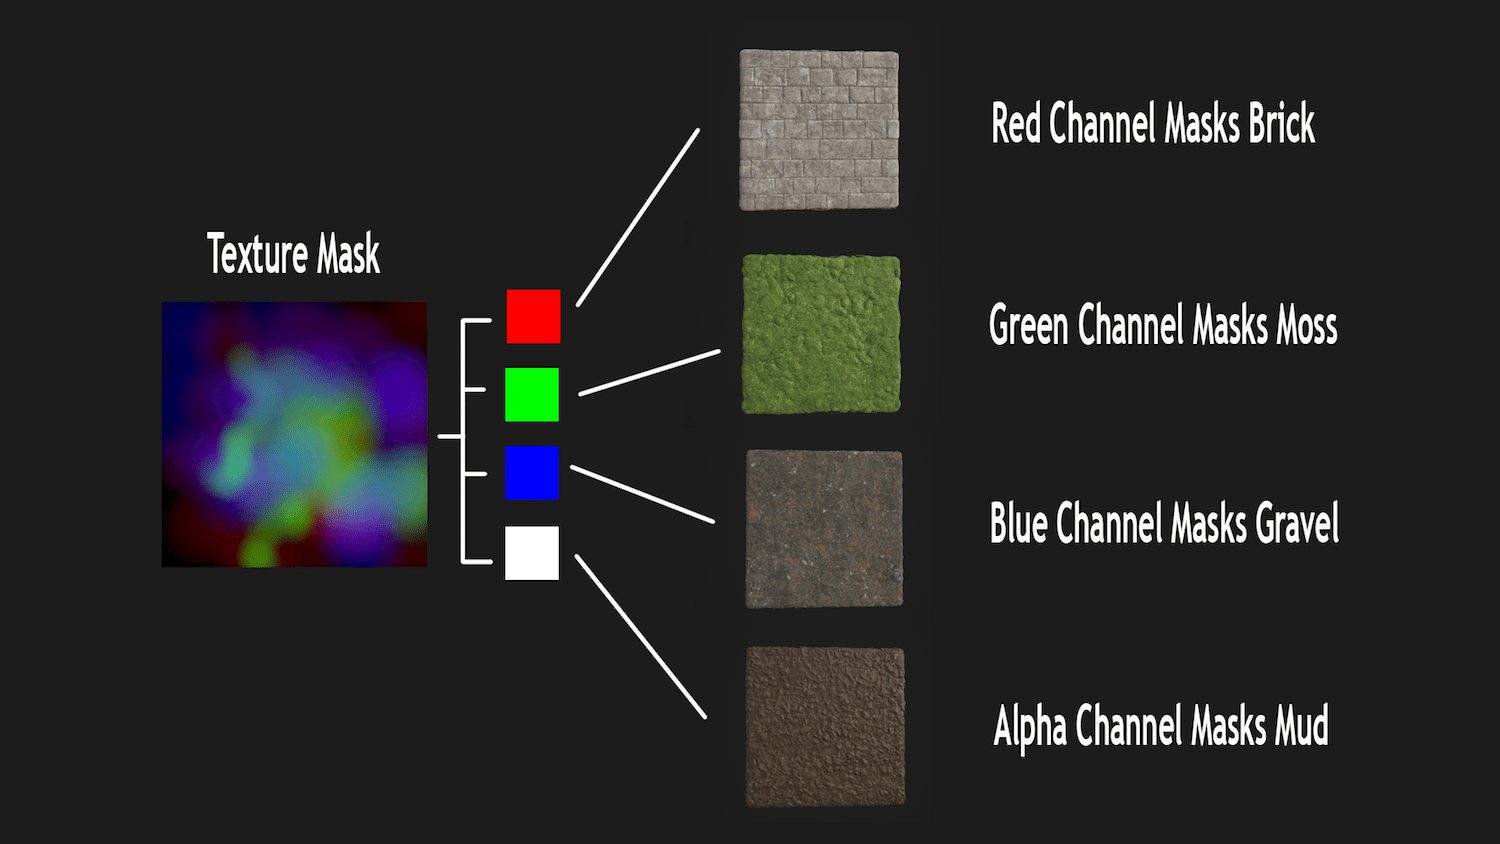
This example will show how to blend 4 materials based on their heights. This can be very useful for larger surfaces in an environment such as architecture or geology because it lets you break up tiling and get a lot of interesting variation in color and value without requiring too much texture memory. This example will blend brick with moss, gravel, and mud. Each of these will match a different channel in a mask.
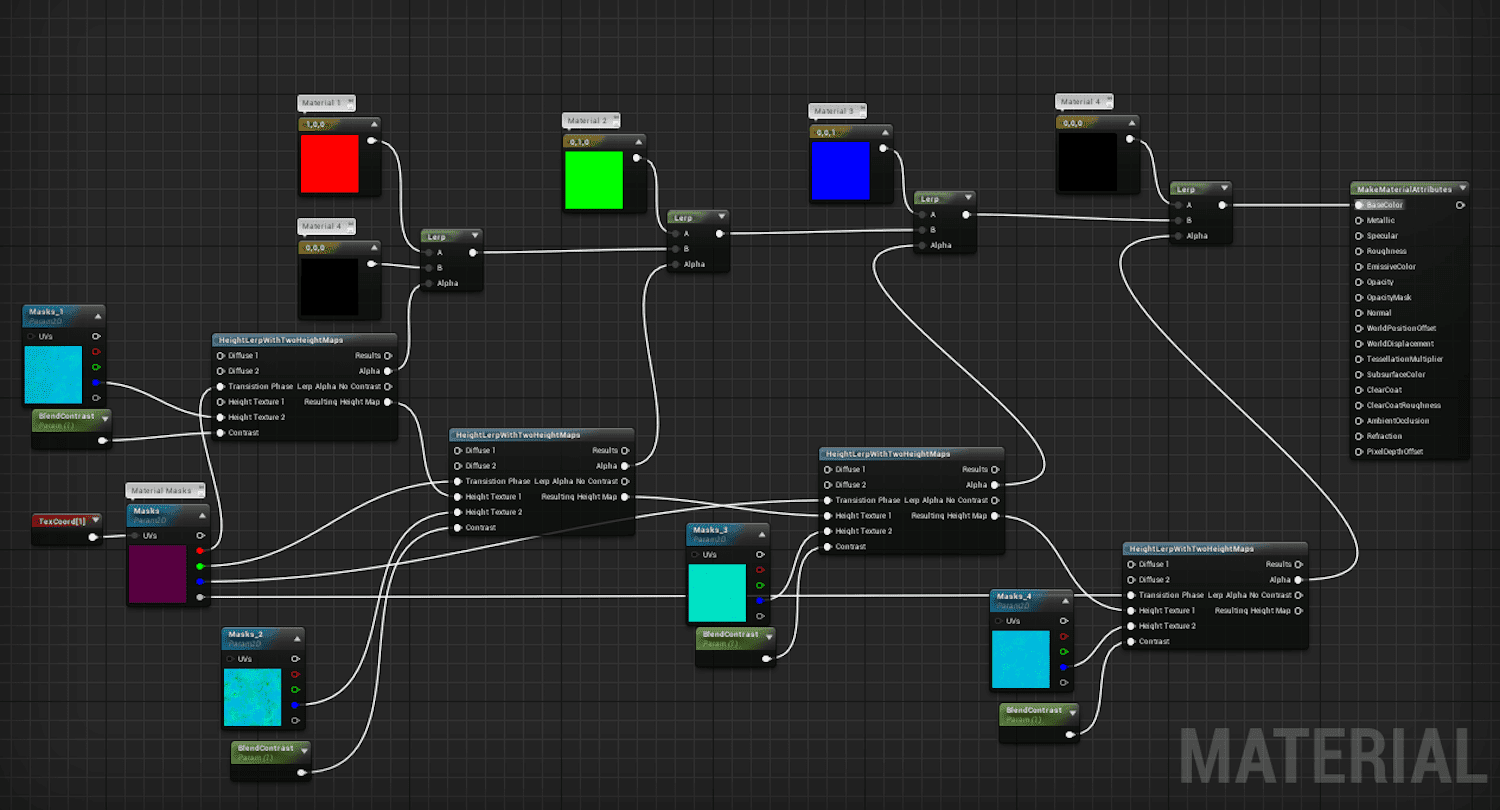
Here is a basic overview of how it will be set up.
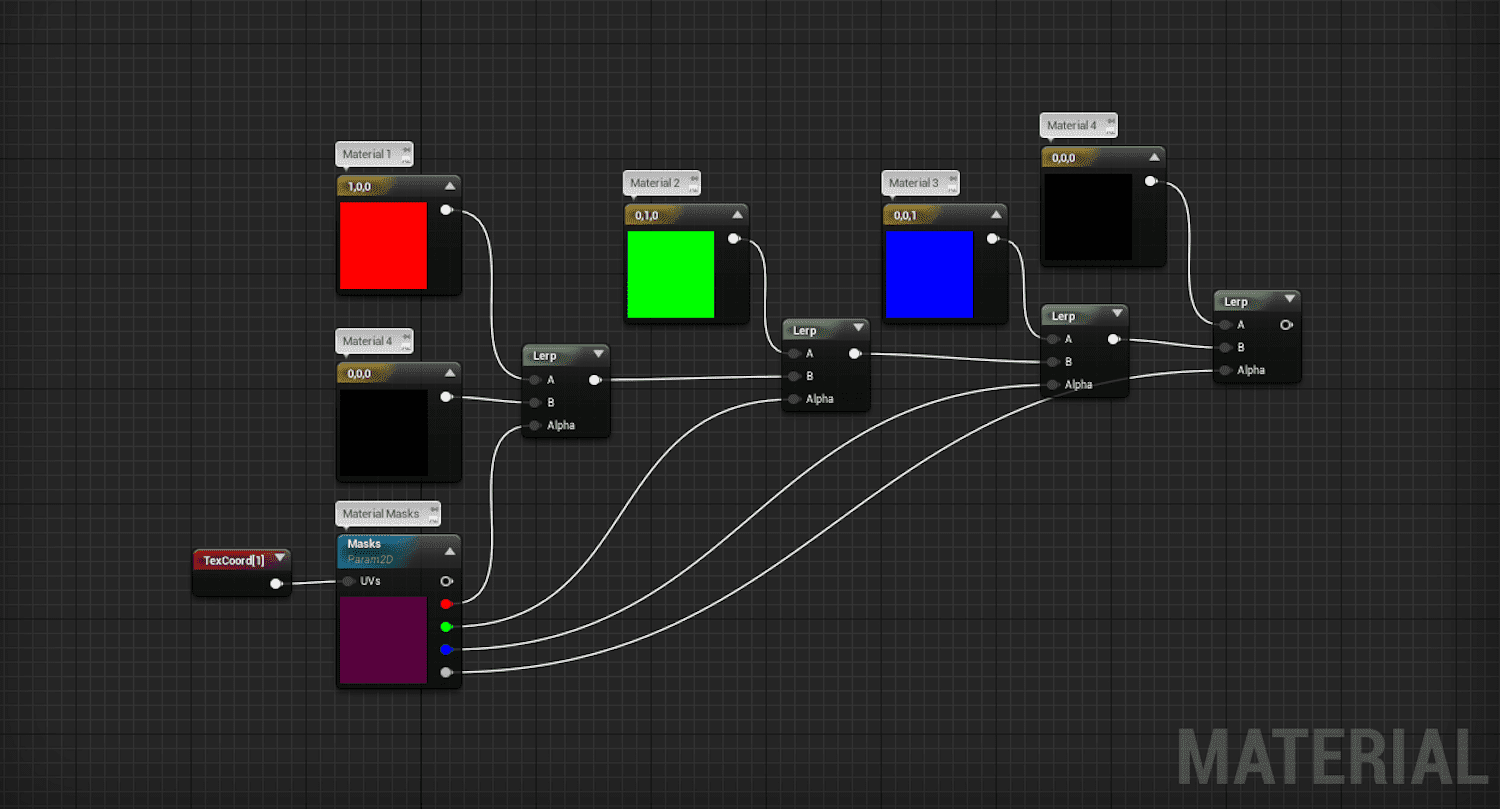
Essentially, it’s a series of lerps controlled by the four channels in a texture mask. In this case, the mask uses UV channel 2 so that the tiling of the materials can be controlled in the first channel.Next each channel of the mask can be put through a height
Next, each channel of the mask can be put through a height lerp similar to the puddle example.
In this case, the height map is stored in the blue channel of a mask texture. There’s one for each material layer. It also stores metallic in red and roughness in green. Combining the masks like this instead of using separate grayscale textures helps save memory.Here’s how the material should look so far.
Here’s how the material should look so far.
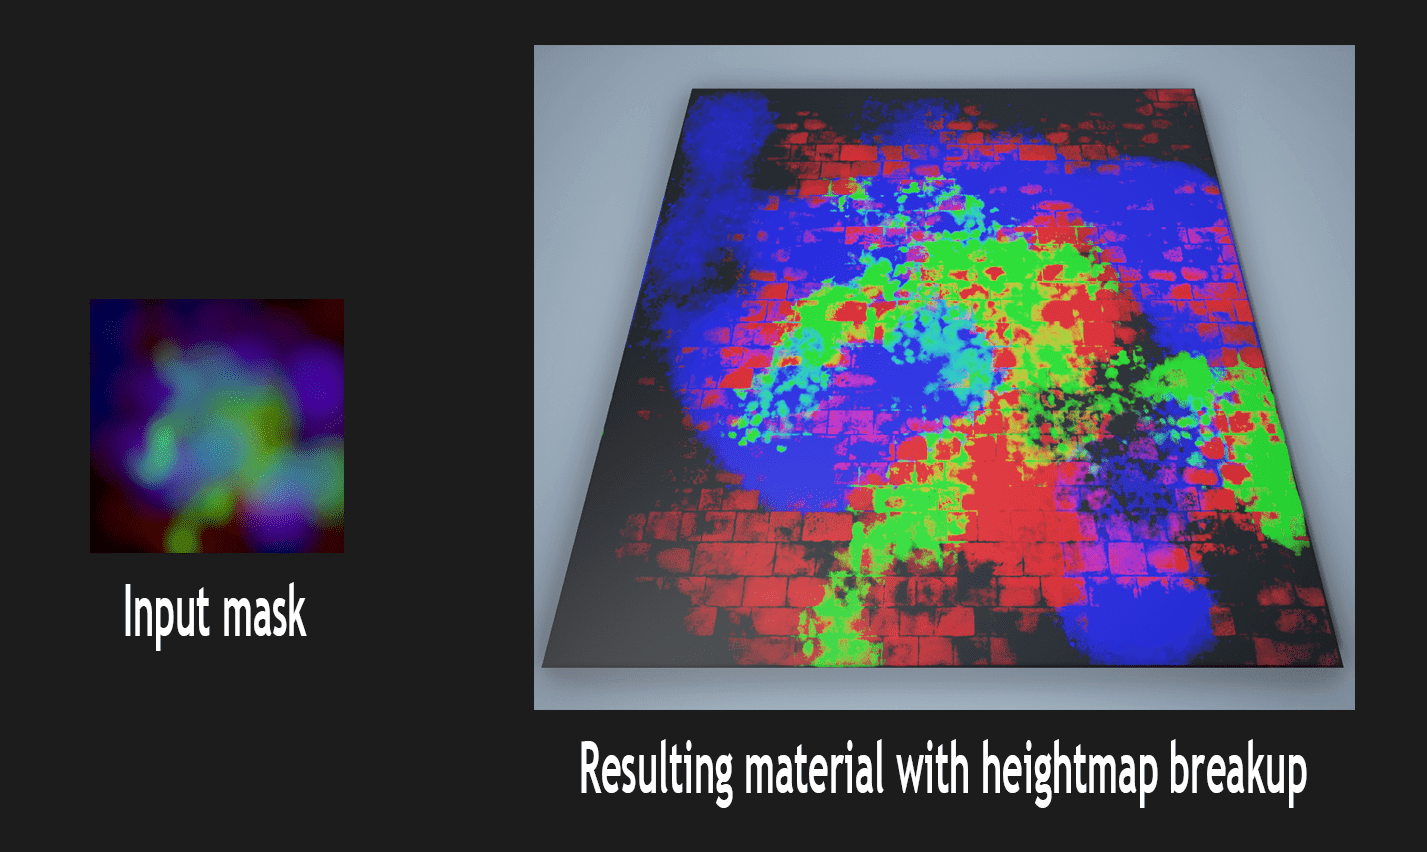
As this image shows, you can get a lot of edge breakup from even a blurry low res mask when using height maps. The next step is to replace each of these colors with the four material layers.
Related Link: Surviving Your First Year in a Games Company – Part 1
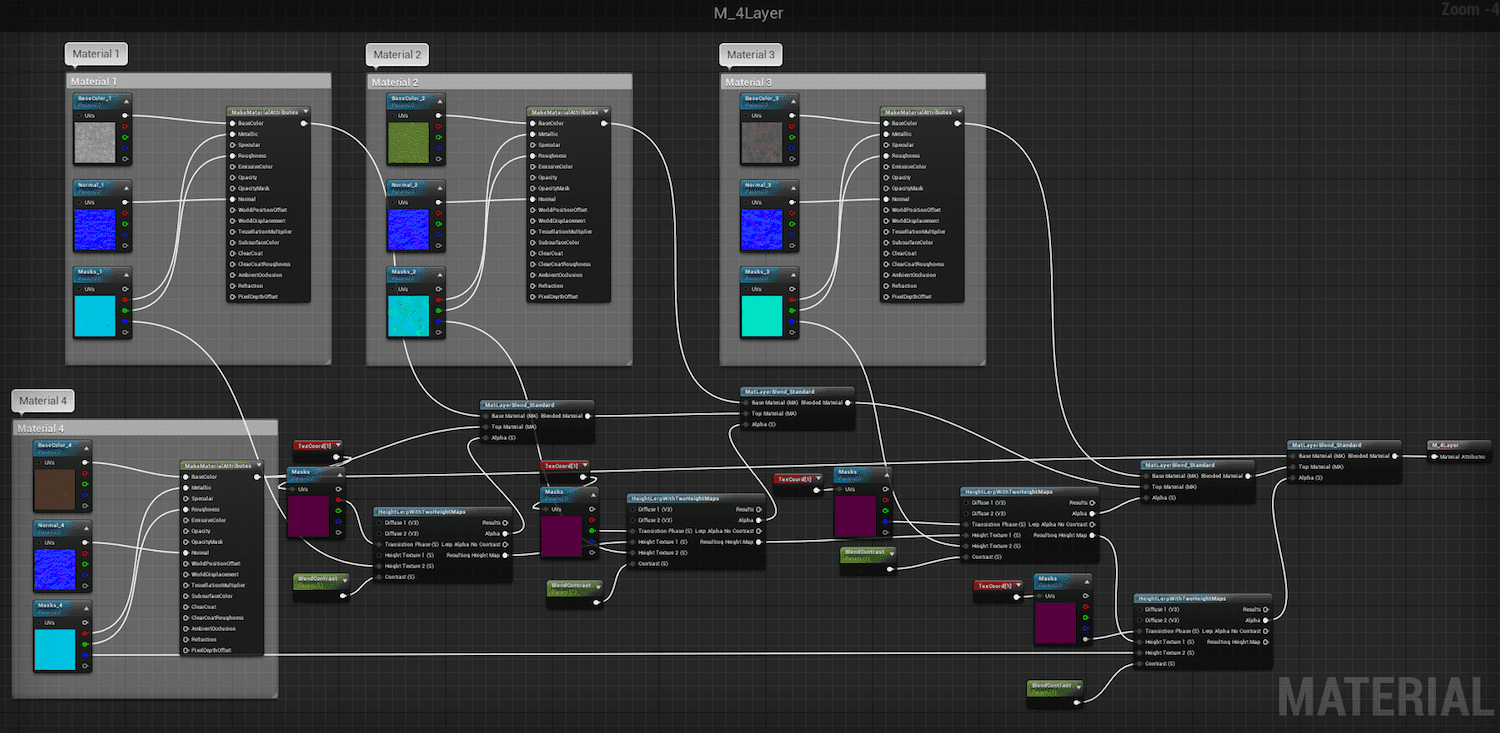
In this case, I’ll use make material attributes to keep the graph a bit cleaner.Here’s an example of one layer.
Here’s an example of one layer.
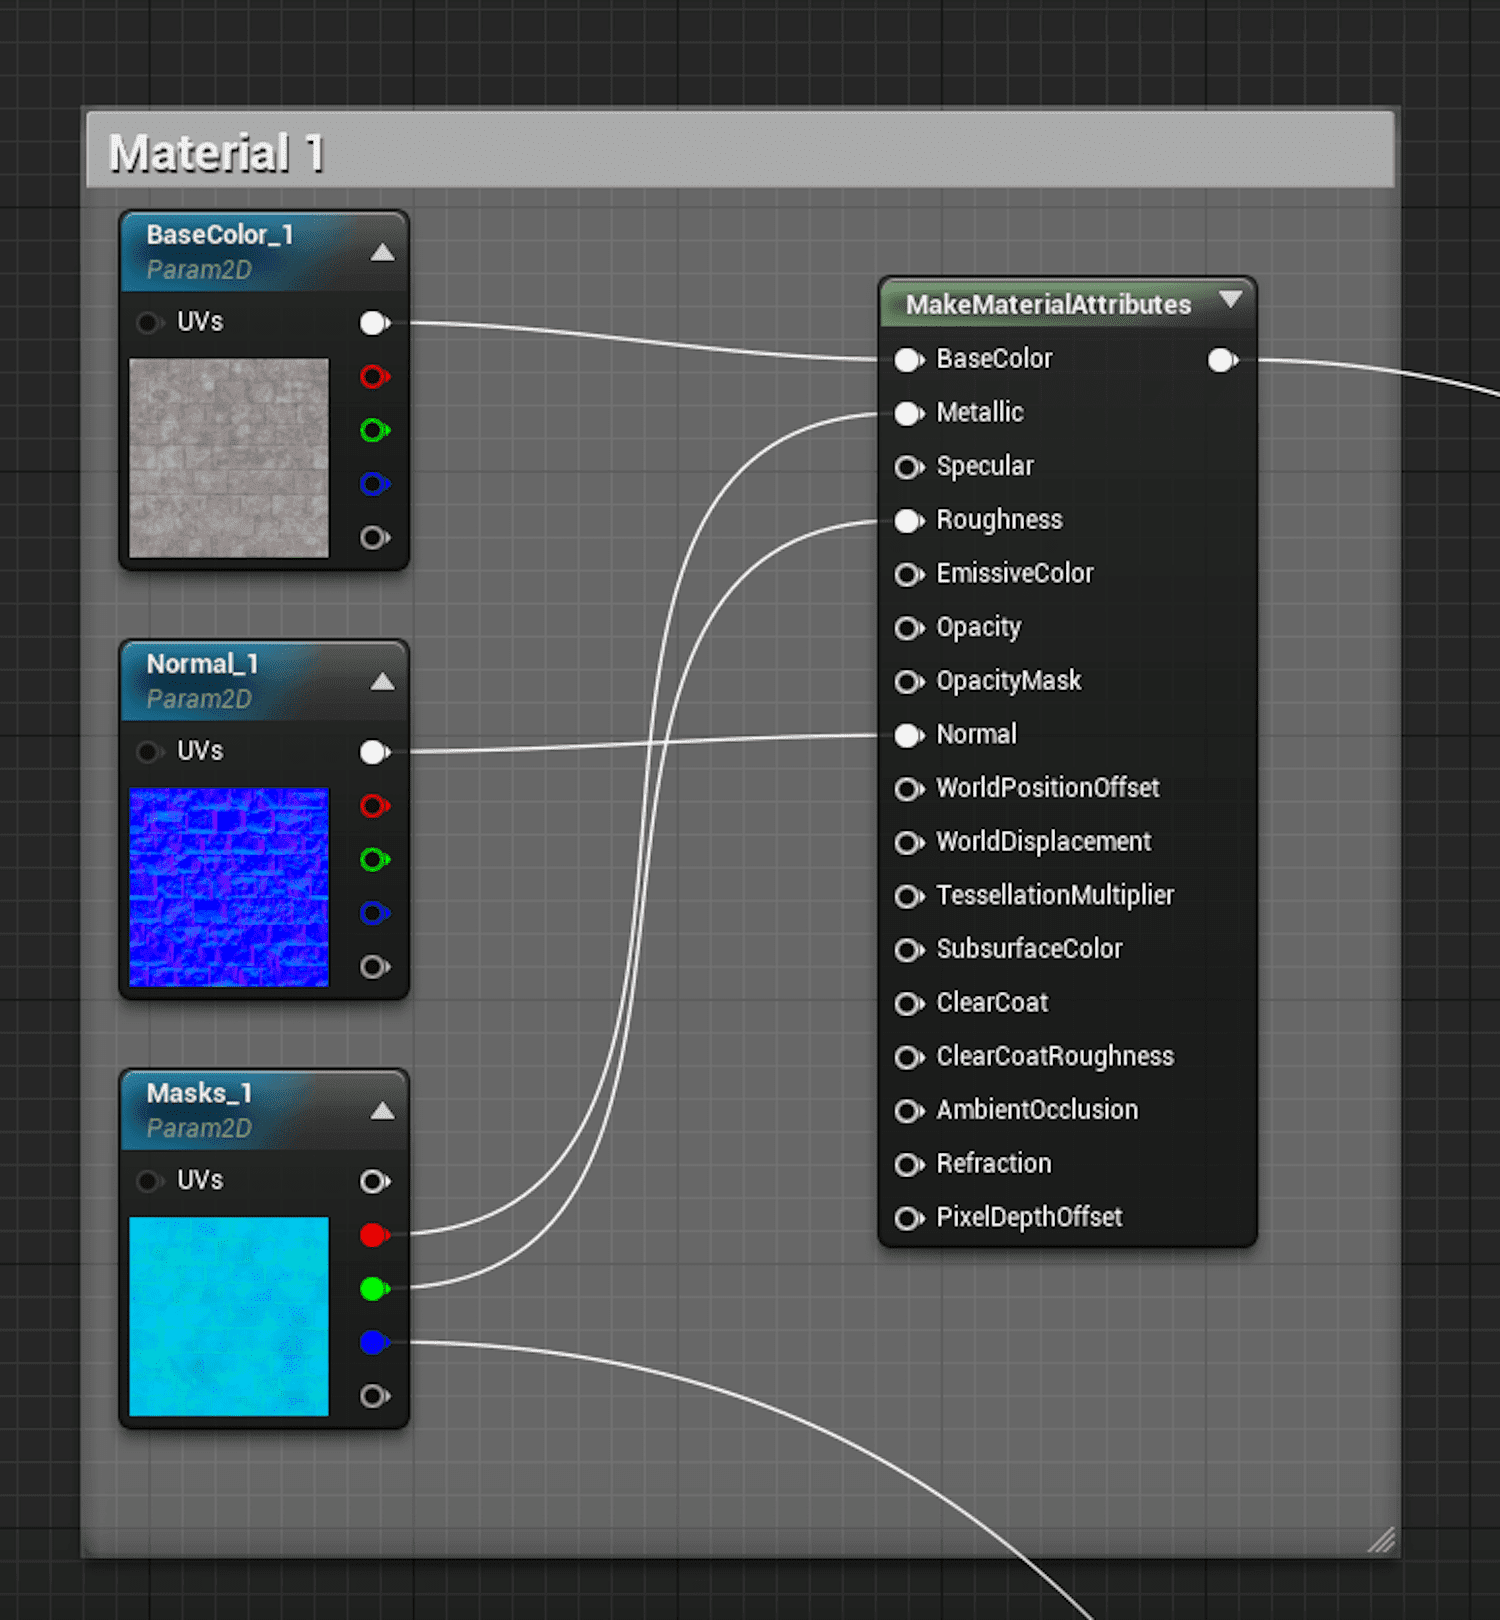
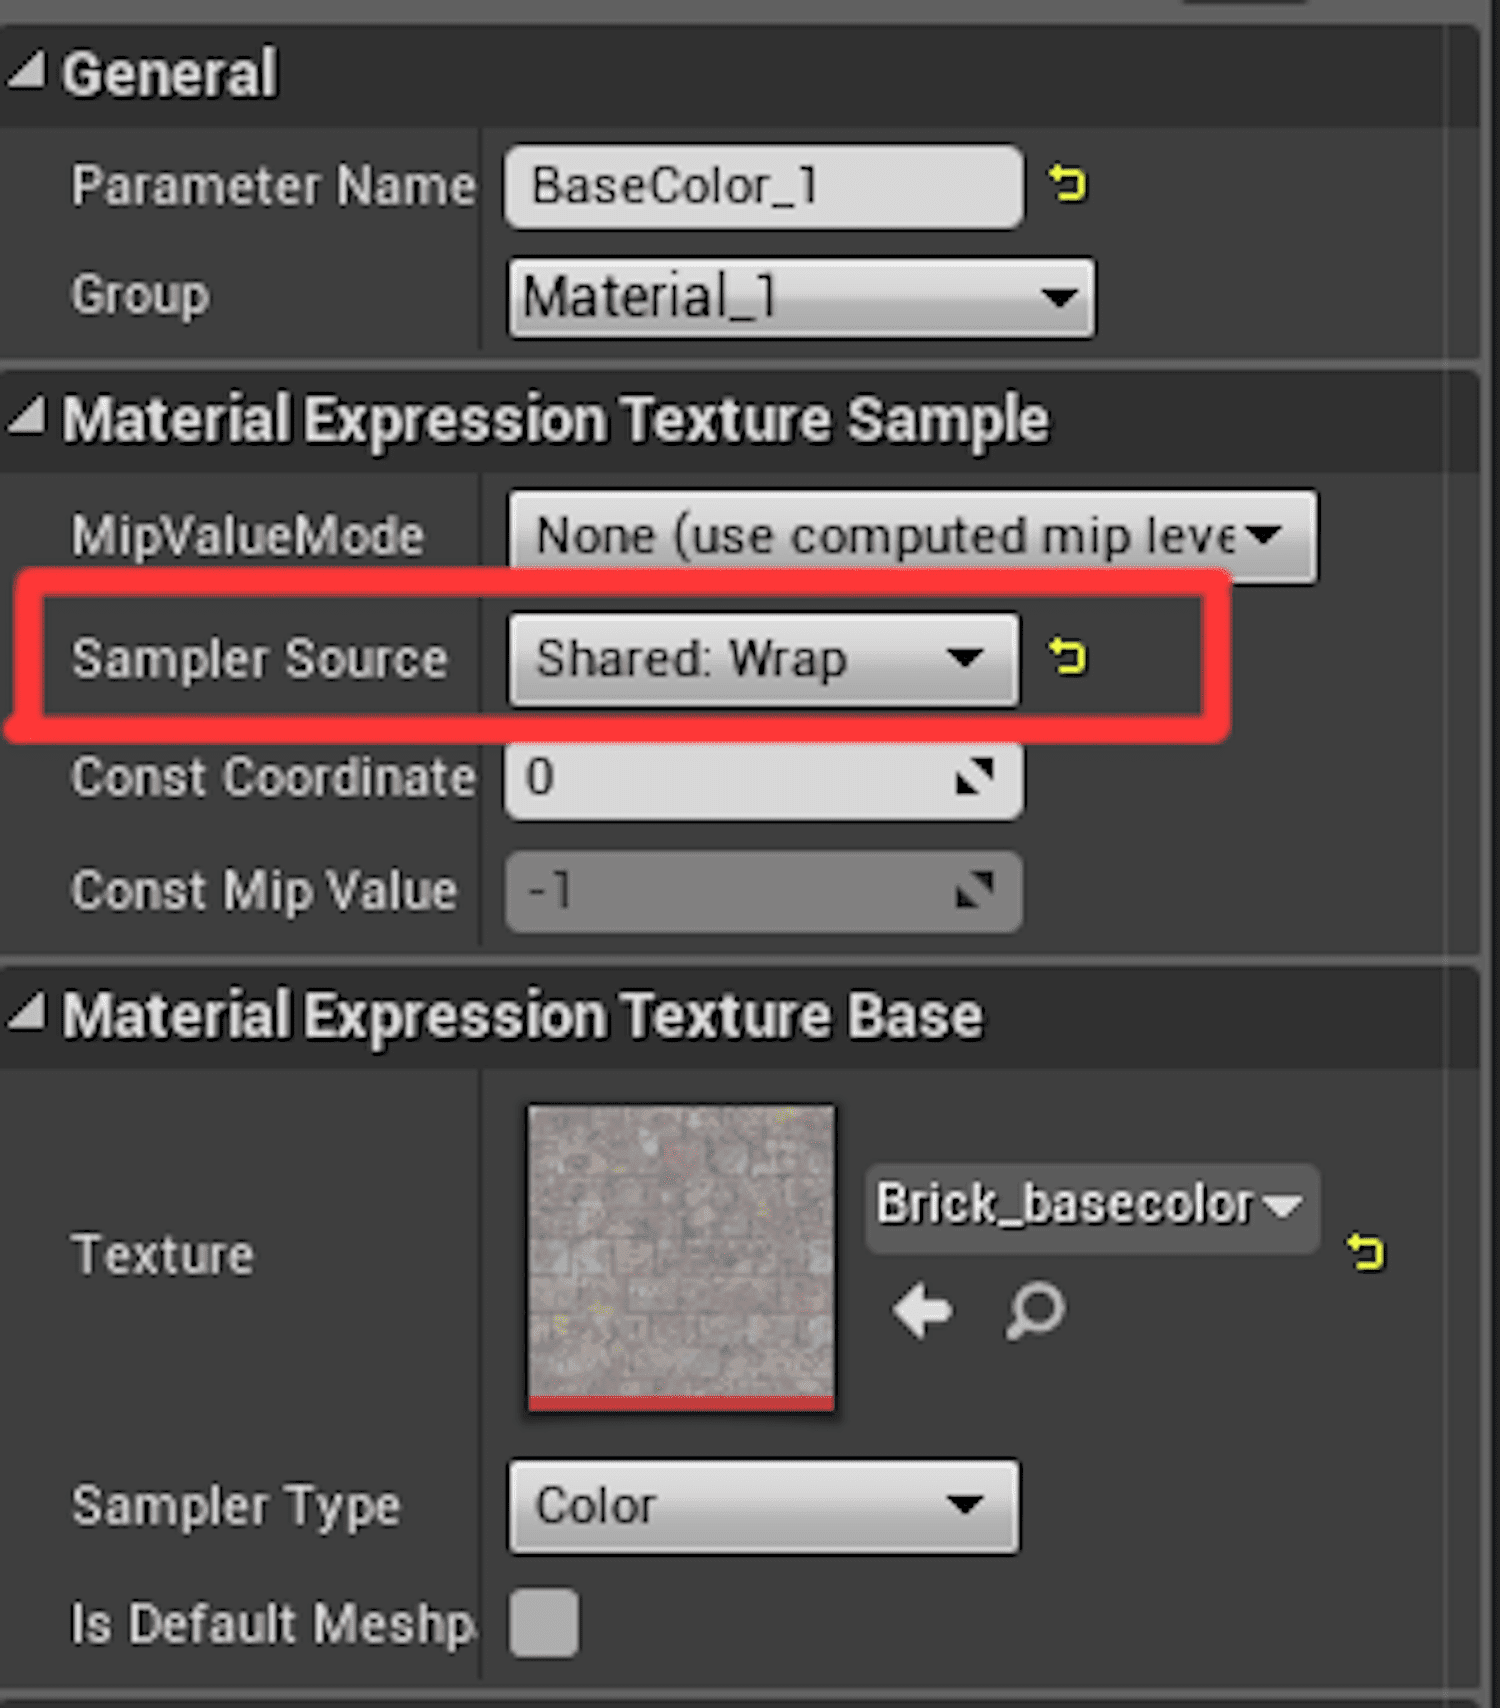
So there are three parameters for each layer: base color, normal, and the masks. Again, the mask is storing metallic in red, roughness in green, and height in blue. One more caveat with the mask is that it’s storing mathematical values, not color information. So as mentioned earlier, the texture should have
So as mentioned earlier, the texture should have RGB unchecked in its settings. Since this material will be using quite a few textures, it’s also a good idea to set their sampler source to shared: wrap, which will help avoid some future compiling errors.
The next step is to replace the lerps from earlier with MatLayerBlend_Standard for blending each of the material layers.
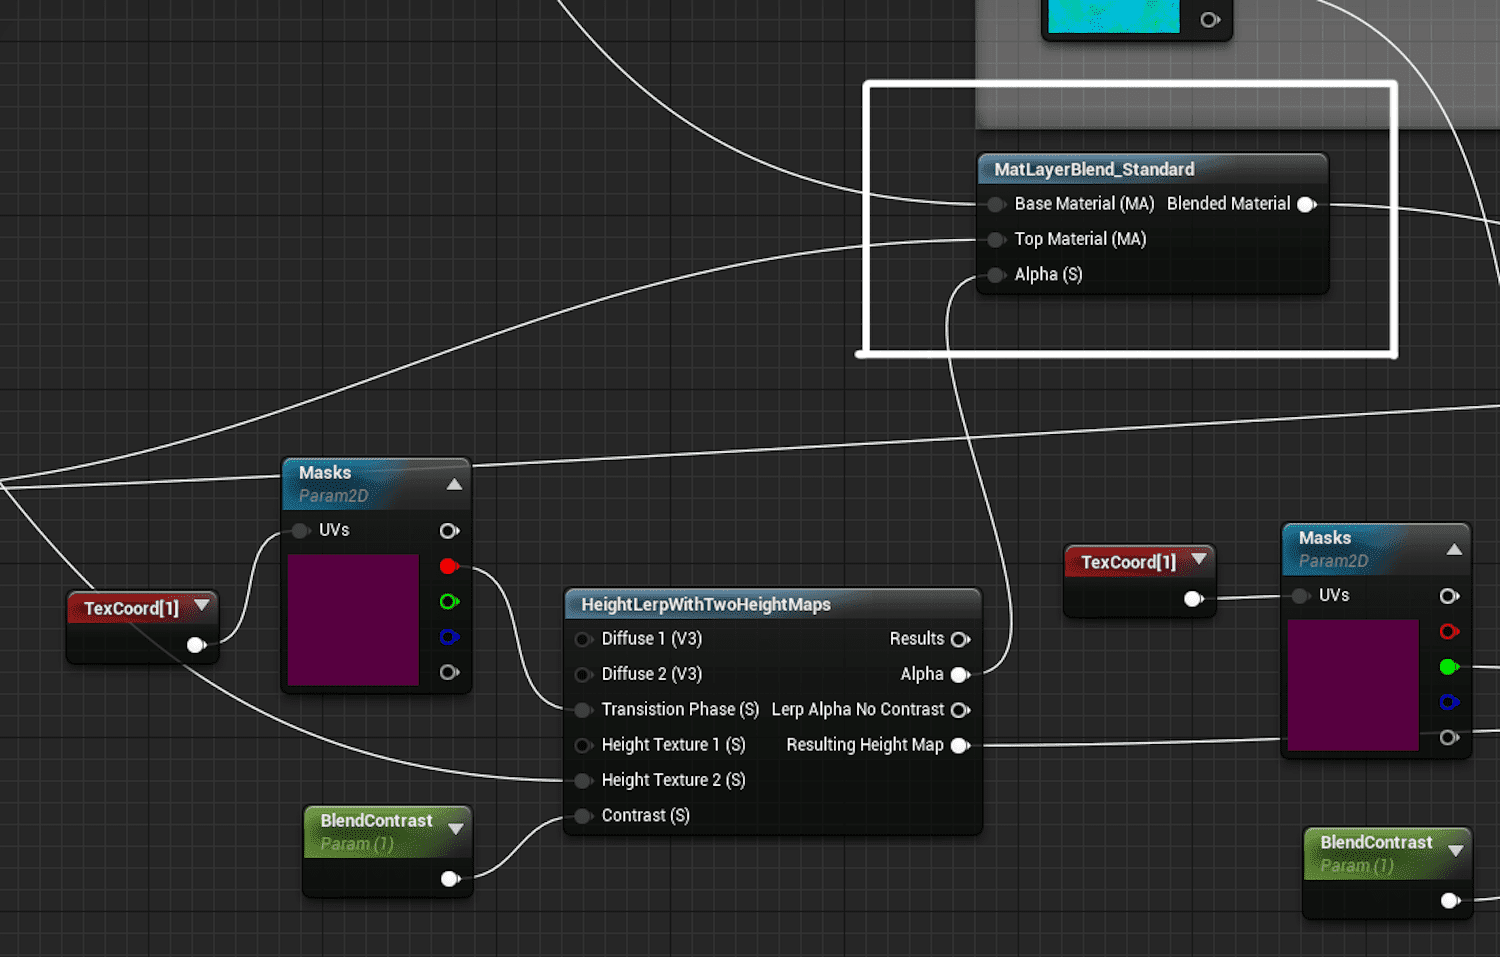
Here’s what the whole graph should look like with the earlier colors swapped out for full materials.
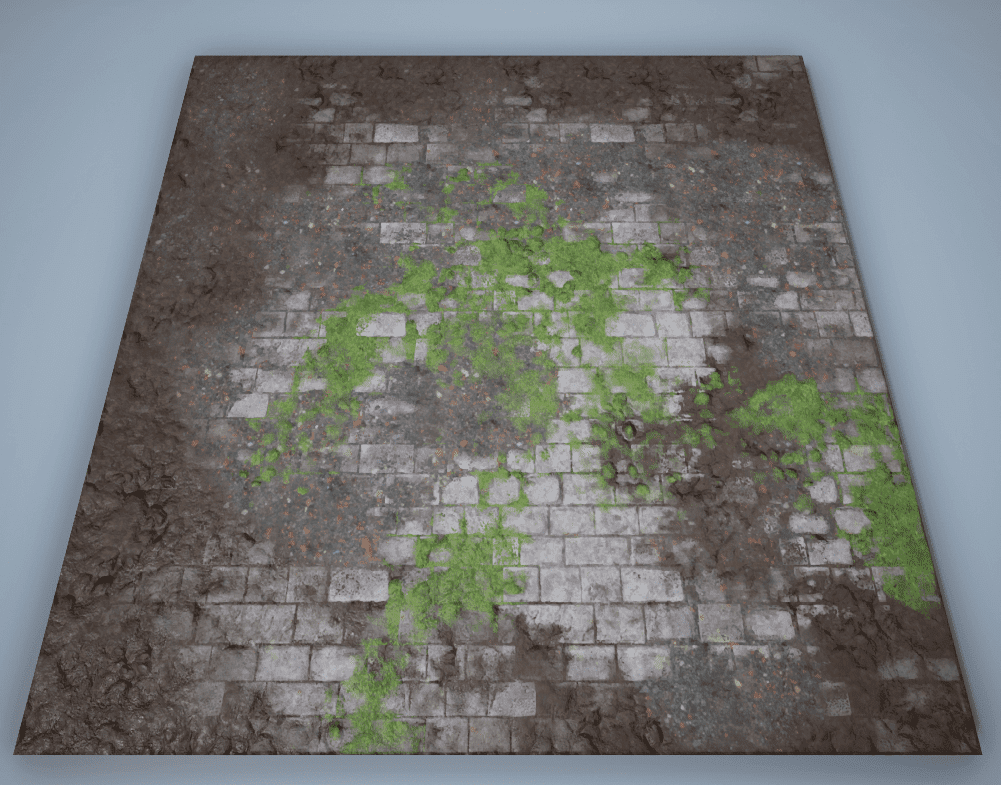
Here is the resulting height blended layered material.
Mask Painting in Substance
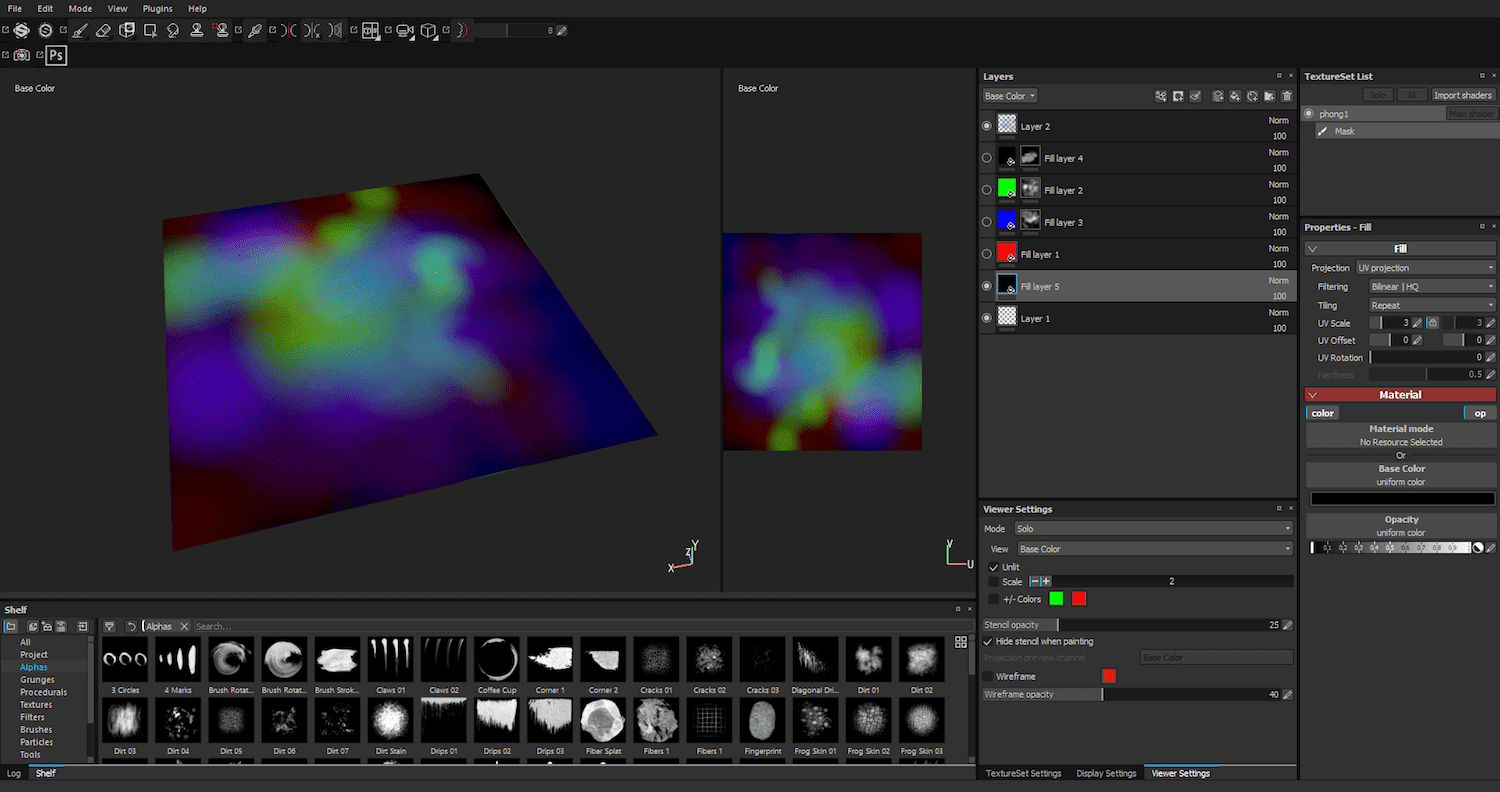
I’ve found that it can be helpful to preview how a layered material will look while painting masks in Substance Painter. Earlier I mentioned a shader built into the program for displaying layered materials. I customized this shader slightly to include the height blending feature described in the previous section. It will visually match up with the 4 layer blend example. Download Link
Essentially, you can just paint RGB and opacity values and the shader will display the material blends instead of the colors.
Painted colors:
You can plug any substance material into the four slots on the shader for the layered material.
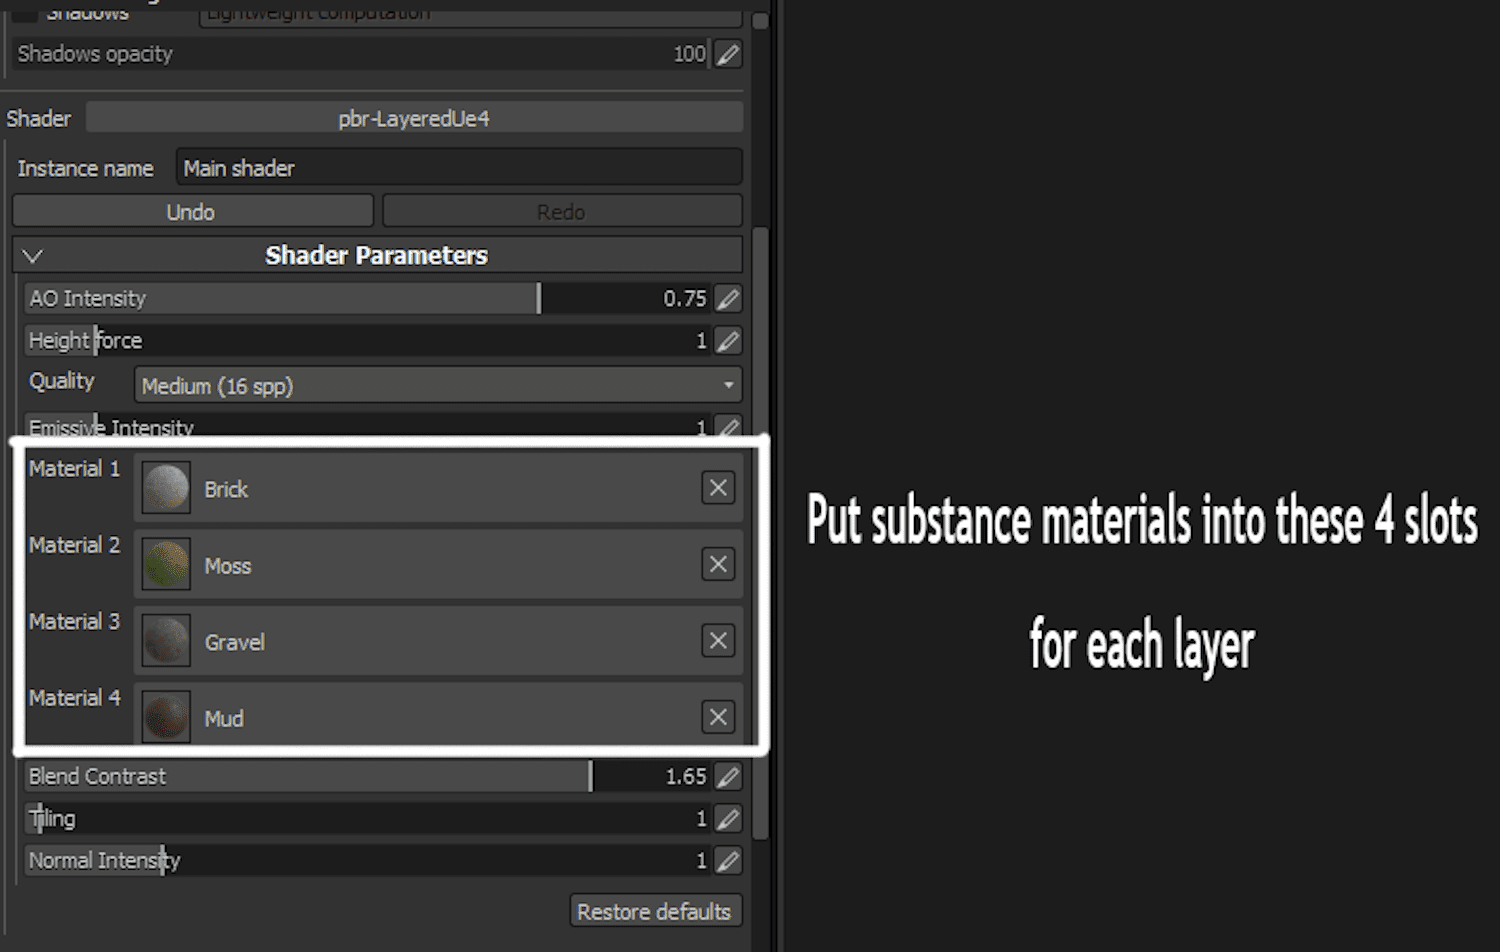
In order for these materials to use height blending though, ensure they have a height output in Substance Designer.

After you’re finished painting a mask, you can make a quick template for exporting it.

This will export a texture mask from the rgb and opacity values that you paint for each layer.
Masking With Vertex Colors
There are many cases where you may not want to use a separate texture mask to control the blending of material layers. Vertex colors can be a great alternative as they are very light on memory. You can also paint vertex colors directly in Unreal’s editor, which helps save a few steps in the masking process. You can switch the 4 layer blend material to vertex colors by replacing the mask texture with a vertex color node.
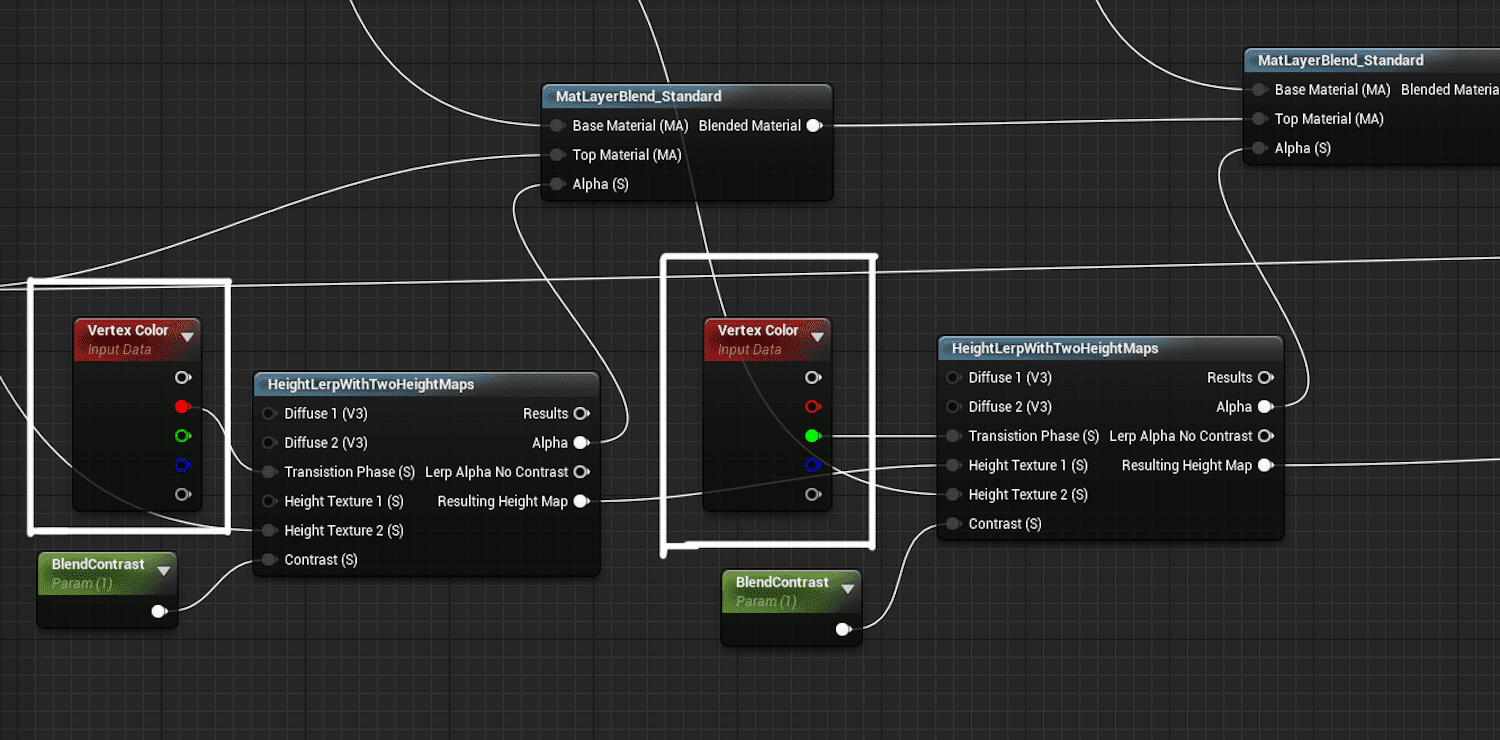
So each channel of the vertex color node can control the transition phase for the four layers.
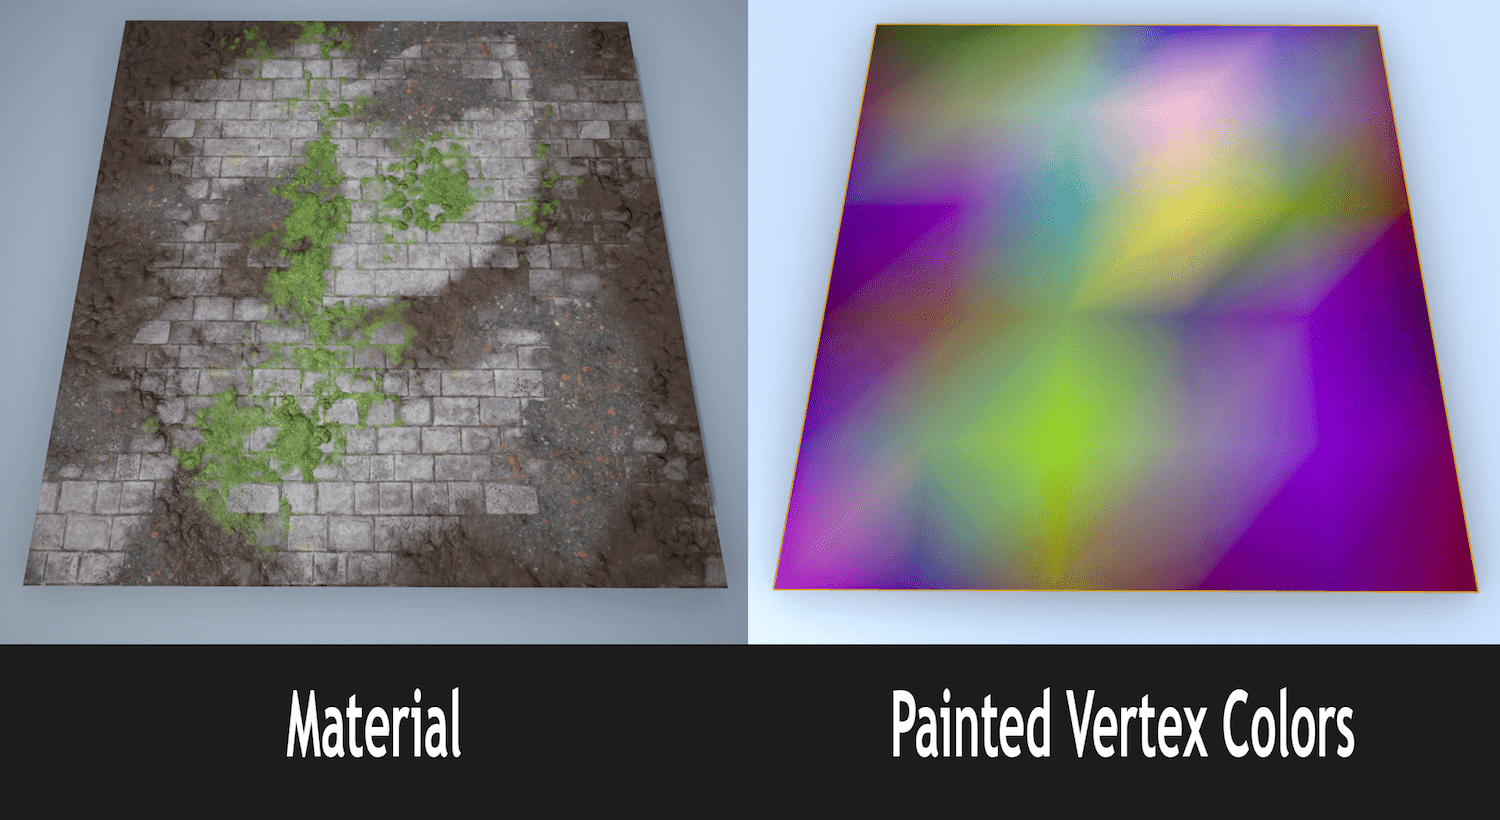
As this image shows, you can get some pretty decent blending using vertex colors. The expense is some lost specificity depending on the distribution of verts on the model you are masking.
Transferring Image to Vertex Colors
Another useful tip I learned at Monolith is how to transfer an image to vertex colors. For instance, say you were blending using a texture, but decide to switch to vertex blending to save some texture memory. You can transfer the colors from a texture to vertex colors using this technique in 3ds Max:
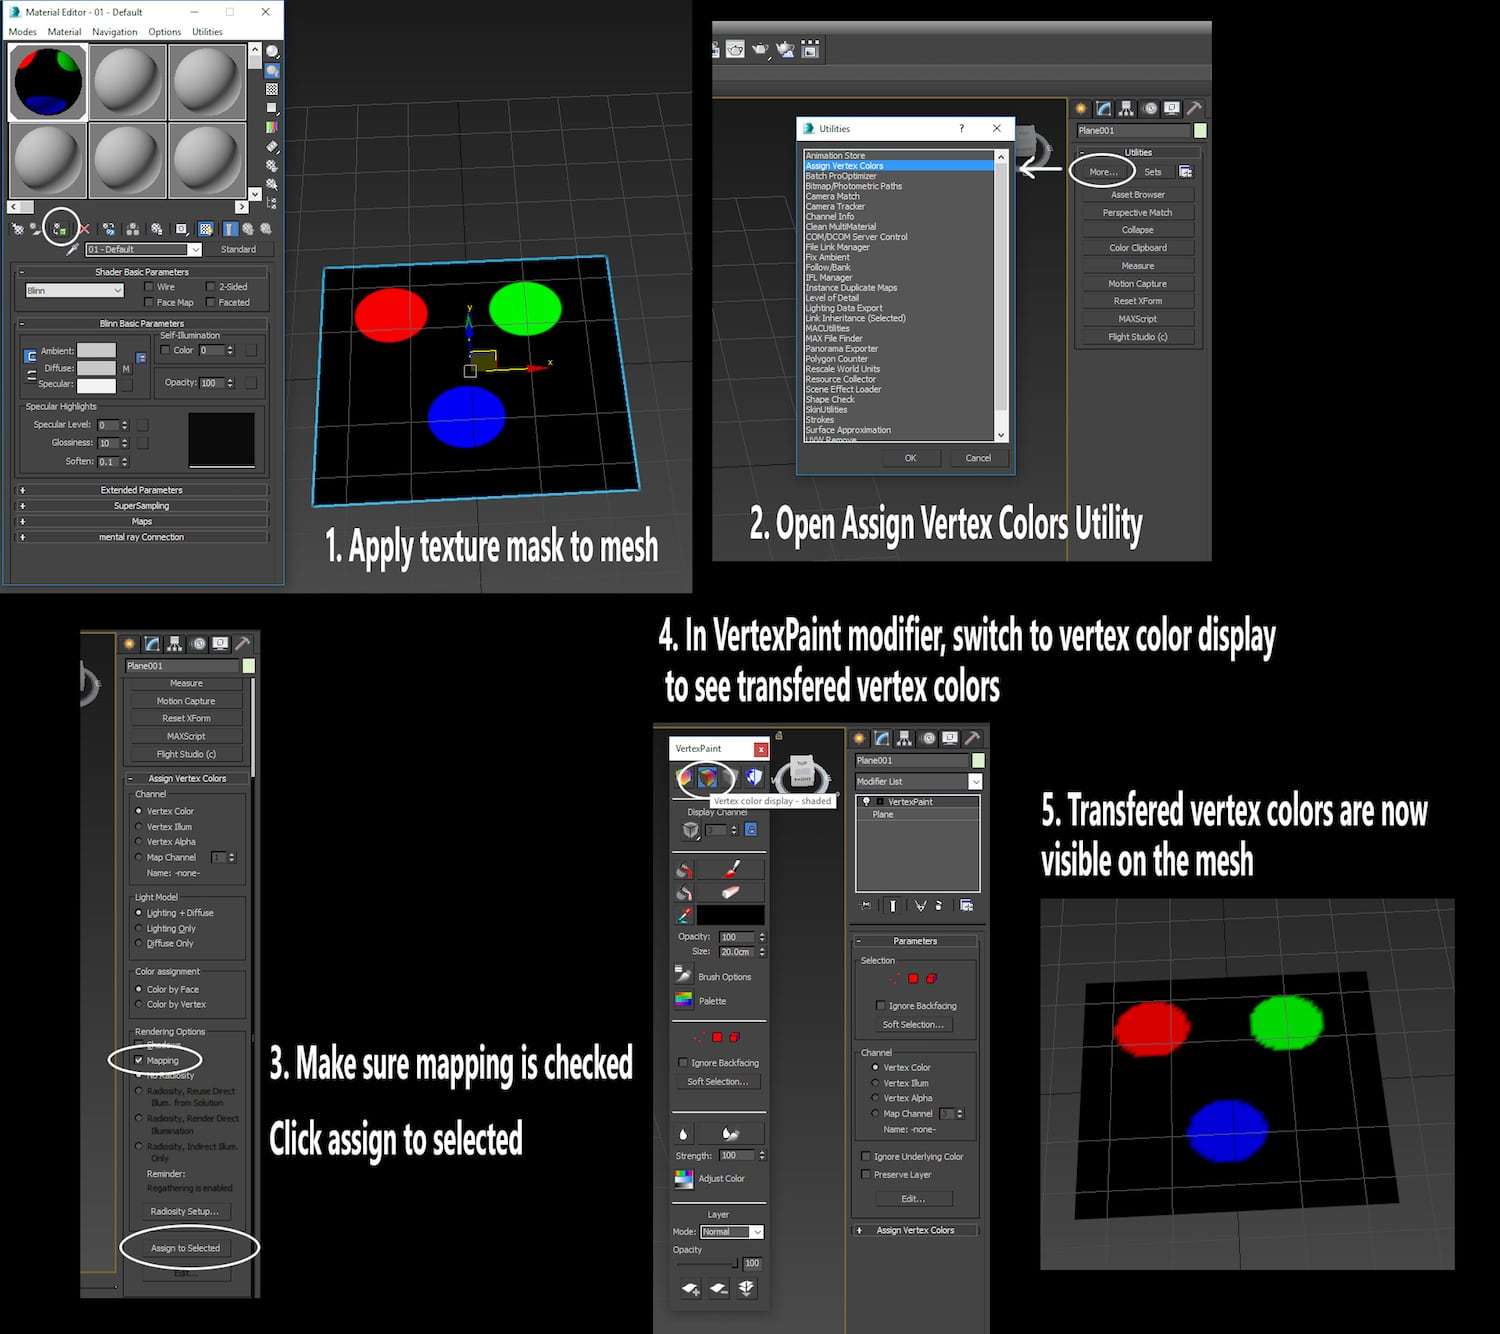
The quality of the transfer is dependent on how many verts are on the mesh, but this can be a useful technique whenever you want to derive some vertex color masks from image data.
Breaking Up Tiling
There are a lot of different ways you can break up the tiling across large surfaces. One new technique I learned about at Monolith is finding ways to split up large surfaces so that sections can be rotated in different directions.
Related Link:Surviving Your First Year in a Games Company – Part 1
As an example, if you’re making some paved ground, you’ll quickly run into some noticeable repetition when mapping it to large areas.
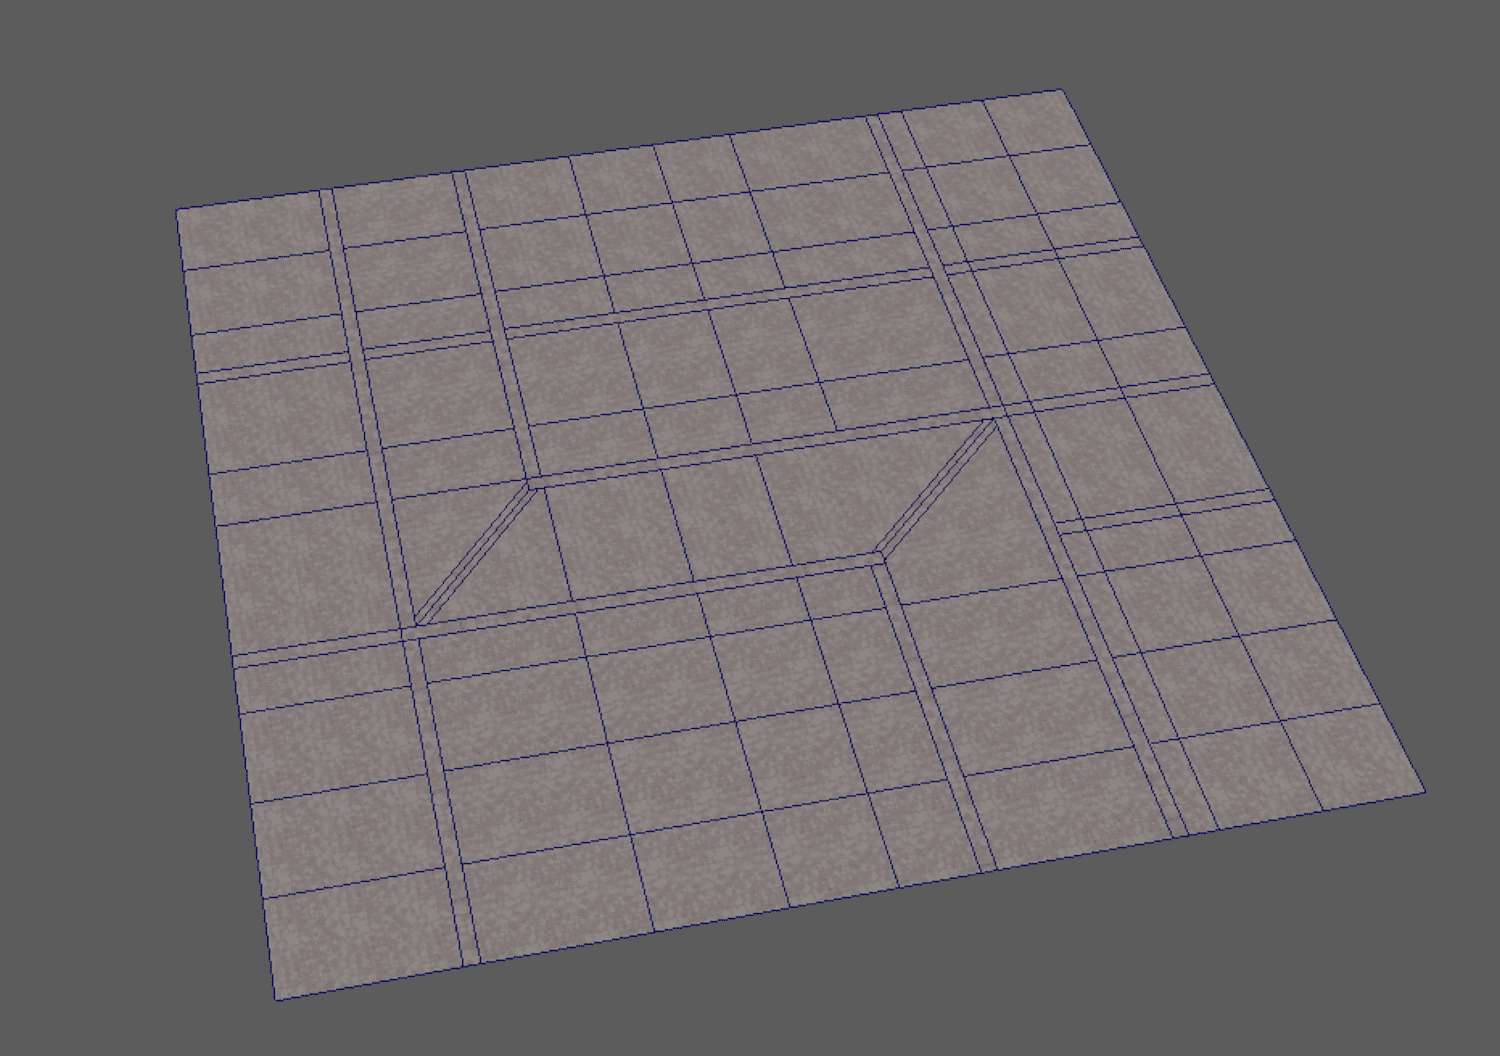
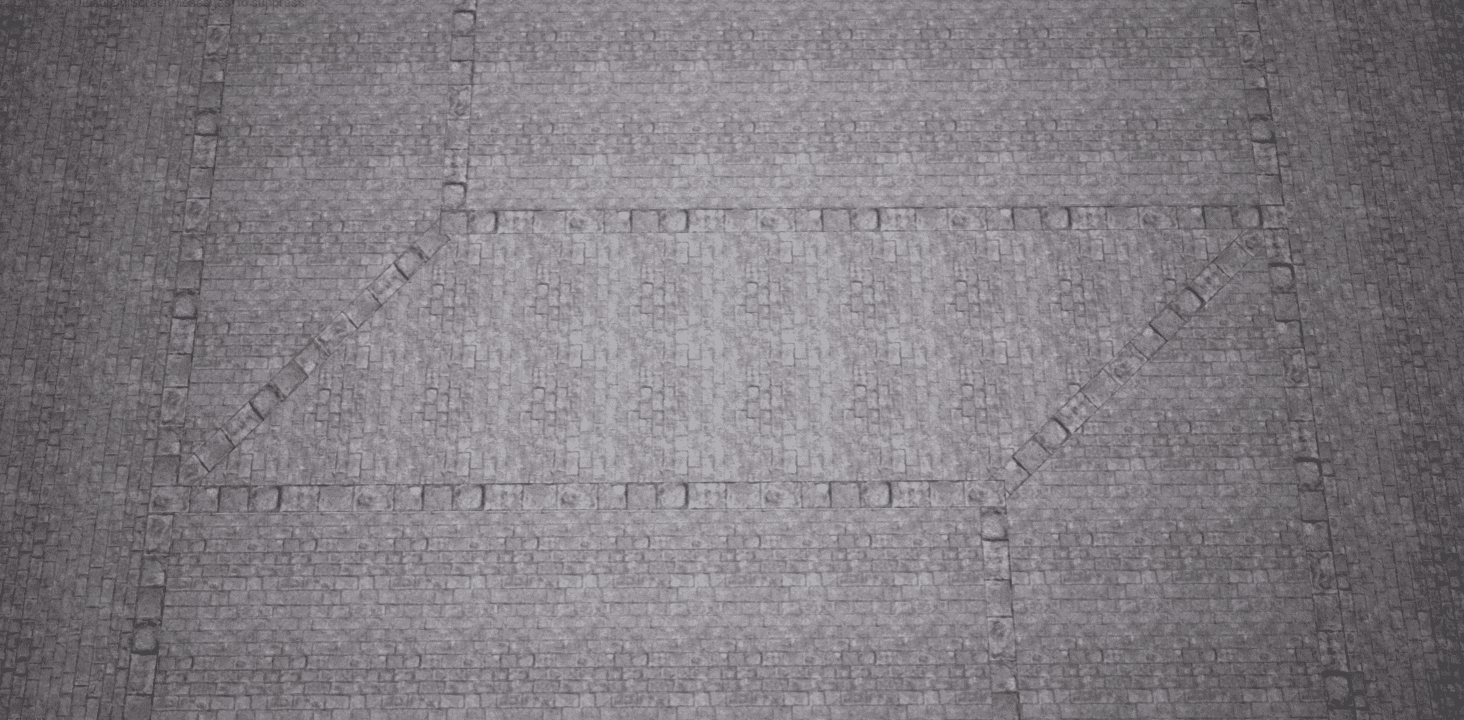
To solve this, you can cut trim into the geometry and rotate the bricks in different directions.
Finally, you can get some more variation on top of this by using some blends like the material from the previous section.
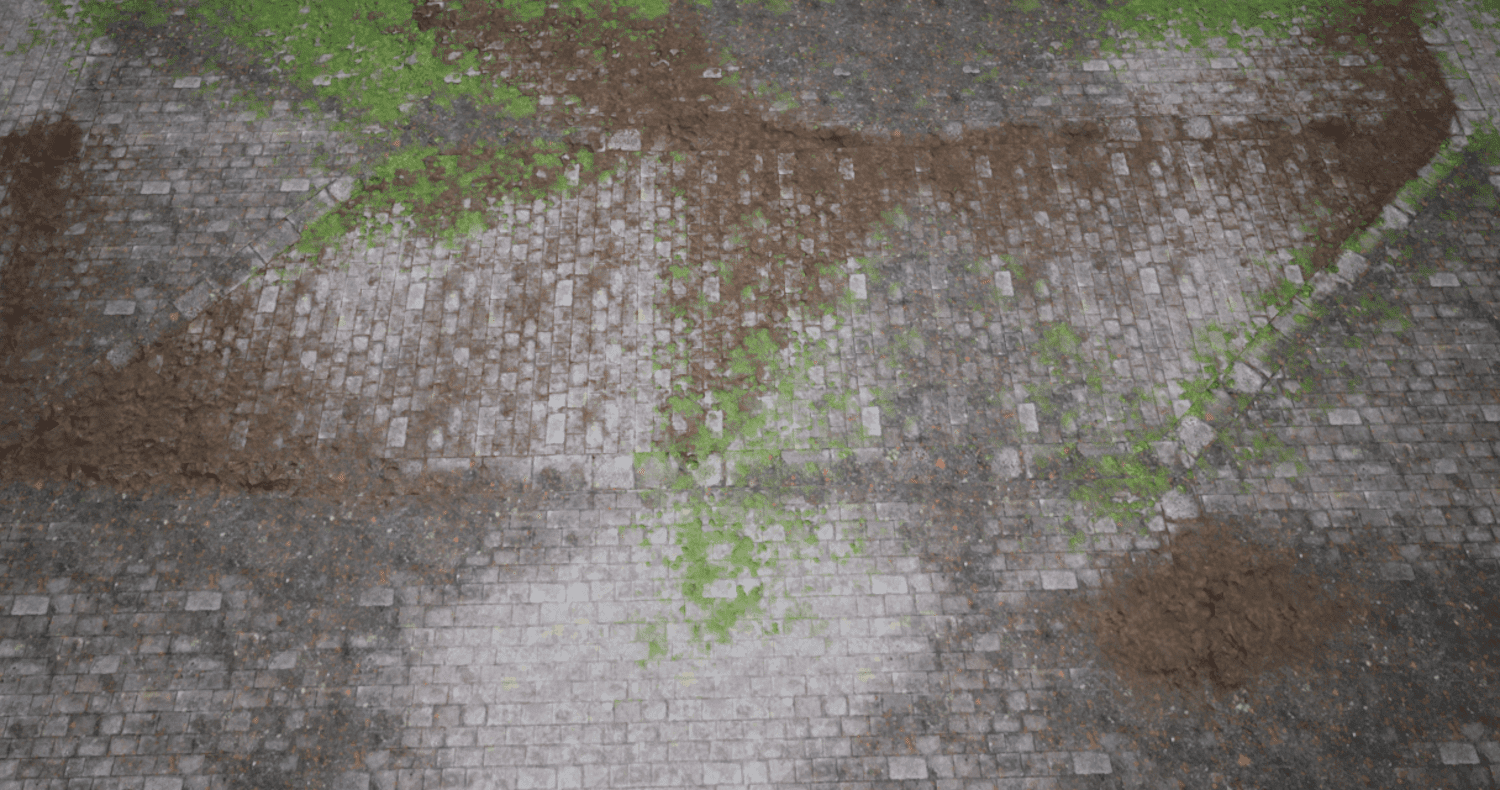
Using these types of techniques on large surfaces such as architecture or pavement can really help make a scene seem more varied and natural.
Optimization
Memory
Another thing I learned at Monolith is that it’s essential to think about how much memory your artwork is using, particularly when creating a game for multiple platforms such as Xbox One and PS4 that have specific memory limits.
Memory reporting tools are very helpful for figuring out what areas you should target first. In Unreal Engine, you can use the mem report command.
You can generate the memory report by opening the console in the editor and typing “memreport -full”
You can find more info about the command here.
It generates a file in your project saved folder under Profiling/MemReports that you can open in notepad.
For example, looking at a memory report for one of my levels, I noticed that one of my meshes was using more memory than most of the others. Here’s an excerpt of the section from the memory report.

The column ResExcKB shows how much memory the mesh is using. In this case SM_zenBridge is using 4064.38 KB or around 4 MB. After opening the mesh in the editor, I found that the majority of the memory was going towards the mesh’s distance field.
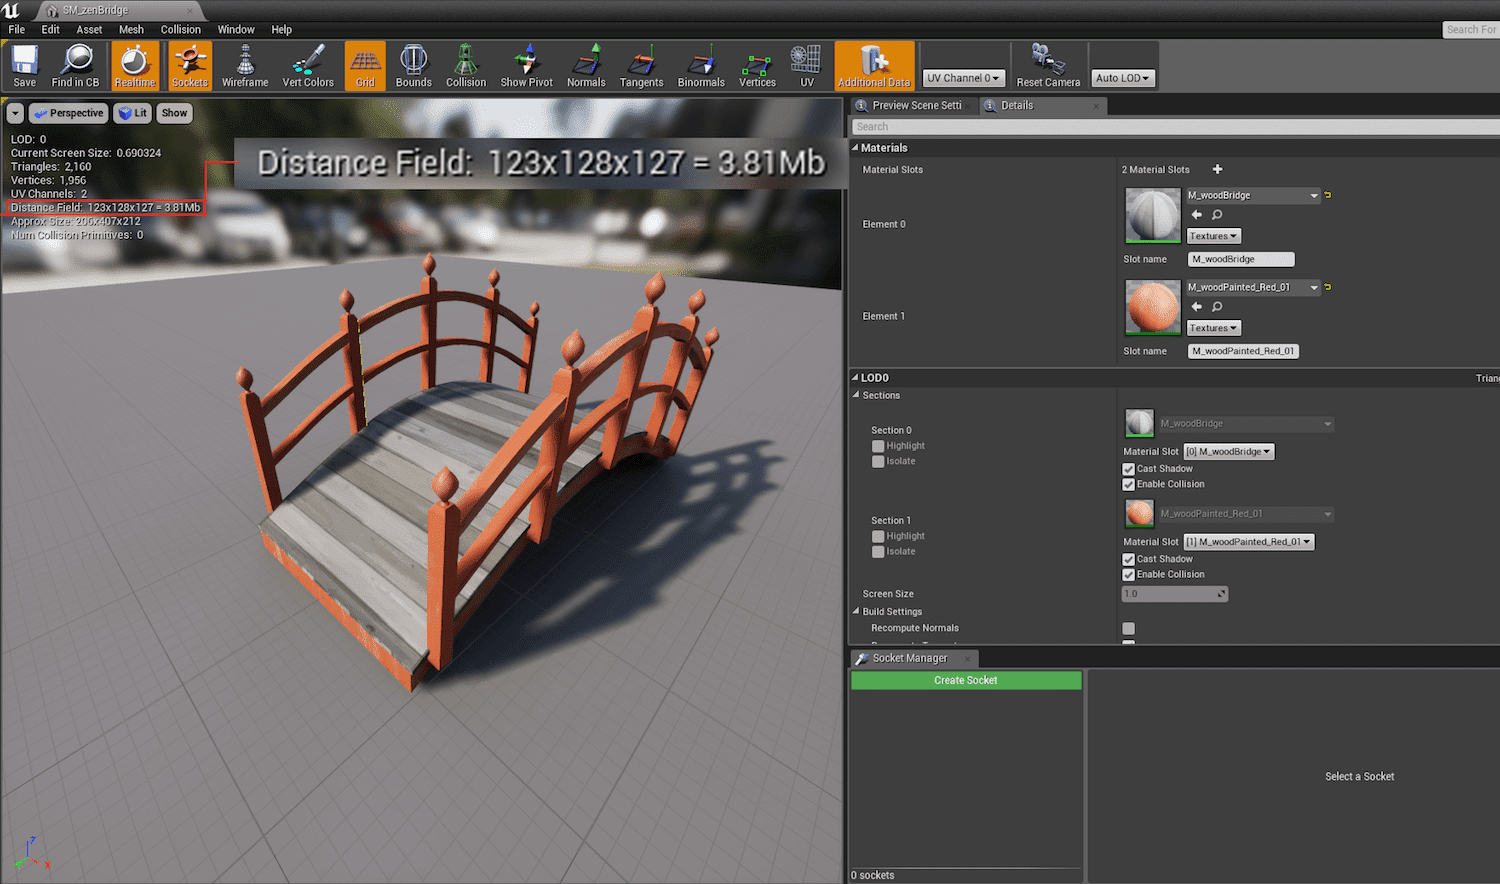
In this case 3.81 MBs out of the total 4MBs are used on the distance field. If I was running into memory issues in the level, one of the first things I’d try is lowering the distance field resolution on this mesh.
Alternatively, you can view memory usage using the statistics tool.
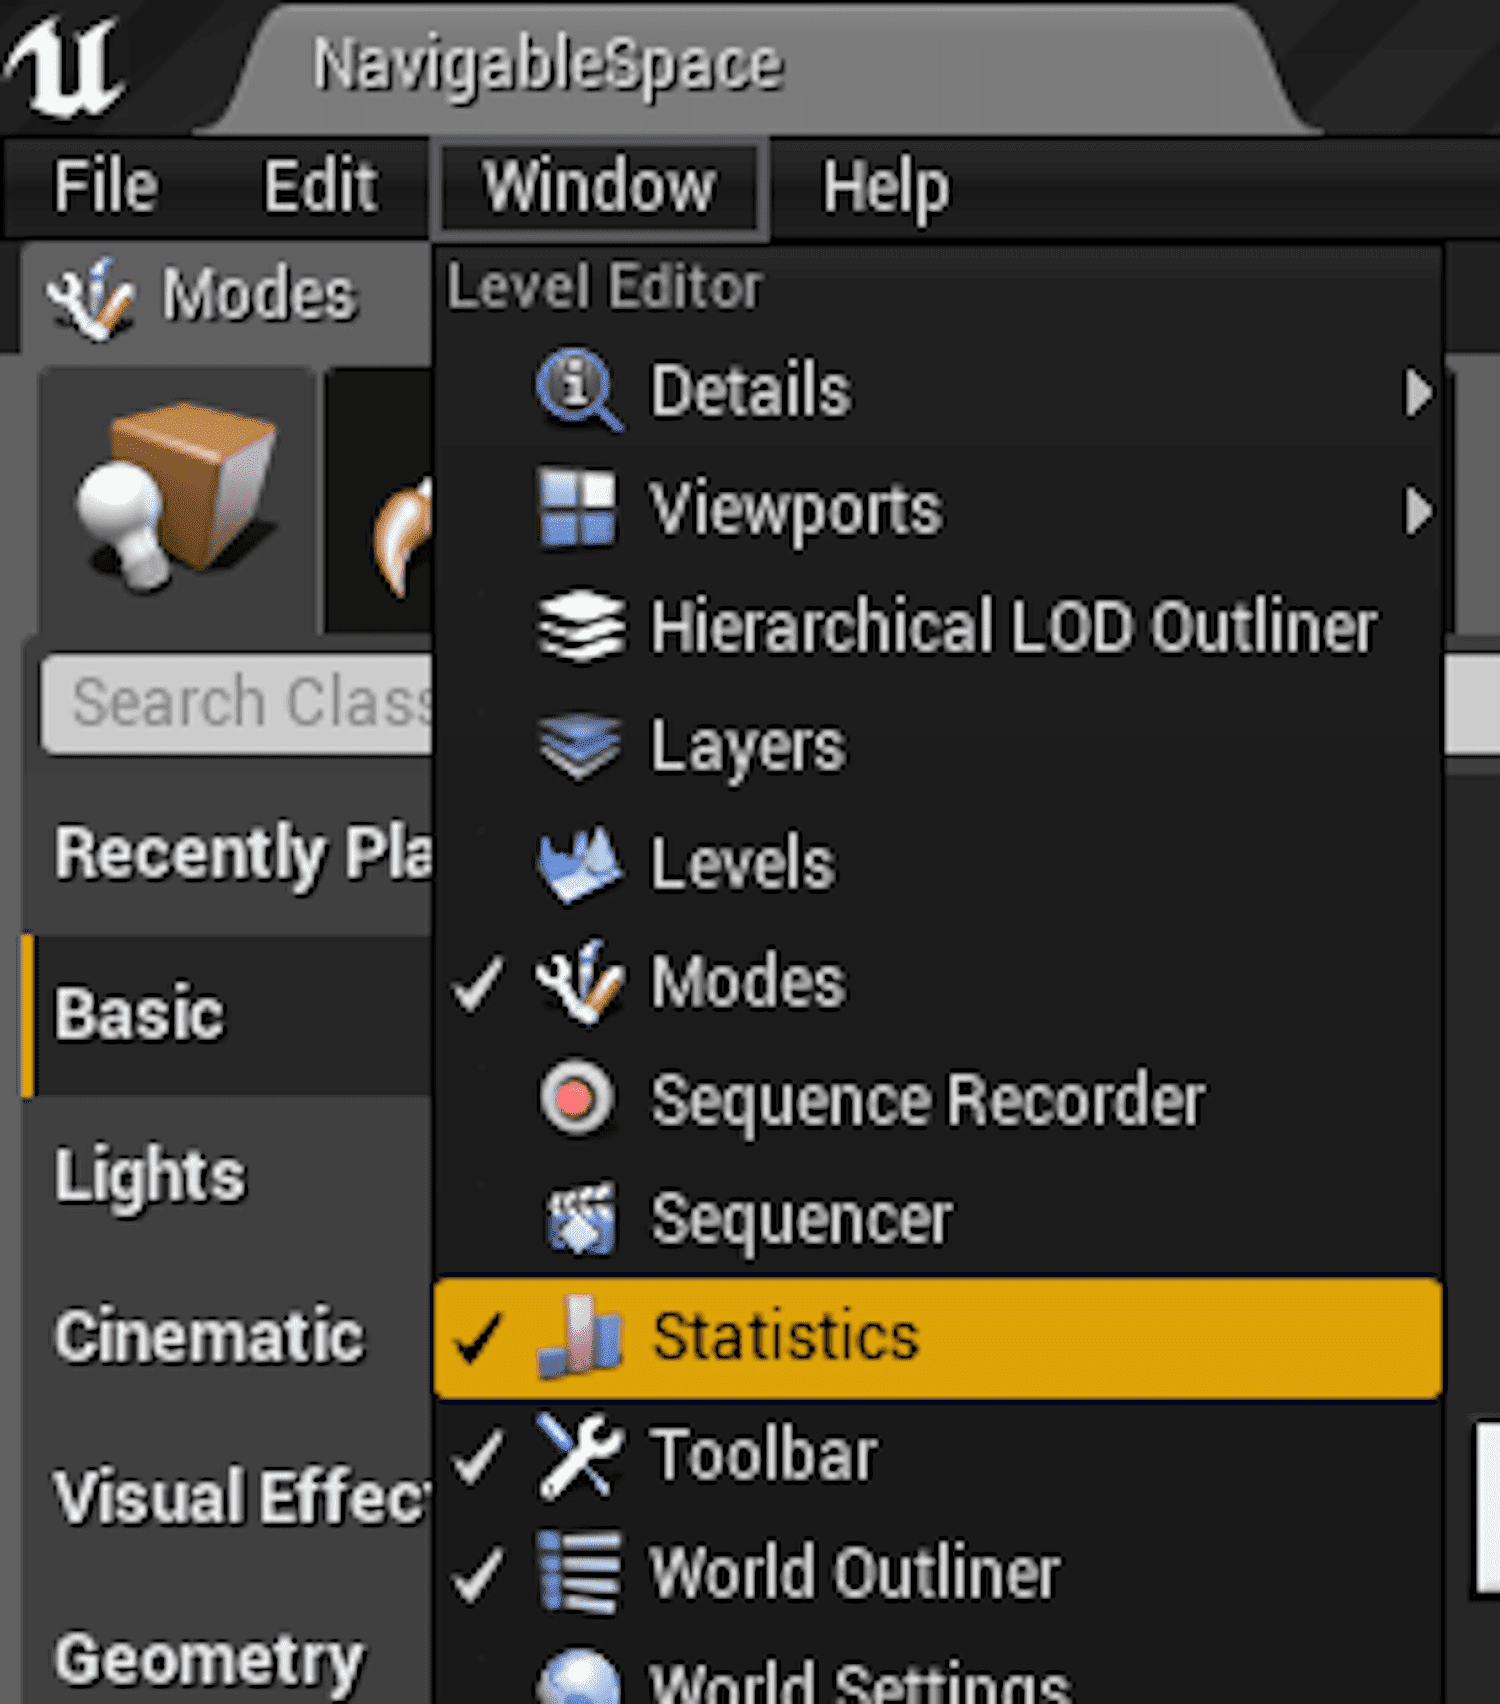
It doesn’t contain as wide of a range of information as a memory report, but it gives helpful organized lists for meshes, textures, and lighting.
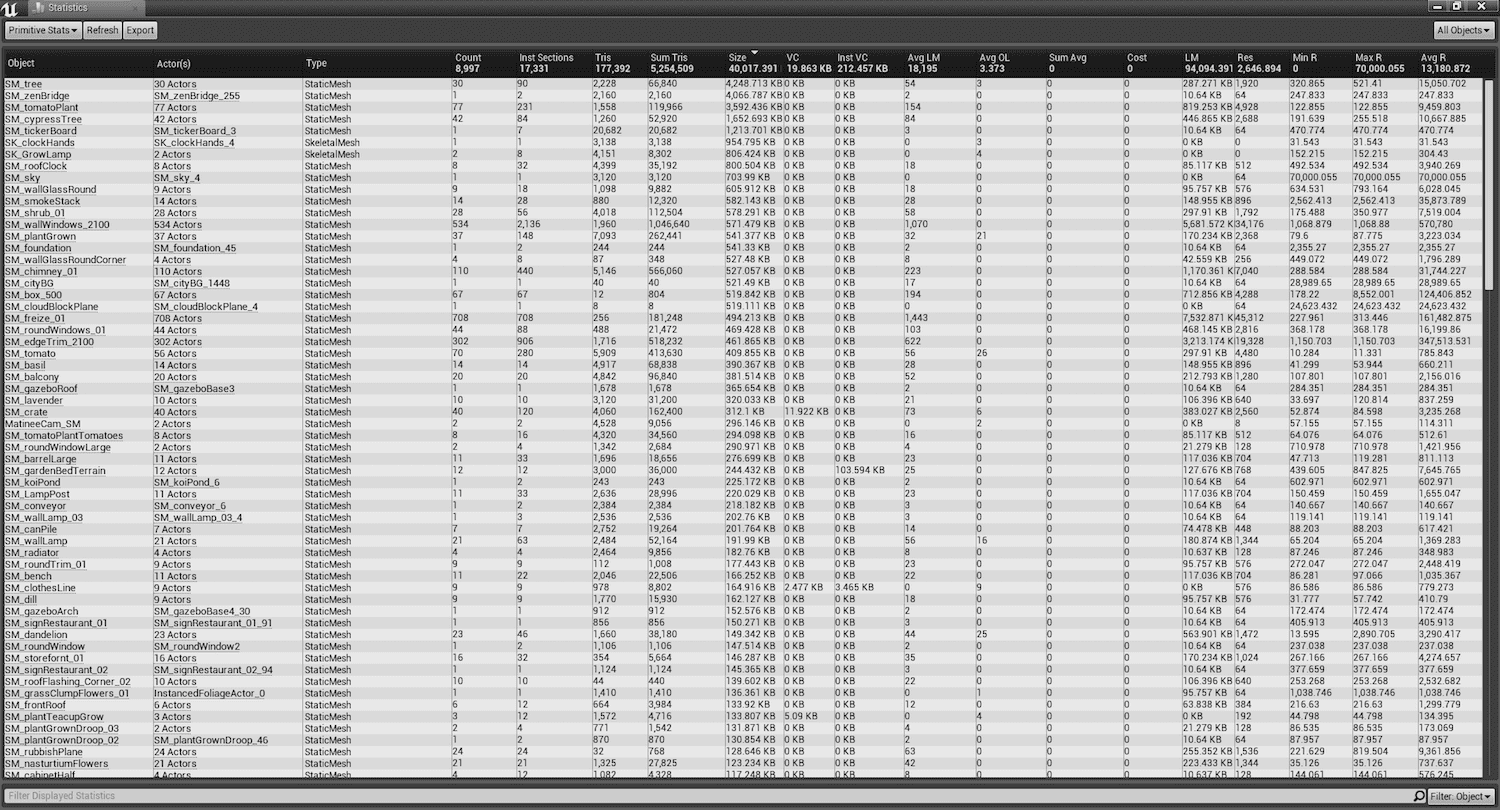
Above is an example of meshes in the statistics window. It gives lots of useful columns that you can sort by size, such as tri counts, resource size, and light map memory.
Aside from mesh memory, texture memory is also important to consider. The memory report contains a similar list for every texture used in a level. Alternatively, you can use the size map tool to check memory usage of texture dependencies for any given asset.
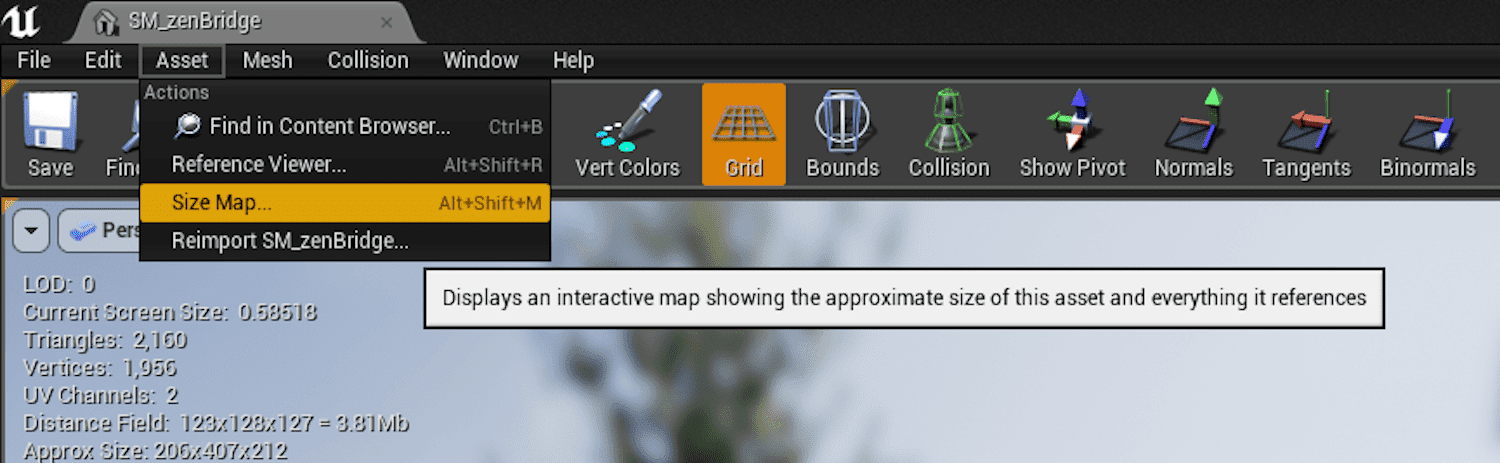
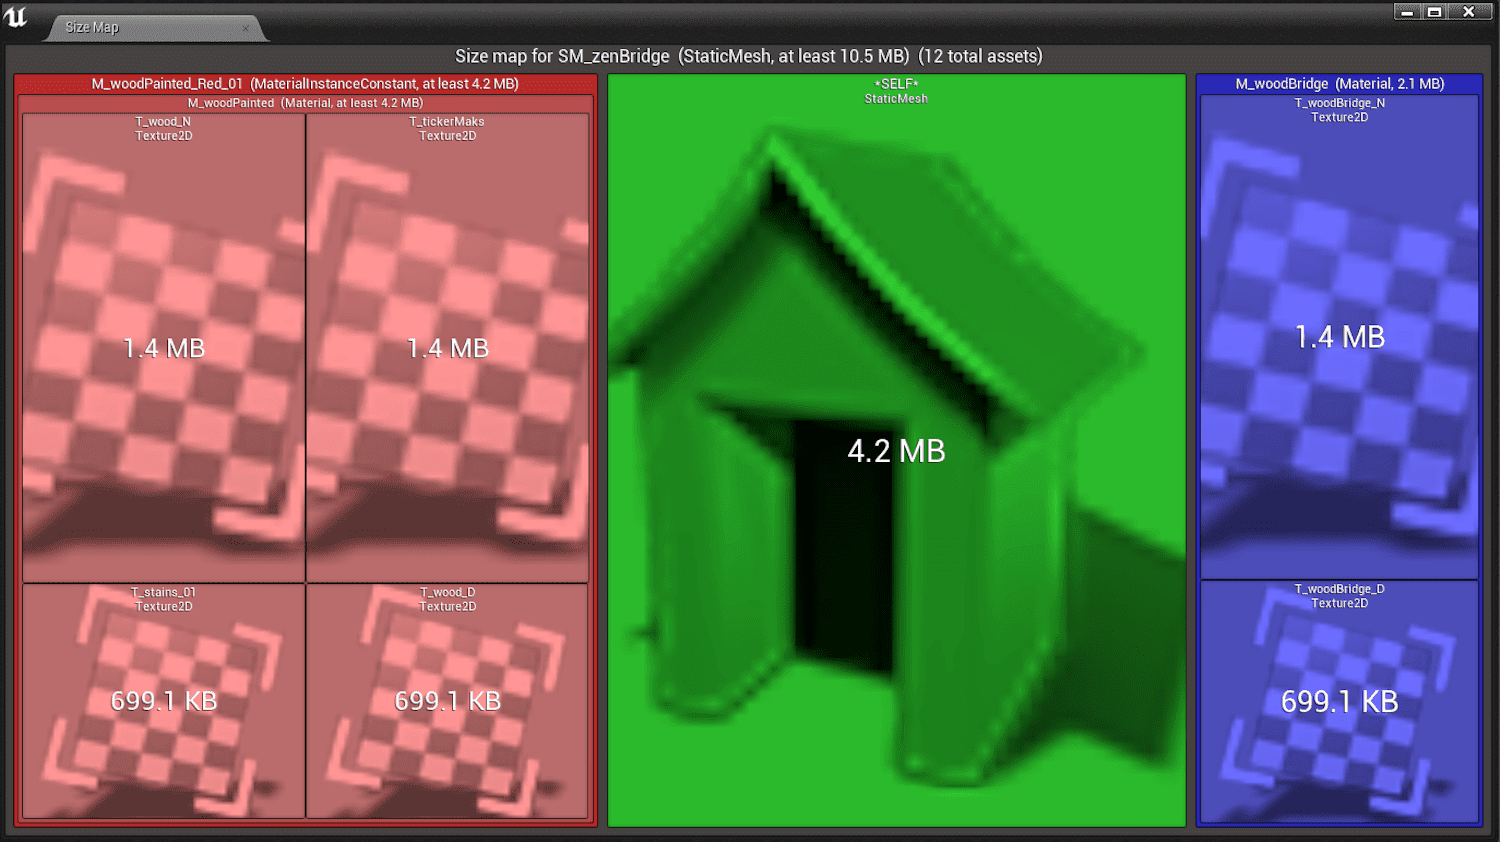
Here’s the size map for the bridge asset. It scales different aspects of the asset based on how much memory they are taking up. In this case, the mesh is taking the most memory at 4.2 MB followed by 3 referenced textures taking up 1.4
Mipping is a quick way to experiment with saving some texture memory. In this case, I could try mipping down one of the mask textures that the asset is using.
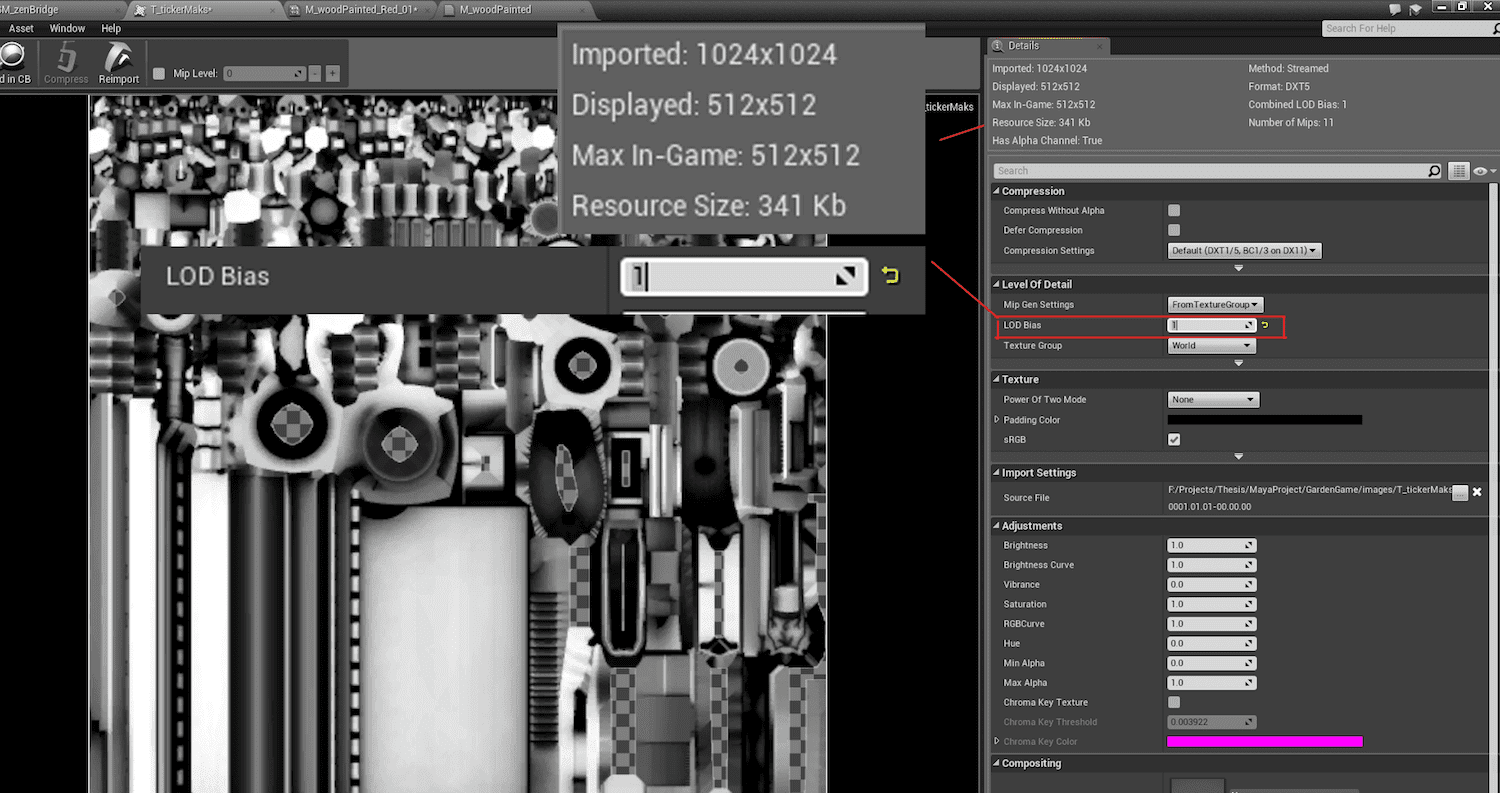
Setting the LOD Bias from 0 to 1 cuts the texture resolution in half and lowers the memory from 1.4MB to 341 KB. If you think your texture looks too low res after doing this, you could always set the LOD Bias back to 1, restoring the original texture and look for other areas to save memory.
Outside of mipping textures, there’s also a few different things you can try to reduce mesh complexity that can save memory and help performance.
Something quick you can try is the mesh reduction tool in Unreal Engine’s asset editor.
Using the mem report tool, I found another relatively expensive mesh in my project that was using 1060 KB.
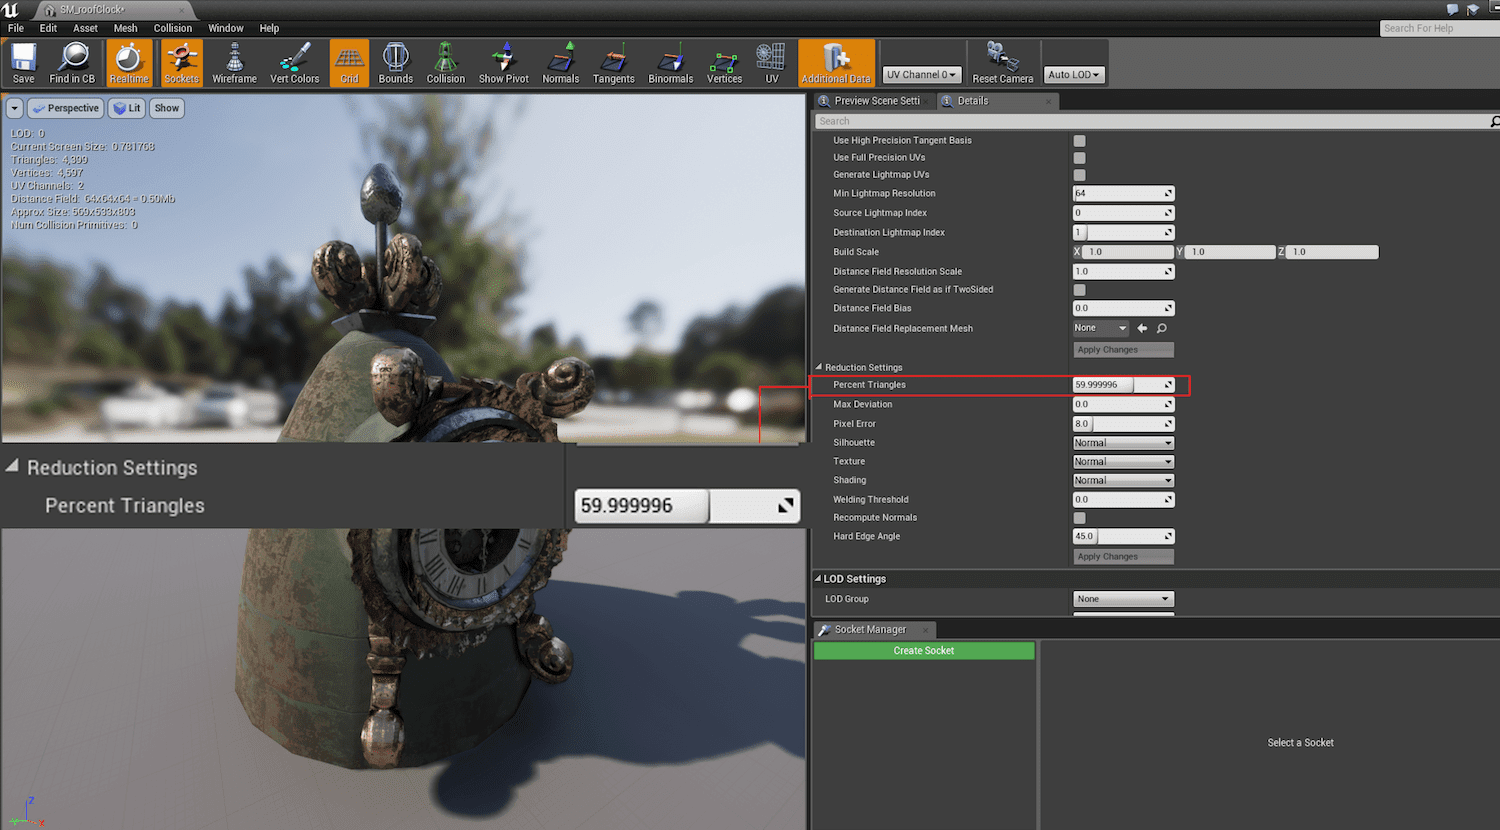
Going to reduction settings and lowering percent triangles from 100 to 60 reduced the mesh from 7243 to 4597 verts and lowered the memory to 796 KB, making a minimal visual difference.
Going through larger assets from the memory list and cutting the triangle percents down with the auto reduction tools can help you make some quick broad changes to improve performance.
This is also non-destructive, meaning you can restore any given asset to its original geometry by setting the triangle percentage back up to 100.
You can use this same tool for generating LODs. LODs are progressively simplified versions of any given mesh that switch out based on how far they are from the camera. For instance, a building that has 15000
LODs are progressively simplified versions of any given mesh that switch out based on how far they are from the camera. For instance, a building that has 15000 verts could switch to a version that’s 10000 verts at a medium distance and 5000 at a far distance. LODs are very important to consider when creating open world games.
The Unreal Engine 4 documentation has a guide on using the mesh reduction tool for LODs here: LINK
Outside of Unreal Engine, there are a variety of other tools you can consider to reduce geometry for optimization and LOD creation such as:
- MeshLab
- Simplygon
- Pro Optimizer in 3ds Max
- Dynamesh, ZRemesher, and Decimation Master in Zbrush
Of course there are many times where you can’t entirely rely on automatic methods for lowering vert counts. I think an important thing to consider when manually optimizing is to focus on areas where you can get big savings first and move on to smaller things depending on how much time you have.
For me, I like to create a basic spreadsheet with a list of assets that I’m working on. One column would show their initial vert counts and another would show the new vert counts after optimizing.
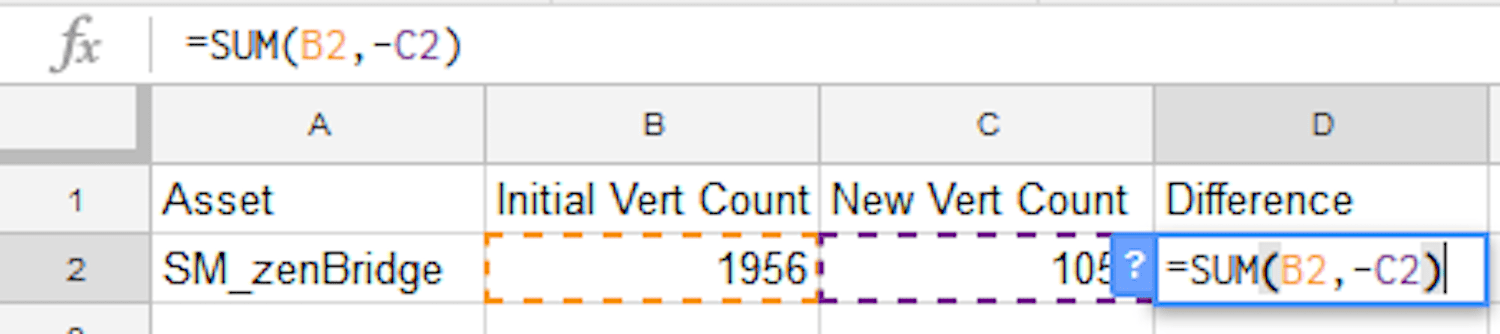
Above is an example. I made columns for the asset and vert counts, as well as one for the difference between the old and new vert counts using the function “=SUM(B2,-C2)”. Once you have that row set up, you can start copy pasting it for all the assets you’re working on.
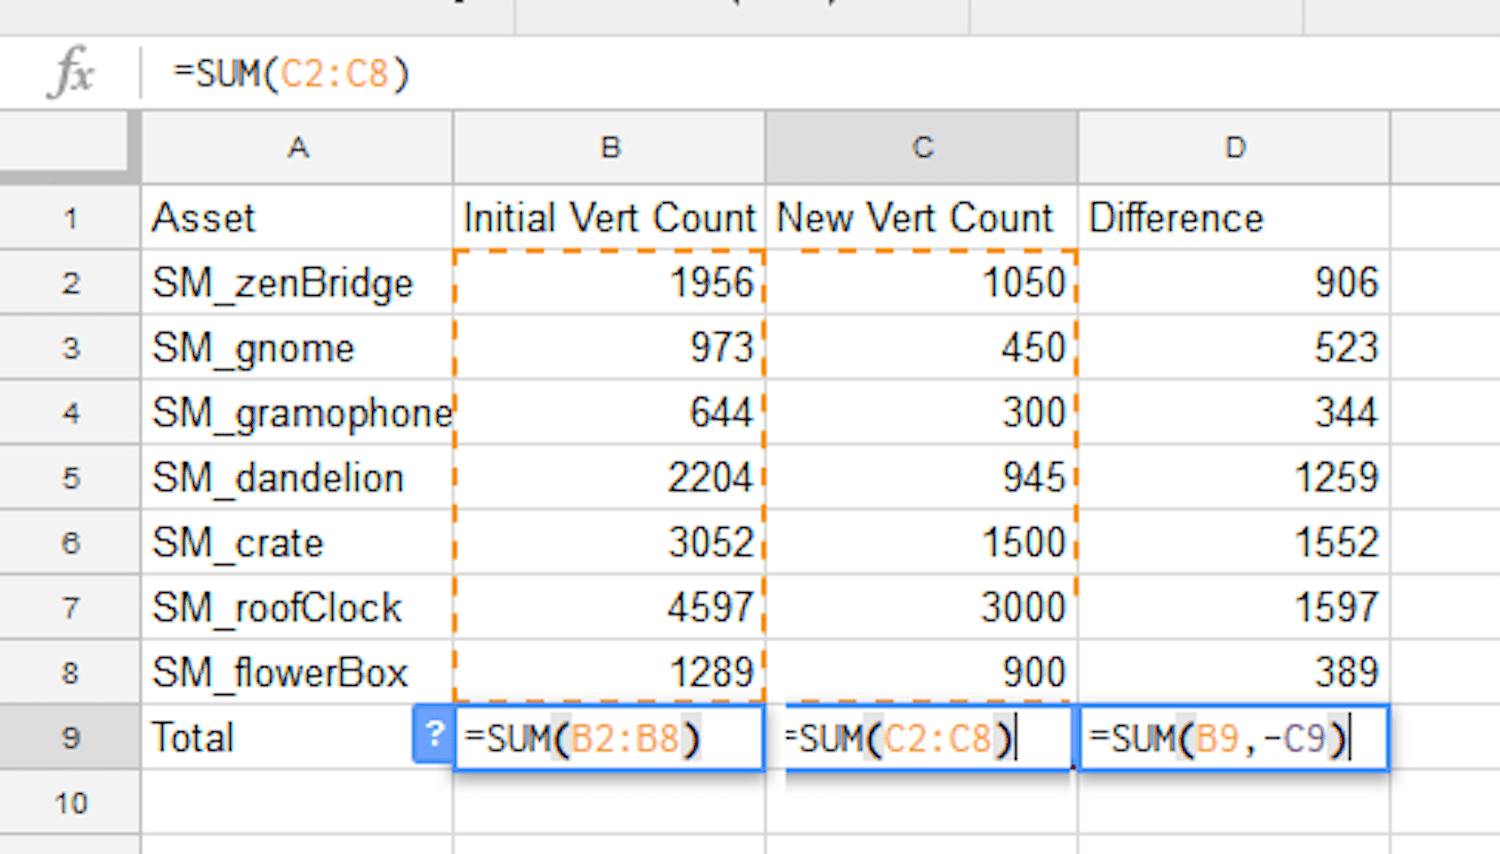
Once I get the whole list, I add a row on the bottom for totals using the above equations. The box on the far bottom right gives the total verts saved across this group of assets.
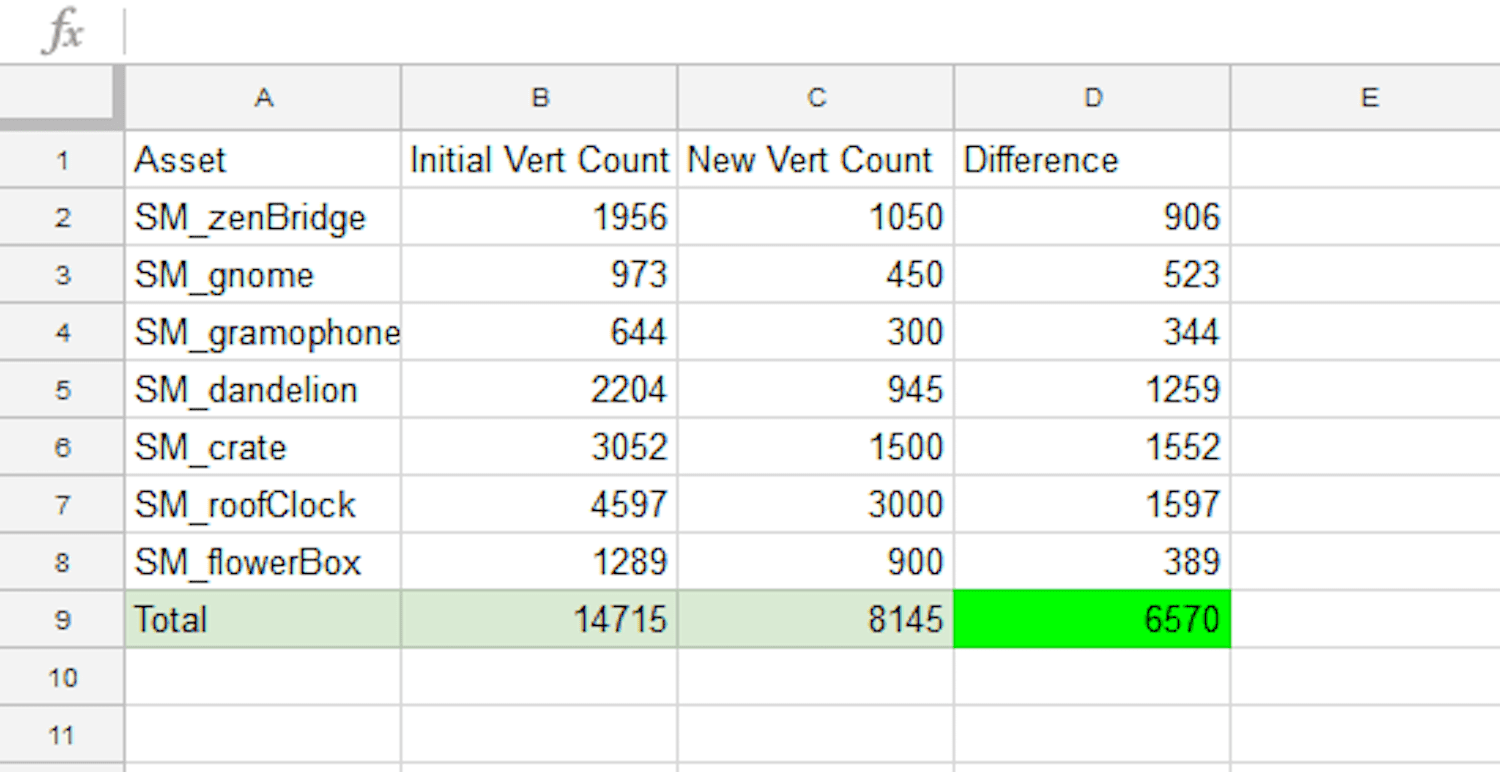
Here’s what the list looks like after it’s set up. I like working this way, because I can get a picture of the overall gains I’m making on many assets, versus spending a long time just trying to reduce a single asset as far as possible.
In terms of techniques, I usually like to start with the weld tool. Sometimes even welding all the verts with a value of .01 can give some surprisingly good results.

In the above example, I lowered this circular mesh from 36350 to 6294 verts just by welding all the verts with a threshold of 5. Of course you should definitely be careful when doing this and make sure that you aren’t losing any important parts of the geometry or creating texture stretching issues.
At the very least, you can use the tool to see what areas get collapsed first and get an idea of where you can manually start optimizing.
Conclusion
Overall those were some of the major things I learned working at Monolith and how you can apply those ideas in other game engines such as Unreal.
Thanks for checking out my article! If you ever have any questions or see any areas that I could improve in the article feel free to contact me at [email protected].