
In these 5 projects, Xian Guan uses Houdini to simulate natural phenomenon and effects.
1. RBD Destruction:
Rollercoaster
In common RBD simulations, most constructions are broken into pieces. The major challenge in this reference was the rollercoaster was largely deformed while broken into shards at the same time, which almost resembled the motion of fluid.
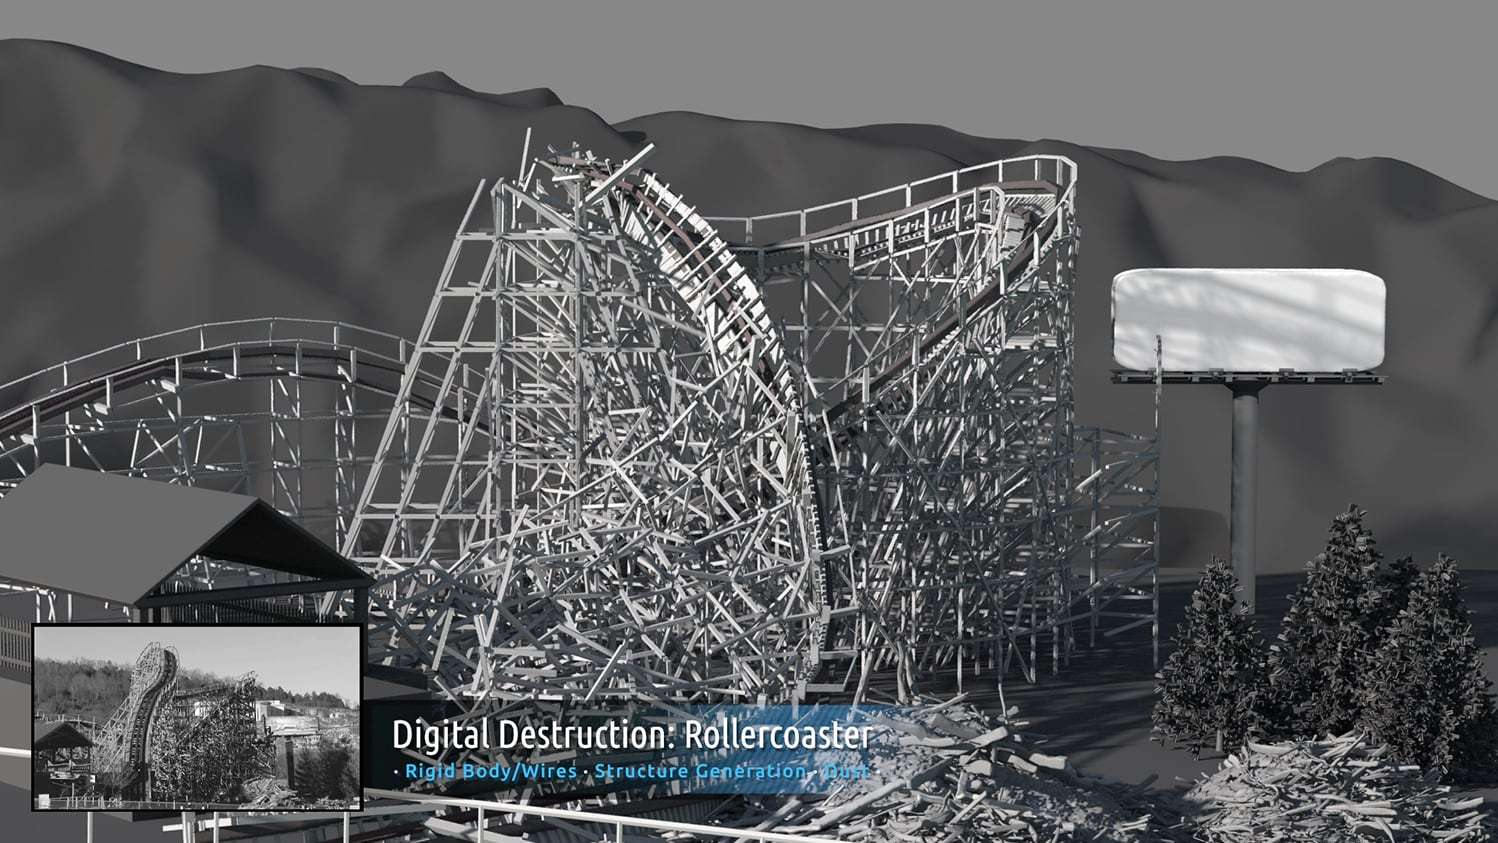
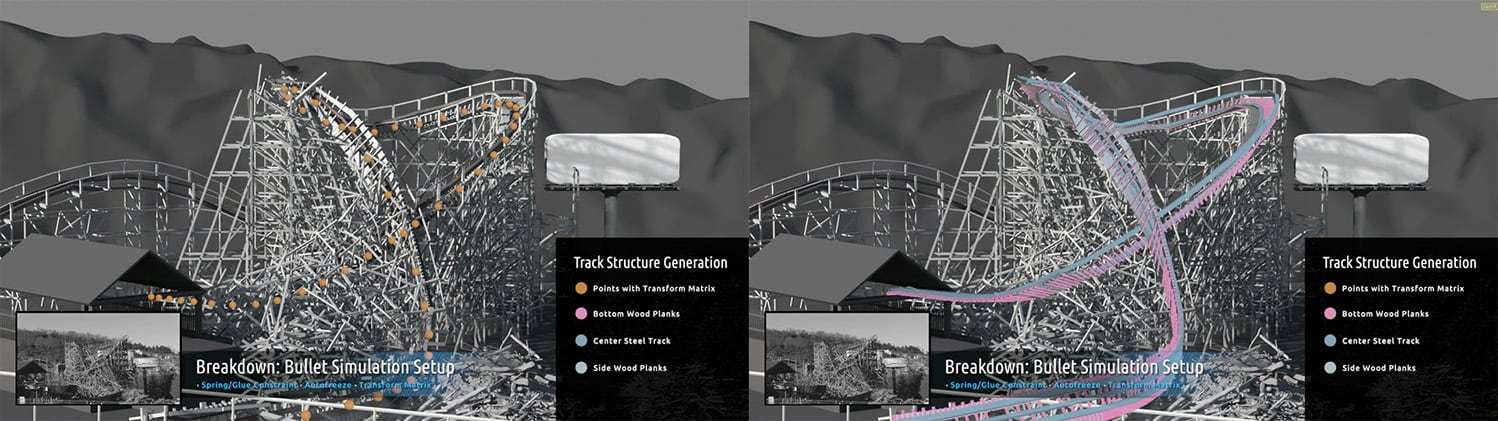
In this project I was responsible for everything except models of trees, billboard and cabin. I developed a procedural geometry system in Houdini SOPs which allowed me to draw one spline and generate a rollercoaster mesh using the spline based on its position, length, curvature and other attributes.

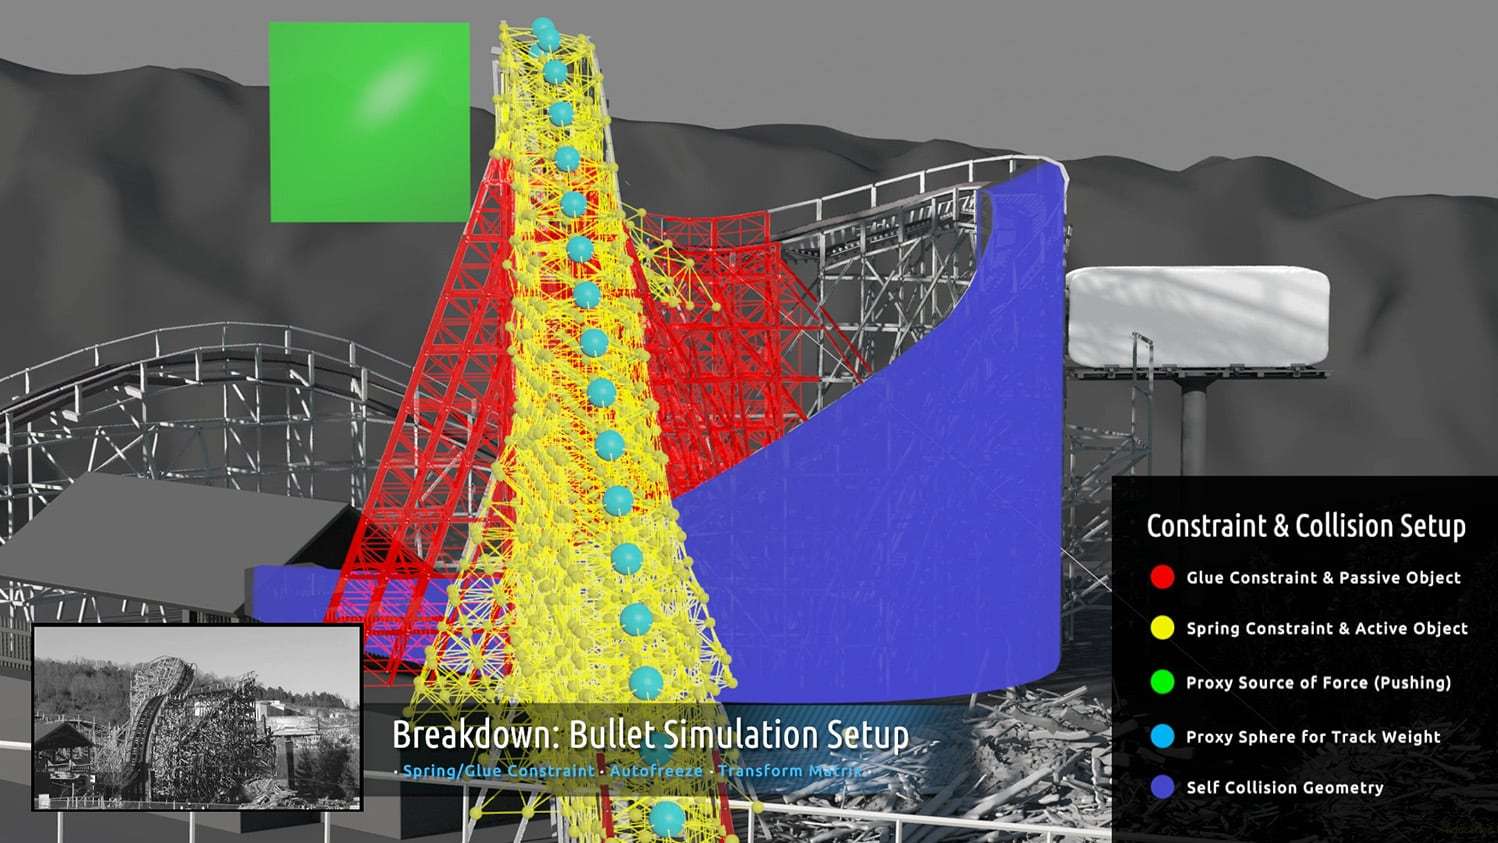
Glue constraints (red) and spring constraints (yellow) were combined in the main bullet simulation for the need of shape deformation and broken shards.
A heavy invisible cube (green) pushed the rollercoaster at certain frame to mimic the situation of rollercoaster being constantly shaken to destruction.
Only wood parts were being simulated, while metal tracks were represented by spheres (cyan) in terms of weight and influence.
By carefully balancing initial constraint value using noise pattern, eventually the rollercoaster was able to fall aside slowly. At this stage, a CHOPs auto-freeze setup was used to reduce inevitable mesh jitter at the end of simulation.
After the main simulation, a secondary bullet simulation with customized timing achieved the motion of falling wood planks (purple). This was done separately from the first bullet simulation, otherwise technical complexity and difficulty would increase exponentially.
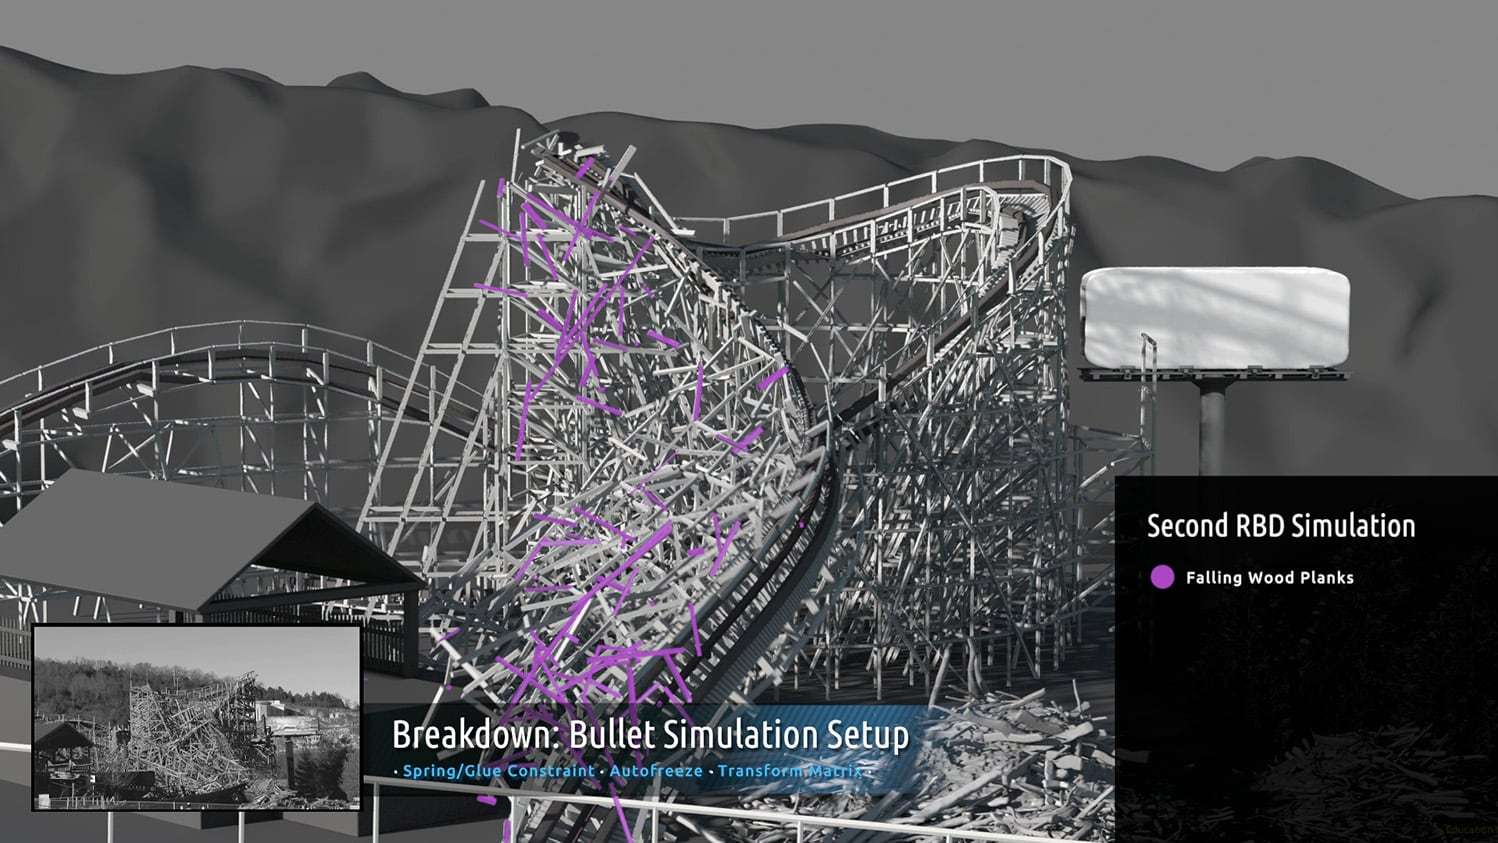
Transform matrix allowed me to generate the metal tracks and largely increase the mesh resolution of wood planks after simulation.
In terms of finaling the shot, I also did wire simulation for the pulling rope, pyro simulation for the dust puff and some CHOPs procedural animation for camera shake.
The wood pile on the right bottom corner was generated by running a Rigid Body simulation of dropping wood plank from above to the ground.
The common approach of modeling the pile using wood plank copies would result in severe mesh intersection and make it impossible to work for simulations at all.
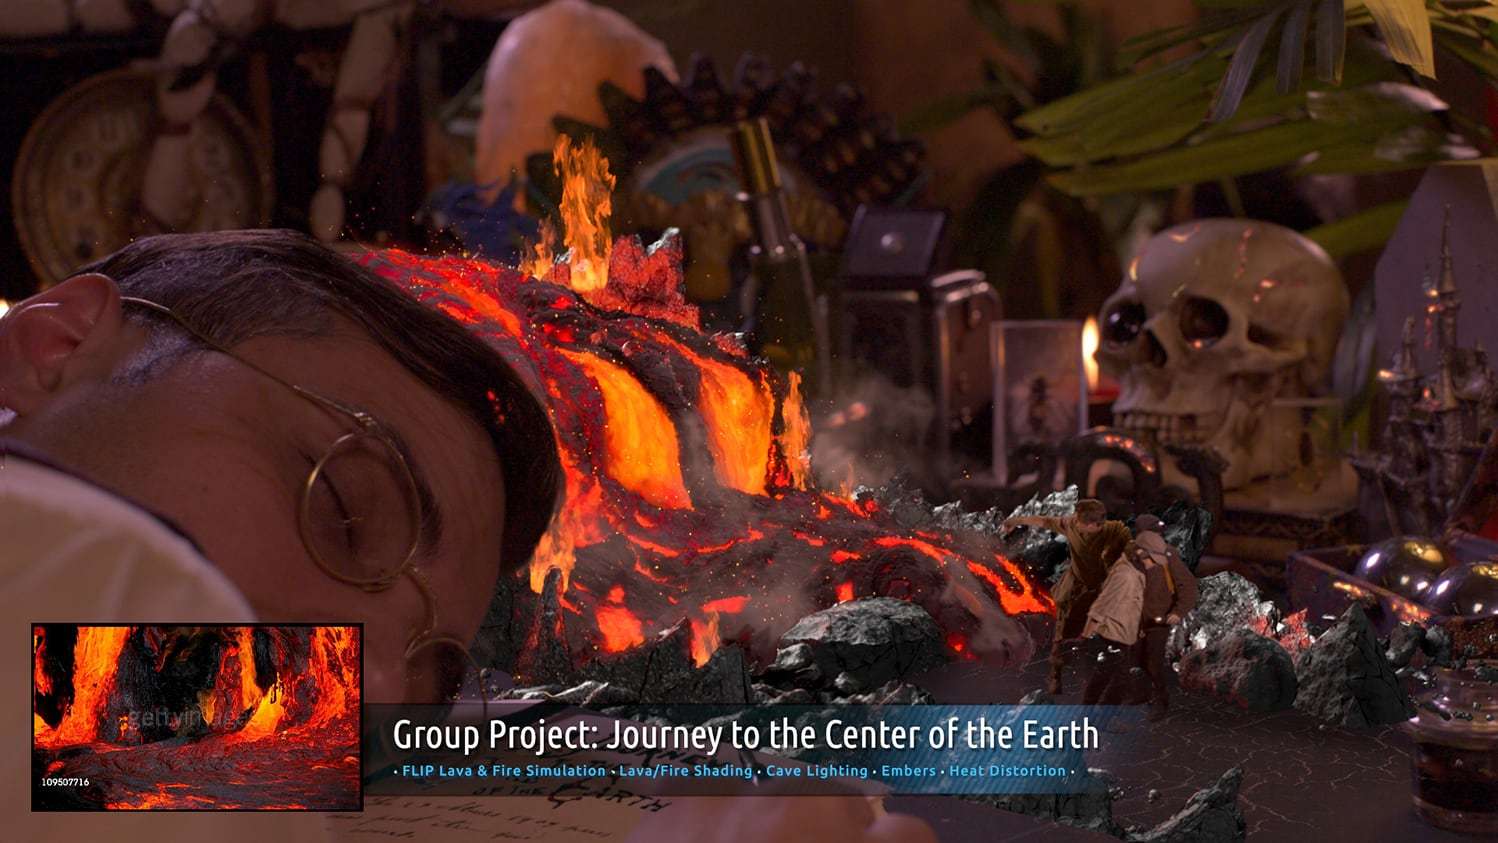
2. FLIP & Pryo Simulation Group Project:
Journey to the Center of the Earth
This group project was designed partially based on a Jules Verne’s Sci-Fi book. When the scholar fell asleep reading the book Journey to the Center of the Earth, he had an interesting dream about a scene in the book – a lava river approaching the book’s characters in an underground cave tunnel.
We were supplied with plate, camera tracking and roto layers in Nuke. I was responsible for lava, fire and embers’ simulation, shading, rendering. I also worked on interactive lighting on the cave, heat distortion effect and all elements’ final comp.
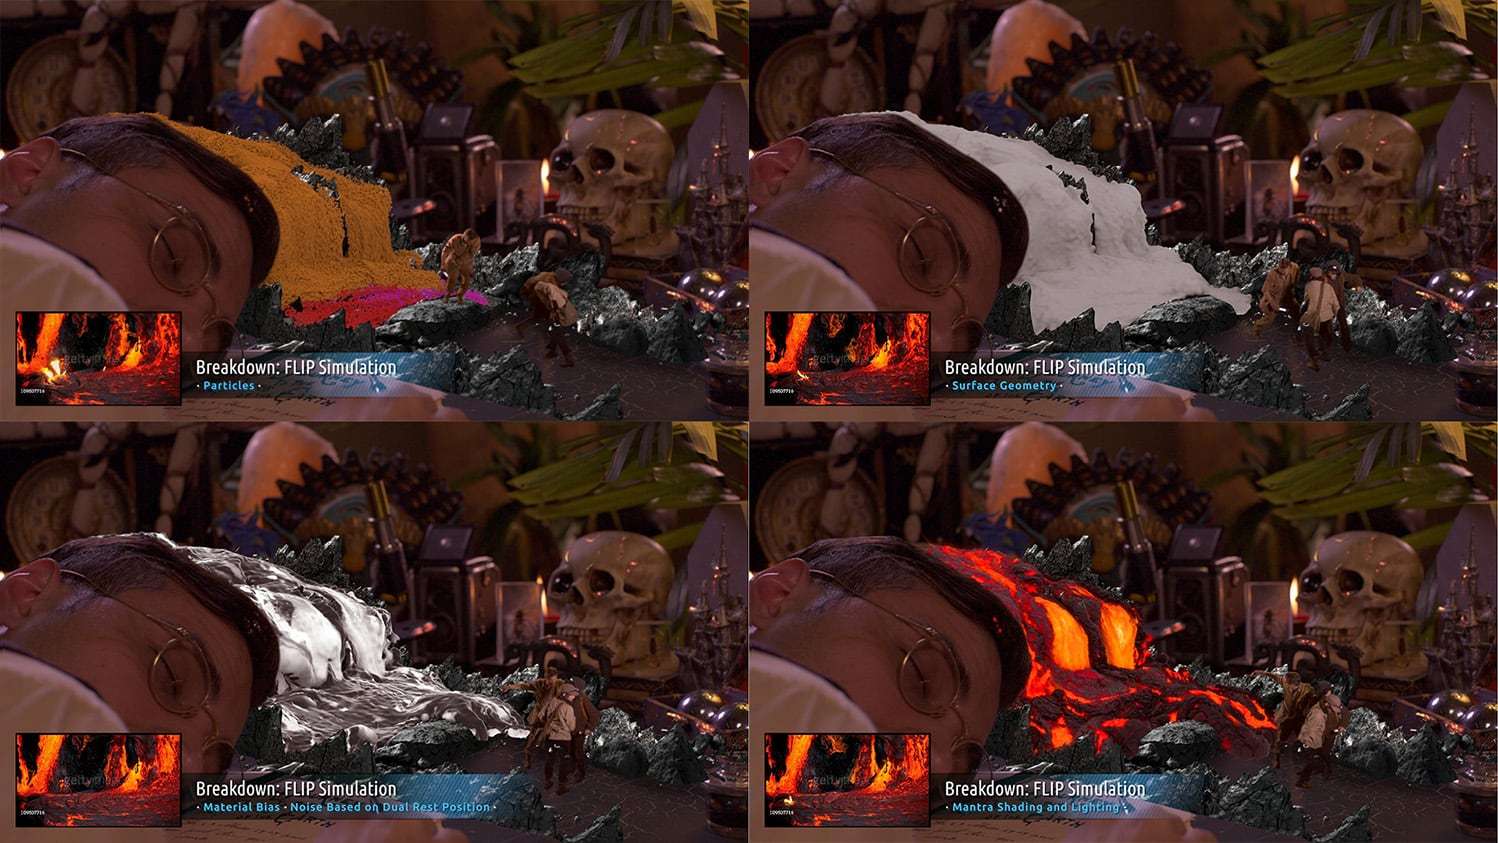
For the main lava FLIP simulation, I started with several FLIP sources with varied temperature (yellow, red and pink). Temperature was mapped to fluid viscosity attribute to represent lava’s gradual solidification as the result of getting cold.
To hit the shot notes of forcing lava stream to actually climb over the rock in front of characters, I wrote a VOP microsolver to manipulate velocity direction along the rock surface.
For the bottom FLIP sources (red and pink), an ocean spectrum particle velocity field was plugged into solvers to create some mild lava waves.
After fluid particles’ motion worked quite well with shot layout and timing, I moved on to customize a Mantra shader using particle life, velocity, vorticity, temperature and other attributes.
The dual rest field built in the FLIP simulation from the beginning was used to create a noise bias pattern to divide fluid and solid parts of lava.
Eventually, final renders were separated into beauty, diffuse, reflection, refraction and emission. Multiple particle attributes were also exported as AOVs to help color correction in Nuke as well.
All the fire in this shot was finished in Pyro Simulation. Animated fuel was fed into each to adjust to the shot timing. Volume shading using density, heat and temperature field allowed the look to be nailed quickly.
Embers were added in the end to decorate the shot using particle simulation. Particle life attribute was used to control each ember point’s color, scale and opacity to add variation overall.

3. Procedural Geometry:
Sunflower Growth
The idea of this project came from the moment when I saw Mystique’s gorgeous transformation in X-men film series. I came across this interesting time lapse reference of sunflower’s growth and I decided to achieve the intriguing motion as much as I can.
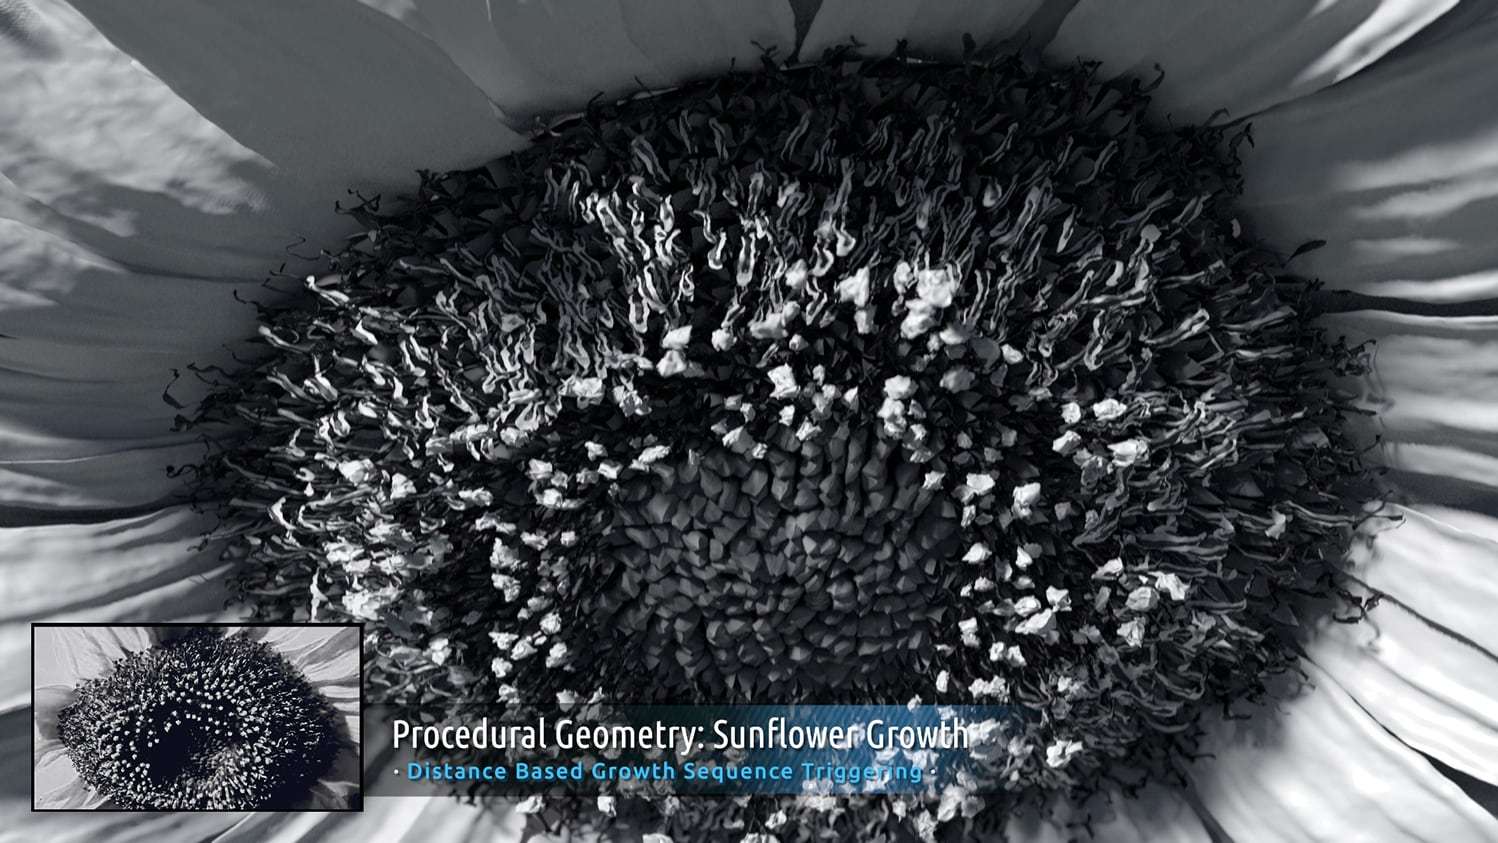
In the center of the flower there was a control sphere animated to grow bigger. I created growth animation for one single flower pod from blooming to withering.
Character rigging and animations were done in Houdini so that it was easier to be integrated with Houdini’s particle system for crowd
The center control sphere was used to control attributes of every flower pod including scale, x rotation, geometry switch, twisting, etc. And each flower pod’s attributes determined which animation stage the pod was at.

4. Crowd Simulation:
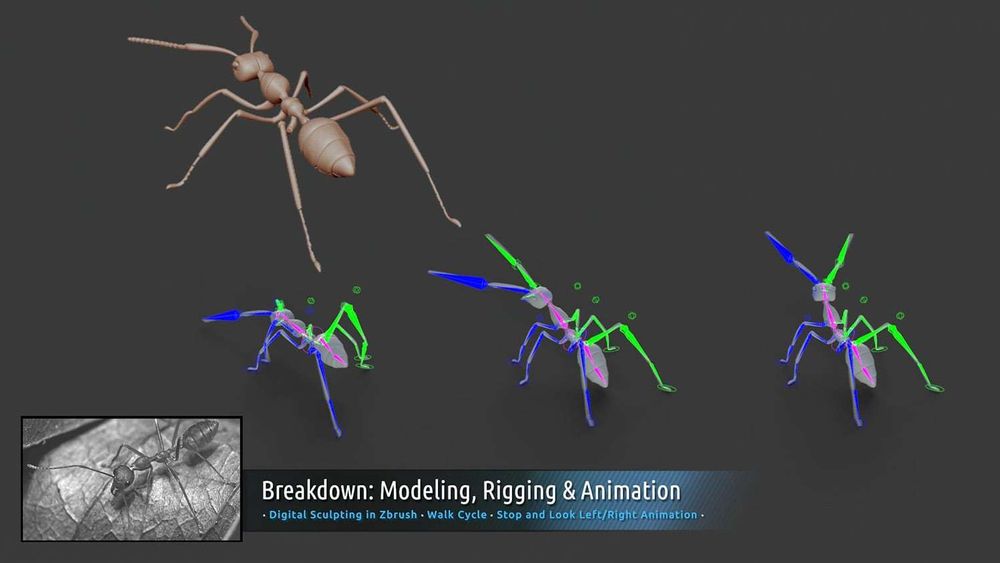
Weaver Ants Bridge
This is my favorite project in my reel. The iconic zombie climbing Jerusalem wall scene in World War Z (2013) film was a huge inspiration to me when I watched it, so I decided to create a crowd simulation with similar collaboration effect.
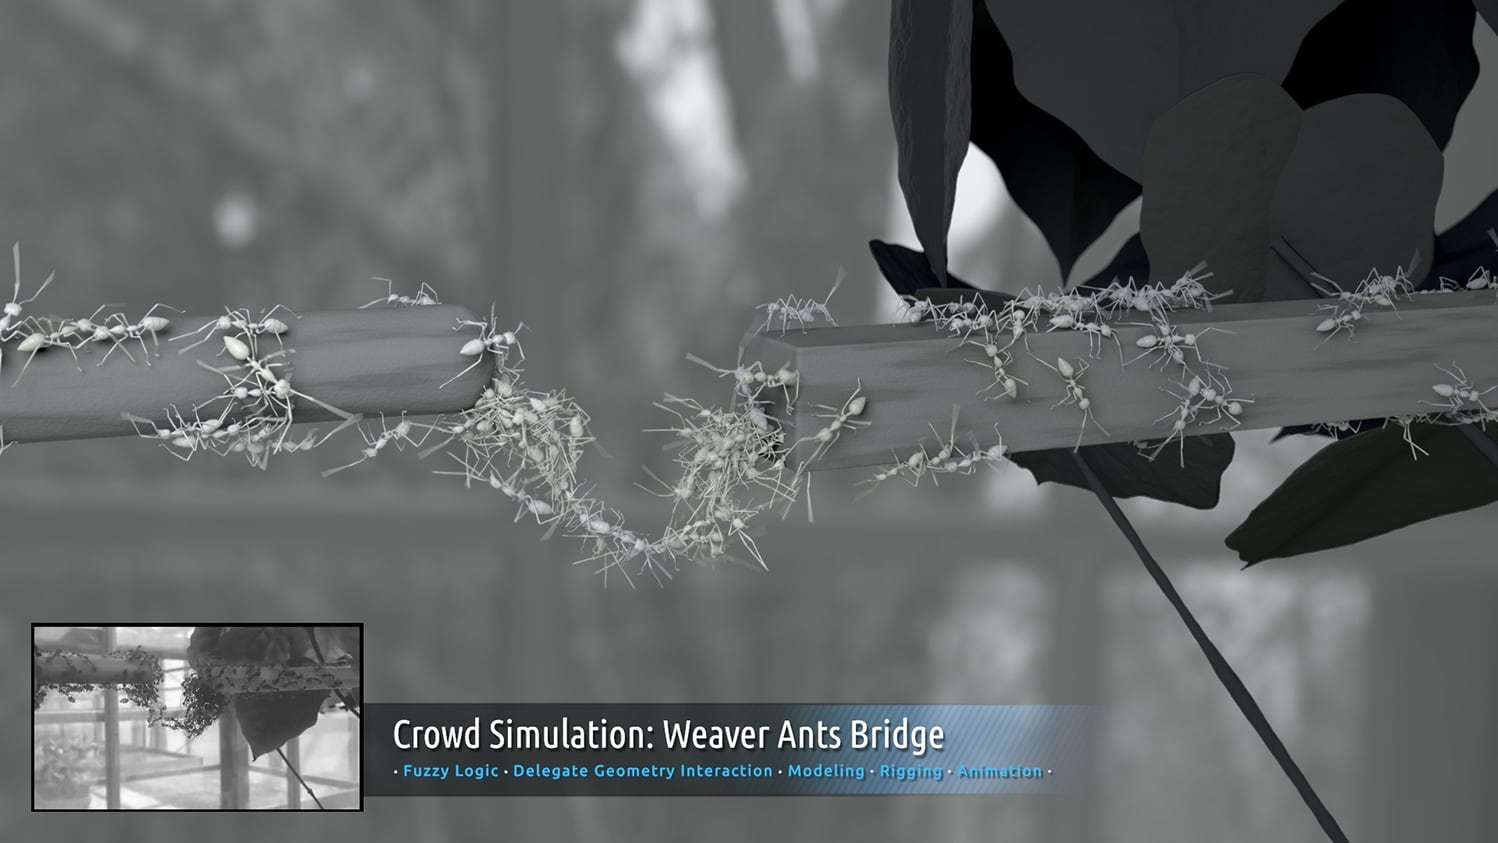
I started from modeling one weaver ant in Maya and ZBrush, and then unwrapped it so I could bake out displacement map from ZBrush.
Character rigging and animations were done in Houdini so that it was easier to be integrated with Houdini’s particle system for crowd.
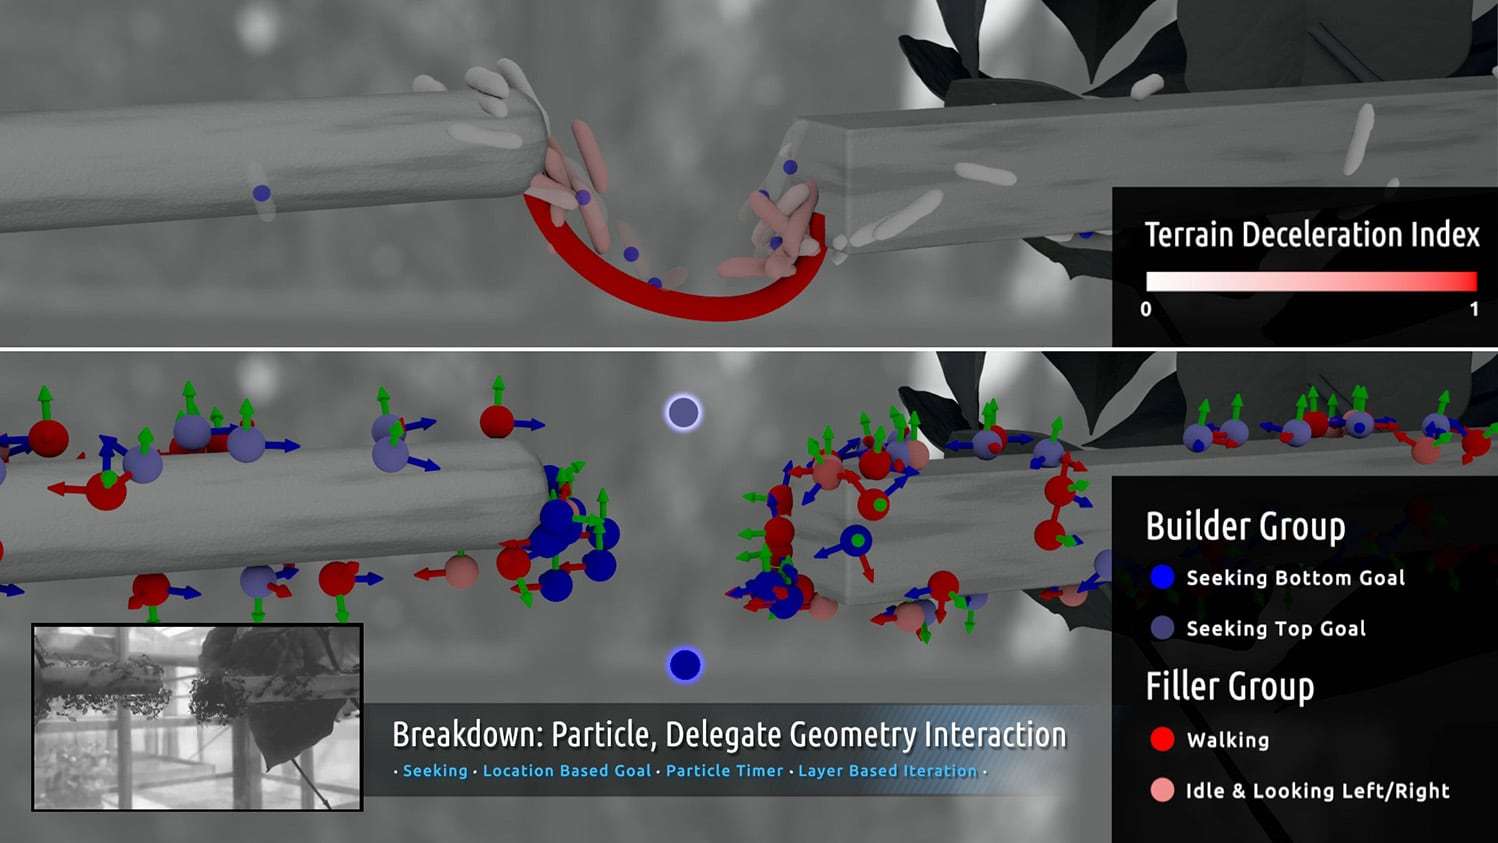
A timer was setup for each ant’s particle to decide if it’s walking, idle and looking left, or idle and looking right, accordingly which animation out of three cycles should be utilized.

All weaver ants were divided into groups with equal number. Each group was released from both sides of the wood a few seconds after previous group.
When they were approaching the invisible curve hanging between the two wood sticks, they received the terrain’s decelerate attribute (red) with decay over distance, and gradually slowed down till fully stopped.
The bounding cell shape geometry for each ant served as part of the terrain for next group and passed on the decelerate attribute.
Fuzzy logic was utilized to assign different walking speed, turning angle, acceleration, idle time and other attributes to each ant in order to create variation among the whole crowd.
Location based goal switch system allowed the ants to seek the center goal (purple) or continue climbing down the invisible curve following the bottom goal (blue).
In order to achieve the natural slight shaking of the ants bridge in the reference, I also combined a wire simulation of the curve itself and some SOPs noise, and then used CHOPs lookup to replicate these two motion patterns to the position of the ants, making them seem like bouncing up and down slightly.
For scene decoration, camera shake animation was generated procedurally in CHOPs. In Nuke, I added color variation to each ant using Particle ID and Group AOVs in the Mantra renders.
Rendering both with and without wood stick holdout allowed me to correct mesh intersecting error happening between ants and wood sticks, which is an inevitable problem with particle simulation.
5. Procedural Shader:
Opal
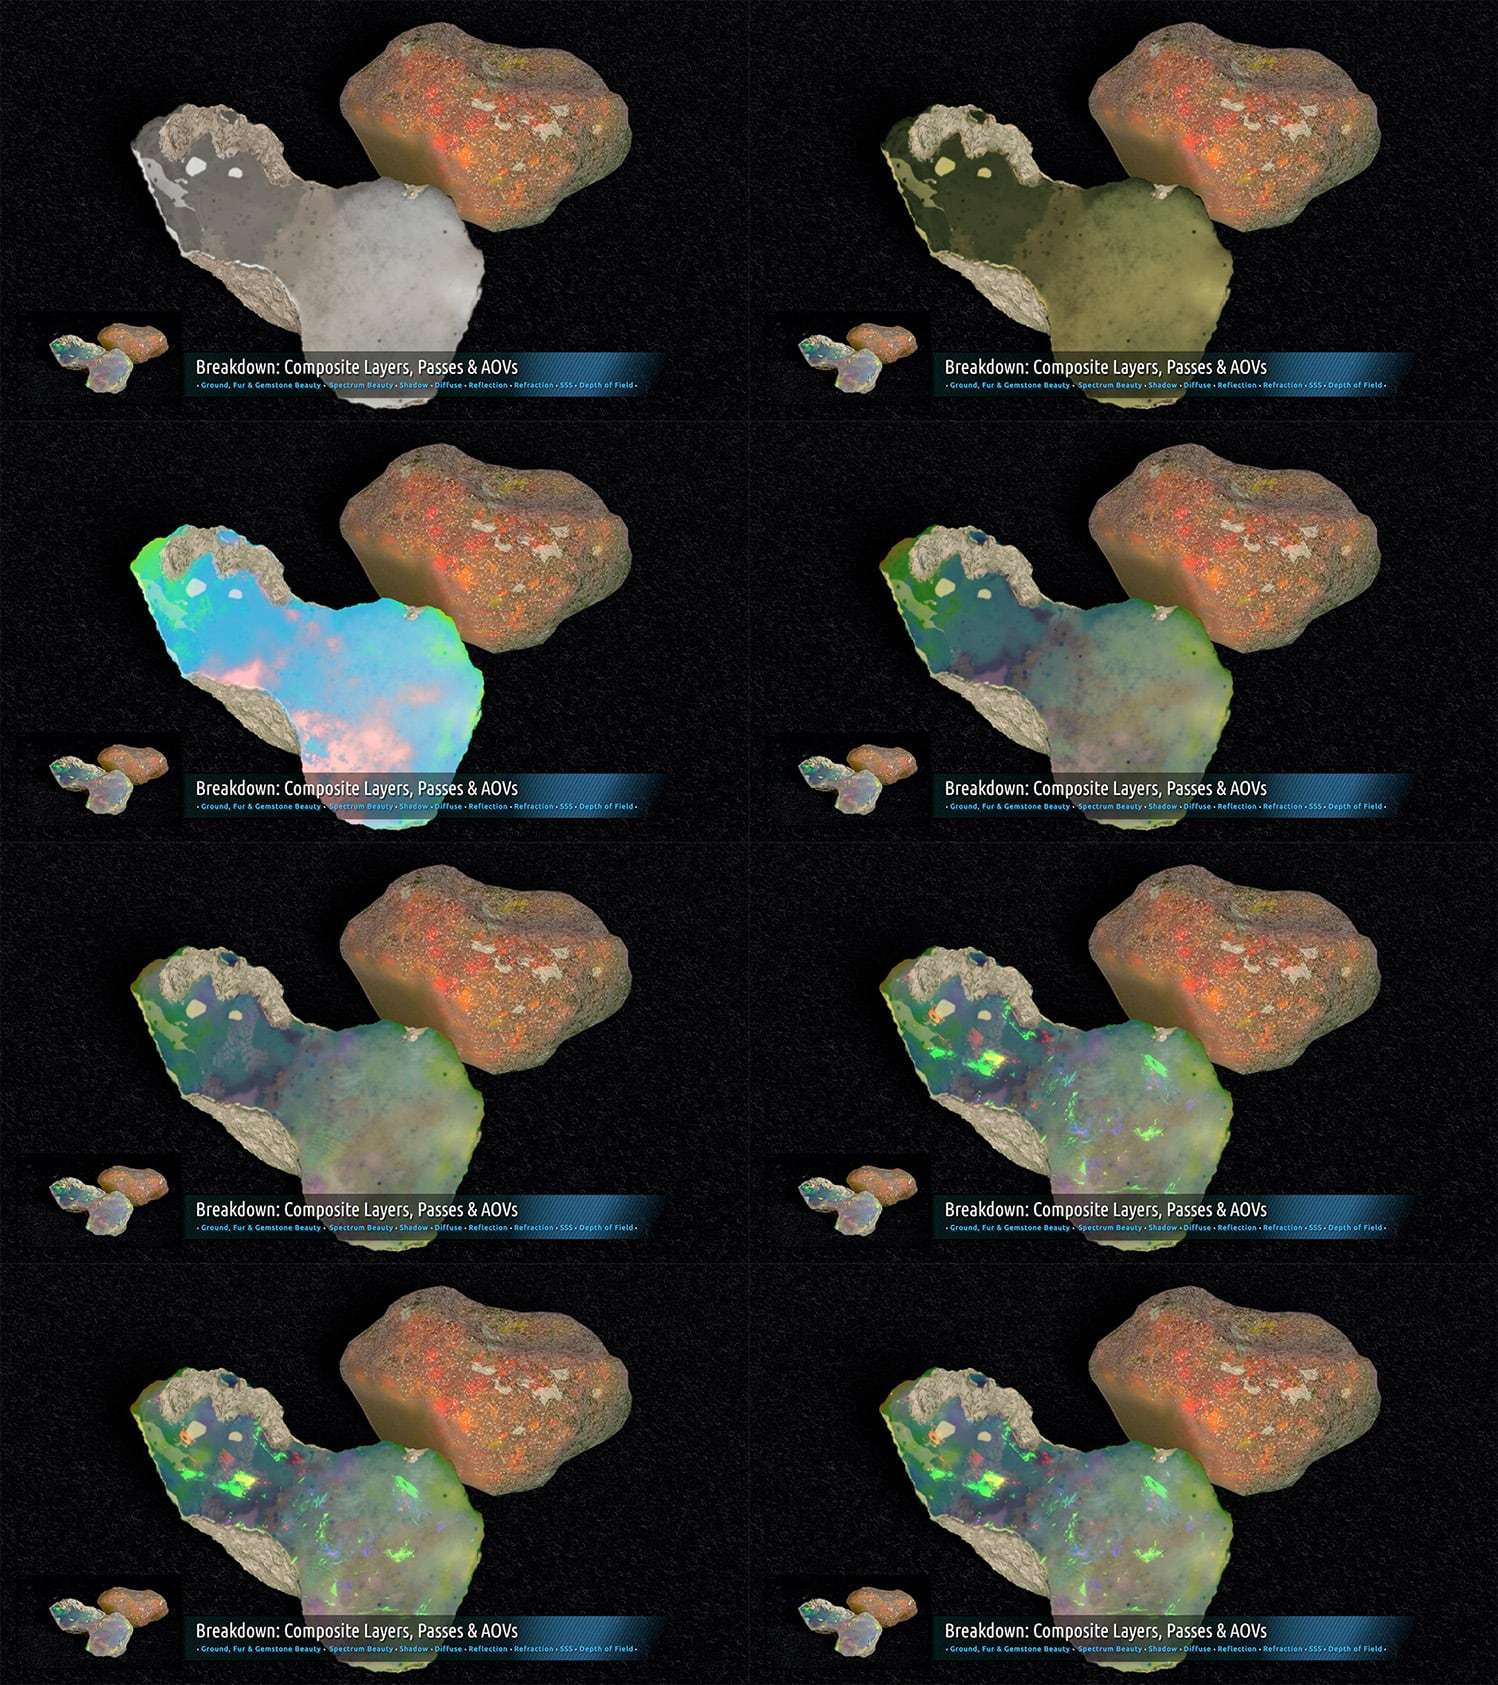
I’m always fascinated by minerals and can’t help observing them in my hands for hours. Among all minerals, opal’s variable color under different lighting conditions never ceases to amaze me. So I bought two tiny pieces of opal, took photo references and started exploring.
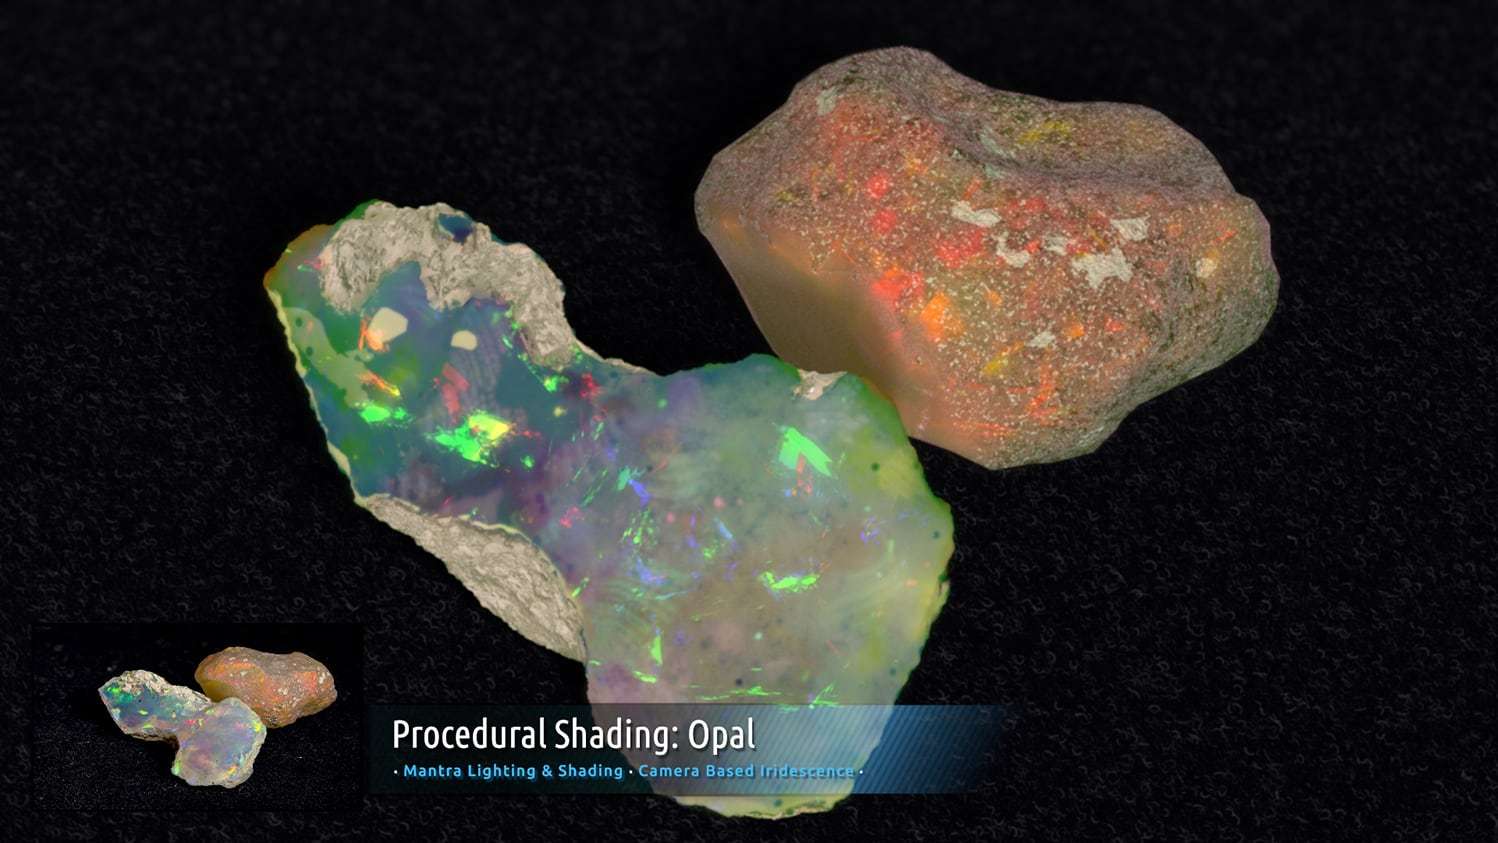
This project was lit, shaded and rendered in Houdini Mantra. I developed a procedural SOPs noise pattern to calculate iridescence color based on camera position, angle and other attributes.
By varying several noise patterns’ frequency and animating the camera path, I got a series of iridescence patterns of size variation. All the render layers and passes, including diffuse, reflection, refraction, SSS, shadow, different iridescence patterns, ground, fur, etc. were comped in Nuke and color corrected.