
 This article runs you through my final major project while I attended **De Montfort University. **It is based on an alternative World War II, with the majority of the work being mechs, and this tutorial will go over the creation of one of these mechs.
In this alternate universe I was creating, the Nazis had gained advanced technology and with it created over-the- top war machines, so I set out to create three mechs within the style of The Wehrmacht with each hopefully looking unique.
Research
As with any design project, I start the first thing I do is research. I began by looking at World War II vehicles, collecting as much reference as possible from the era. Next I moved onto looking at existing vehicle designs from films, games and even other artists, if it looked awesome it went into my research document even if it wasn’t era-appropriate, just don’t be afraid to reference other artists work, if you can take part of their design and improve upon it there is nothing wrong with that!
Initial Design Ideas
Now having a huge photoshop document filled with reference and research I began to design something. The early stages of the design process for me are less about drawing pretty pictures, and more about dumping out as much stuff as possible into a viewable format and there are many ways to do this.

Above are the initial ideas I did for this mech, which are all quick sketches done in Photoshop, but I’ve also shown another method of idea generation I sometimes use which is just working with solid silhouettes.
Both work well, and it is all about what you’re most comfortable with, but these are just two ways of generating ideas. From the above sketches, I picked out my favourite and worked on refining it, thanks to Photoshop you can iterate on a design quickly and as many times as you need.

3D Block Out
The next step for me is to create a 3D block out within 3DS Max. I could draw out the final design by hand but the benefits of having a 3D model simply outweigh doing this stage traditionally. Once the model is created, I can plan the lighting and composition with ease, use it for other drawings if needed (like proper orthographic) and even use it for more complex scenes.
To start I draw myself a quick and ugly orthographic and from there begin to model. Unfortunately, I won’t go into too much detail here as this could be a tutorial all by itself!

At this stage I am still technically designing, making sure that the various parts are a good size in correlation to each other and that the mech looks good from all angles. The above block out is rather simple, especially around the legs, and over the course of the project, I learned to spend a little more time on refining the details to ease the later stages.
With modelling done I add a daylight system (Create >Systems >Daylight) and by changing the Sunlight, Skylight and renderer to mental ray and setting the position to manual you can get a huge amount of control over your lighting. The final step is to add a camera then render out.
Line Work
Depending on what you want the final image to be it really depends on how long you’ll spend on your line work.
Some people let the lines do most of the work, with some simple block colours to sell the concept while other people will probably not even create line work and just go straight into painting.
I tried a huge variety of things, even a Swans face and the final colour scheme I chose was a combination of a mushroom and some garden slugs!
I love line art and took the opportunity this project to practise it whenever I could, meaning I spent a decent amount of time at this stage. Below is an example of how I used the previous 3D block out with my line work.

There are many ways to now utilise this line art: I could leave it as is, drop in some simple colours, clean up the render a little and combine the 2 or use it as a base for a more detailed painting.
Painting
To set up for my final image, I first separated the mech into different layers, which will help when painting the different parts. To show this better I coloured the separations on the image below; each colour is its own layer within Photoshop and by using a combination of transparent pixel lock and clipping layers, you get huge control over where you are painting.
 I generally paint in values first as I’m not confident enough, to begin with colours, focusing on the larger forms and using the 3D render as a base. As the painting goes on make sure to create new layers for the smaller details (like cut lines etc.), this will allow you to go back and adjust parts without ruining all the juicy detail you’ve worked so hard on.

One way to experiment with colour is to use photographs and clipping layers… again. I placed all the mech layers into a folder within Photoshop then began to clip photographs with the mech folder, by changing the photograph layer blending mode you can get some really interesting colour designs, and it’s all done extremely quickly, you can even blend the photographs with each other for further experimentation.
I tried a huge variety of things, even a Swans face and the final colour scheme I chose was a combination of a mushroom and some garden slugs!

Once you’ve found a decent colour scheme flatten the chosen photographs and begin to colour pick from the layer then paint back into it making sure all the colours are in their correct place. You might need to change the Eyedropper tools sample to “Current Layer” which can be done along the top toolbar in Photoshop.
Final Touches
The major painting is now done, and it’s time to add the final details, you can paint in some glowing lights/lenses using the colour dodge blending option or add any dirt, scratches or decals that you wish.
What you do with the background is really up to you, as leaving it white is a valid option. I added some clouds to give it more interest, then used a distorted radial gradient to simulate a spotlight, but make sure it adheres the shadows in your scene. I also threw in a few little dust specs, mostly around the spotlight, to add even more atmosphere. To colour this background I simply used a gradient map.
Entering The Rookies is one of the ways I am trying to get my work seen
Over the entire painting I then use a colour balance as a final tweak to try and bring the colours together, then I create a new layer and go Image >Apply Image, this will flatten your entire image onto one layer while keeping all the working layers below.
With the flattened layer I use the Iris Blur filter to add depth, and you can even try out adding some chromatic aberration if you’re into that (Filter >Lens Correction >Custom) or some noise by adding a new layer, filling it with a mid grey then going to Filter >Noise >Add Noise then setting the layer to overlay and dropping the opacity. All of this is optional and can be played around with as much as you’d like!
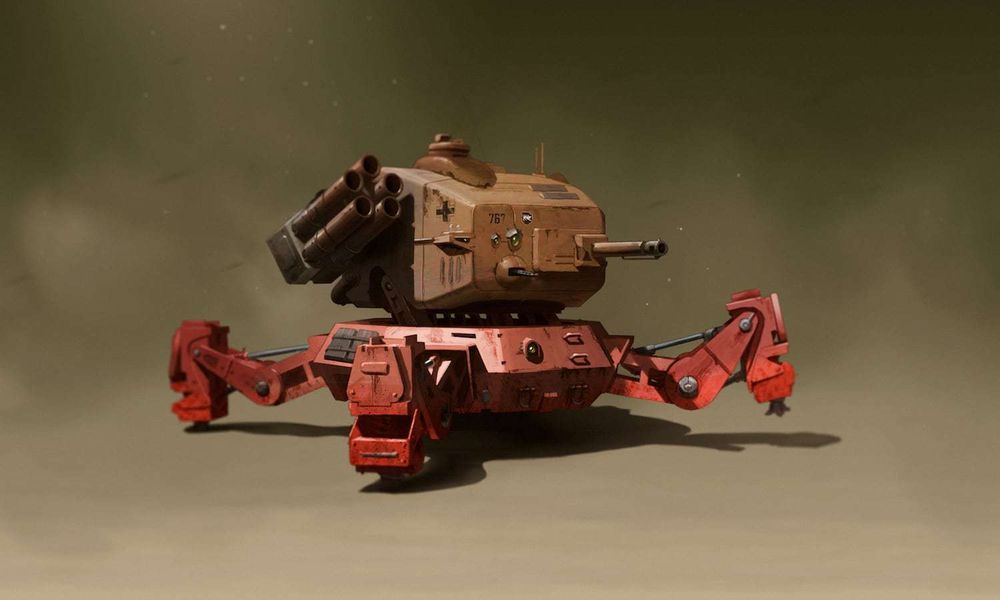
 Here’s the final concept! This process is something which I’ve had great fun with over the last few months and has given me some awesome results, but this is just what I’ve pieced together from different sources and incorporated into my own pipeline. Hopefully, you can now do the same.